
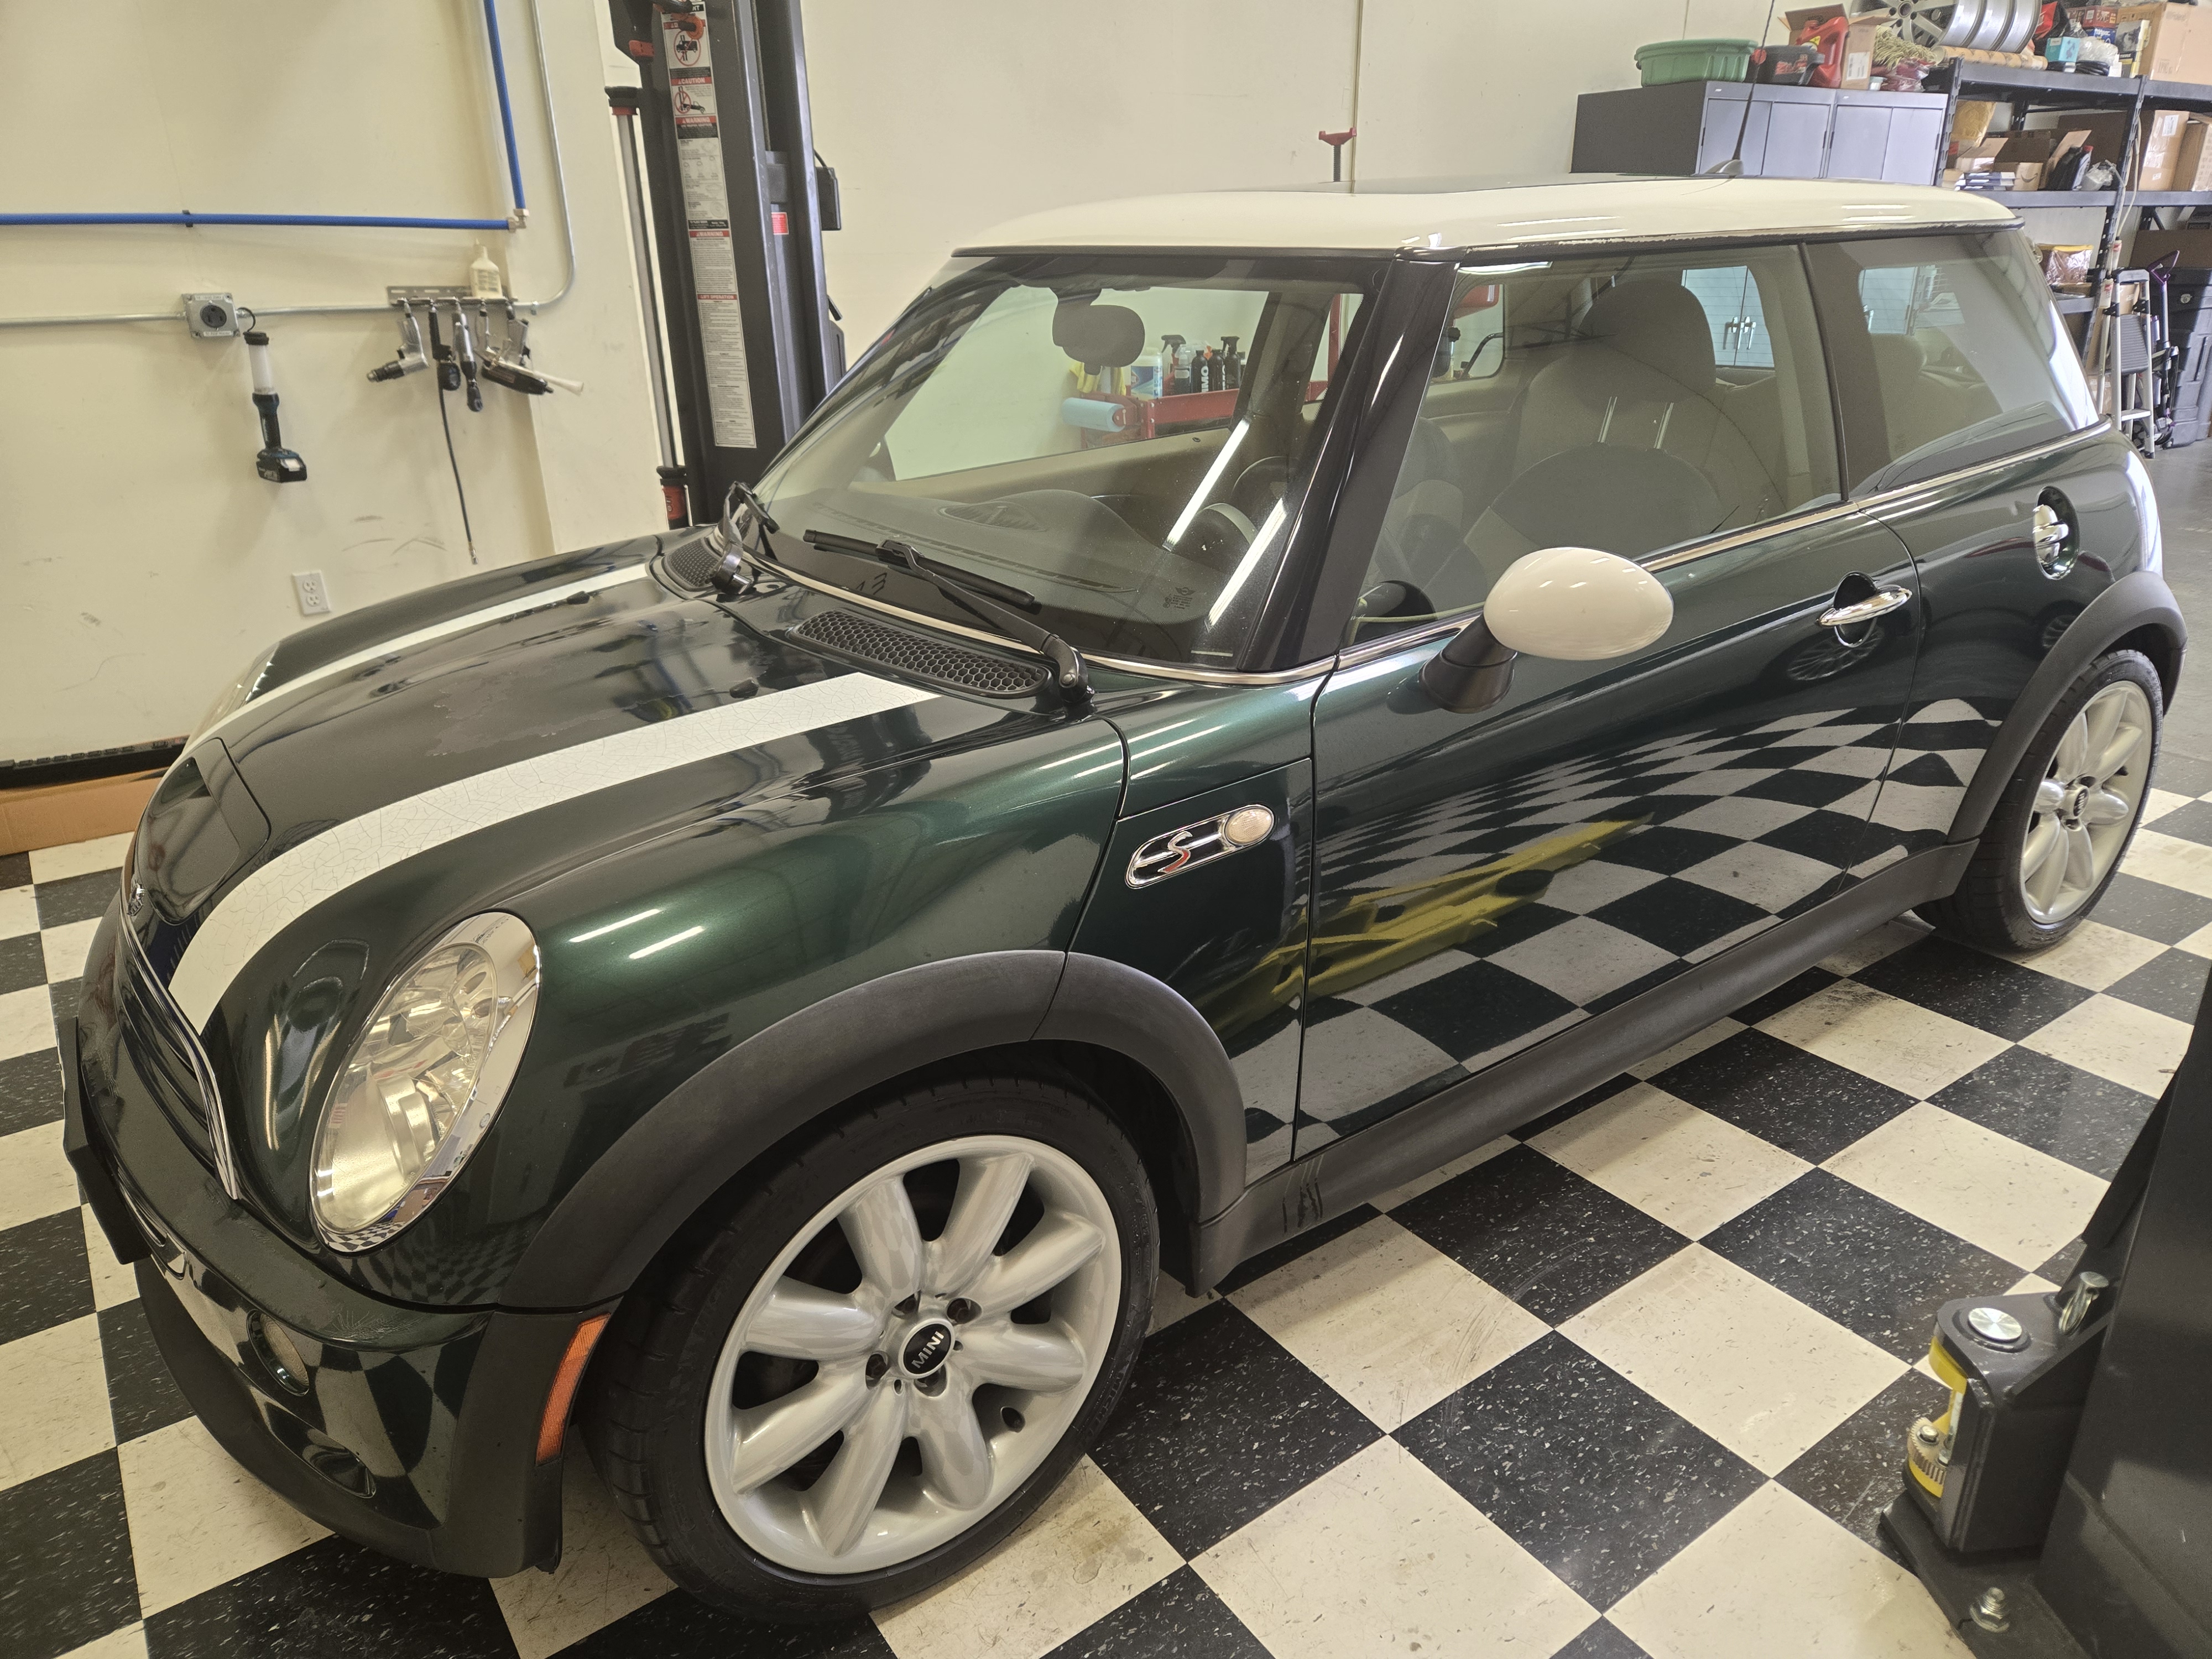
Vehicle Details
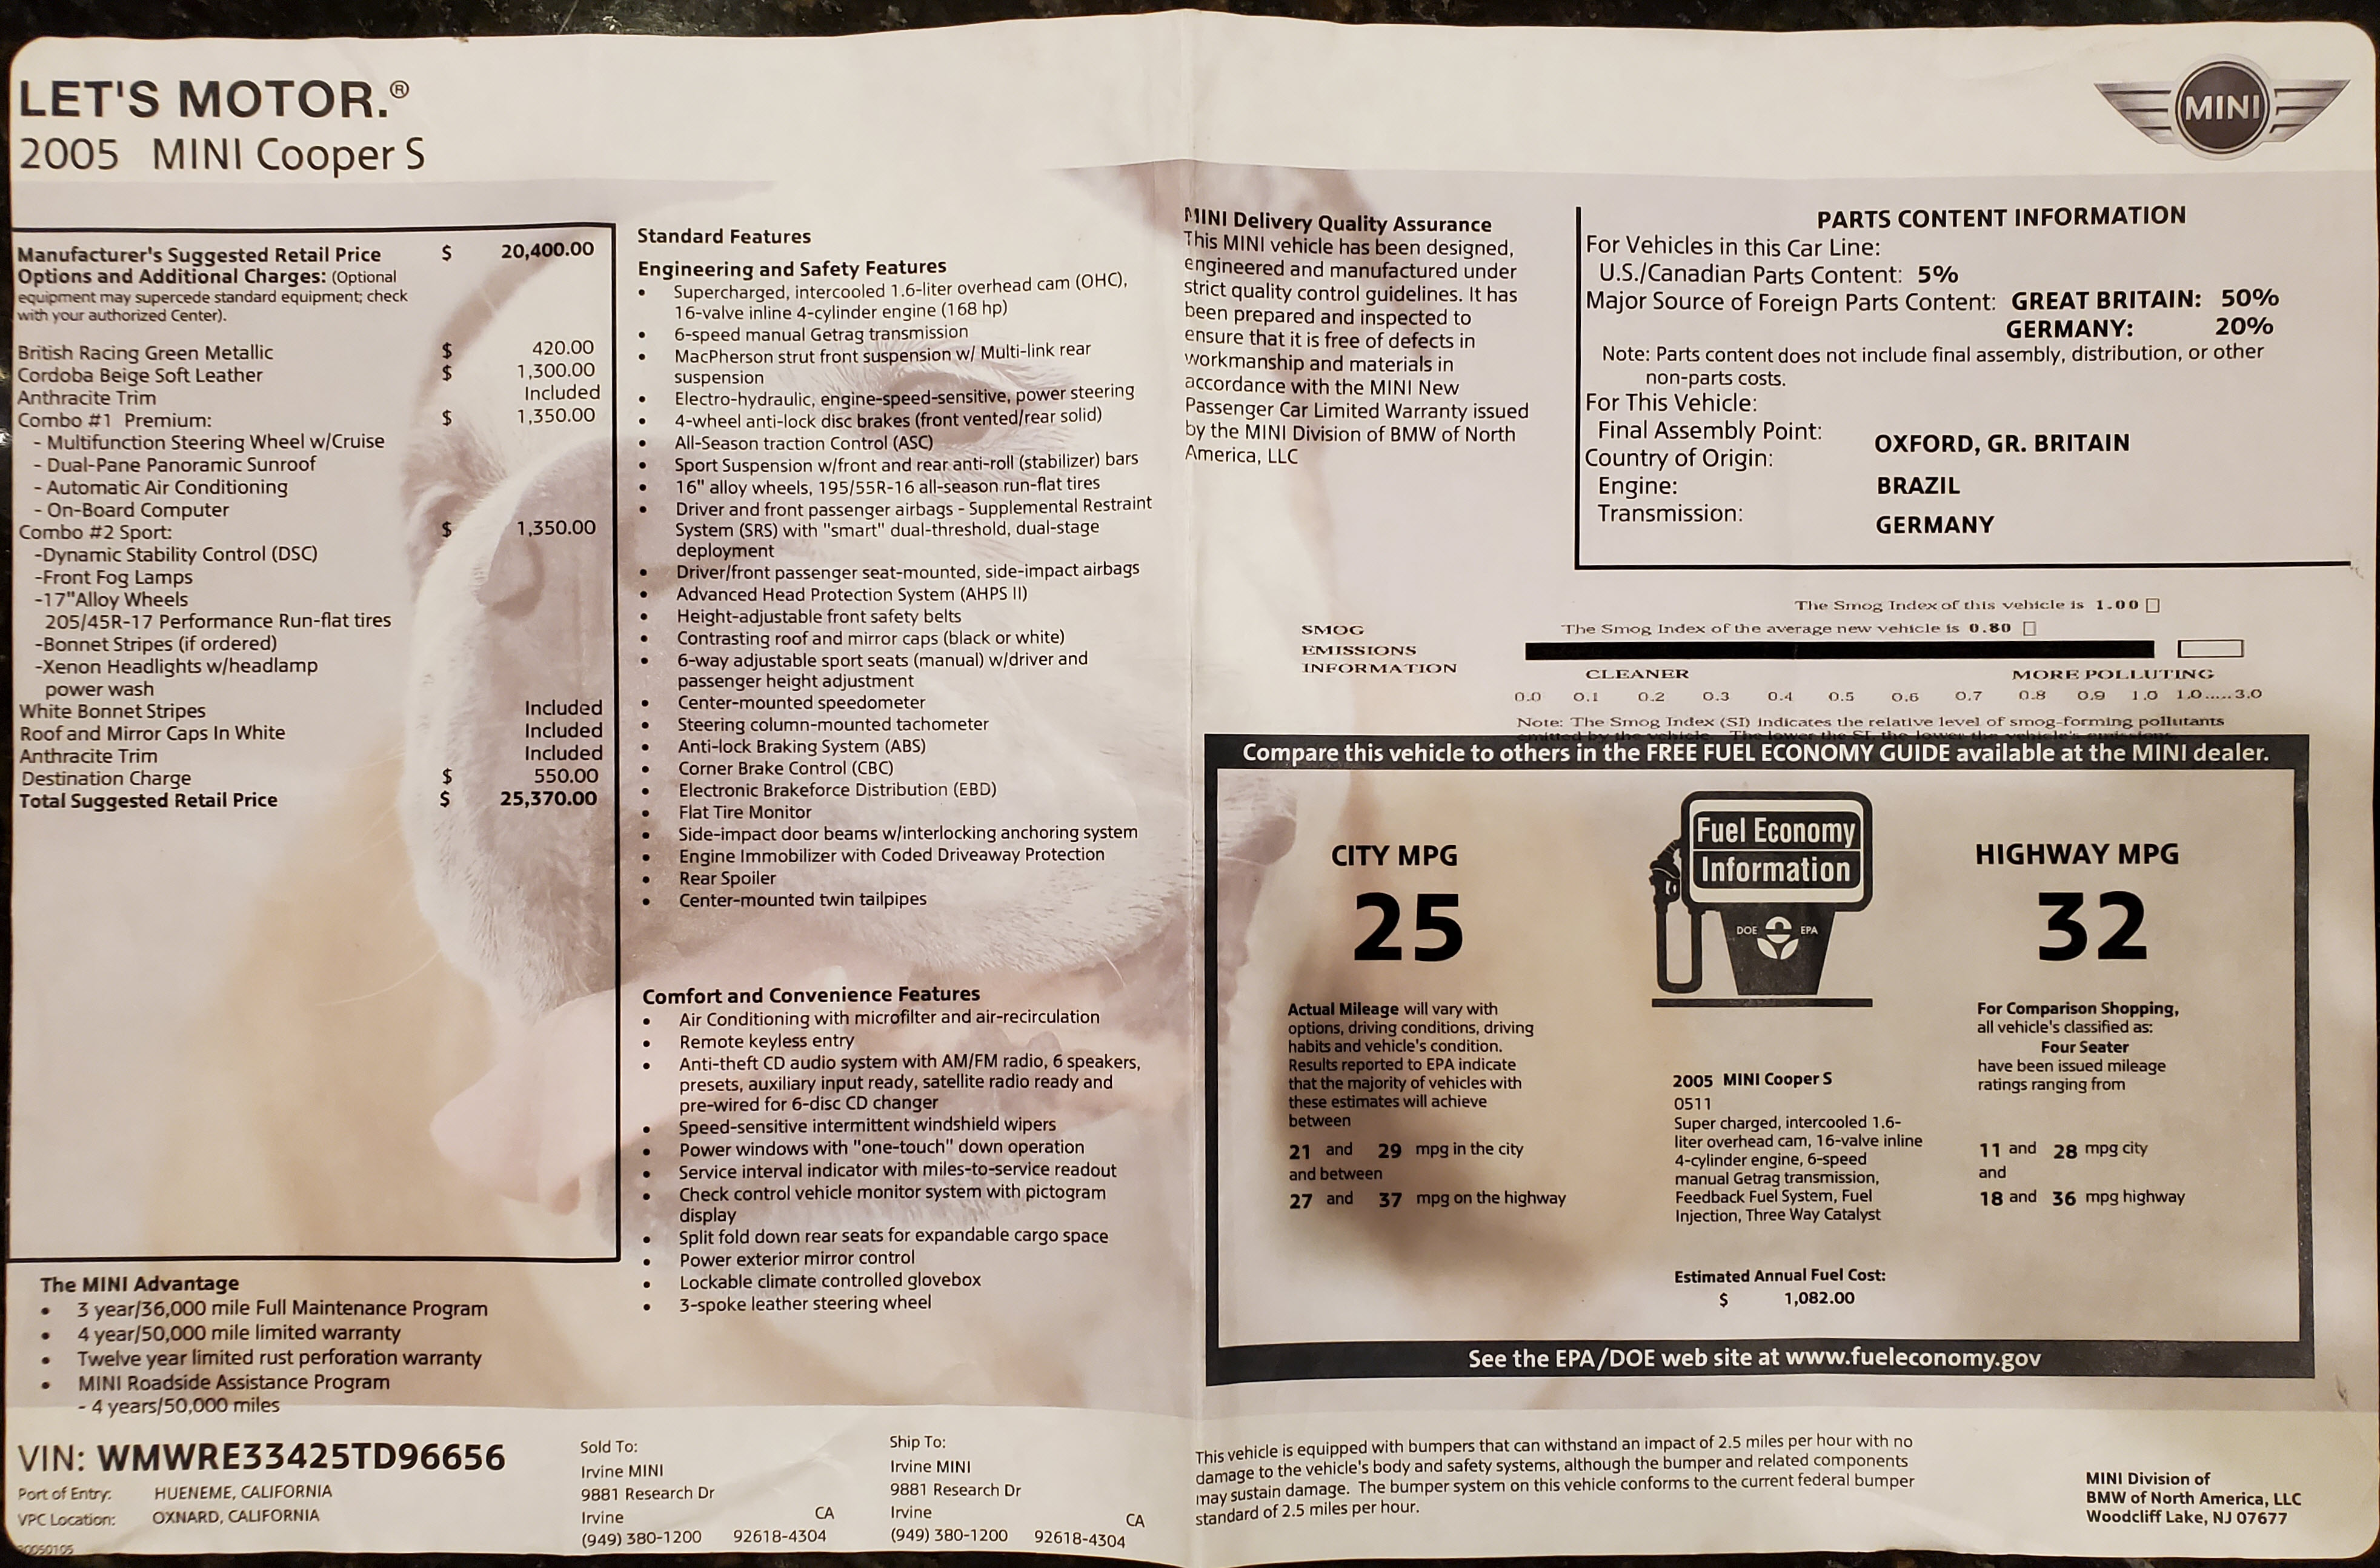
- Make – Mini
- Model – Cooper
- Model Year – 2005
- Trim – S
- Options – Premium Package (Multifunction Steering Wheel, Dual Pane Panoramic Sunroof, Automatic A/C, Computer) & Sport Package (DSC, Fog Lamps, 17″ Alloys, Bonnet Stripes, Xenon Headlights)
- Engine – 1.6 liter Supercharged (168 bhp)
- VIN – WMWRE33425TD96656 (VIN Decoder here)
- Purchase Date – (2nd owner) April 12, 2014
- Purchase Mileage – (2nd owner) 116,481 miles
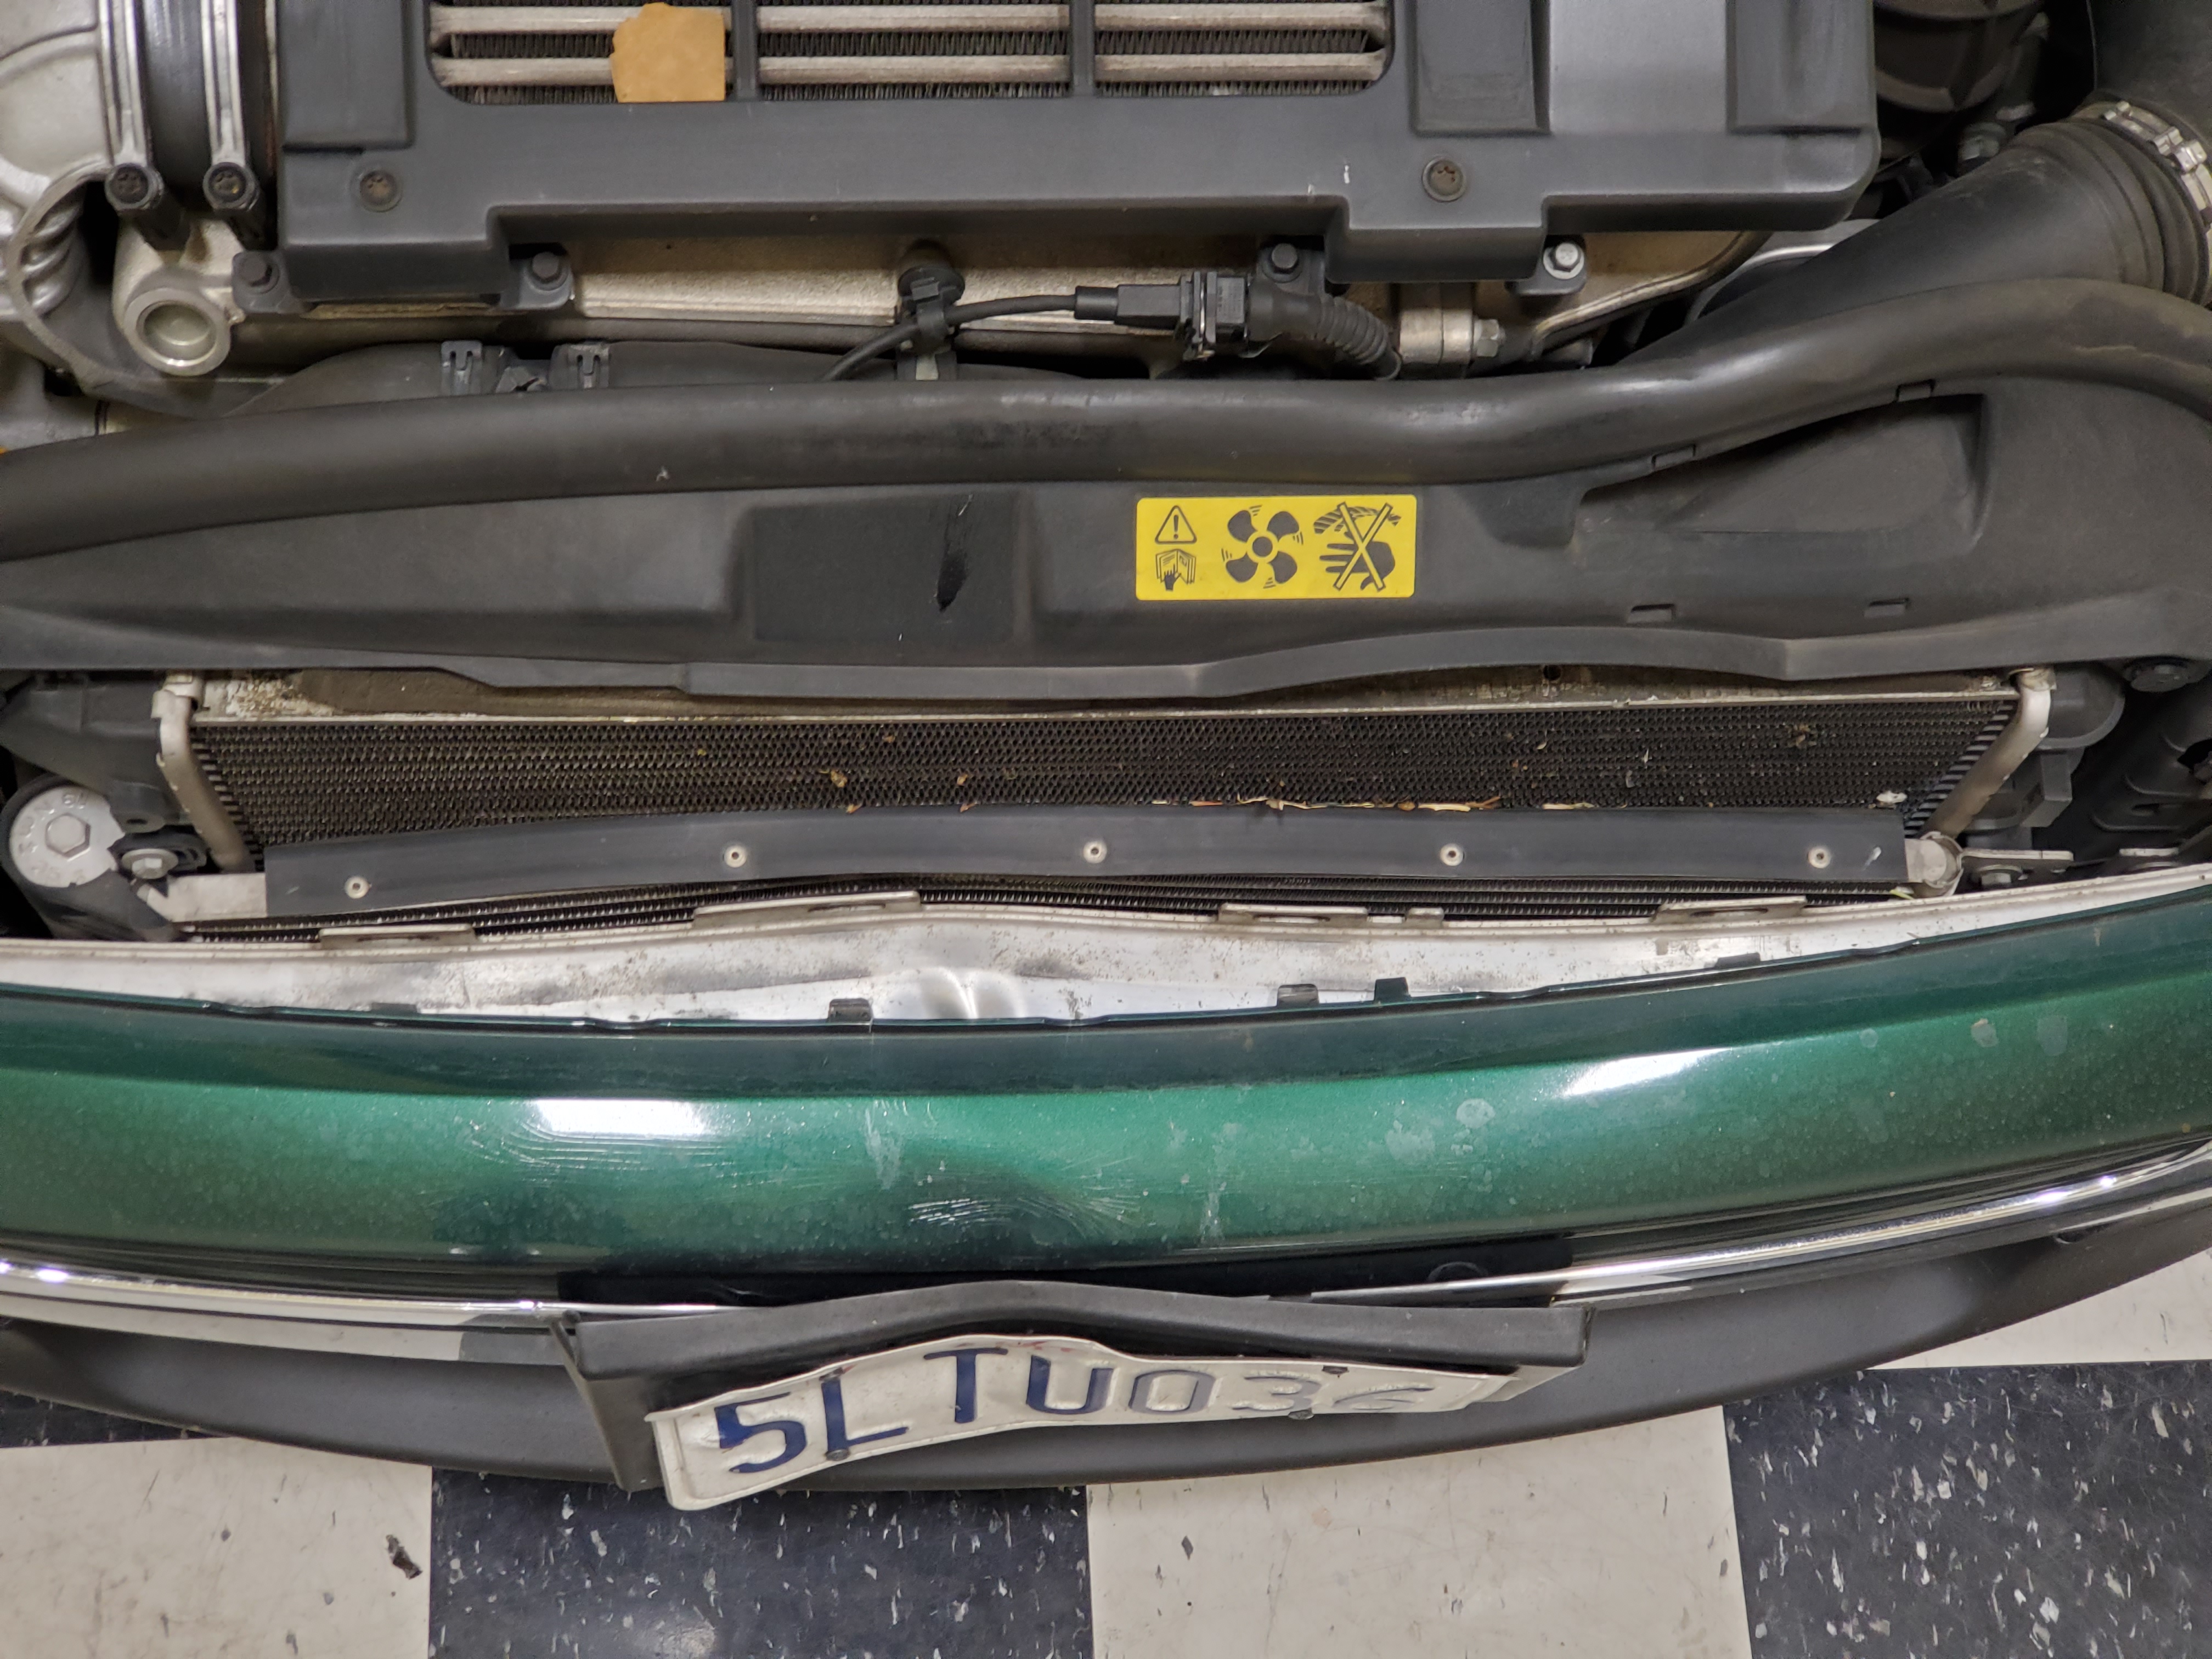
- License Plate – 5LTU036 (California) (SMOG Lookup here)
- Color – British Racing Green
Additional Specs online here and on Wikipedia here.
MyCarFax Records here (logged in as Stefano)

Service History
Date: February 21, 2026
Mileage: 1??,???
Performed by: Angus and Stefano
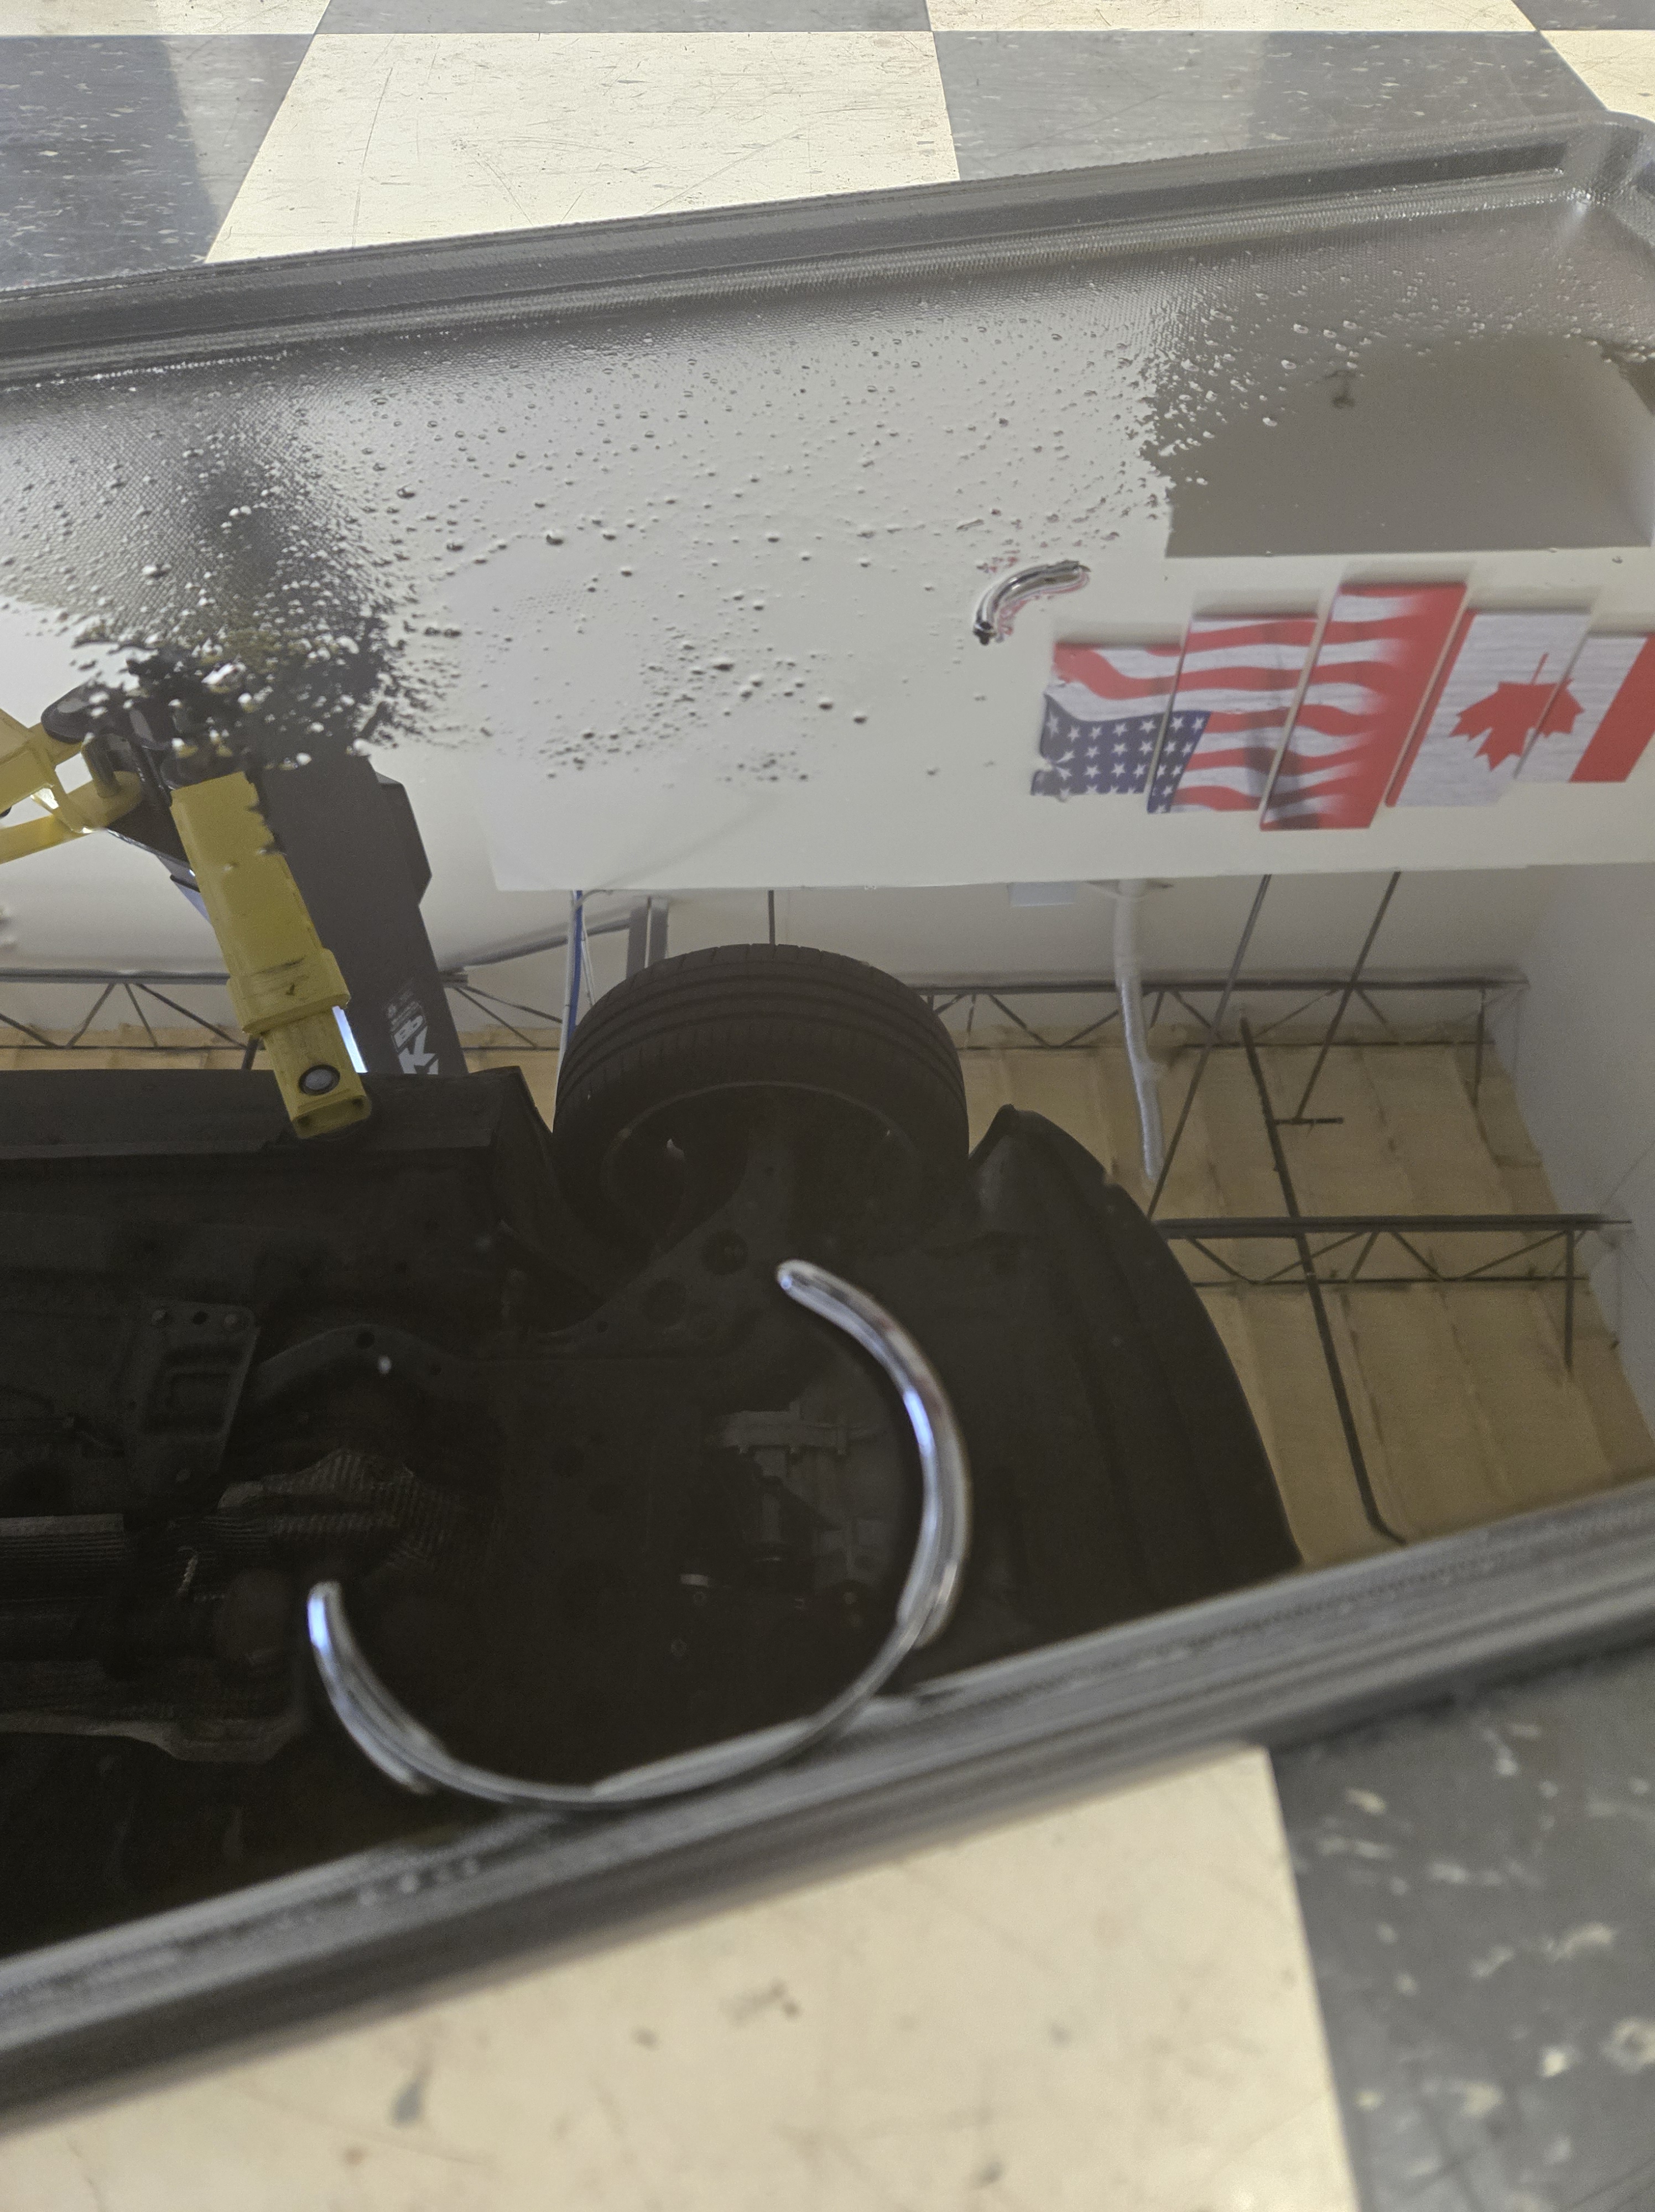
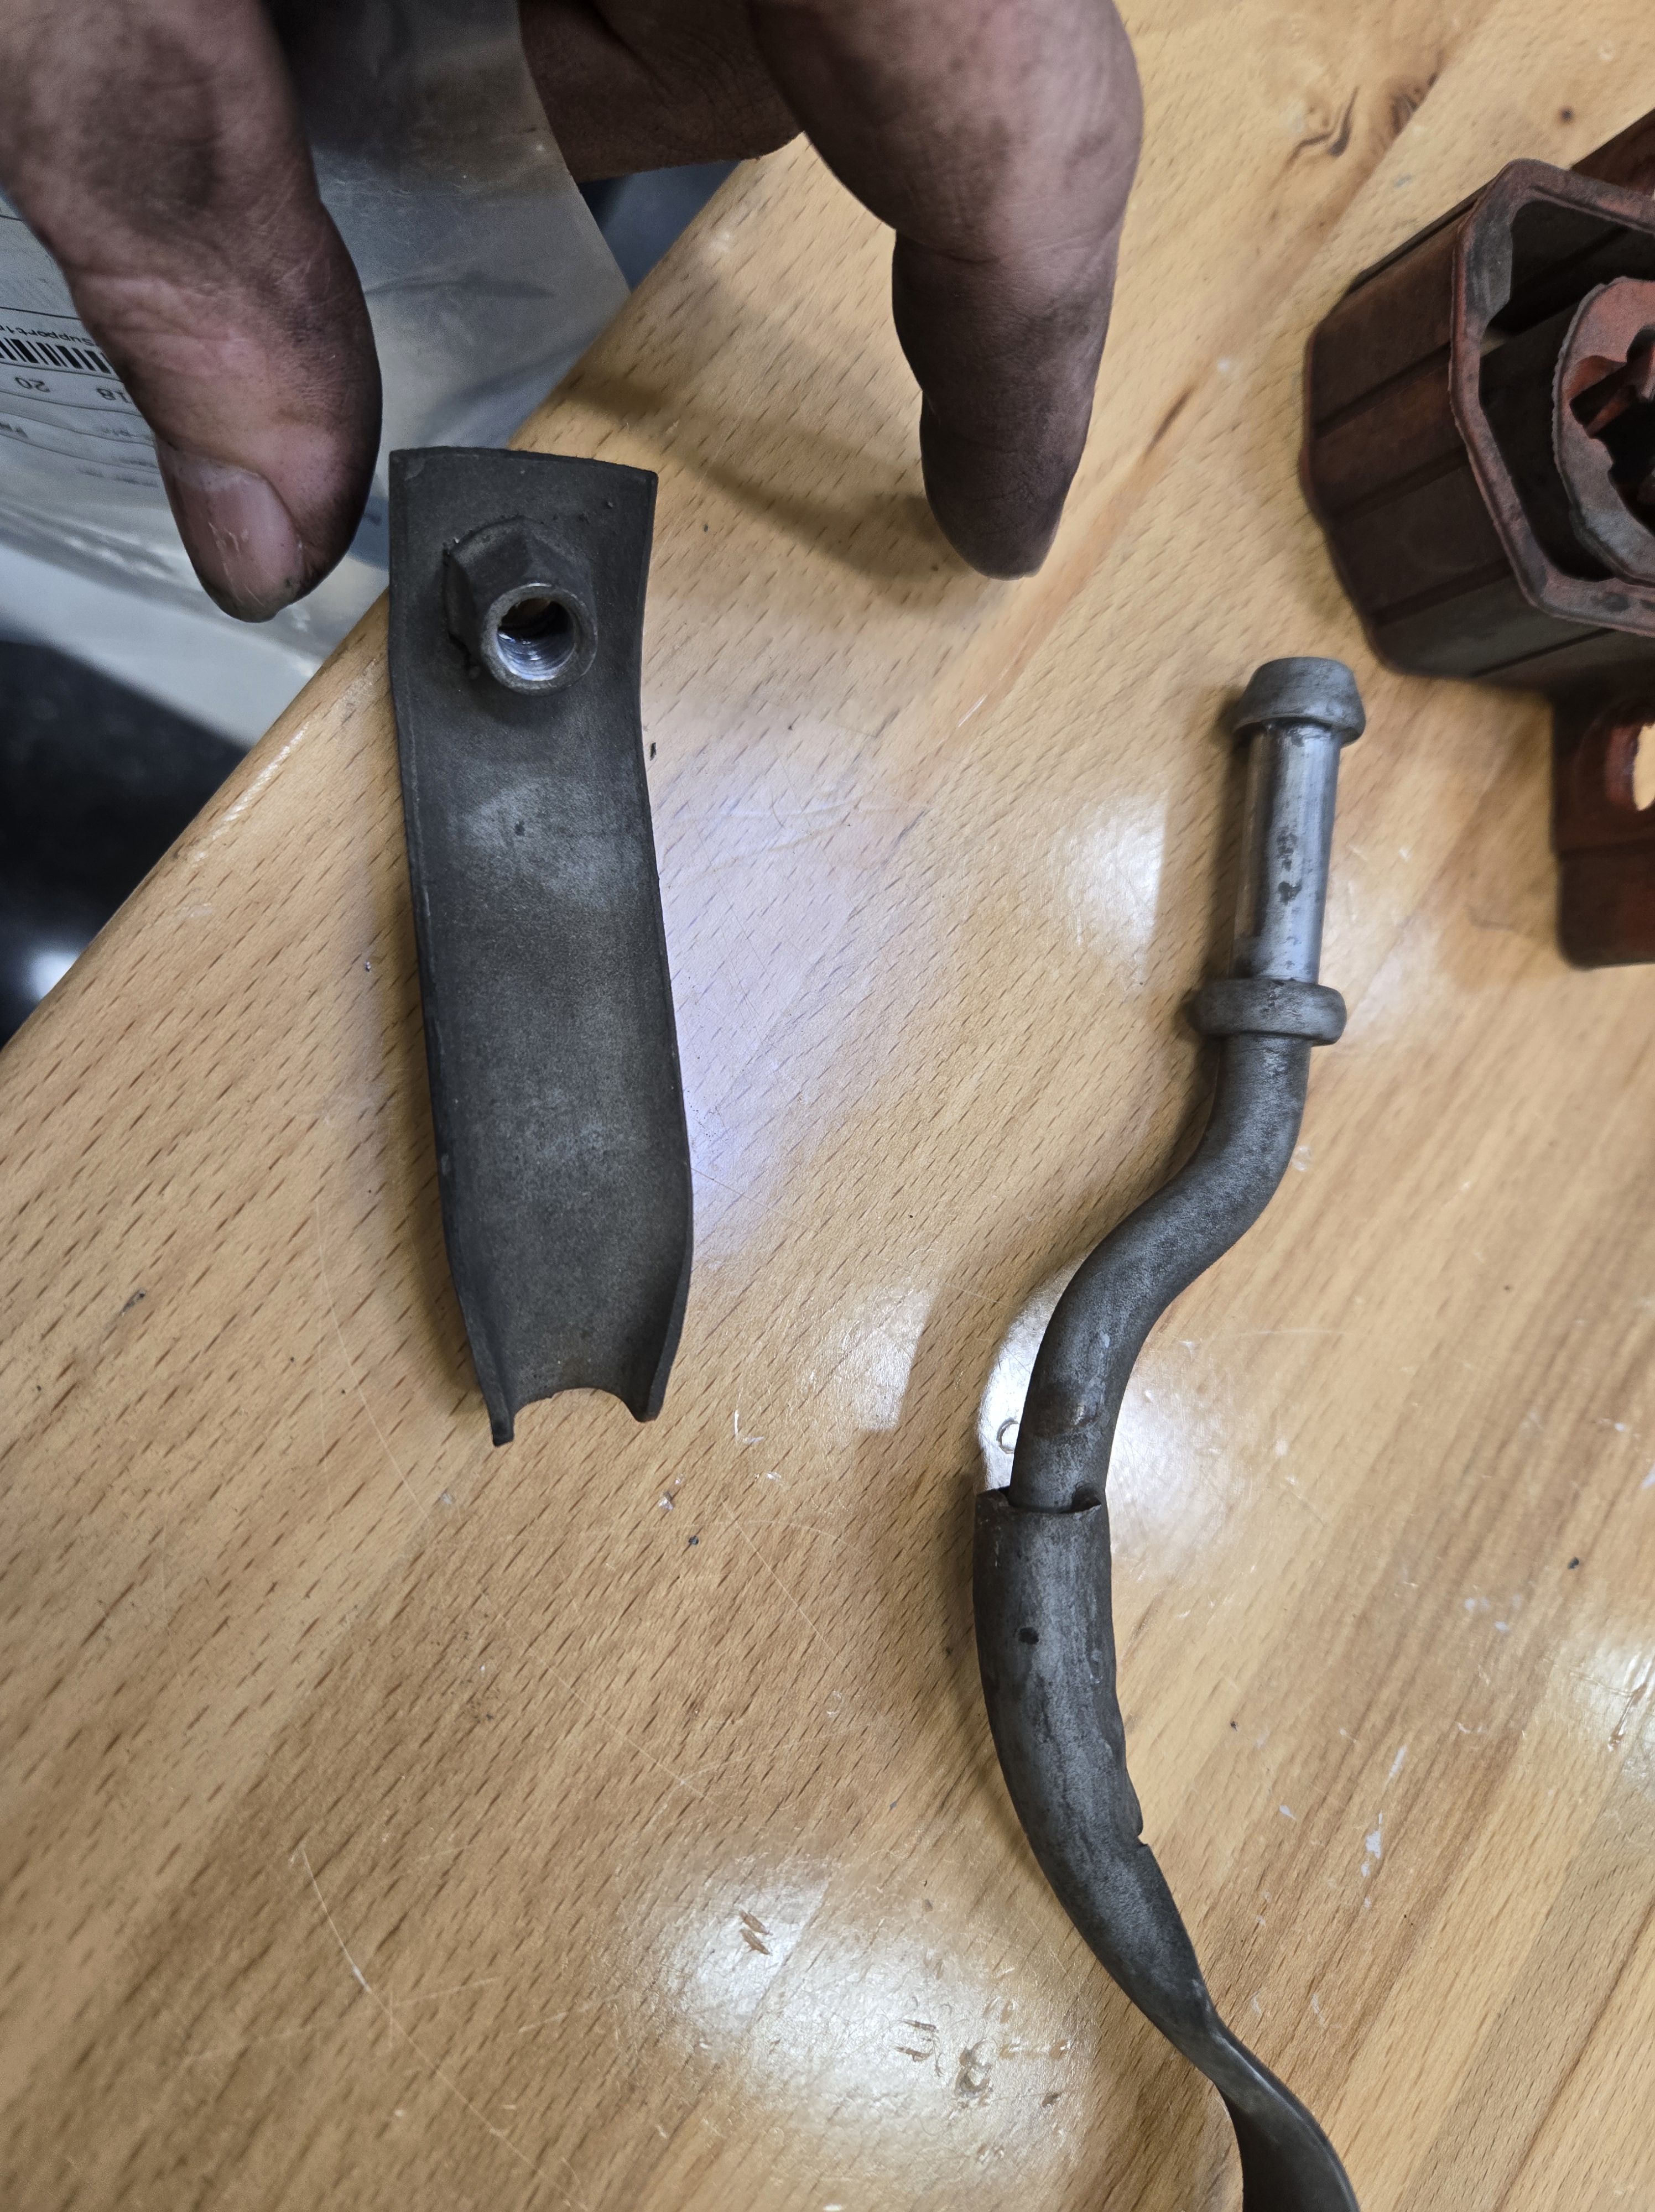
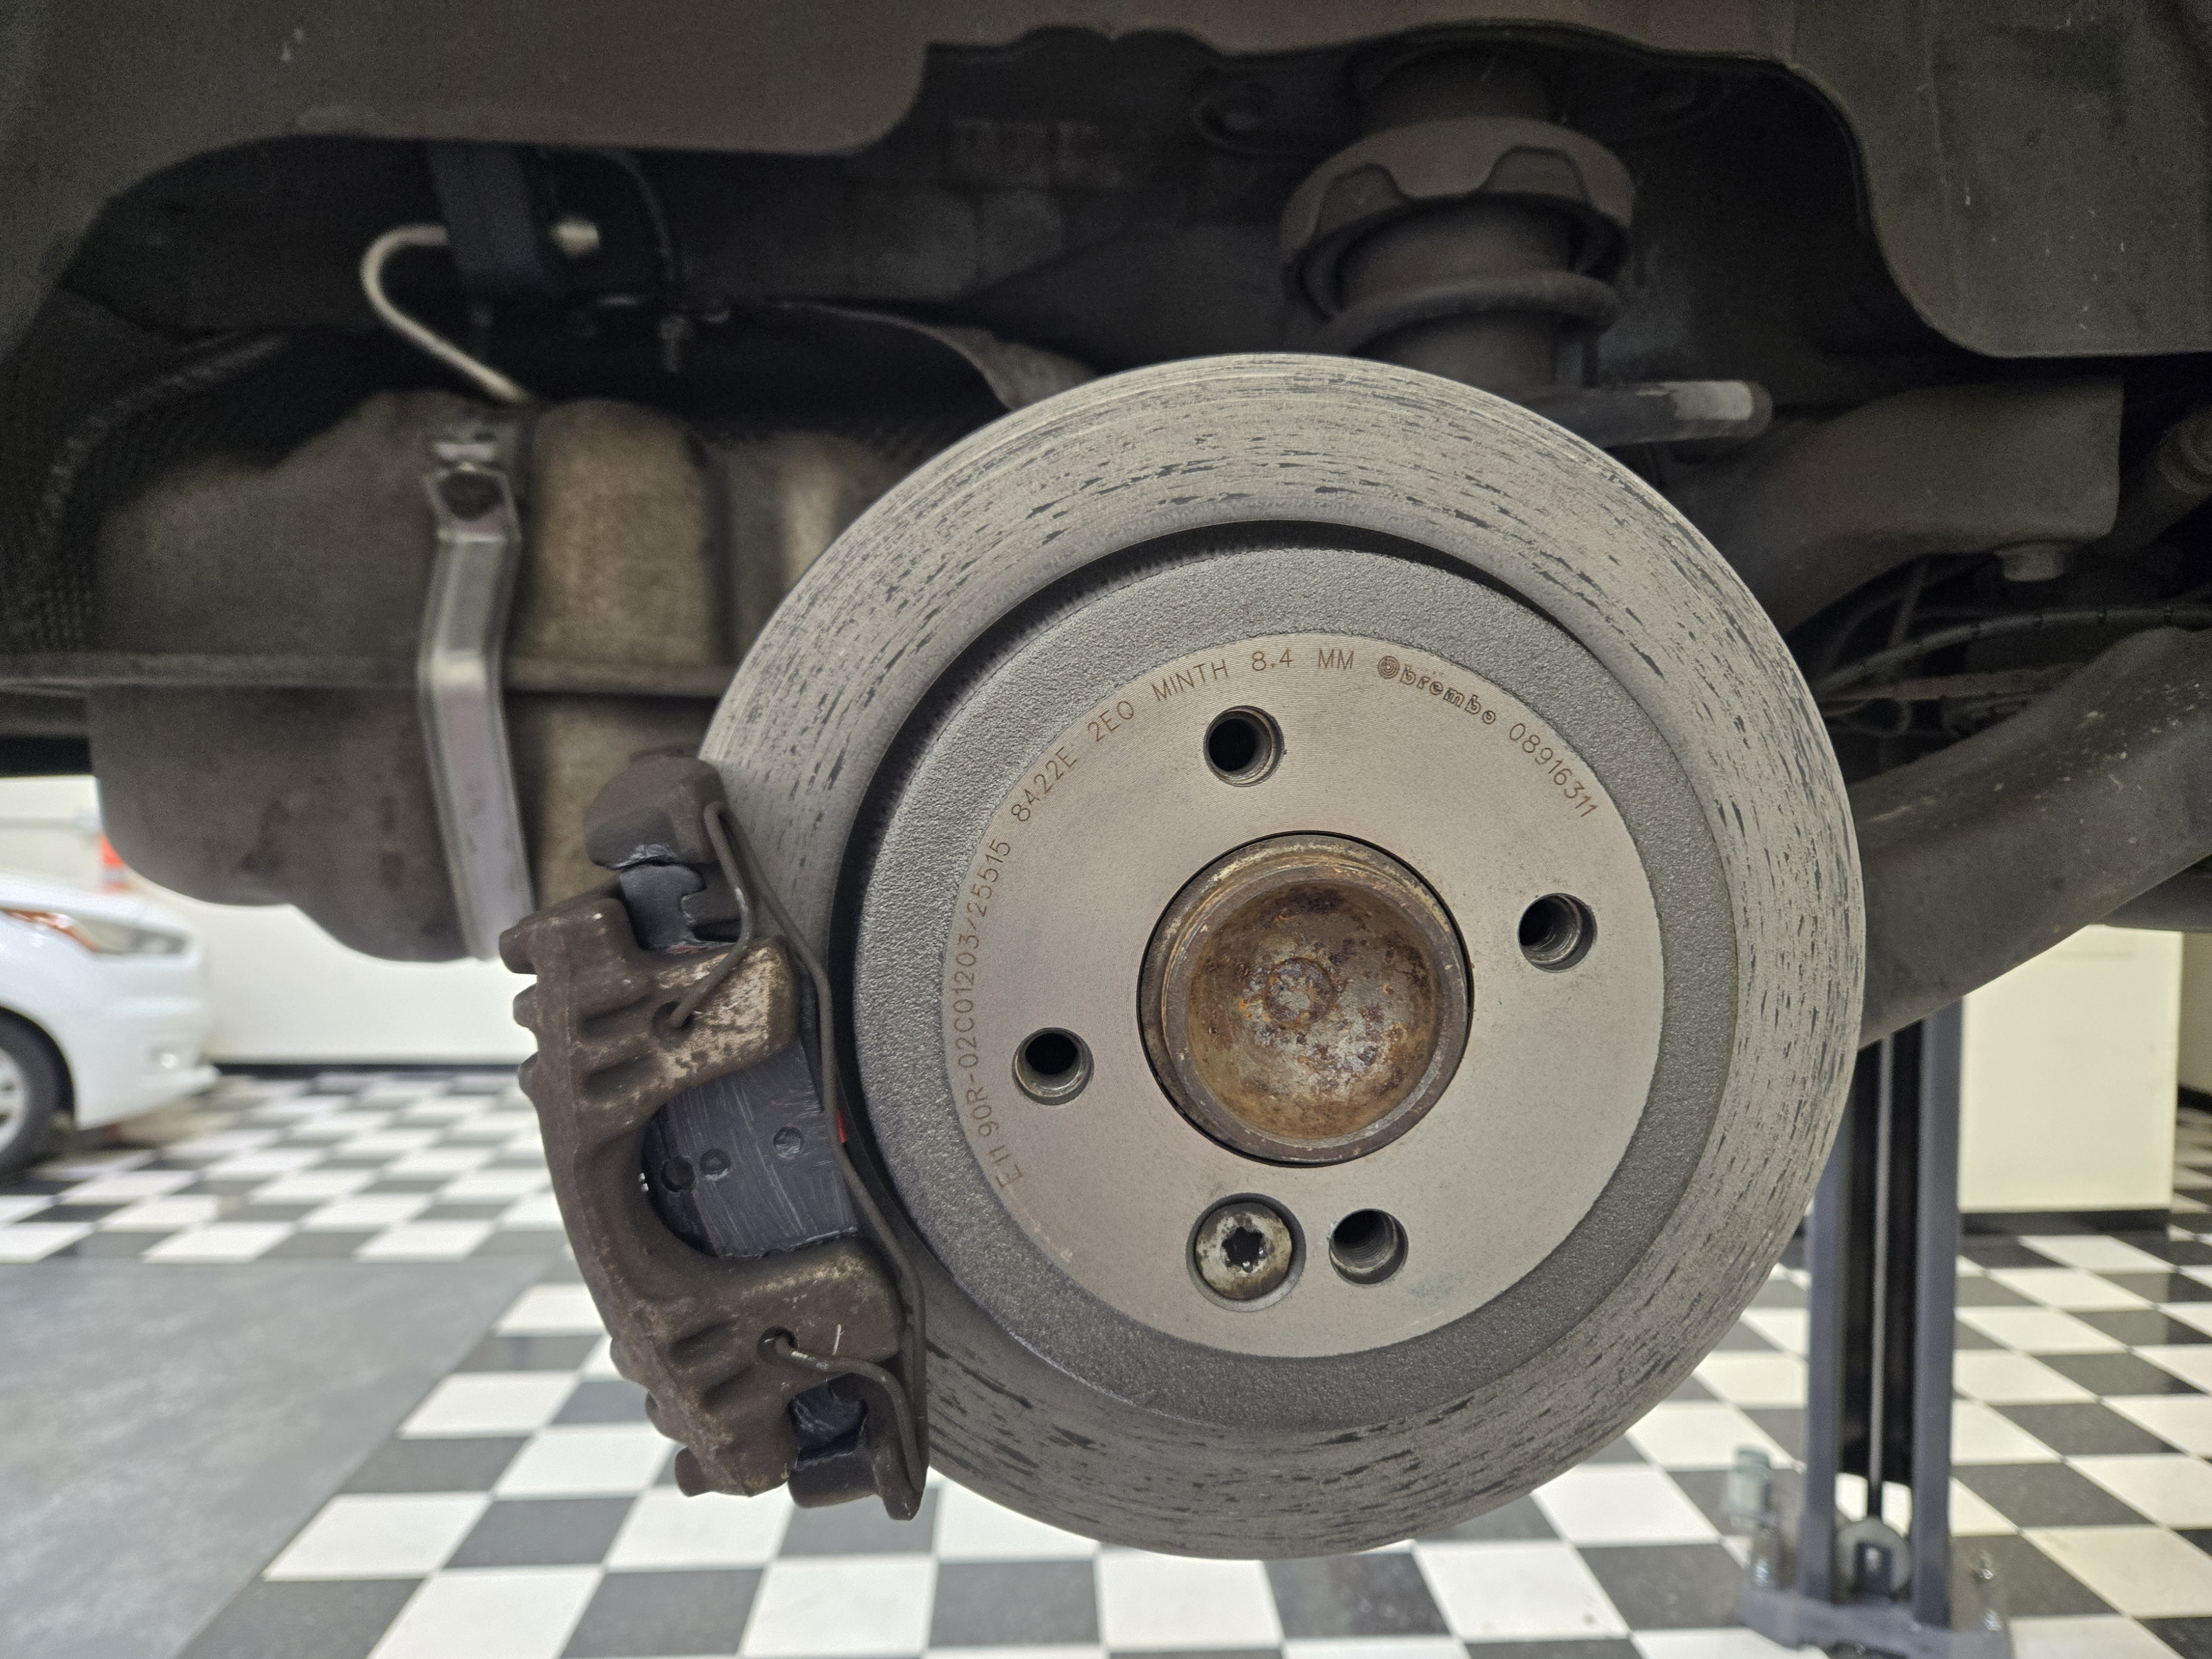
Services Performed: Angus reports that the brake wear warning light came on. Performed four wheel brake inspection:
- Brake Inspection
- Front
- Inner and outer pads at 8mm. Great shape.
- LF brake wear sensor shows sign of cracking!! This is the likely culprit. Recommend replacement.
- Rotors
- LF at 20.4 mm. Small lip, even wear. Great shape.
- RF at 20.9 mm. Small lip, even wear. Great shape.
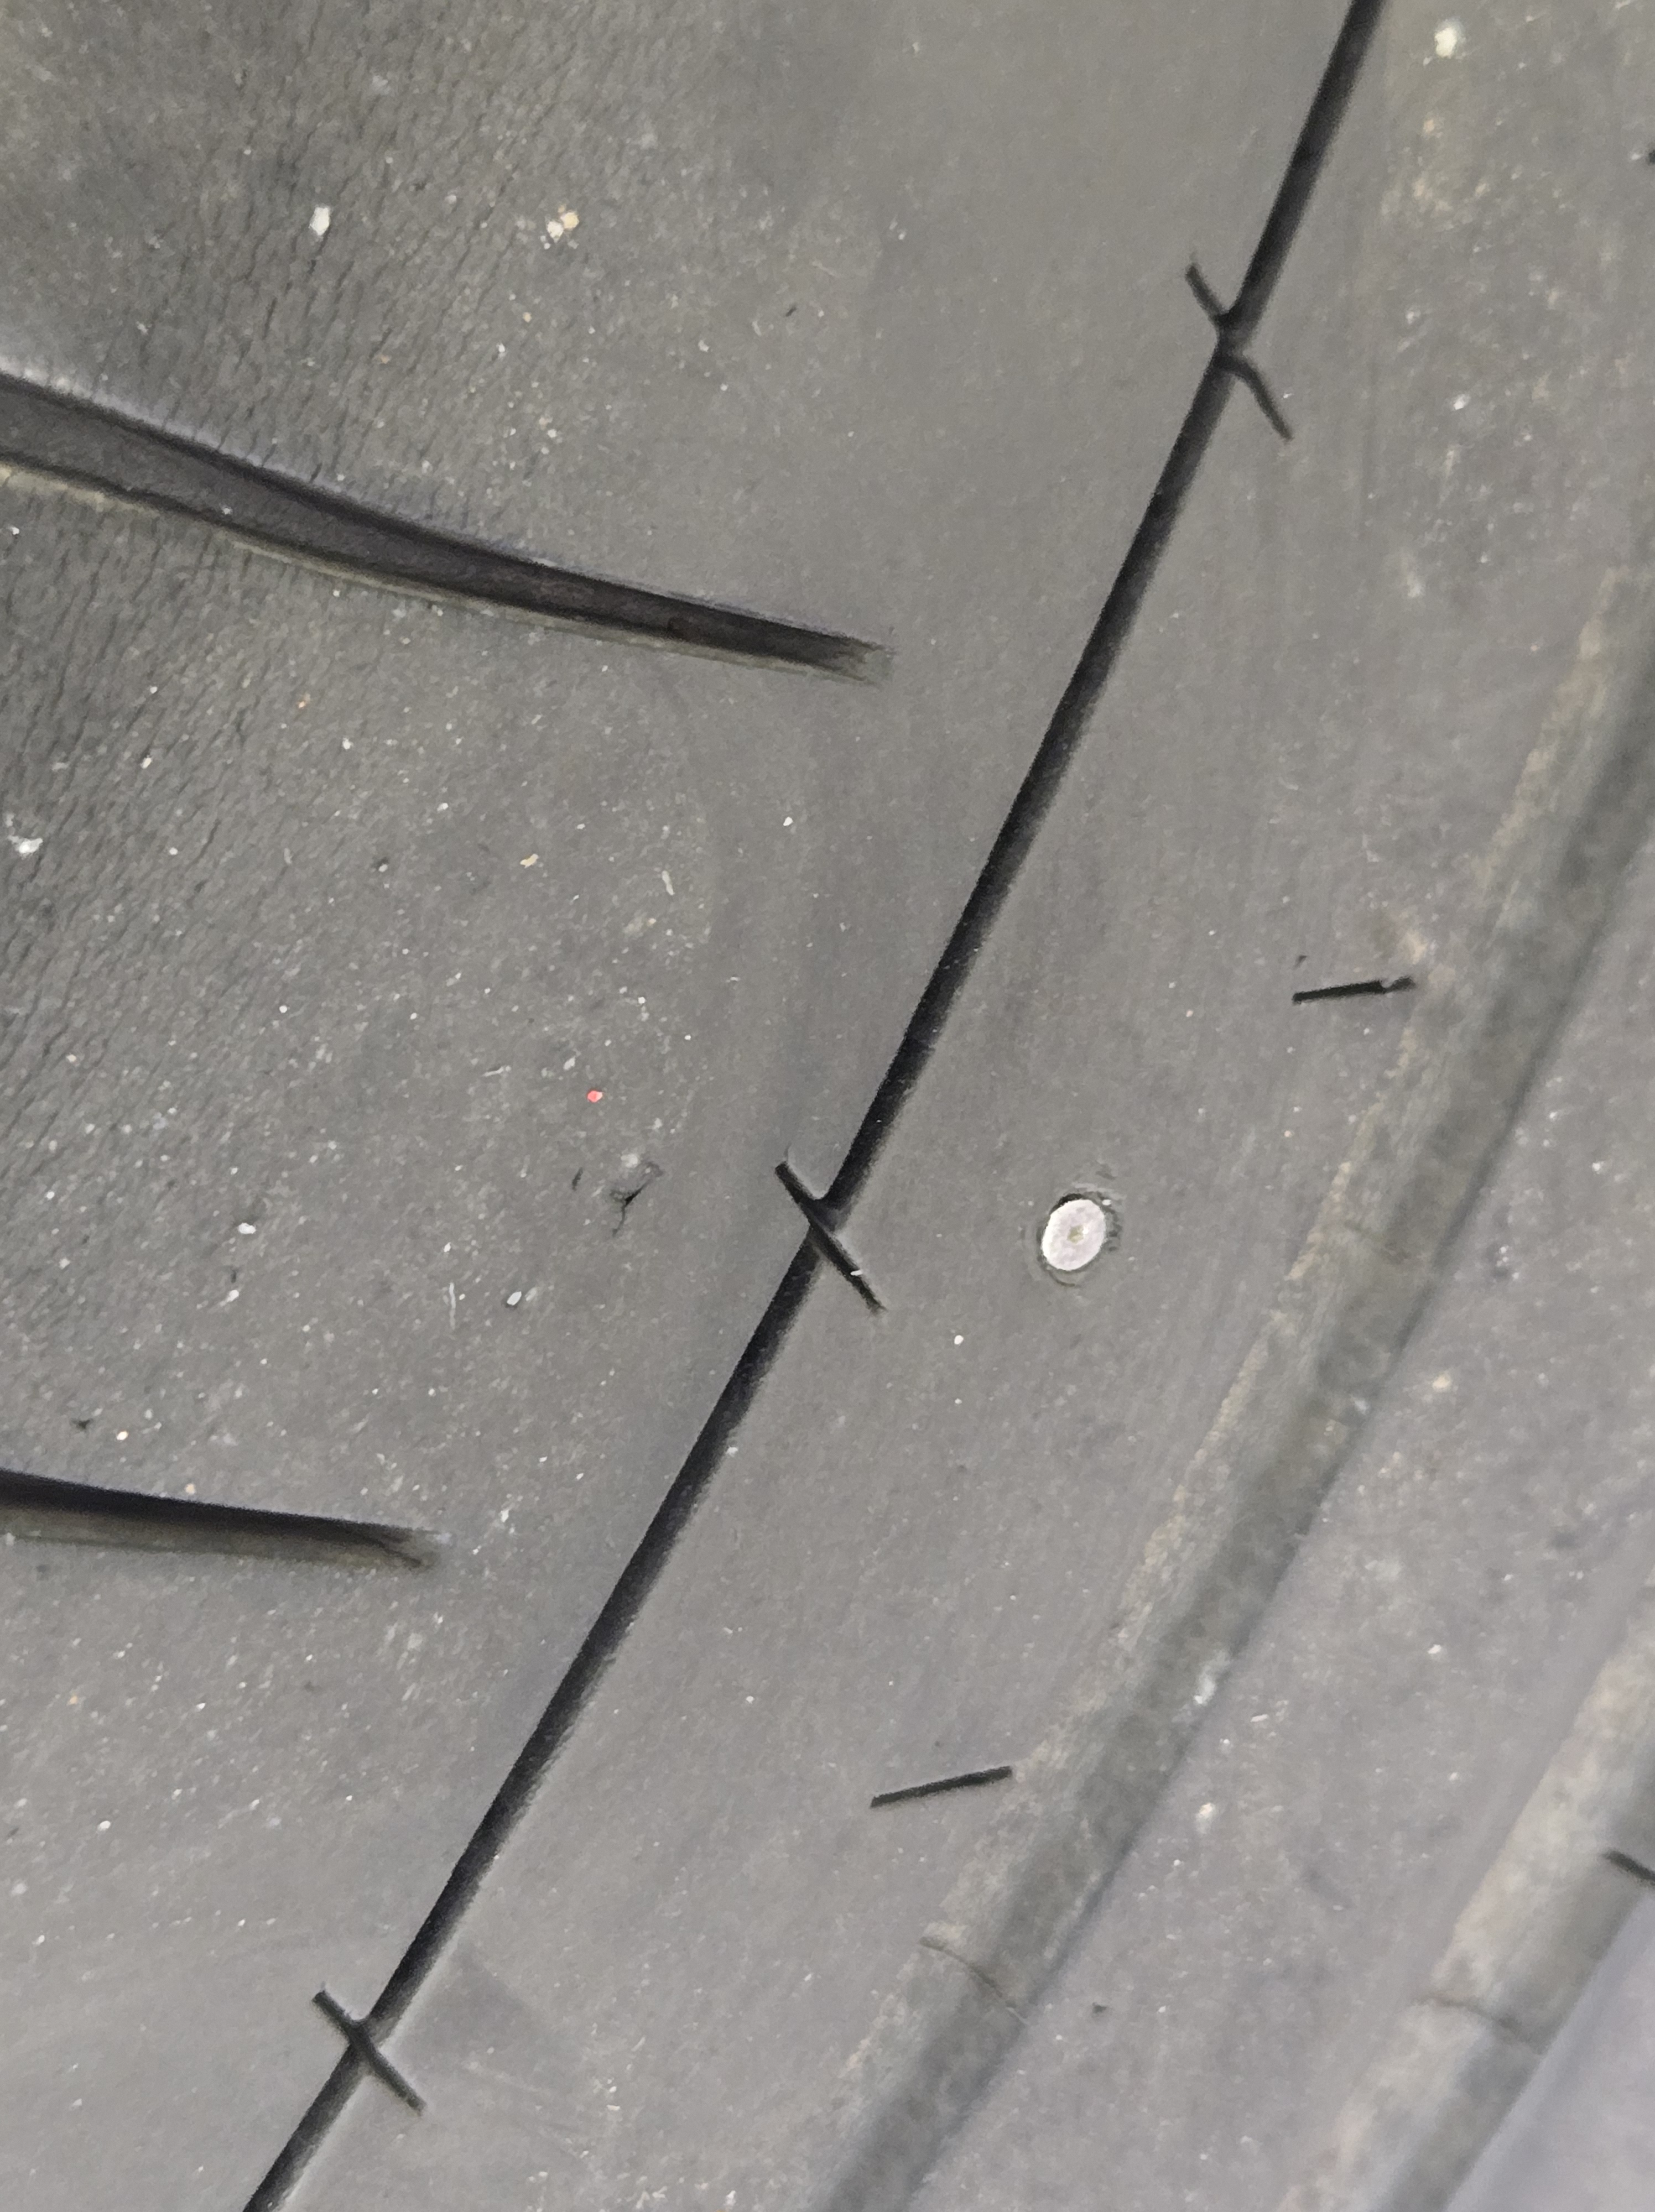
- Tire tread
- LF – ranges from 4.5/32″ on the inner most tread groove to 6.25/32″ on outer most. Wearing faster on insides.
- RF – ranges from 4.25/32″ on the inner most tread groove to 6.5/32″ on outer most. Wearing faster on insides.
- Inner and outer pads at 8mm. Great shape.
- Rear
- Inner and outer pads at 8+mm. Great shape.
- Rotors
- LR at 9.7 mm. Even wear. Great shape.
- RR at 9.8 mm. Even wear. Great shape.
- Tire tread
- LR – ranges from 5.5/32″ on the inner most tread groove to 6.75/32″ on outer most. Wearing faster on insides.
- RF – ranges from 3.75/32″ on the inner most tread groove to 5.5/32″ on outer most. Wearing faster on insides.
- Set tire pressures to 38 psi front and rear
- Rotated ONLY the LR to LF. Did not rotate the right side tires. Trying to keep the most meat on the front.
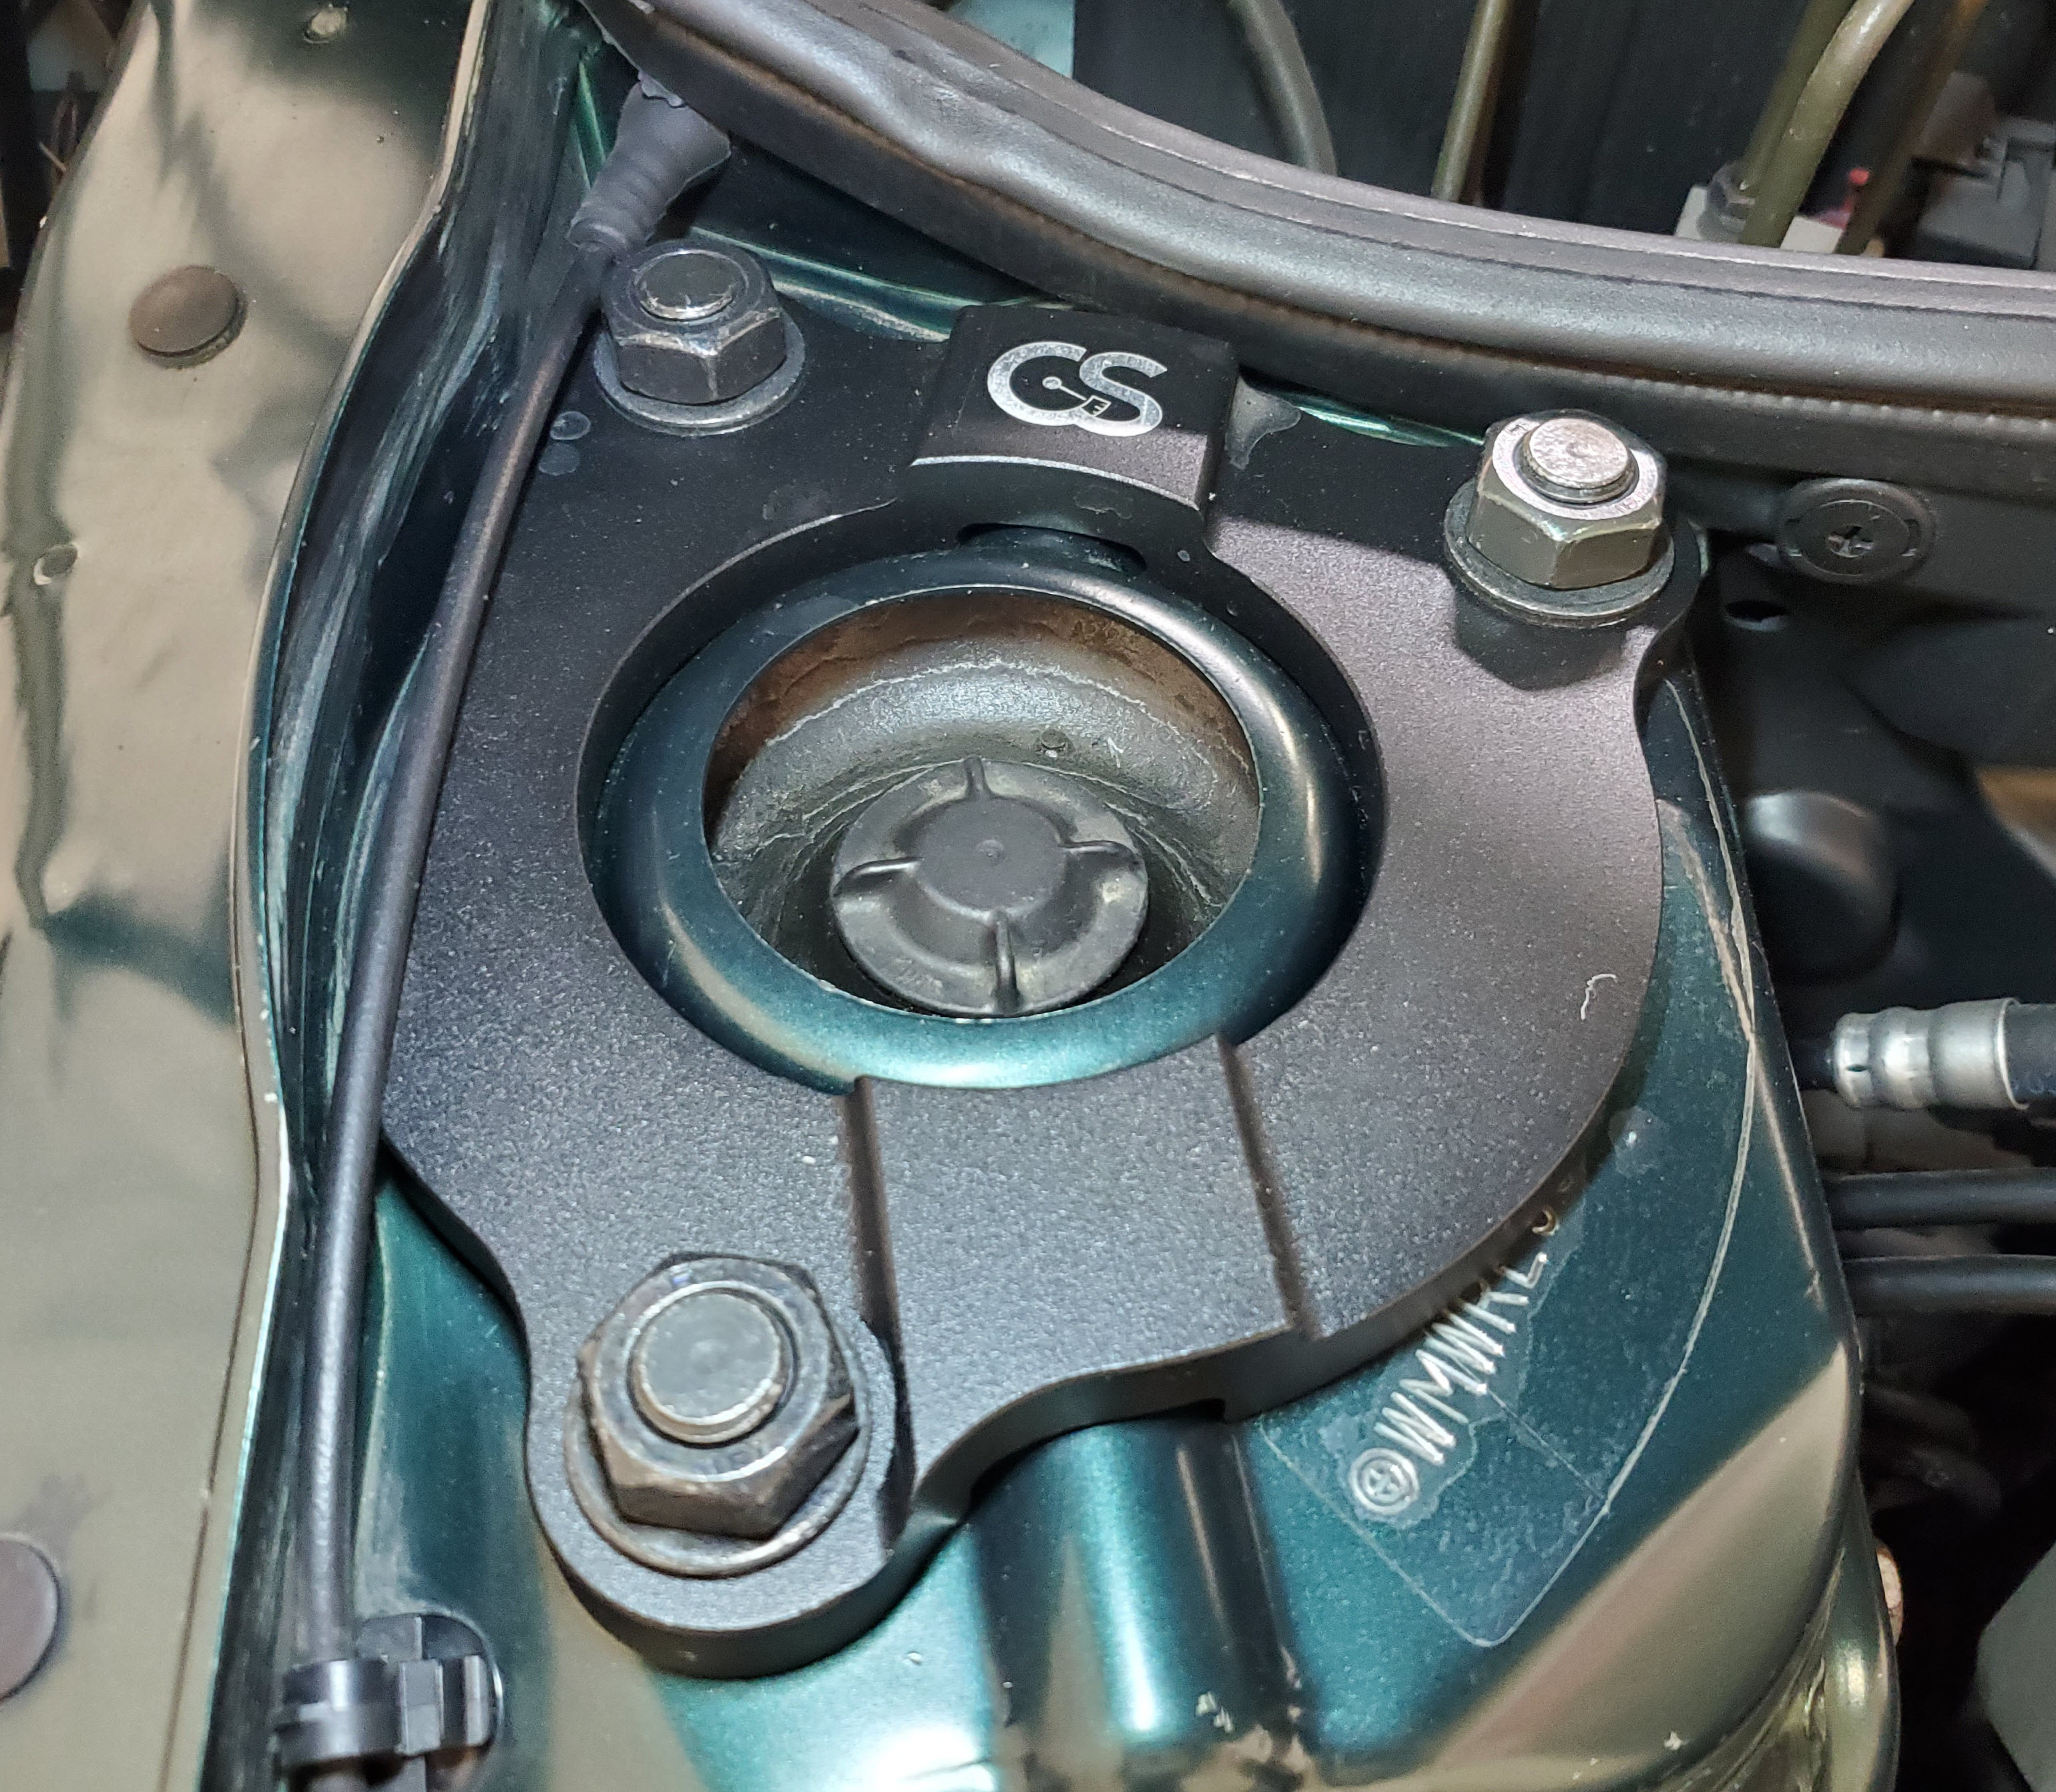
- Connected Raymundo’s Autel MaxiCom MK906 Pro-TS to the car to review codes, and test if it can enable the newly installed rear fog light and switch pack. Was able to test the switch, switch indicator light and turn on the rear fog light (all worked) but could not code the car to know to turn the light on/off with the switch. So close. Cleared codes, none returned.
- Topped up oil with 1.5 liters of Castrol Edge 5W-30.
- Topped up coolant with approx. 1/2 liter of BMW OEM coolant.
- Power steering fluid was OK
- Brake fluid was OK
- Front
Recommendations:
- Order new front brake wear sensor and fit
- Ride these tires out through summer 2026 and relace all four before the rainy season starts. Get a four wheel alignment after new tires fitted.
- If at Mini dealer for alignment, ask them to code the rear fog light to work.
Date: November 16, 2025
Mileage: 1??,???
Performed by: Angus and Stefano
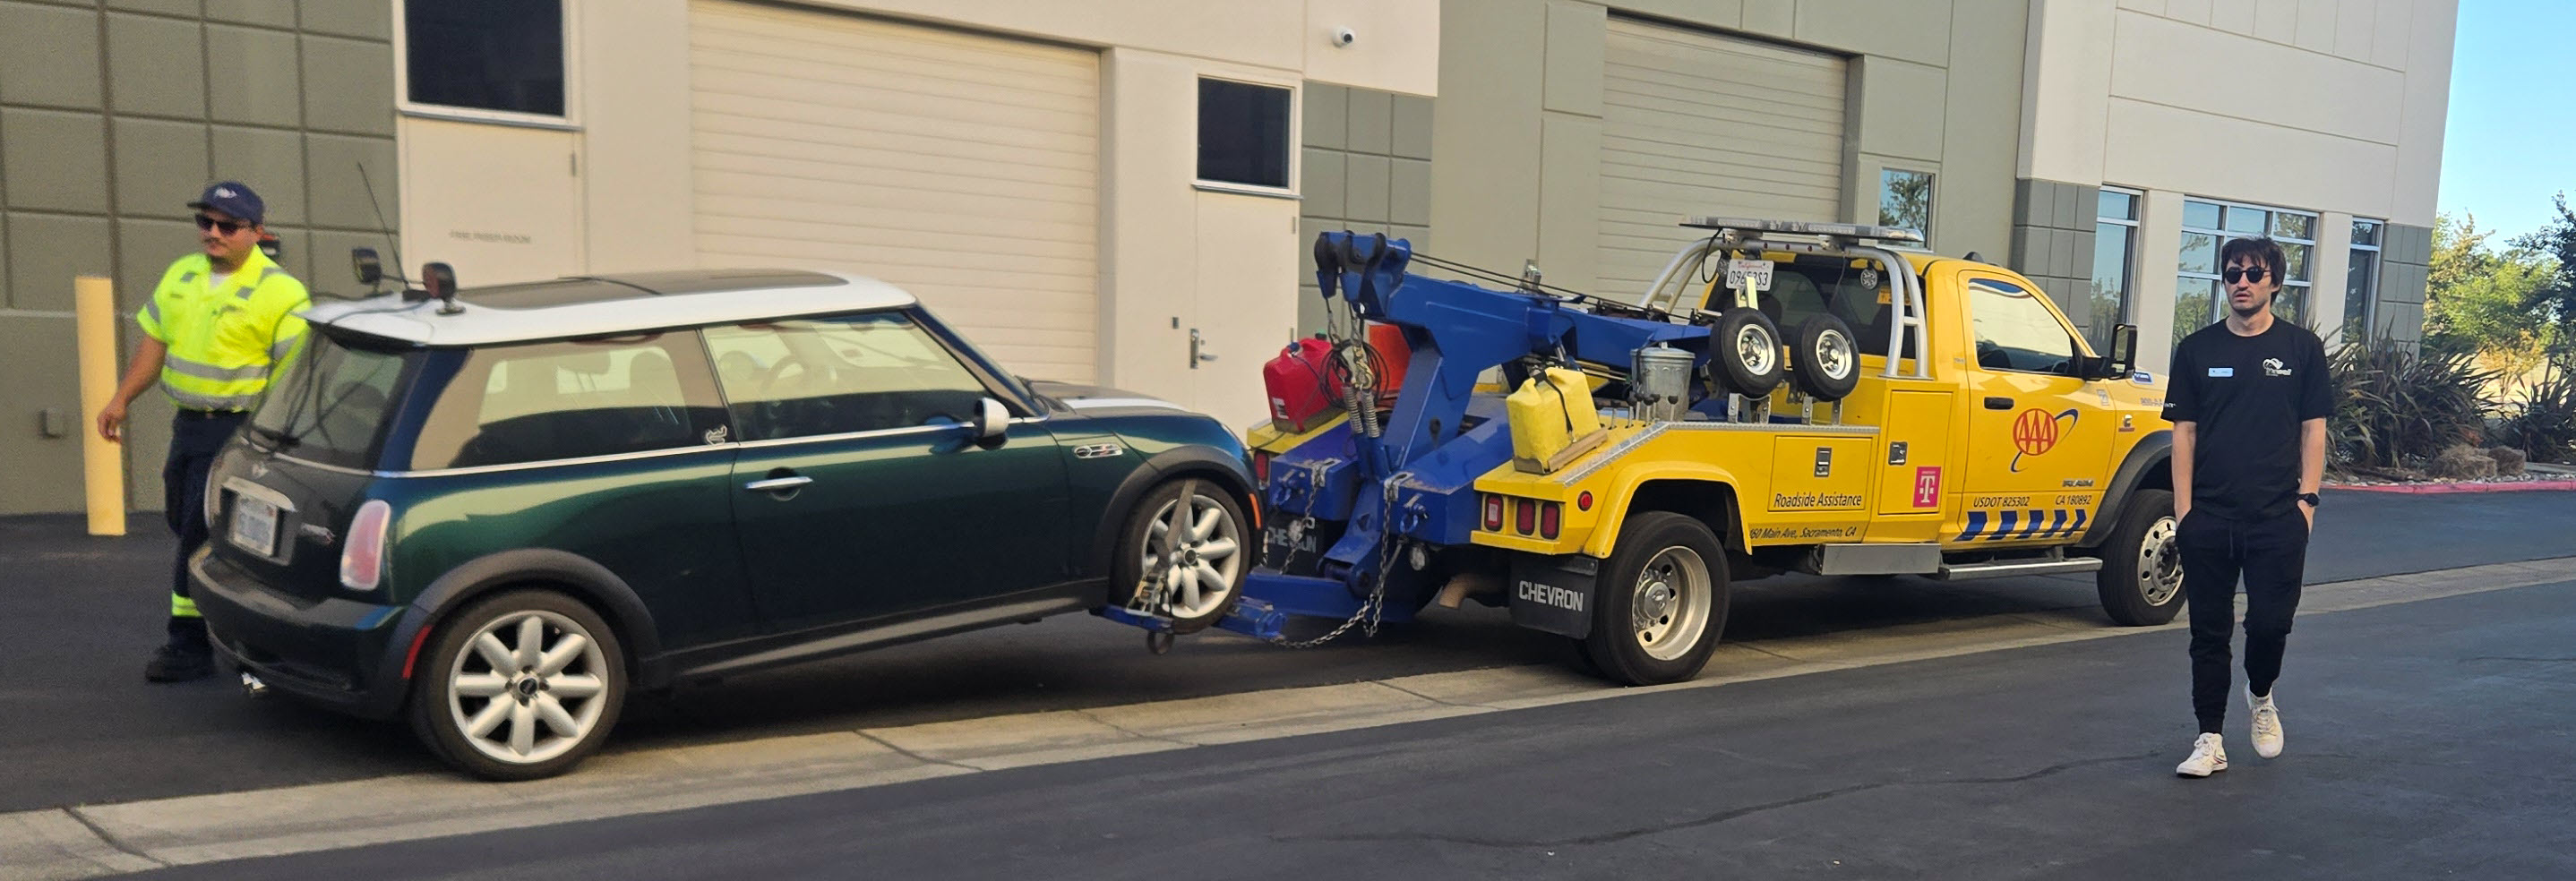
Services Performed: Gromit stranded Angus at work a few weeks ago (Oct 27, 2025). Crank no start. AAA towed back to Stefanos. Diagnosis led to the fuel pump had died. Ordered a new Hella brand fuel pump and gasket for $223 from PartsGeek.com (OEM was too expensive, over $545). Disconnected the battery, removed rear seat bottom, removed fuel pump access cover, removed old fuel pump, replaced pump gasket seal with new one, and installed the new fuel pump. Started right up. Took about an hour.
Date: April 20, 2025
Mileage: 168,415
Performed by: Stefano
Services Performed: Mini hasn’t been driven much in the last year. Angus was driving Barney mostly. Over march and april Stefano tackled a bunch of things to get Gromit back on the road:
- Changed the Engine oil
- ~5 Liters of Castrol Edge 5W-20
- Changed the Oil Filter
- Used a Wix cartridge sourced from local O’reilly’s
- When I started the car after the change, there was a MASSIVE oil leak. Puked 2 liters in about the first 60 seconds before I noticed by inspection. Retraced my steps, and found that the new o-ring had split in TWO (2) places, into 2 chunks. Defective? Went and purchased another Wix oil filter (and o-ring) and replaced O-ring only. Topped off engine oil. All good. Next service will just change the filter (with the extra I have) without changing the o-ring.
- Checked the Fluids
- Topped off Washer Fluid with a liter of Blue
- Topped off the Engine Coolant with about 500ml of OEM coolant. Was down due to the oil cooler change noted below.
- Topped of Brake fluid with maybe an ounce. Recommend Brake Fluid Flush next service.
- Rotated the tires front to rear on same sides. Torqued the wheels.
- Set the tire pressures to 38 psi
- Vacuumed the interior
- Washed the exterior and dressed the tires
- Checked ECU for Codes with the Autel OBDII tool No codes!
- Reset the Engine Service Due warning using the reset tool
- Chasing the worsening oil leak at the area around the oil cooler and front timing cover. Wasn’t sure what the source was, so went full monty and:
- Removed the oil filter housing assembly and replaced the gasket to the engine block with new one ordered from FCP Euro.
- Degreased the entire area back to clean so I can spot any return of the weeps.
- Removed and reinstalled the existing Oil Pressure Sensor, renewing its teflon tape.
- Removed the oil cooler to replace the seals.
- Noted that the water side of the heat exchanger was clogged
- Ordered a new oil cooler from FCP Euro.
- Ordered new oil cooler seals (two large o-rings) from FCP Euro.
- Installed the new cooler and seals, along with new bolts.
- On first run, had the massive oil leak of the split oil filter seal (noted above) so everything got coated with fresh engine oil. Ugh. Degreased it all yet again.
- After replacing the cooler and gaskets, this did NOT fix the leak. The weep always shows on the lower left corner of the timing cover (which is a low spot). I can’t remember changing the front main seal or timing cover gaskets during the big overhaul a few years back, so this is probably the original gasket after 165K miles. Went for it:
- Ordered a timing cover seal kit that included two seals for the integrated oil pump, the timing cover seal, and the front crank seal.
- Ordered a special Harmonic Balancer removal tool necessary to get the crank pulley off. More proof I had never changed it, I didn’t already have the tool
- Bunch of steps to knock this out, removed RF fender liner (2 bad clips), removed crank pulley, serpentine belt, belt tensioner, and belt idler pulley. Finally removed the timing cover.
- Discovered a missing timing cover bolt that was supposed to be covered by the idler pulley. Had an M8x20mm in my spares, so crisis averted. Book says to replace the small seal under the center timing cover bolt. Couldn’t source it from Mini dealer in a timely fashion, and it wasn’t leaking and was in good condition, so cleaned it up.
- Inspected timing chain guides and tensioner. Looked OK.
- Cleaned the mating surfaces of the block and timing cover.
- Replaced the four seals in the timing cover.
- Put a dab of RTV gasket sealer on the spot where two piece of the block mate along the gaskets surface (per Bentley manual instructions).
- Replaced timing cover and torqued all bolts to spec. Replaced accessories torquing bolts to spec.
- Once again degreased the whole area.
- Checked the engine oil level make sure was at 100% full
- Started the car, let run for 20 mins. No initial signs of leak. Parked overnight with clean cardboard underneath. Checked in the morning – NO drips! Yeah!
- Put car back on lift, and closely inspected.
- Dry near timing cover and oil filter cooler
- Some signs of a forming drip at the rear of the block where it meets the transmission. Unclear if its coming from the rear main seal or elsewhere. No sign of coming from above like valve cover. Oil was clean, same as the newly changed oil, so guessing it will be a rear main seal. Super bummer. This seal was changed by Stefano when new clutch was installed during the major overhaul. Will monitor.
- Reinstalled the fender liner with two new OEM Mini clips (happened to have in Stefano’s stock)
- Reinstalled the road wheel and torqued.
- Removed the oil filter housing assembly and replaced the gasket to the engine block with new one ordered from FCP Euro.
- Official Mini Bulldog keychain was broken. Sourced a replacement of Ali Express online. All good again.
- TPMS warning light was on. Found a nail in the RR tire. Took to local Les Schwab for a patch. Strangely the nail stub was still in the tire on return, so removed it. Not sure it was even punctured. Reset tire pressures to 38 psi and pressed the TPMS calibrate button on center console to reset.
- Brake warning light was on
- Rear brakes were down to metal on metal. Allan had borrowed the Mini for about 3 weeks, and suspect he drove home with brake set.
- Ordered new set of rear brake rotors and pads from Brembo.
- Ordered new rear brake wear sensor from Amazon.
- Replaced the rear brake rotors, pads and sensor.
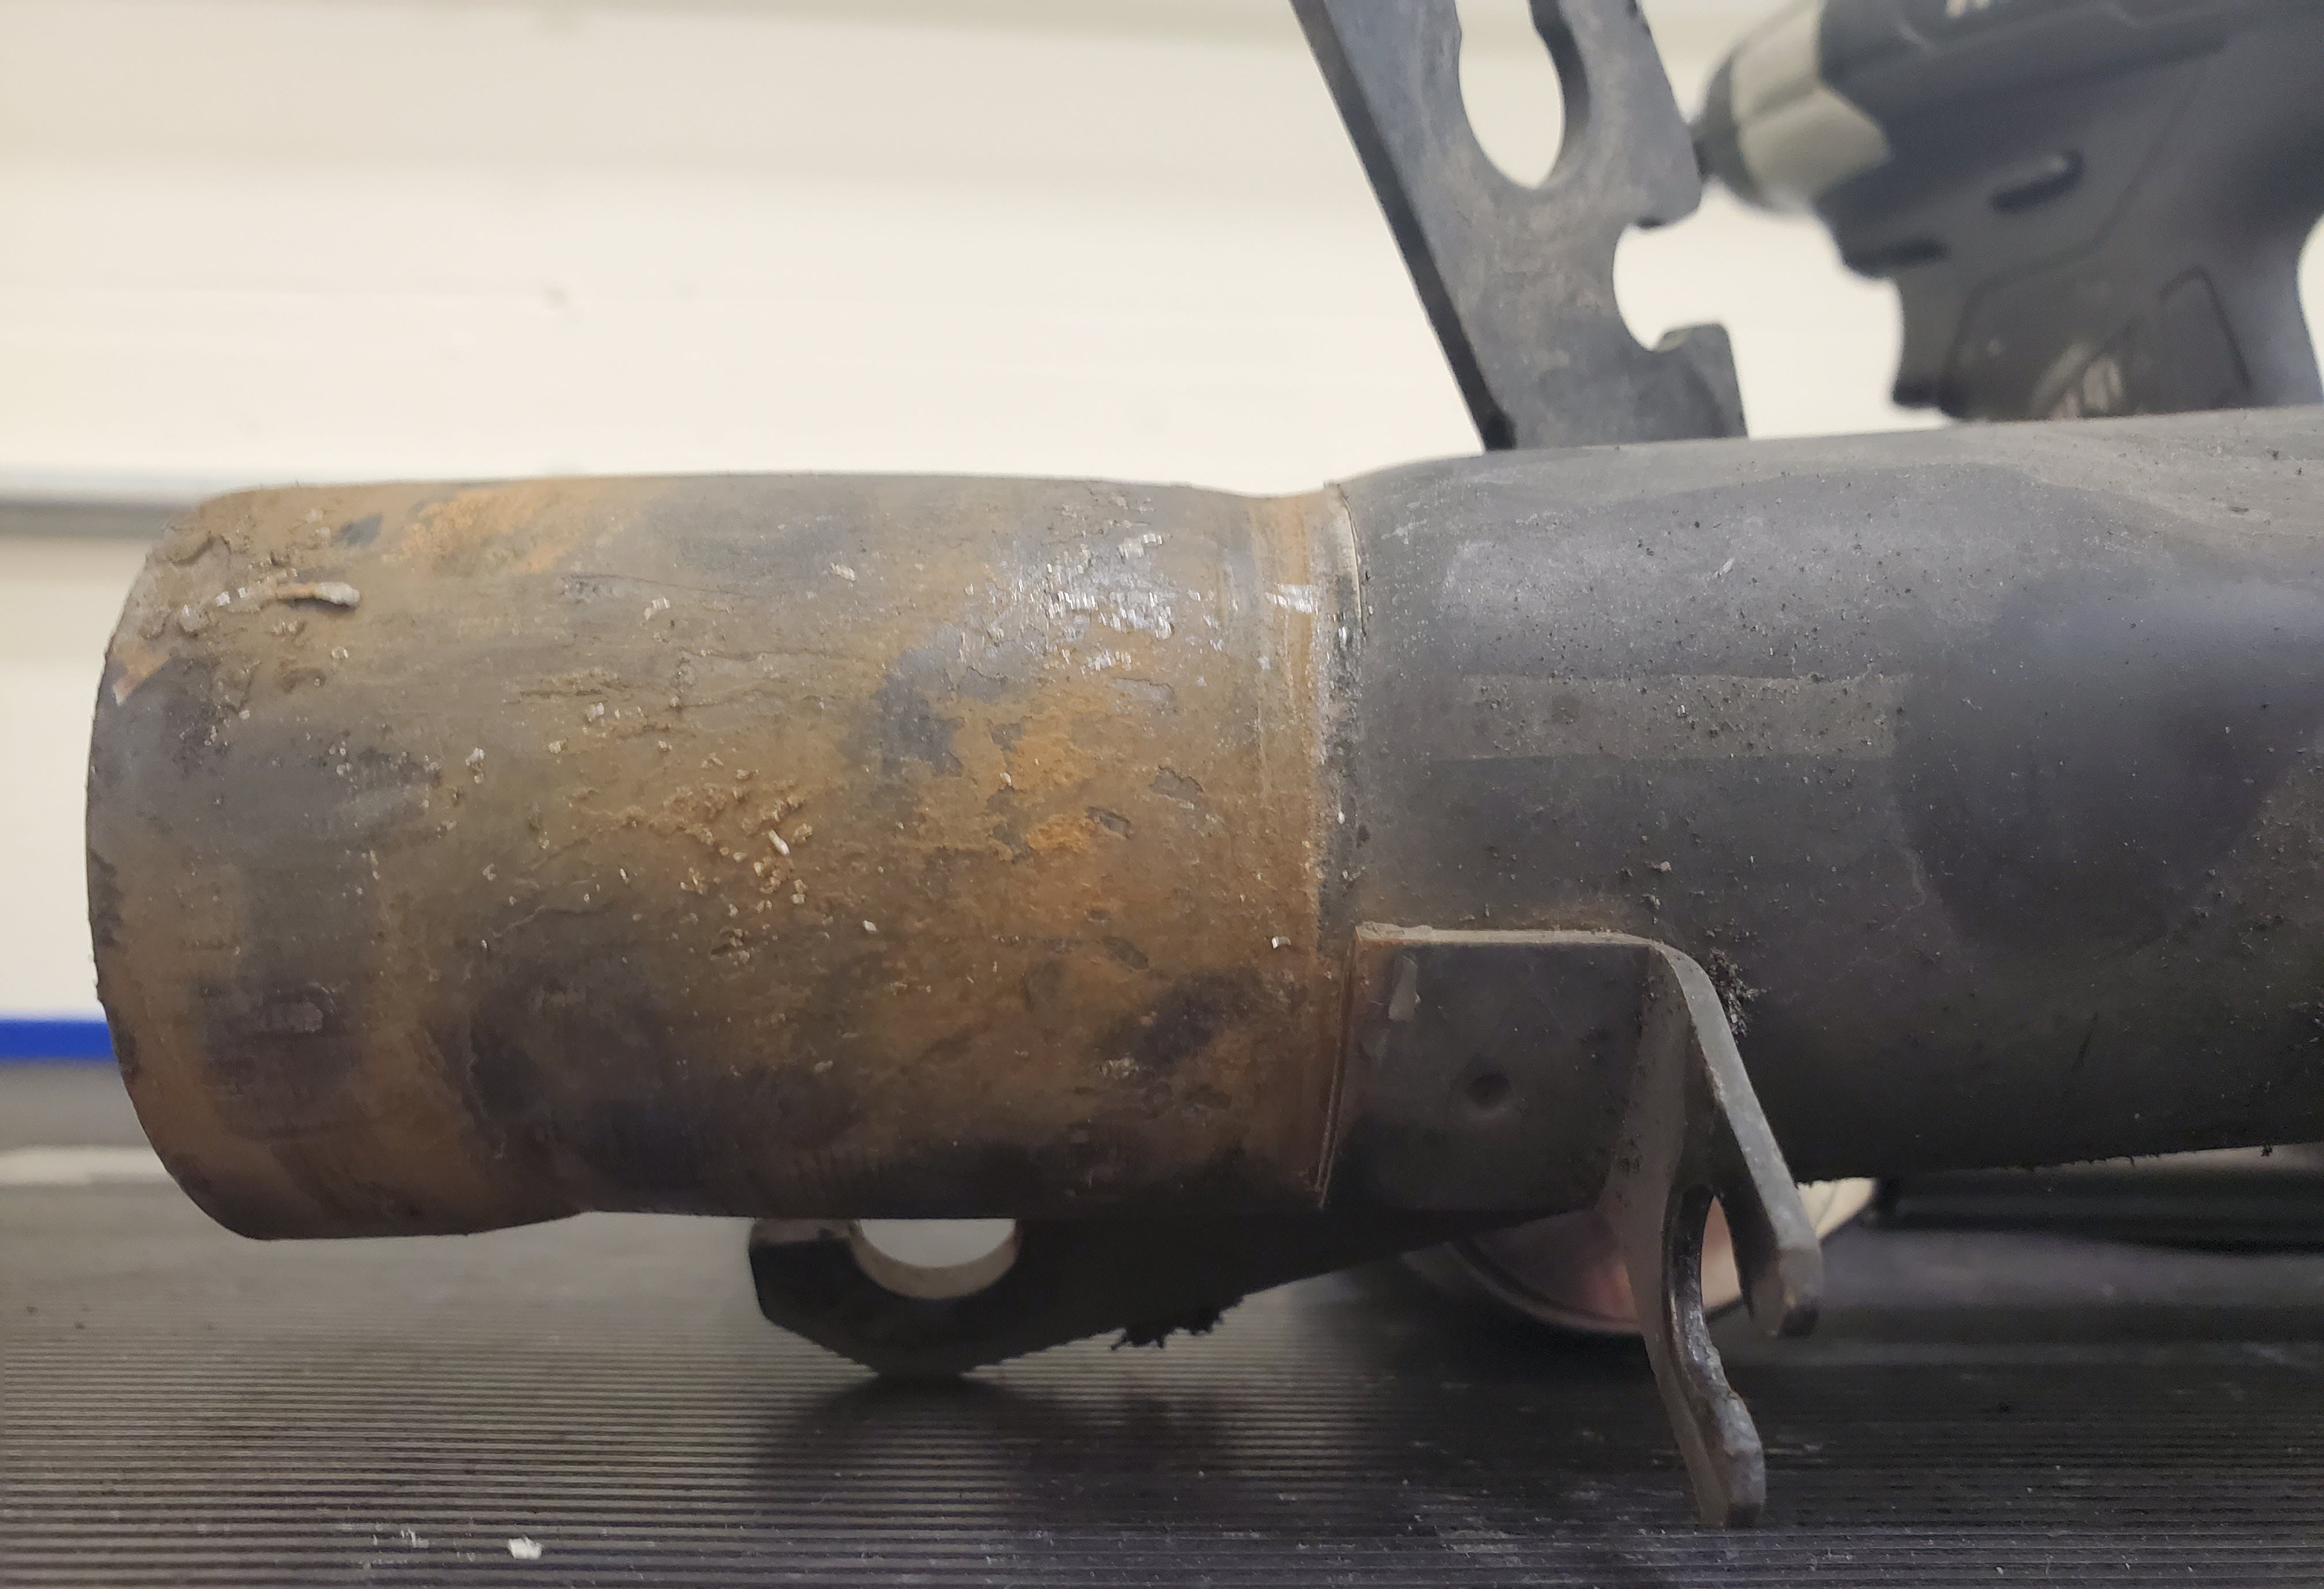
- Clunking from Right Rear reported by Allan after he borrowed it.
- Inspection found that the RR exhaust hanger was broken off. Ugh.
- Ordered a new OEM RR hanger
- Installed the RR Hanger, only to discover that the strapping was ALSO broken near the right center hanger. Ugh. Removed the rest of the broken hanger and rubber donut.
- Ordered an entire new aftermarket RR muffler band assembly
- Installed the new RR muffler band assembly.
- This finally fixed it. Muffler is mounted properly now.


Time for Gromit to be back on the road with Angus. Turned over the keys!
Date: January 2025
Mileage: 164,4??
Performed by: Stefano
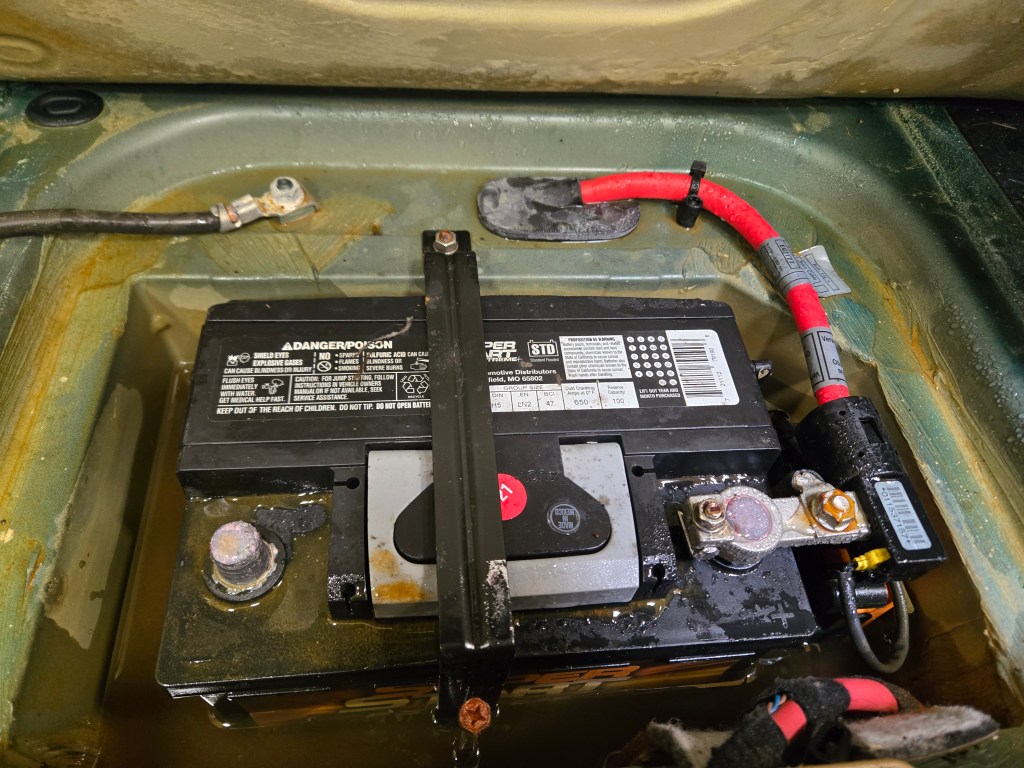
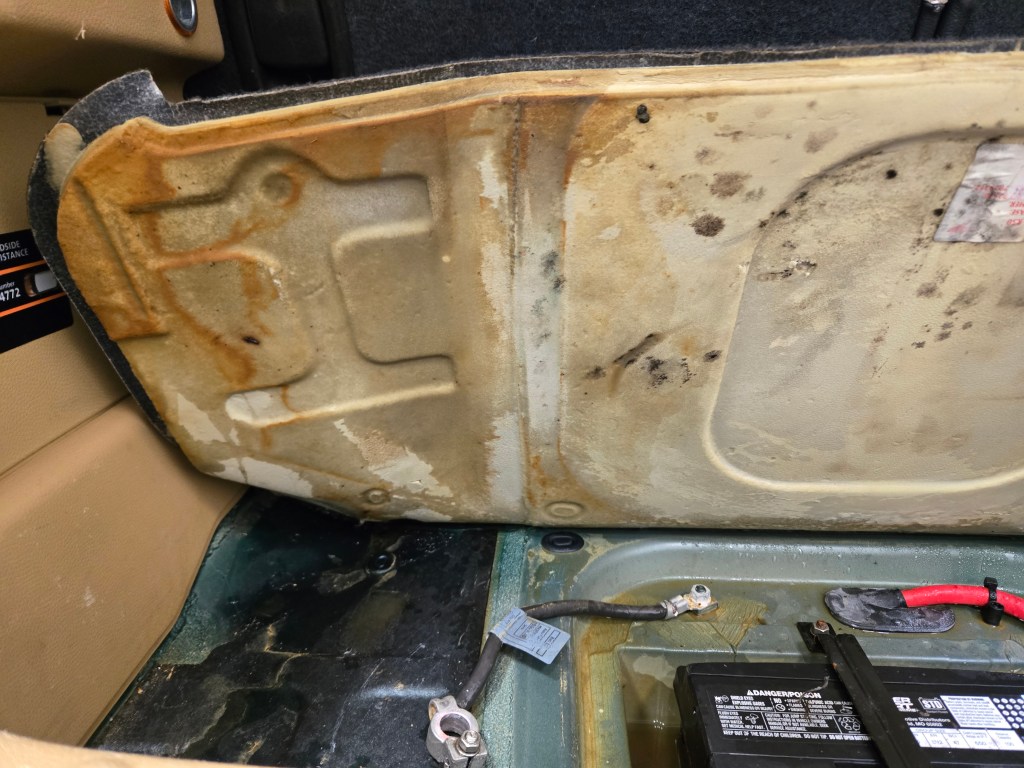
Services Performed: Stefano noticed condensation on the inside windows during cold mornings. Investigated, and the carpets were dry. But, found the rear battery box in the cargo area full of water nearly to the top of the battery. Uh-oh.
- Disconnected and removed the battery. Put the battery on charge.
- Vacuumed out the water and dried the battery box and cables
- Cleaned the water mung off the foam tool kit as best I could. Not perfect. Had been soaking for some time.
- Removed the positive battery fusible link assembly, dismantled and dried out, then buffed off the minor copper corrosion that had began. Reassembled.
- Reinstalled the battery, cables and toolkit. Started up fine.
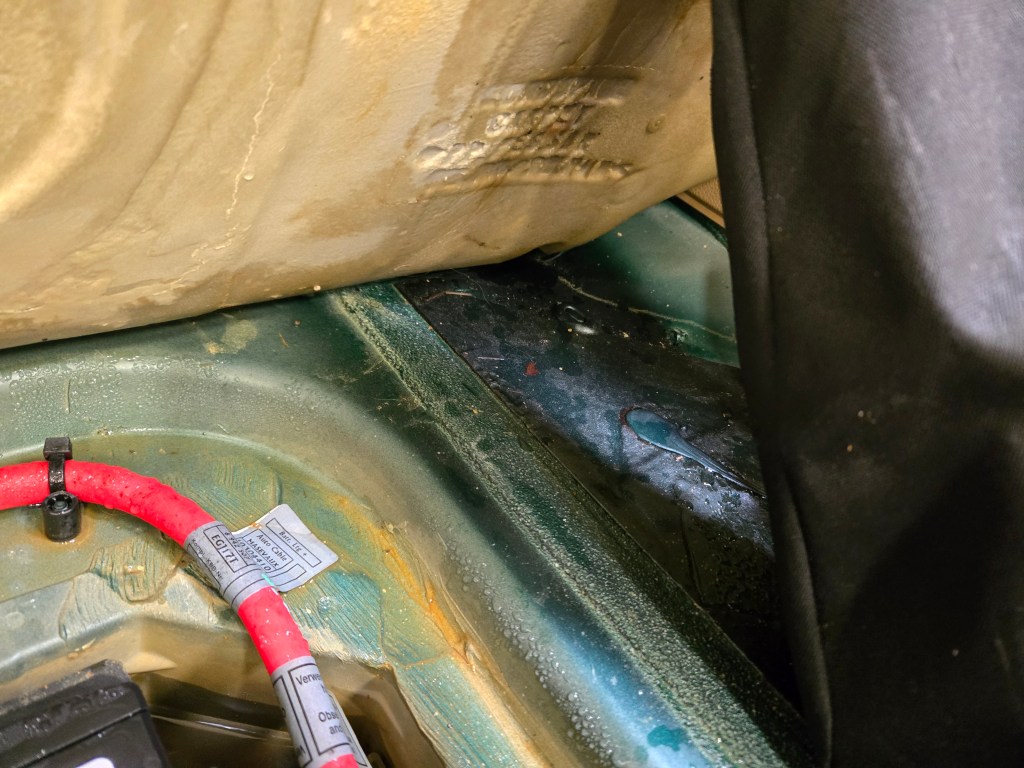
- Investigated for the source of the leak.
- removed cargo are side access panels
- removed rear tail lights
- removed the center brake light.
- removed rear hatch inner covers
- No clear signs, so had Cameraman Rob hose the car exterior while Stefano was stuffed into the cargo area with an inspection light. Almost immediately discovered that the leak was from the rear cargo hatch waist trim at the base of the rear window glass. Water was making its way past the failing rubber seal to the glass, then laying on the bodywork under the seal, and dripping in the 9 mounting clip holes into the hatch area. Stupid design. 9 holes in the body to let water in as soon as the glass rubber perishes. Now that I knew where to look I could see signs of historical staining on the inside of the cargo hatch.
- Cleaned the weep holes in the bottom of the hatch. Very small, and they were clogged with a decade of dust and dirt. This should allow it to drain if more gets in.
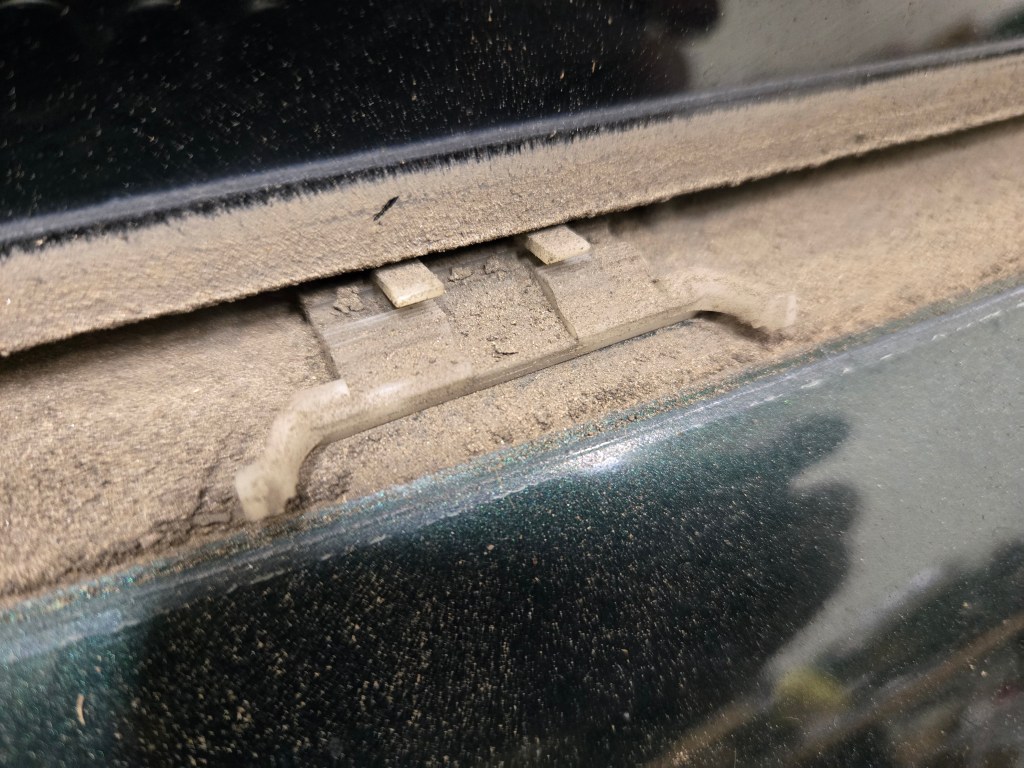
- Removed the old waist trim. Multiple clips snapped during the process.
- Ordered a new waist trim and got 7 of 9 new clips from Neillo Mini. Nearly $150 for this stuff!
- Cleaned the 10 years of crud off the waist trim ledge
- Installed the new clips, and left the best remaining two of the originals. Was a witch to get the left most two to seat. BMW Mini had set the window glass slightly too low. Each of the new clips had a tiny bit of gasket material under it to try and seal the hole. Still woeful.
- Installed the new waist trim. The right outer edge of the trim doesn’t sit pressed as tightly to the glass as I would hope, but serviceable.
- Did the water ingress test with Rob and the hose again. Completely dry this time.
- Slightly adjusted the cargo hatch fitment to the car (left/right shunt gaps)
- Slightly adjusted the hatch latch tightness to pull the hatch tighter on close.
- Reinstalled all the other trims and bits to finish up the project
- Interior Detail
- Vacuumed and vornado’d and then Bissell carpet cleaned the carpets
- Cleaned the seats and door cards with Lather and detail brush.
- Cleaned the existing WeatherTech floor mats with Bissell carpet solution and a nylon bristle brush on the drill. Cleaned them up great!
- No odor or mustyness from the water leak. Caught it early enough.
Noted that the LR and RR side window waist trim rubber is just as deteriorated. The RR trim is actually broken off its front clip I think. But, I don’t think it attached to the body the same way so we aren’t seeing water ingress from it. These should be replaced eventually, even for the aesthetics. These are likely over $100 each plus more clips, so not worth replacing unless we opt to do a full exterior refresh and paint job of the car.


Date: December 26, 2023
Mileage: 168,726
Performed by: Stefano
Services Performed: Stefano took the car to Smog’n’go for its CA DMV Smog test, and it failed. They said it had two MIL codes (P0137 – O2 Sensor Circuit Low Voltage Bank 1 Sensor 2 (after cat) and P2270 O2 sensor signal biased stuck lean Bank 1 Sensor 2). Check engine light was not lit, but two days ago it came on when the car was stalled multiple times during some manual driver training in parking lot. A few starts later the light went out on its own, but I guess the codes were still present at the Smog check time. Cleared the codes using Autel, and returned to Smog’n’go and they said I had to do 100 miles before they would retest. Argh. Wasted trips.
Will monitor the code after 100 miles and potentially need to replace the downstream O2 sensor if it returns.
Date: December 23, 2023
Mileage: 164,700
Performed by: Stefano
Services Performed: Stefano figured out rattle that had been coming from the rear hatch areas for months. Sounded like a clunking/clanking of something (like a rod) within the hatch. But, spotted the right rear muffler hanger looking low when following the car one day. Inspected the hanger to see if it had broken, and fount the hanger mount to the car was loose. The nut had been unwinding itself for who knows how long. Removed RR wheel, tightened the exhaust hanger back to the vehicle body, and tested, no more rattle (win for Stefano). Reinstalled RR wheel and torqued to spec.
Also reset the Service Due indicator light on the dash – this wasn’t on back in Aug 23 during the actual service. Used the Autel.
Date: August 20, 2023
Mileage: 164,017
Performed by: Stefano
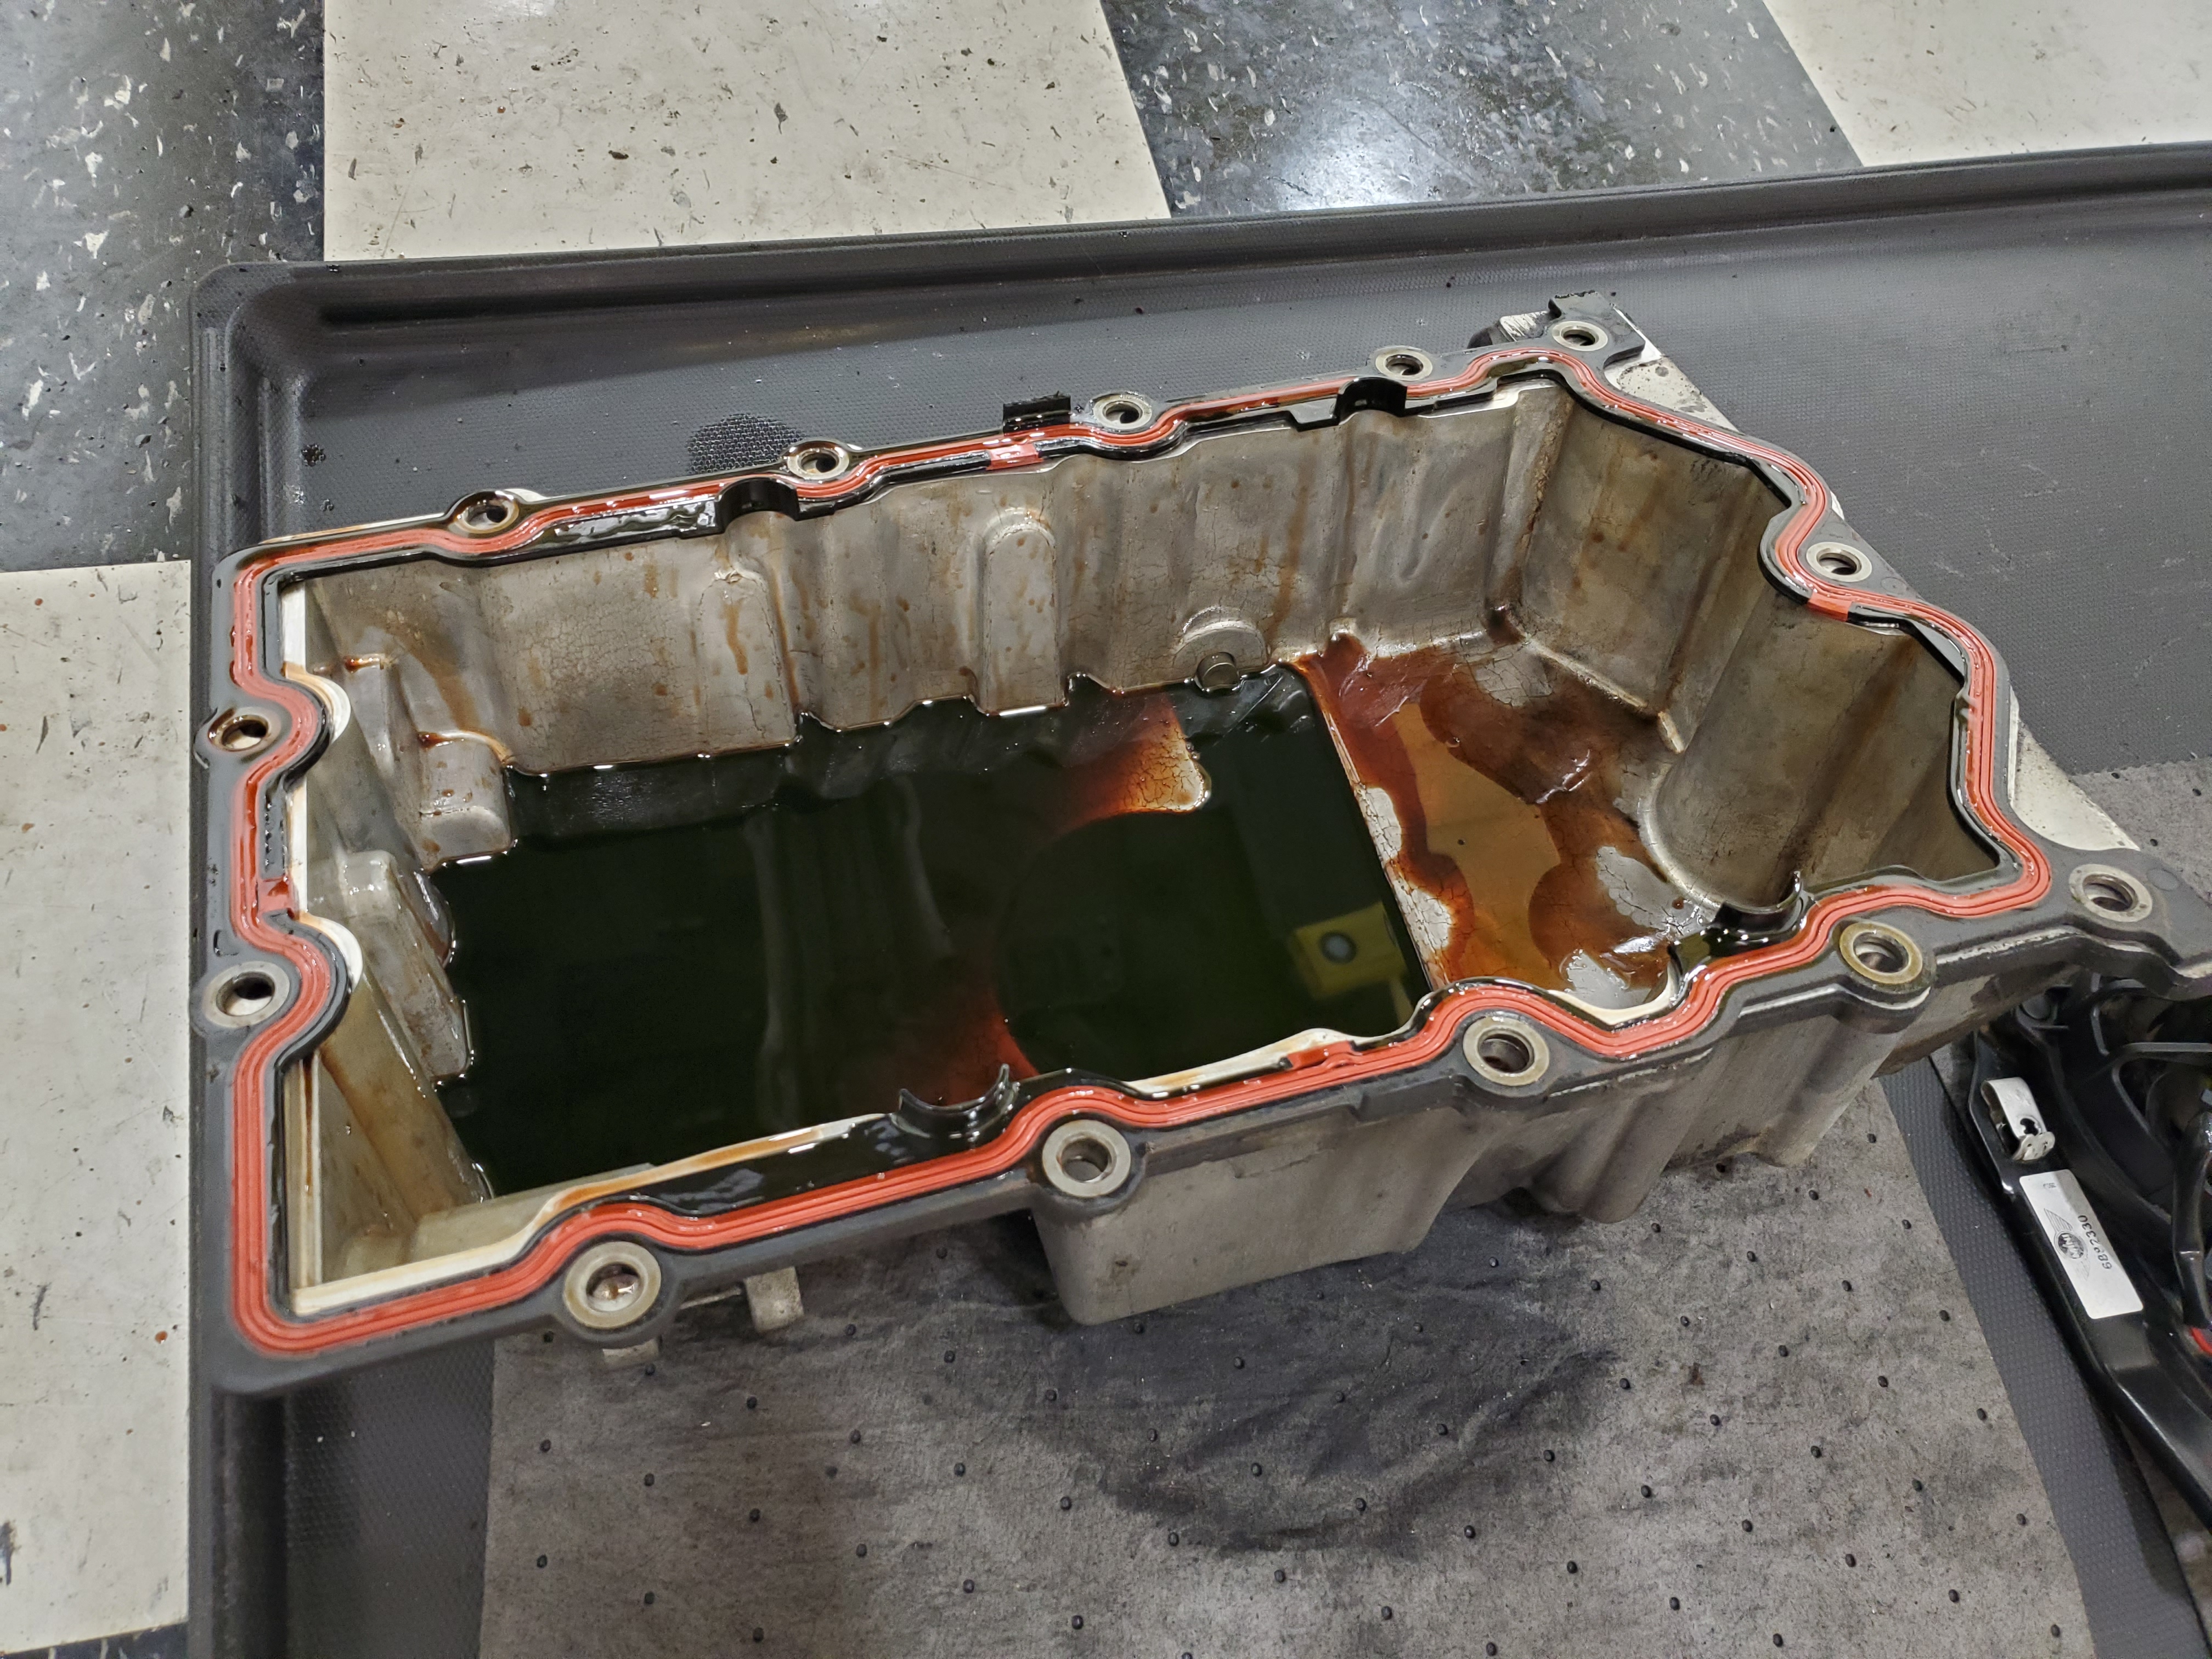
Services Performed: Stefano got the bit in his teeth and wanted to eradicate the oil leaks. Combined it with the annual service:
- Diagnosed and repaired the oil leaks (plural)
- Very oily around the oil filter, oil cooler, power steering hoses, oil pan. Added UV dye to the oil and used UV light to look for weeps.
- Oil Pressure Sending Unit was found to be still be weeping a tiny bit potentially from the threads. Purchased a proper 1-1/16″ oil pressure sensor socket and snugged it up.
- Power steering pressure hose was found to be oozing at the crimp hose joint when was at full lock.
- Ordered a replacement OEM hose from Seattle Mini.
- Drained power steering fluid reservoir
- Replaced hose and banjo connection aluminum crush gaskets.
- Degreased the entire area
- Refilled reservoir with new Pentosin CHF 11S fluid. Ran the car for 5 mins and did 10 lock to lock cycles. Suctioned out the reservoir fluid again, and refilled with more fresh Pentosin CHF 11S. Topped up to max.
- Inspected for leaks, all dry. Good to go.
- Oil pan gasket was found to be weeping near the front of engine (cranks pulley end)
- Ordered new OEM Oil Pan Gasket from Seattle Mini.
- Degreased the whole area
- Drained engine oil
- Changed the Oil Pan Gasket and torqued to spec
- Changing the engine oil. Replaced with 5.5 liters Castrol Edge 5W-30 Synthetic.
- Changed the engine oil filter. Replaced with Mini OEM filter purchased from Seattle Mini.
- Inspected and topped off the engine coolant with a few ounces of BMW OEM Coolant.
- Inspected and topped off the washer fluid with plain water
- Set tire pressures to 38 psi Front/Rear
- Inspected exterior lights. Left Front side marker light out, replaced with new bulb. All good.
- Discovered A/C not blowing very cold if at all. Cool whiffs at best.
- Purchased a can of A/C Pro at local Autozone
- Followed instructions and boosted pressure a bit. Was in green, but once I added about 1/2 the can you could hear the fan cycling go solid. Blowing solid cold now and auto climate control working well. We’ll see if it lasts and if there is a leak.
- Replaced the missing lower heat shield bolt that was missing near the Catalytic convertor. All good.
- Replaced the lower engine vibration mount (dog bone). Rubber bushing starting to crack.
- Replaced the rear mini logo/badge on the rear hatch. Pried off the old one and then removed glue. Polished paint and ceramic coated. Replaced the badge. Looks really good.
- Issues noted:
- Engine Oil Dipstick wire shaft shielding cracking, and dipstick is breaking. Ordered new OEM dipstick from ECS tuning.

Date: July 1, 2023
Mileage: 163,988
Performed by: Stefano
Services Performed: With Angus away in the Mountains with Barney, I opted to give Gromit a drive. The drivers door window dropped into the door when I opened it. Damn.
- Cable snapped on cheap Amazon regulator I fitted last December
- Warranty replaced it, so I have another crap regulator
- Removed the broken one, fitted the new and adjusted the Window.
- Snow foam washed six months of dust off the outside, looking sharp.
- Charged the battery overnight in shop to catch up – been sitting for a month.
- Checked the fluids, all good.
- Checked the tire pressures and adjusted to spec.
- The ‘McEvoy’ Canada decal on the roof is faded out, so I removed with heat.
Some renewed to do list items would be:
- Inspect the oil leak that continues. Suspect the replaced Oil Pressure Sending unit was installed tight enough.
- Diagnose the seemingly exhaust system related rattle on cold start.
- Diagnose the dead right rear speaker. Continuity test to the back of the head unit. Since there was custom wiring most likely a wire is off.
- Re-stitch the drivers seat shoulder bolster. Ray fixed the same for Avery’s R52.
- Replacement tail light assemblies. Originals are super fogged from sun fade internally. Something cool?
- Next service would be at 166,300 miles (5K) or Sept 1, 2023 (1 year) whichever comes first.
Date: January 12, 2023
Mileage: 163,440
Performed by: Stefano
Services Performed: Stefano dealing with the rear speaker issues:
- Ordered a pair of Polk 692 (6″x9″) speakers and wiring harness adapters from Crutchfield.
- Installed new speakers by partially removing rear side panels. Went fine. Had to replace a few of the panel push on snap clips that were squashed.
- Tested audio again. Right Rear speaker (new one) still does NOT work (same issue as the old one). The LR works great, sounds even better with new. So, three of four speakers are working great. RR speaker must be a wiring issue that will need to be chased down. Best guess is the issue is behind the JVC aftermarket head unit. I think there was a make yourself wiring loom adapter kit that came with the Crutchfield kit, and I’m going to guess that the wire to the RR speaker isn’t connected. Could be the head unit, or something in the car’s wiring loom, but best to start in the most obvious spot.
- Relating to the oil leak solved Jan 4th, noted a single drop in shop on floor. This could be residual from the mess, but it should be visually inspected one more time to confirm no continuing leak.
- When the car cold starts and initially fast idles, there is a rattling noise coming from the powertrain. Haven’t spent a ton of time chasing this, but it does clear up once the car is warm. Previously while it was on a lift during the oil leak fix, I thought I heard it coming from inside the primary CAT. Could have just been something else, but I wonder if the CAT is failing and rattling until it gets hot. This is already a replacement CAT from about 5 years ago where the old exhaust split at the CAT welds and replaced with a used part that came of an R53 with 60K miles. Need to monitor.
- Old car issues creeping in….
Date: January 4, 2023
Mileage: 163,394
Performed by: Stefano
Services Performed: Stefano dealing with a few issues:
- Replaced the oil pressure sending unit. This was the source of the oil leak. Replaced with Mini OEM part ordered from Amazon. Was tricky to install due to the location. Cleaned off oil residue of surrounding area afterwards. Ran on lift for 10 mins and no leak visible.
- Checked oil level afterwards. Still good.
- Stefano linked his phone to the Bluetooth JVC stereo in the car. Adjusted the EQ setting to Jazz seems to make the in car audio at its best. Still needs the rear speakers replaced.
Date: December 22, 2022
Mileage: 163,385
Performed by: Stefano
Services Performed: Stefano dealing with a few issues:
- Now that it was colder out, Stefano noticed that there was little to no heat in the car. Researched and learned that the heater cores are prone to clogging. Did the test (drive with HVAC off for 10 mins, then run on manual at high and should find heat comes for about 30 seconds then cools off again) and this was the case.
- Picked up replacement aftermarket heater core kit from O’Reilly’s auto parts.
- Drained coolant (saved to reuse)
- Swapped heater core. Reused seals and one clamp. Used one new clamp. Was a battle – don’t ask.
- Refilled coolant using Vacuum lift. Ran and burped. Topped with fresh Mini OEM coolant.
- Tested. LOADs of heat now. Fixed.
- Headlight Aim was wonky. Right main beam was high and right. Setup proper aiming in the shop, set for about 3″ of fall over 25 feet. Centered both beams.
- Started to troubleshoot the oil leak. Its in the vicinity of the oil filter housing, oil pressure sender, oil cooler. Was a mess, blow back all over block, suspension, wiring. Used parts clean to spray off buildups. Ran for 10 mins on ramp and couldn’t see a source. Took for a test drive, will inspect further.
- Discovered that the RF speaker was crackling. While testing that discovered that the LF speaker was barely making any sound.
- Ordered a pair of Polk Audio DB 652 6.5″ speakers, brackets and wiring harness from Crutchfield
- Removed door cards, old speakers. Drilled hole for mounting bracket, installed, tested. Working great.
- Took the time to go through settings in head unit and set balace, EQ, date, time, etc.
- While doing all that, also discovered the RR speaker is fully dead. All the car had working before was one LR and crackling RF. Going to review how hard rear speaker changes would be before ordering replacements.
- Need to order about 5 door card plastic mounting dodads. Found that 3 were crushed on the R and 1 on the left
Date: December ??, 2022
Mileage: 163,???
Performed by: Stefano
Services Performed: Stefano dealing with a few issues today:
- Drivers window won’t move much, up or down. Tries, moves fractionally, but that’s it. Even when you pull or push on the glass at the same time, won’t move. About 6 years ago replaced the window track only with an aftermarket kit and guessing its crapped out or the motor has gone this time around.
- Ordered an aftermarket Window Track and Power Window Motor assembly from Amazon [Note to future self – this part was crap and failed in July 2023].
- Replaced window track and windows motor
- Adjusted glass fit in the door opening
- Tested – all good
- Set tire pressures to spec since it was winter temps now and they were all down a bit.
- Noticing oil spots when parked. Appears to be coming from the oil filter/oil cooler area. Will need to clean the area and inspect further.
- Deep cleaned the interior. It was a mess after camping and years without detailed attention
- Vacuumed all the nooks and crannies.
- Cleaned the all the interior plastic panels with 409 and leather cleaner brush, then microfiber wipe. Worked great.
- Cleaned the leather seats, door panel leather bits and steering wheel with Chemical Guys leather cleaner and leather cleaner brush. Then conditioned the leather with Chemical Guys leather conditioner. Worked great.
- 409 washed the weather tech floor mats.
- Cleaned the interior glass
- Exterior Detailed with snow foam wash and scrub.
- Looking better now, but starting to show her age and miles in the California sun. Clear coat failures is happening more now. Hood is a mess, and tops curved edge of the rear quarters now too. Gutter rail black paint flaking. Front bumper crazed and rear bumper was tapped by someone. Roof has indents where the roof rack pads have been. She’s needing a full repair and minor repairs now I’m afraid.
Date: September 8, 2022
Mileage: 161,327
Performed by: Angus and Stefano
Replaced the cabin air filter with a Fram Fresh Breeze Cabin Filter sourced from Amazon.
Connected Autel MD803 OBDII code reader and reviewed any active codes. Nothing significant. Cleared DTCs and rescanned – no persistent codes. Even though the ‘Service Due’ indicator wasn’t showing, I wanted to reset to start the counter from now since I’ve just completed a full service round in the last couple of weeks (see notes below). Used the Autel’s Oil Service Reset function. Not really sure its reset how the counter works, but the next service wouldn’t be due until September 2023 or 166K miles (whichever comes first).
Date: September 4, 2022
Mileage: 161,324
Performed by: Angus and Stefano
Services Performed: Interior Detailing today:
- Deep vacuum of vents, seats and carpets
- Remove and pressure wash the WeatherTech floor mats
- Washed the door cards and dash surfaces with toothbrush and 409. Wet microfiber and dried after.
- Detailed the door cards, center console, steering wheel, pedal assembly and dash. Toothbrush, 409, wet microfiber, vacuum, whatever it took to bring back to excellent condition.
- Cleaned the windows inside and out
Looking as nice inside now as the outside.
Noted the stitching is separated on drivers seat bolster (common issue due to location and sun). Leather could probably do with a proper leather cleaner and treatment (for modern cars).
Date: September 3, 2022
Mileage: 161,321
Performed by: Angus and Stefano
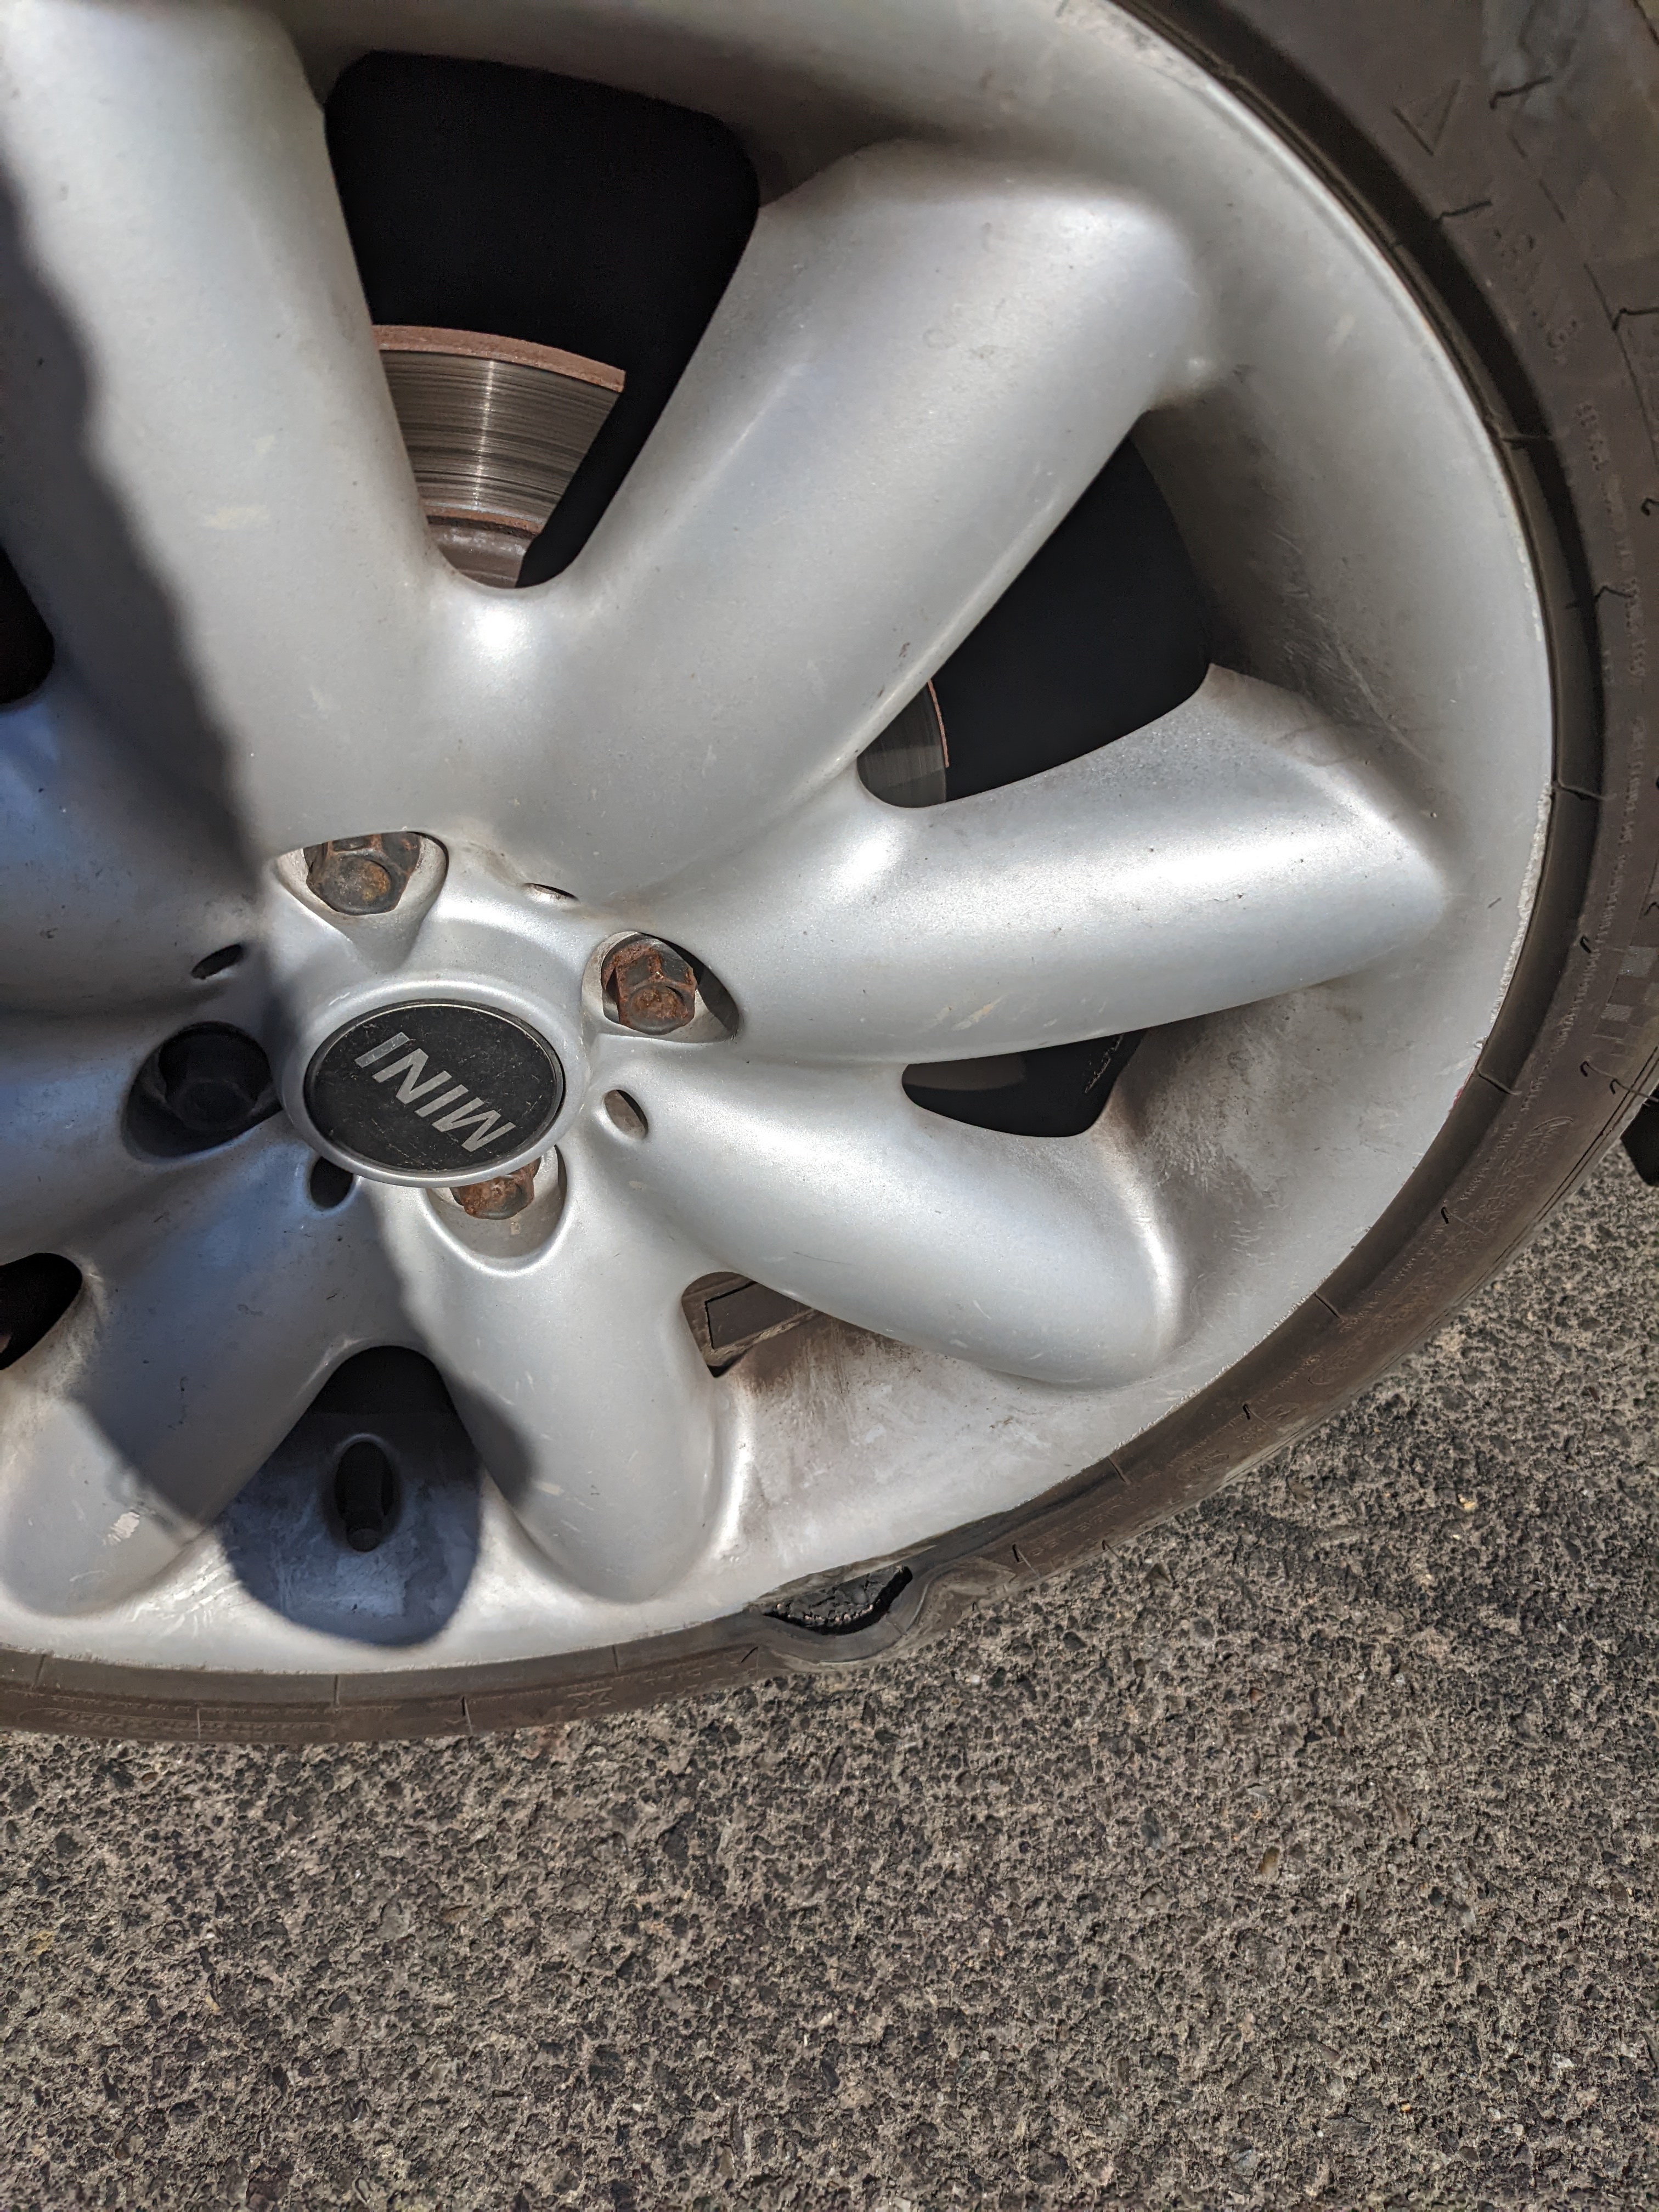
Services Performed: Exterior detail and cleanup today. Started with snow foam, hand and pressure washed. Wheel arches, inner door sills and rear hatch opening given a solid cleanup. Observed that the clear coat on the hood and front bumper are starting to blister and peel from the harsh California sun. Racing stripes on the hood are also cracking from the sun (these were already replaced once when the car was new to Angus – BMW’s design isn’t great for the sun). New rims seem to be a perfect color match for the original rims.
Observed that the drivers door window regulator is acting all sorts of funny. Seems to be slipping, etc. The motor seems to run strong, but wondering if this component is failing again. Replaced once already about 6 years ago. Will investigate further.
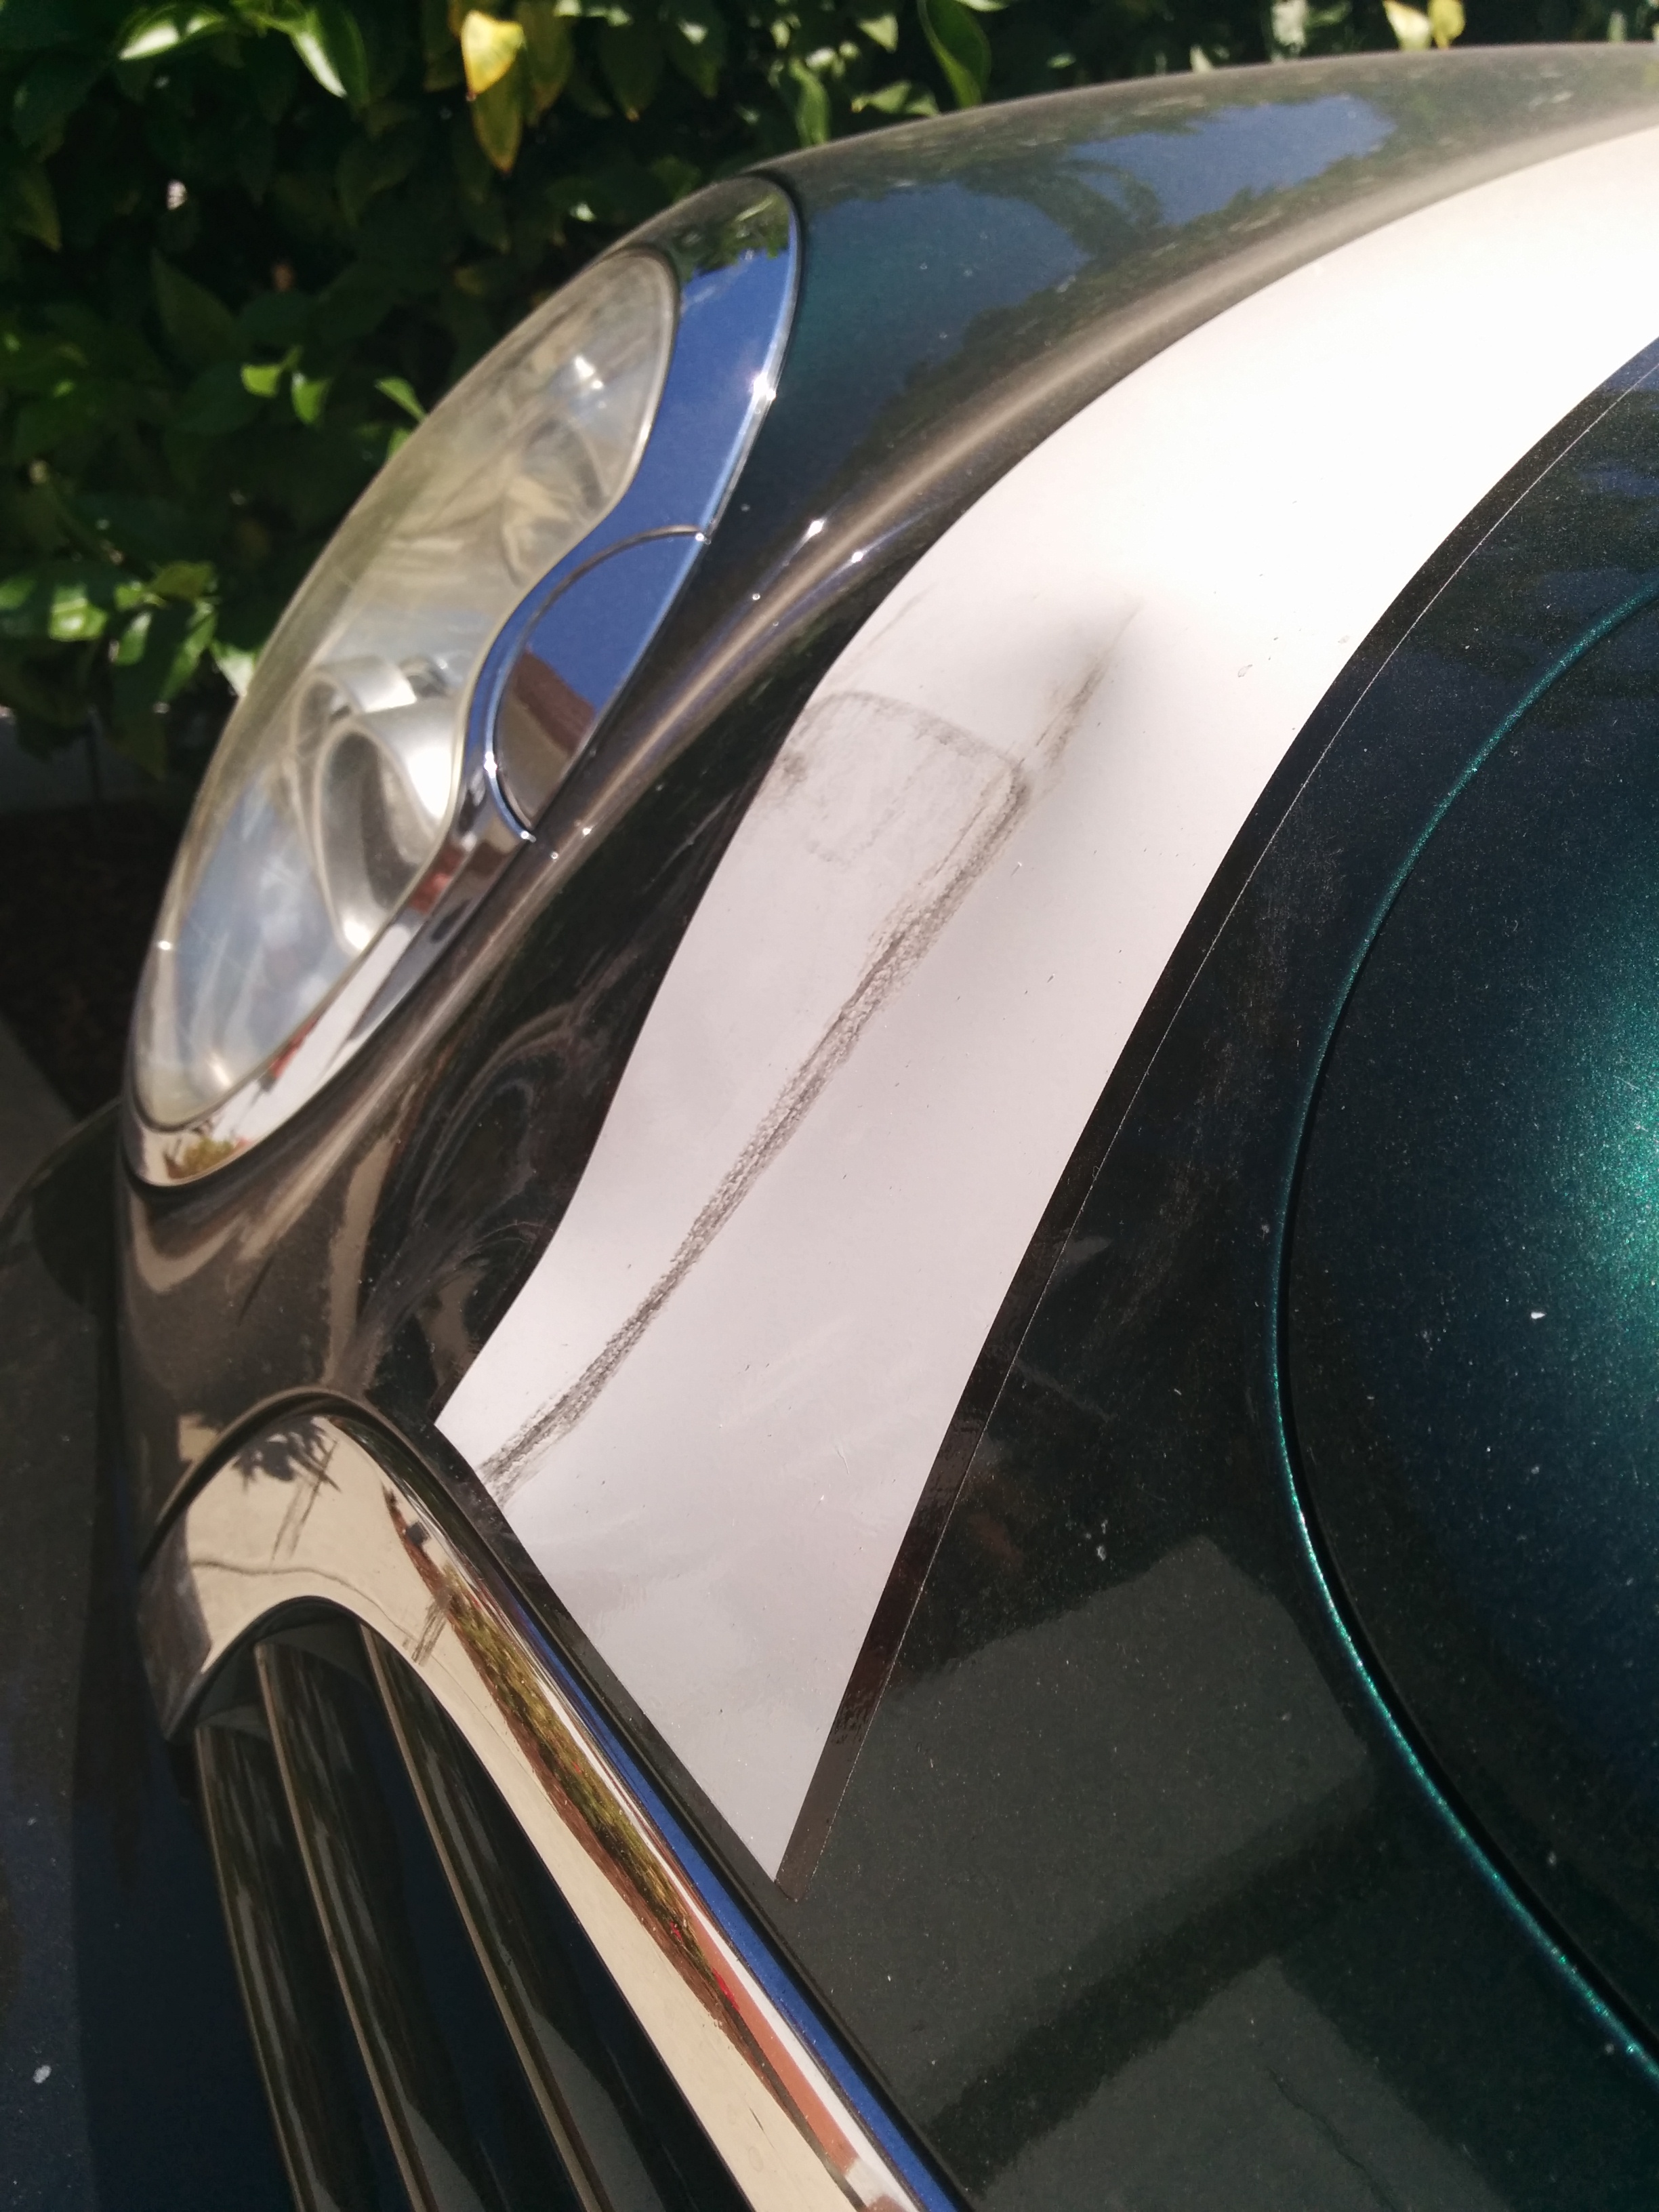
Replaced the tow truck damaged parts on the front bumper – the front bumper lower center plastic spoiler and the center structure right behind it (two pieces total). Removed the entire front bumper, removed the ripped up damaged bits, fitted them, and refitted the entire bumper again (F’ing tow truck driver – argh). Cleaned the new lower plastic with Alcohol solution, then ceramic coated them with same Armor Ceramic solution used when the whole car was done in June 2020 (keeps the plastic looking nice and black). Back to looking great again!

Date: September 1, 2022
Mileage: 161,318
Performed by: Stefano
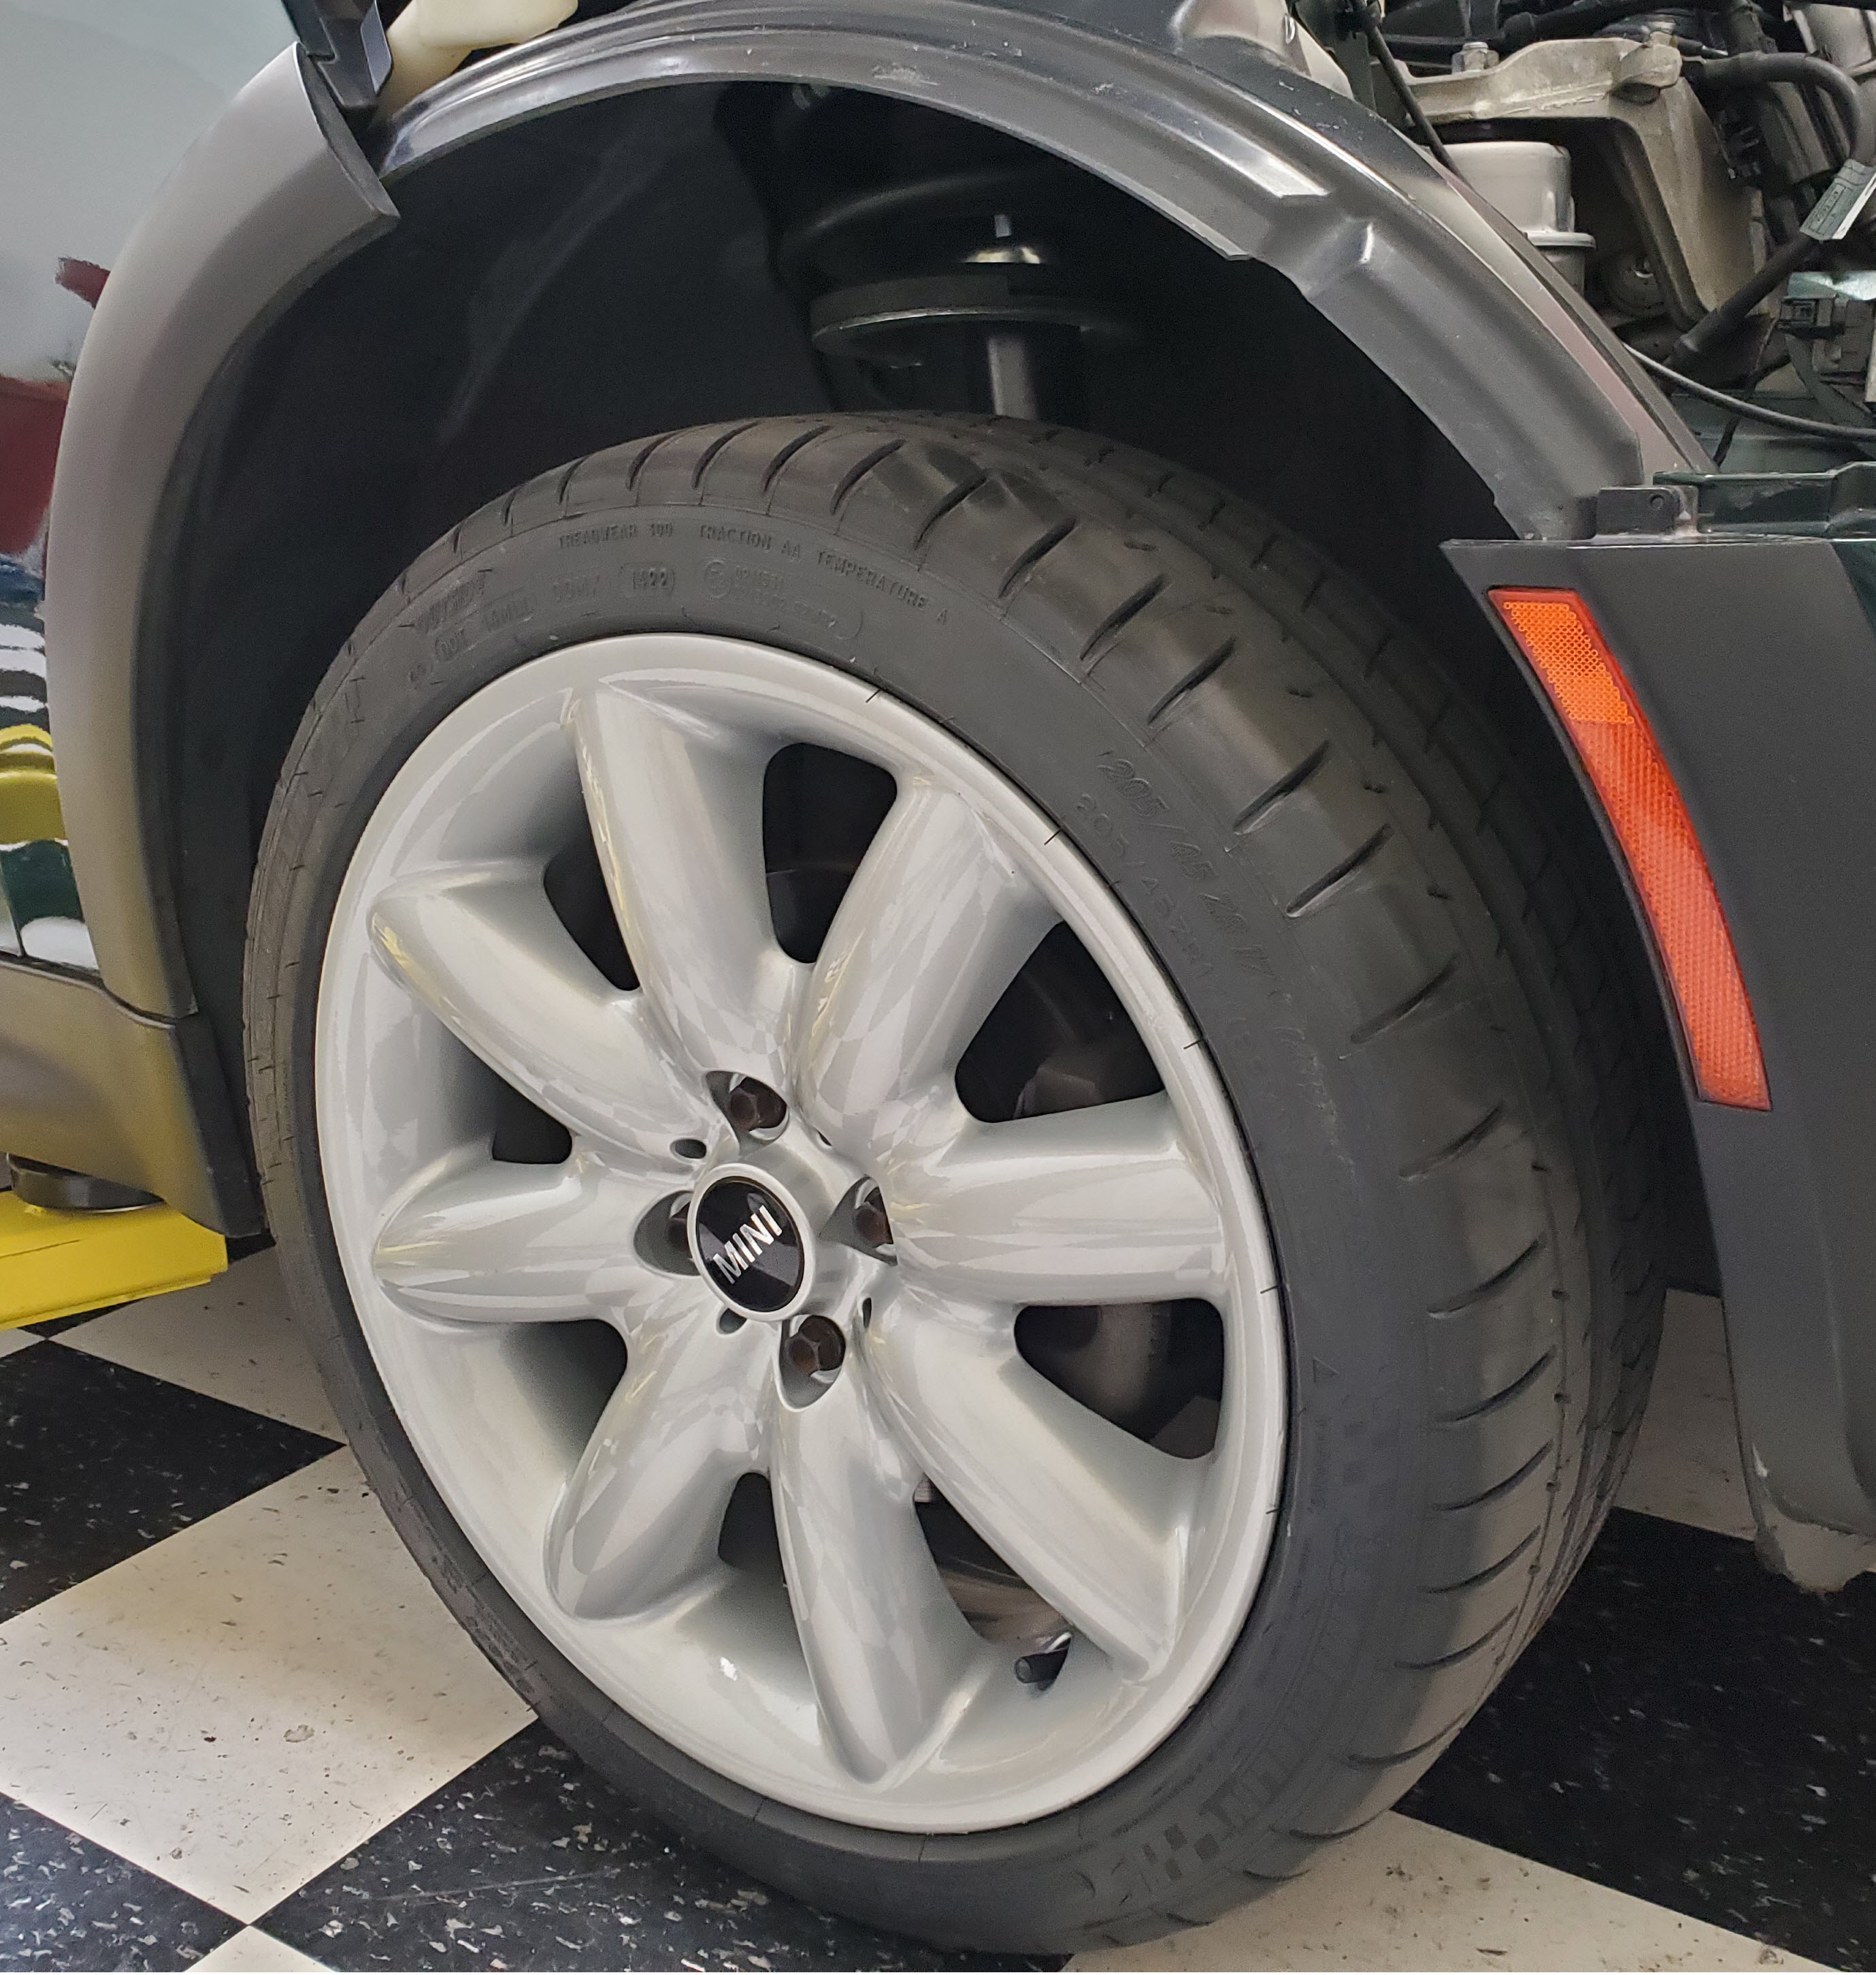
Services Performed: Replaced the two scuffed and potentially pot hole damaged original Mini-lite rims with two newly refurbished identical rims (purchased from eBay). Purchased a new pair of Michelin Pilot Super Sport tires from Tirerack.com to match the damaged ones (that were fitted back in June 2020. Had the local Les Schwab tire center mount and balance the tires and rims. Installed the new rims/tires to the front. Moved the undamaged original left side rims and tires to be the back set. Storing the removed original rims for posterity. Set the front and rear tire pressures to 38 p.s.i. Reset the TPMS sensing system to be calibrated with the new tires and rims. Looking great again with four perfect rims and tires.
Date: August 28, 2022
Mileage: 161,315
Performed by: Stefano
Services Performed: Performed an annual service. This included:
- Changing the engine oil. Replaced with Castrol Edge 5W-30 Synthetic.
- Changed the engine oil filter. Replaced with Mini OEM filter purchased from Mini Mania.
- Replaced the oil drain plug with new Mini OEM drain plug purchased from Mini Mania.
- Removed, cleaned, dried and re-oiled the K&N Engine Air Filter
- Inspected and topped off the Brake Fluid with Motul RBF600.
- Inspected and topped off the engine coolant with BMW OEM Coolant.
- Inspected and topped off the washer fluid with plain water
- Inspected the front and rear suspension.
- Inspected the engine for leaks. Noted a wet area below the engine oil cooler (half shaft and surrounding area), and could see a drip ready to fall off the fins of the oil cooler. Since the gasket was already changed back when the engine was out in July 2018, I think the issue is with the cooler itself and may need replaced. Will monitor. Cleaned the oil from the half shaft and surrounding area.
- Inspected the exhaust system – all good.
- Inspected the brake system. No leaks. Plenty of meat left on the front and rear pads. Rotor wear is normal.
- Pressure washed the engine compartment to get rid of all the dust accumulated from the camp roads in the Sierras. Protected the ECU and Fuse Box while doing this.
- Vacuumed the back trunk/boot area.
- Cleaned the left and right door sill areas.

Date: August 27, 2022
Mileage: 161,312
Performed by: Stefano
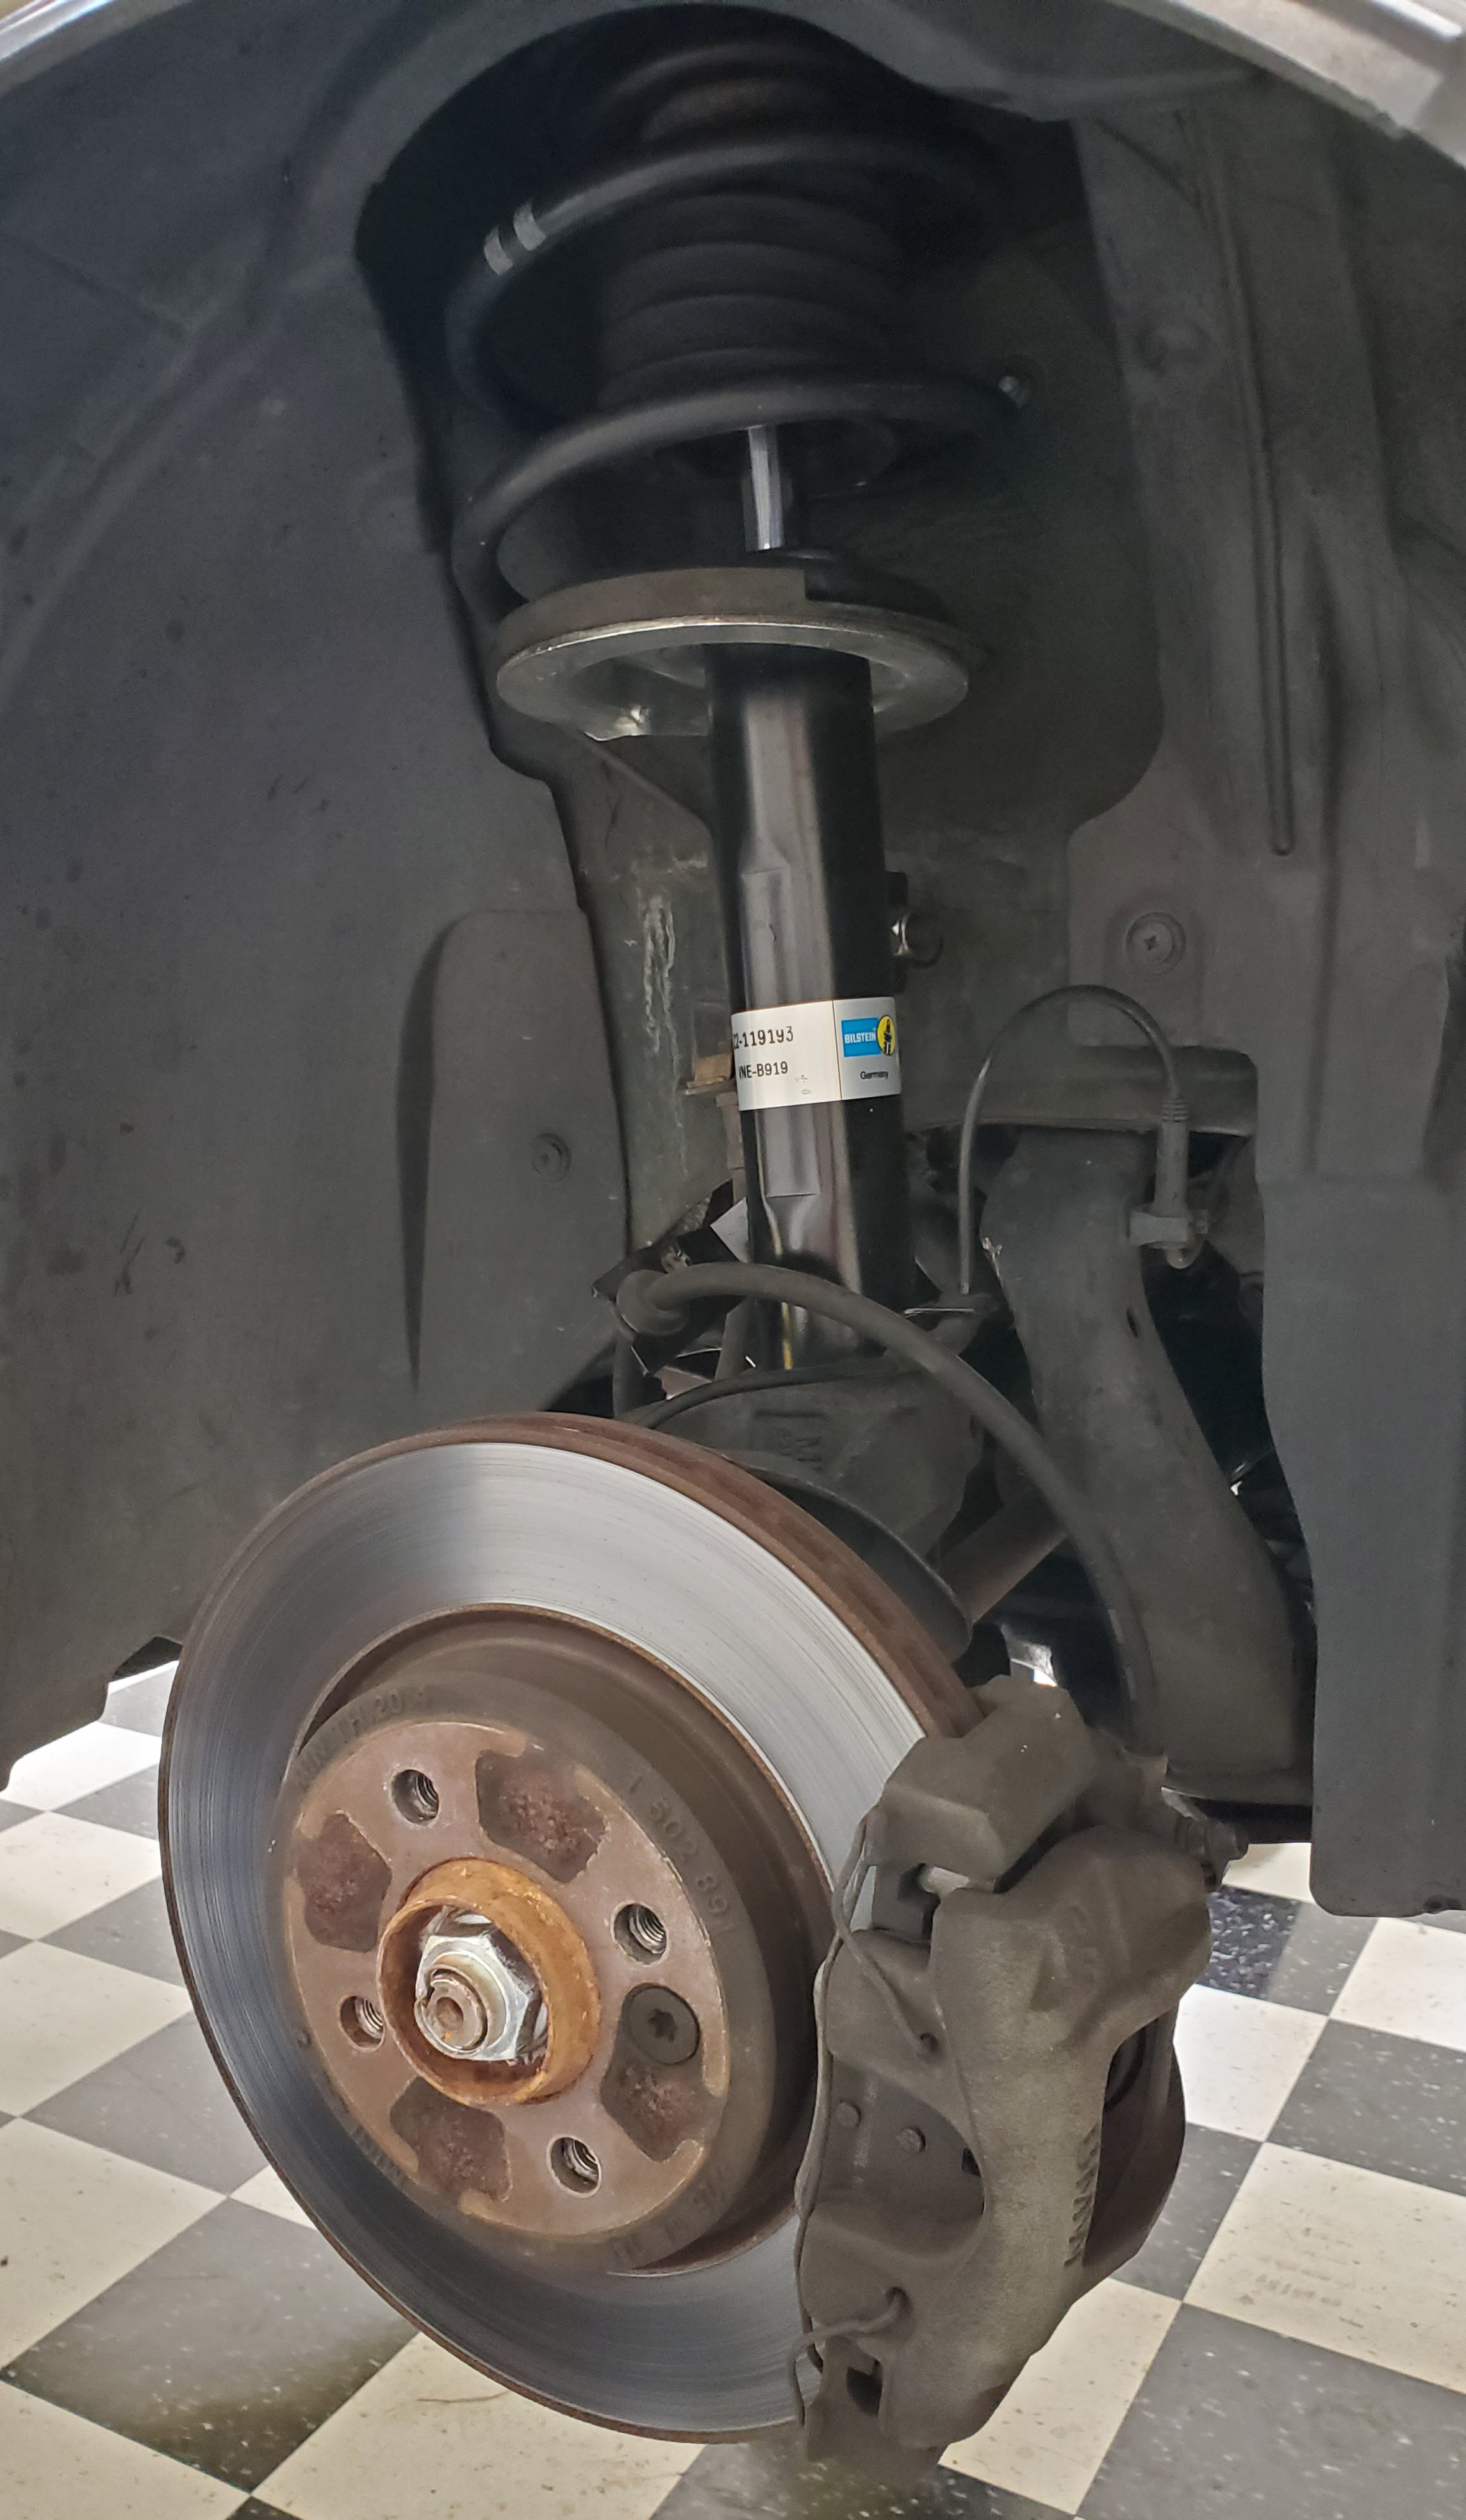
Services Performed: Repaired the suspension damage from the pot hole incident. Including:
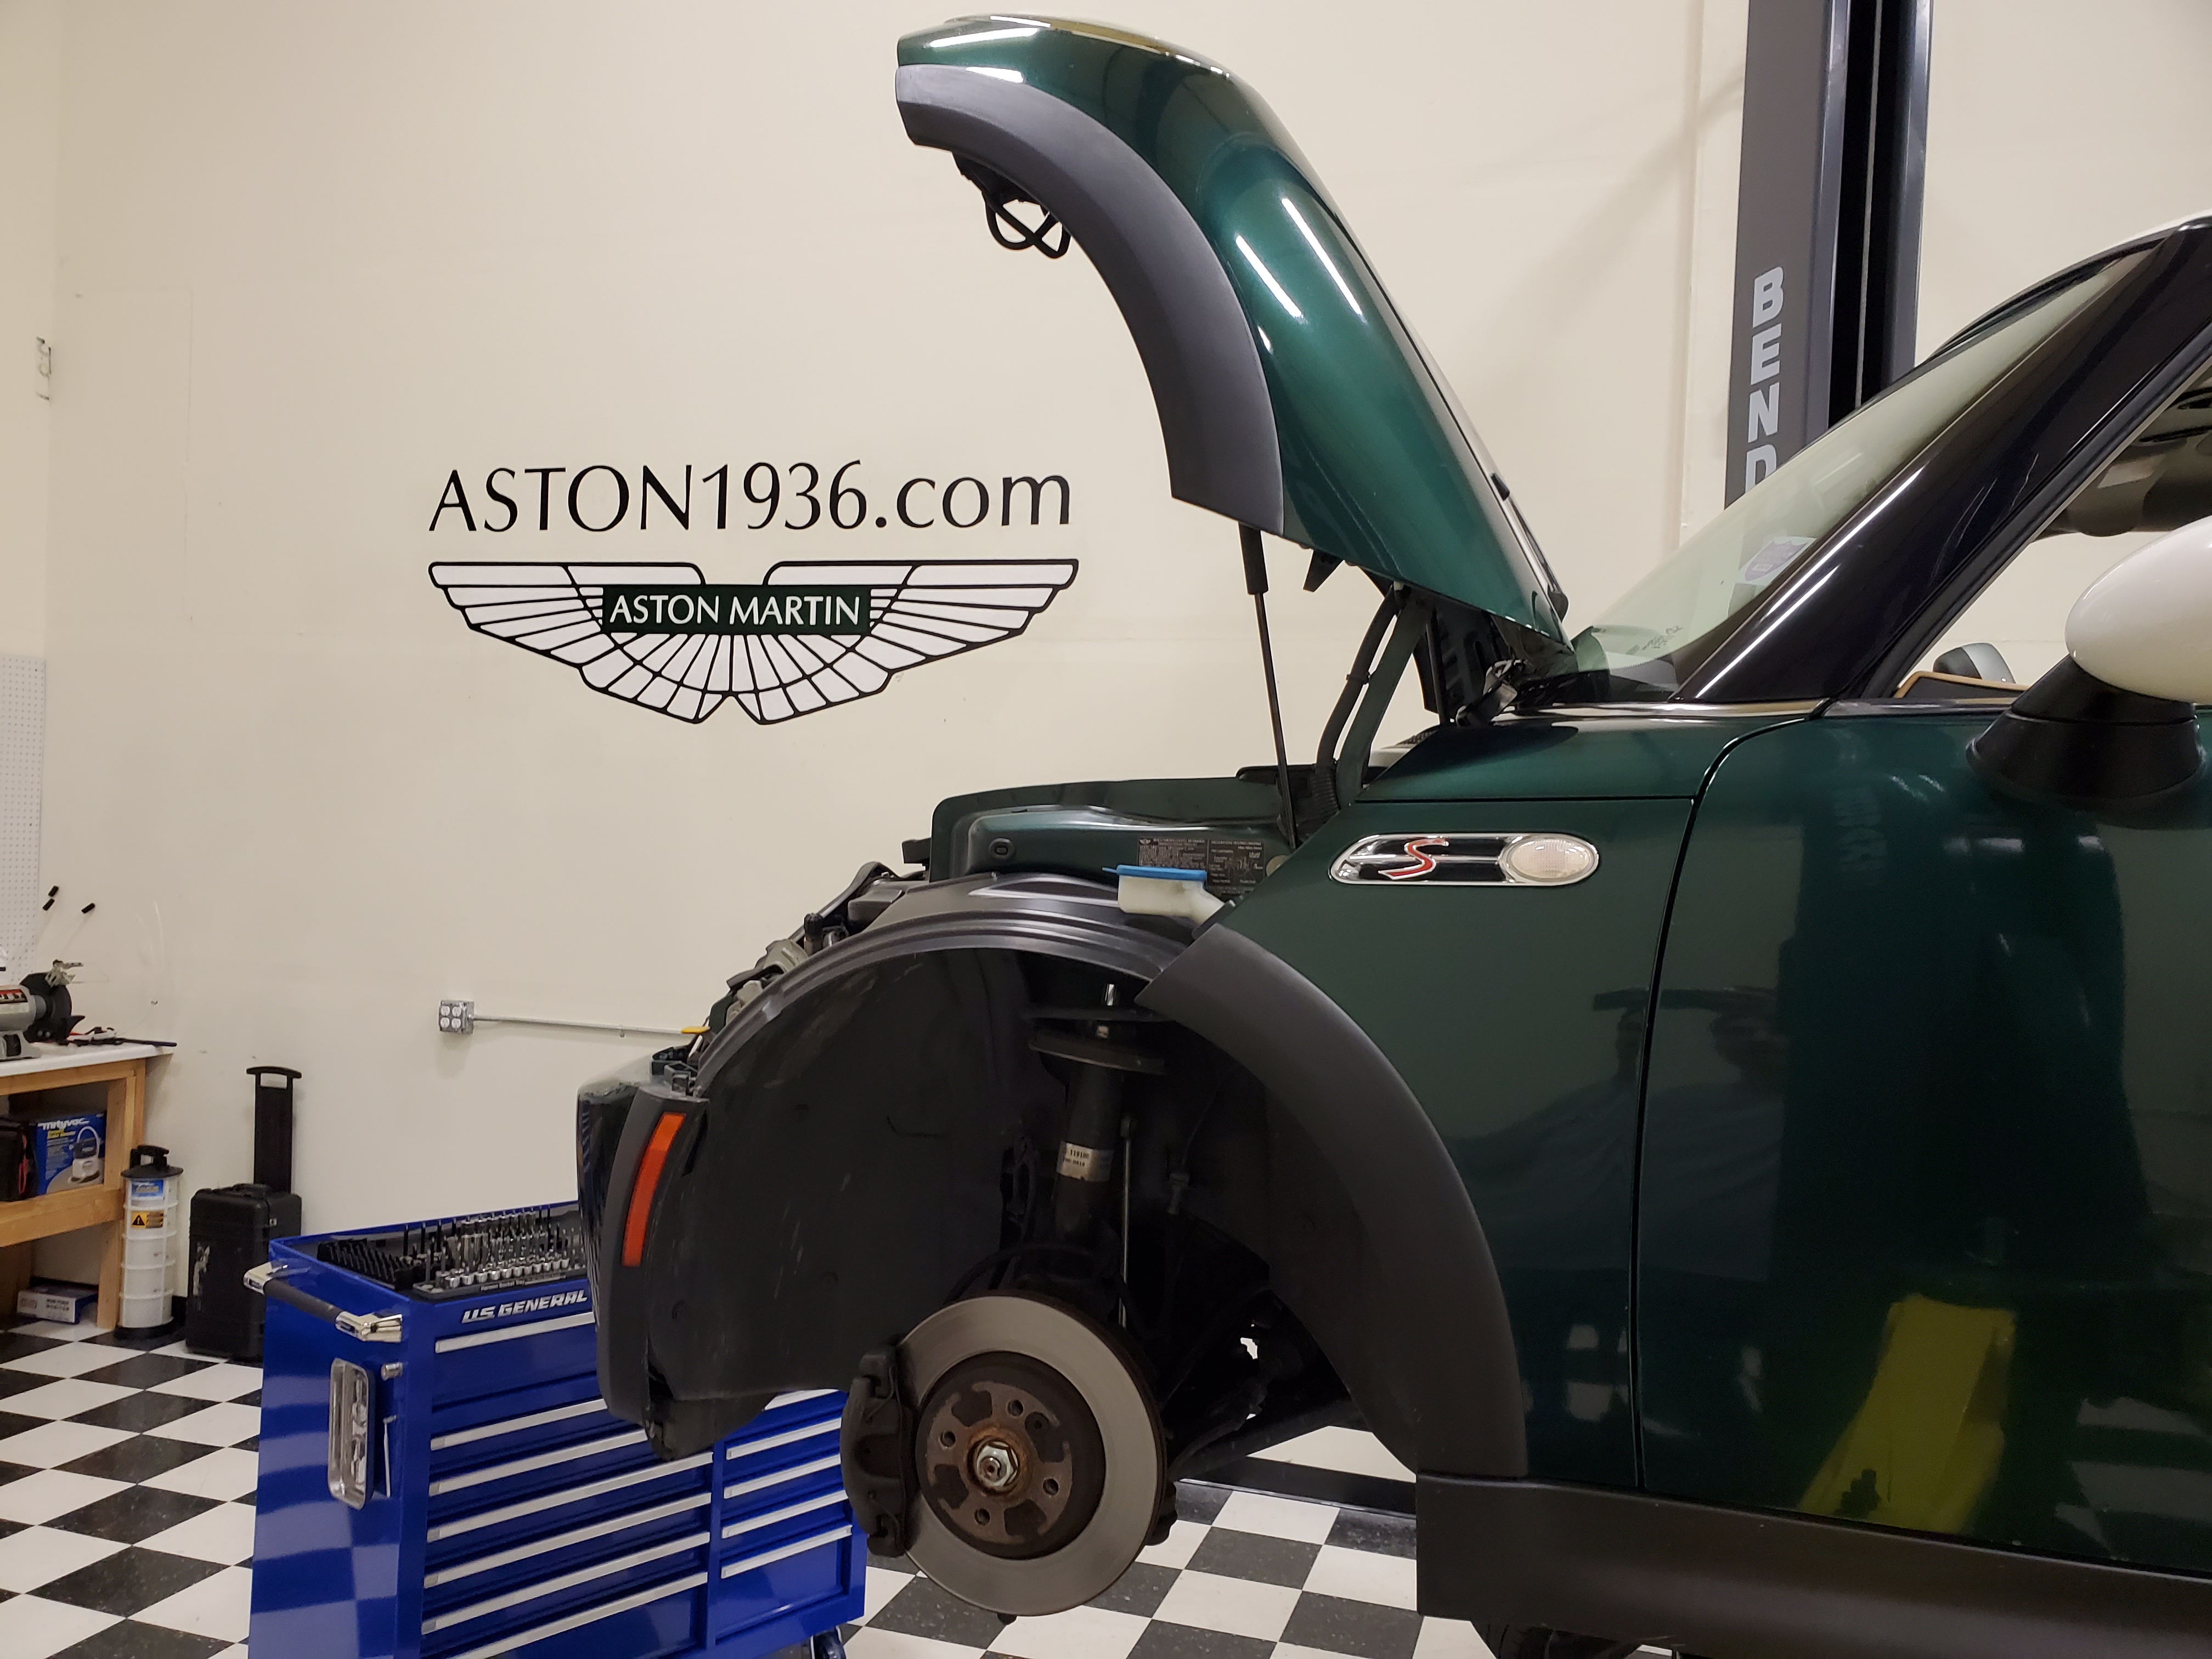
- Replaced the RF Strut assembly with new identical unit sourced from Mini Mania
- Replaced the RF Strut top bearing assembly with MINI OEM item sourced from Neillo Mini in Sacramento.
- Installed a Craven Speed Strut Top Mount strengthening plate kit sourced from Mini Mania.
- Road tested (still on damaged rims and tires). Drives straight again, no noises, handles well. I think we got lucky and that is the extent of the suspension damage.

Date: August 17, 2022
Mileage: 161,309
Performed by: Stefano
Services Performed: Performed a careful inspection of the pot-hole impact damage. More damage was found:
- Right Front wheel was clearly cambered in at the top. Something was broken.
- Discovered the RF strut tube was physically bent at where it is clamped into the wheel hub assembly.
- Inspected the upper strut tower for mushrooming. None found.
- Removed the damaged strut and top bearing assembly. The bearing top plate was bowed.
- The inner face of the new RF tire was chaffed from rubbing against the strut tower (due to the camber it was in contact). Rubber debris can be seen stuck to the inner fender liner.
- The RF rim was severely road rashed. Not sure if this was pre-existing or from the pot hole impact.
- Front bumper assembly damage caused by the tow truck was found to be more extensive.
- Front spoiler mounts had been pulled apart from the sub structure. Should be able to be remounted.
- Front spoiler sub structure was damaged where clips had pulled through.
- Front spoiler uprights pulled apart from the center section and mounts.
- Wheel arch liners pulled away from where they meet the front bumper.
- Recommend purchasing new front spoiler center section, sub structure and mounting hardware. Then removed front bumper assembly entirely, replace parts, and then refit all the pieces together again to make it well again.
Recommend purchasing a new Bosch RF Strut and top bearing assembly. Also replace the two right side rims and Velozza tires. Also consider adding aftermarket upper strut tower strengthening plates. After all refitted recommend a four wheel alignment.


Date: August 15, 2022
Mileage: 161,113
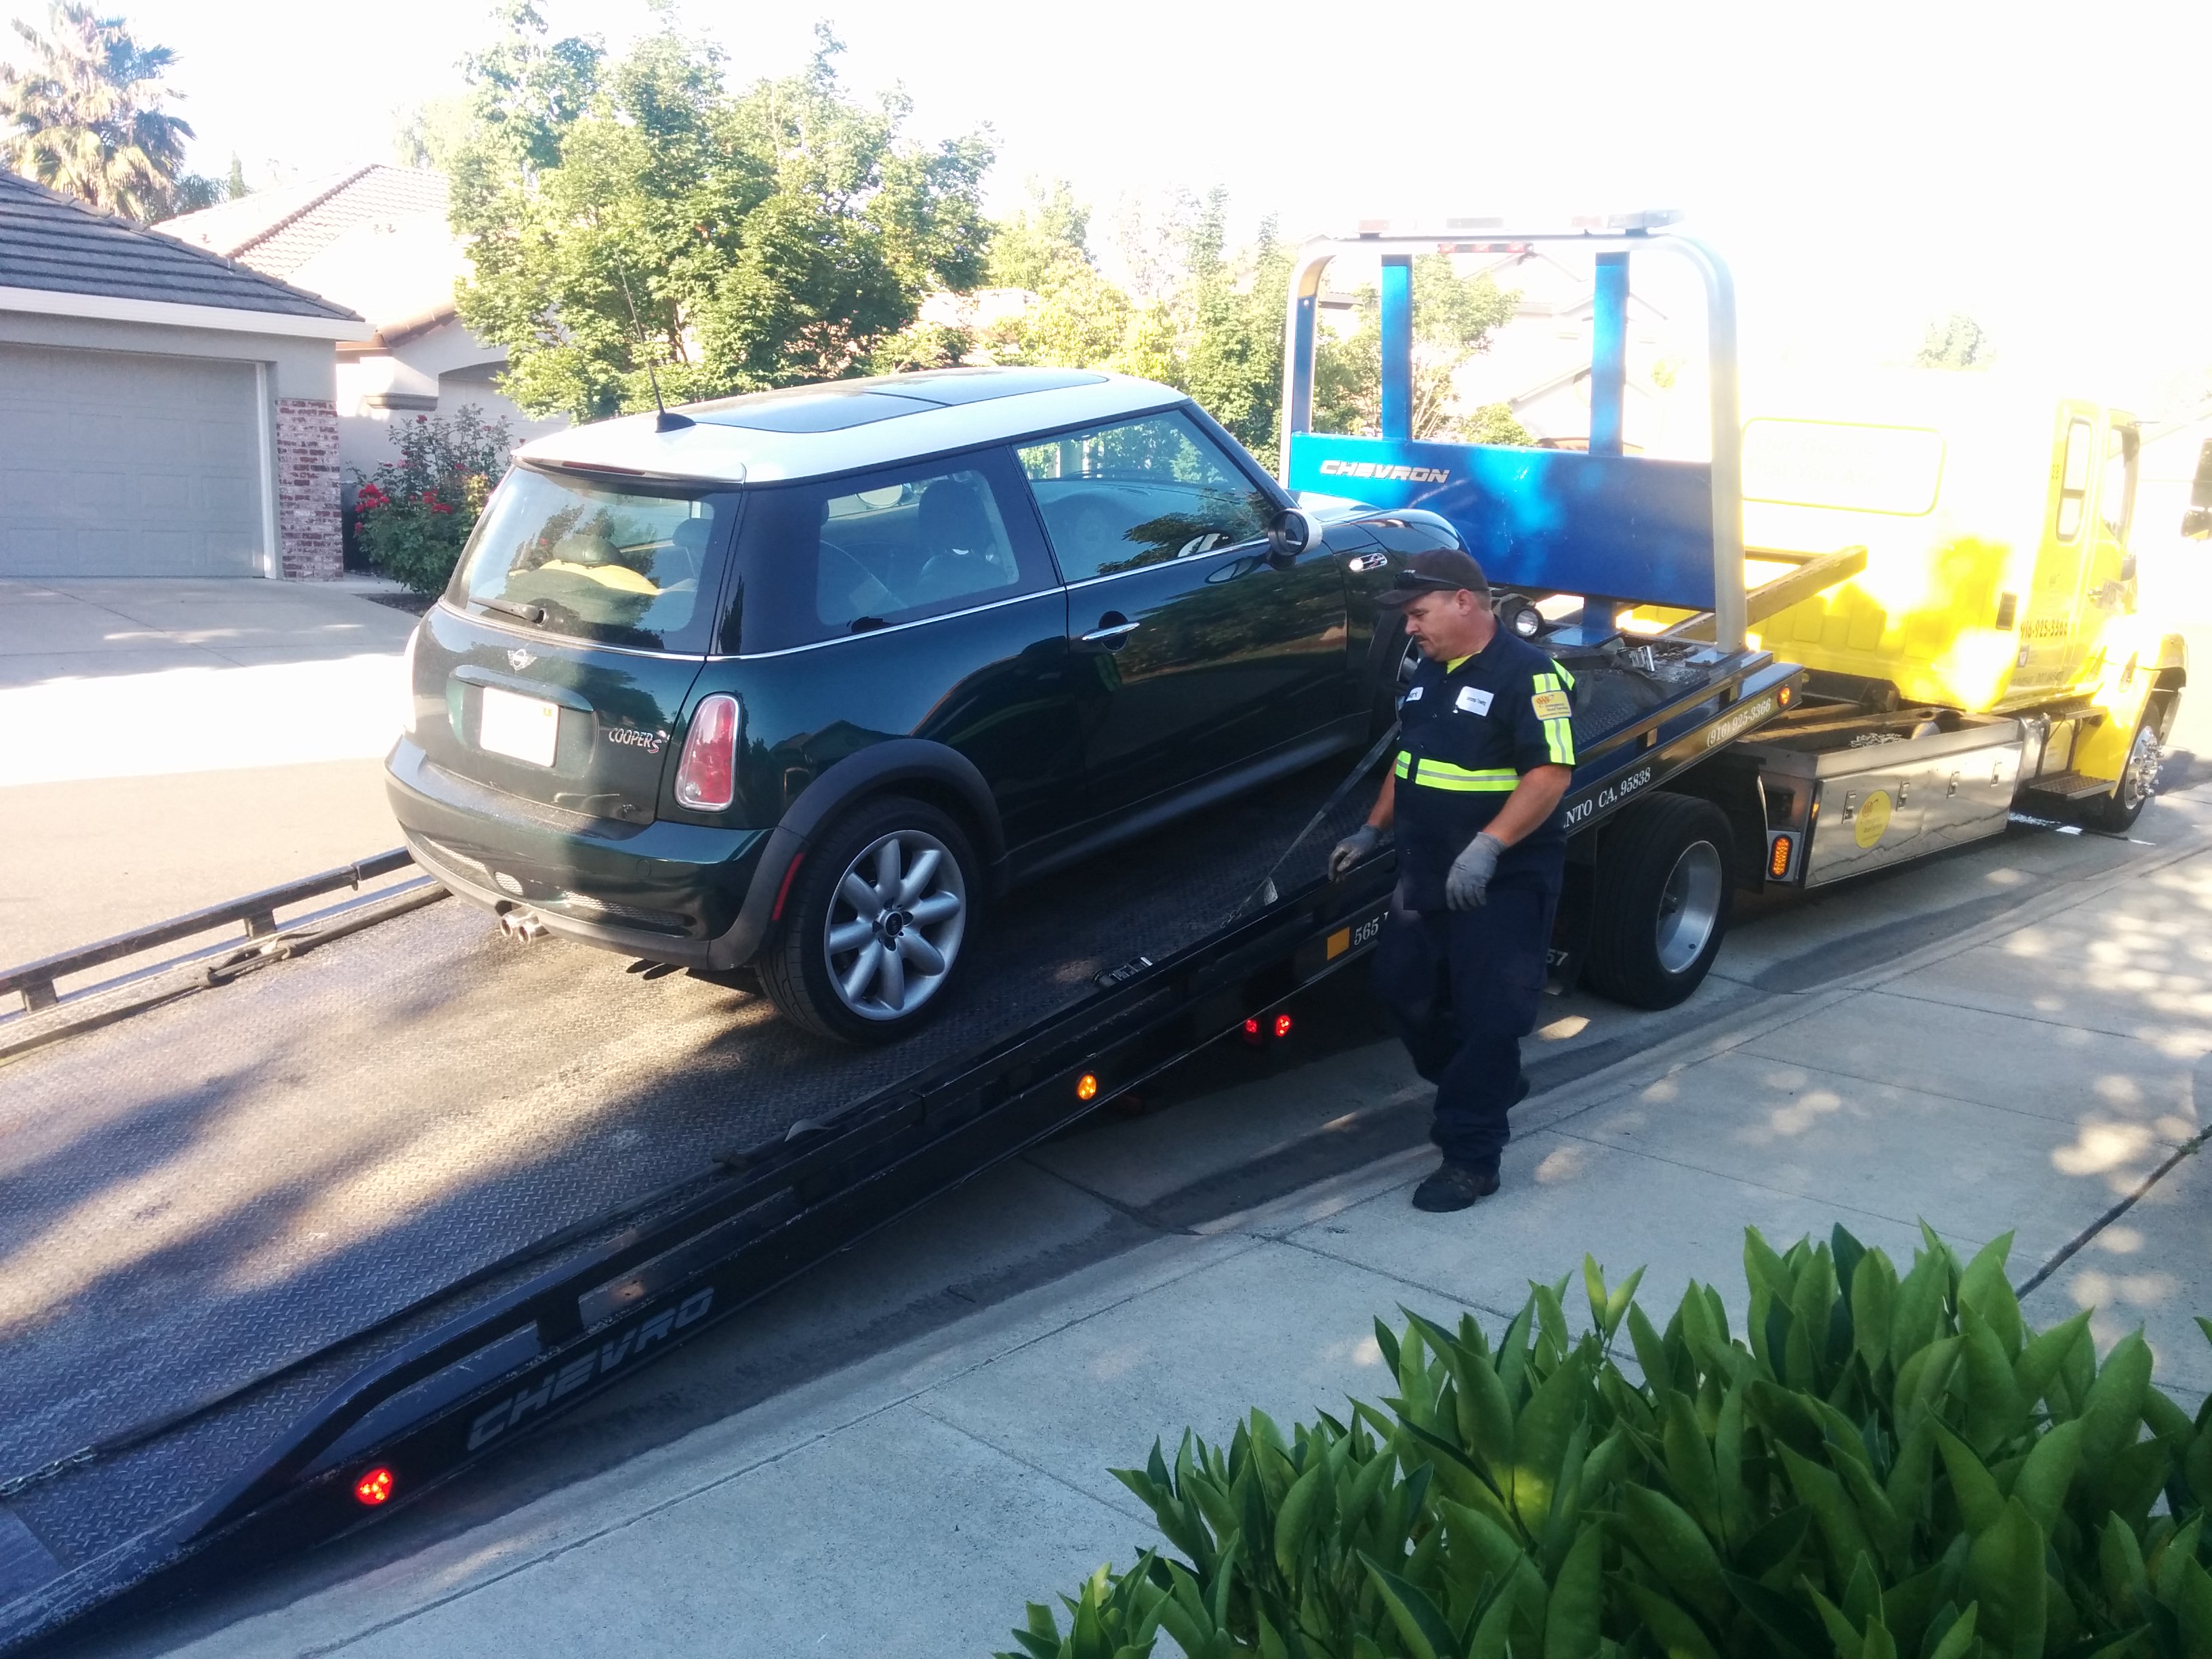
Performed by: Les Schwab Tire Service in Los Banos, California
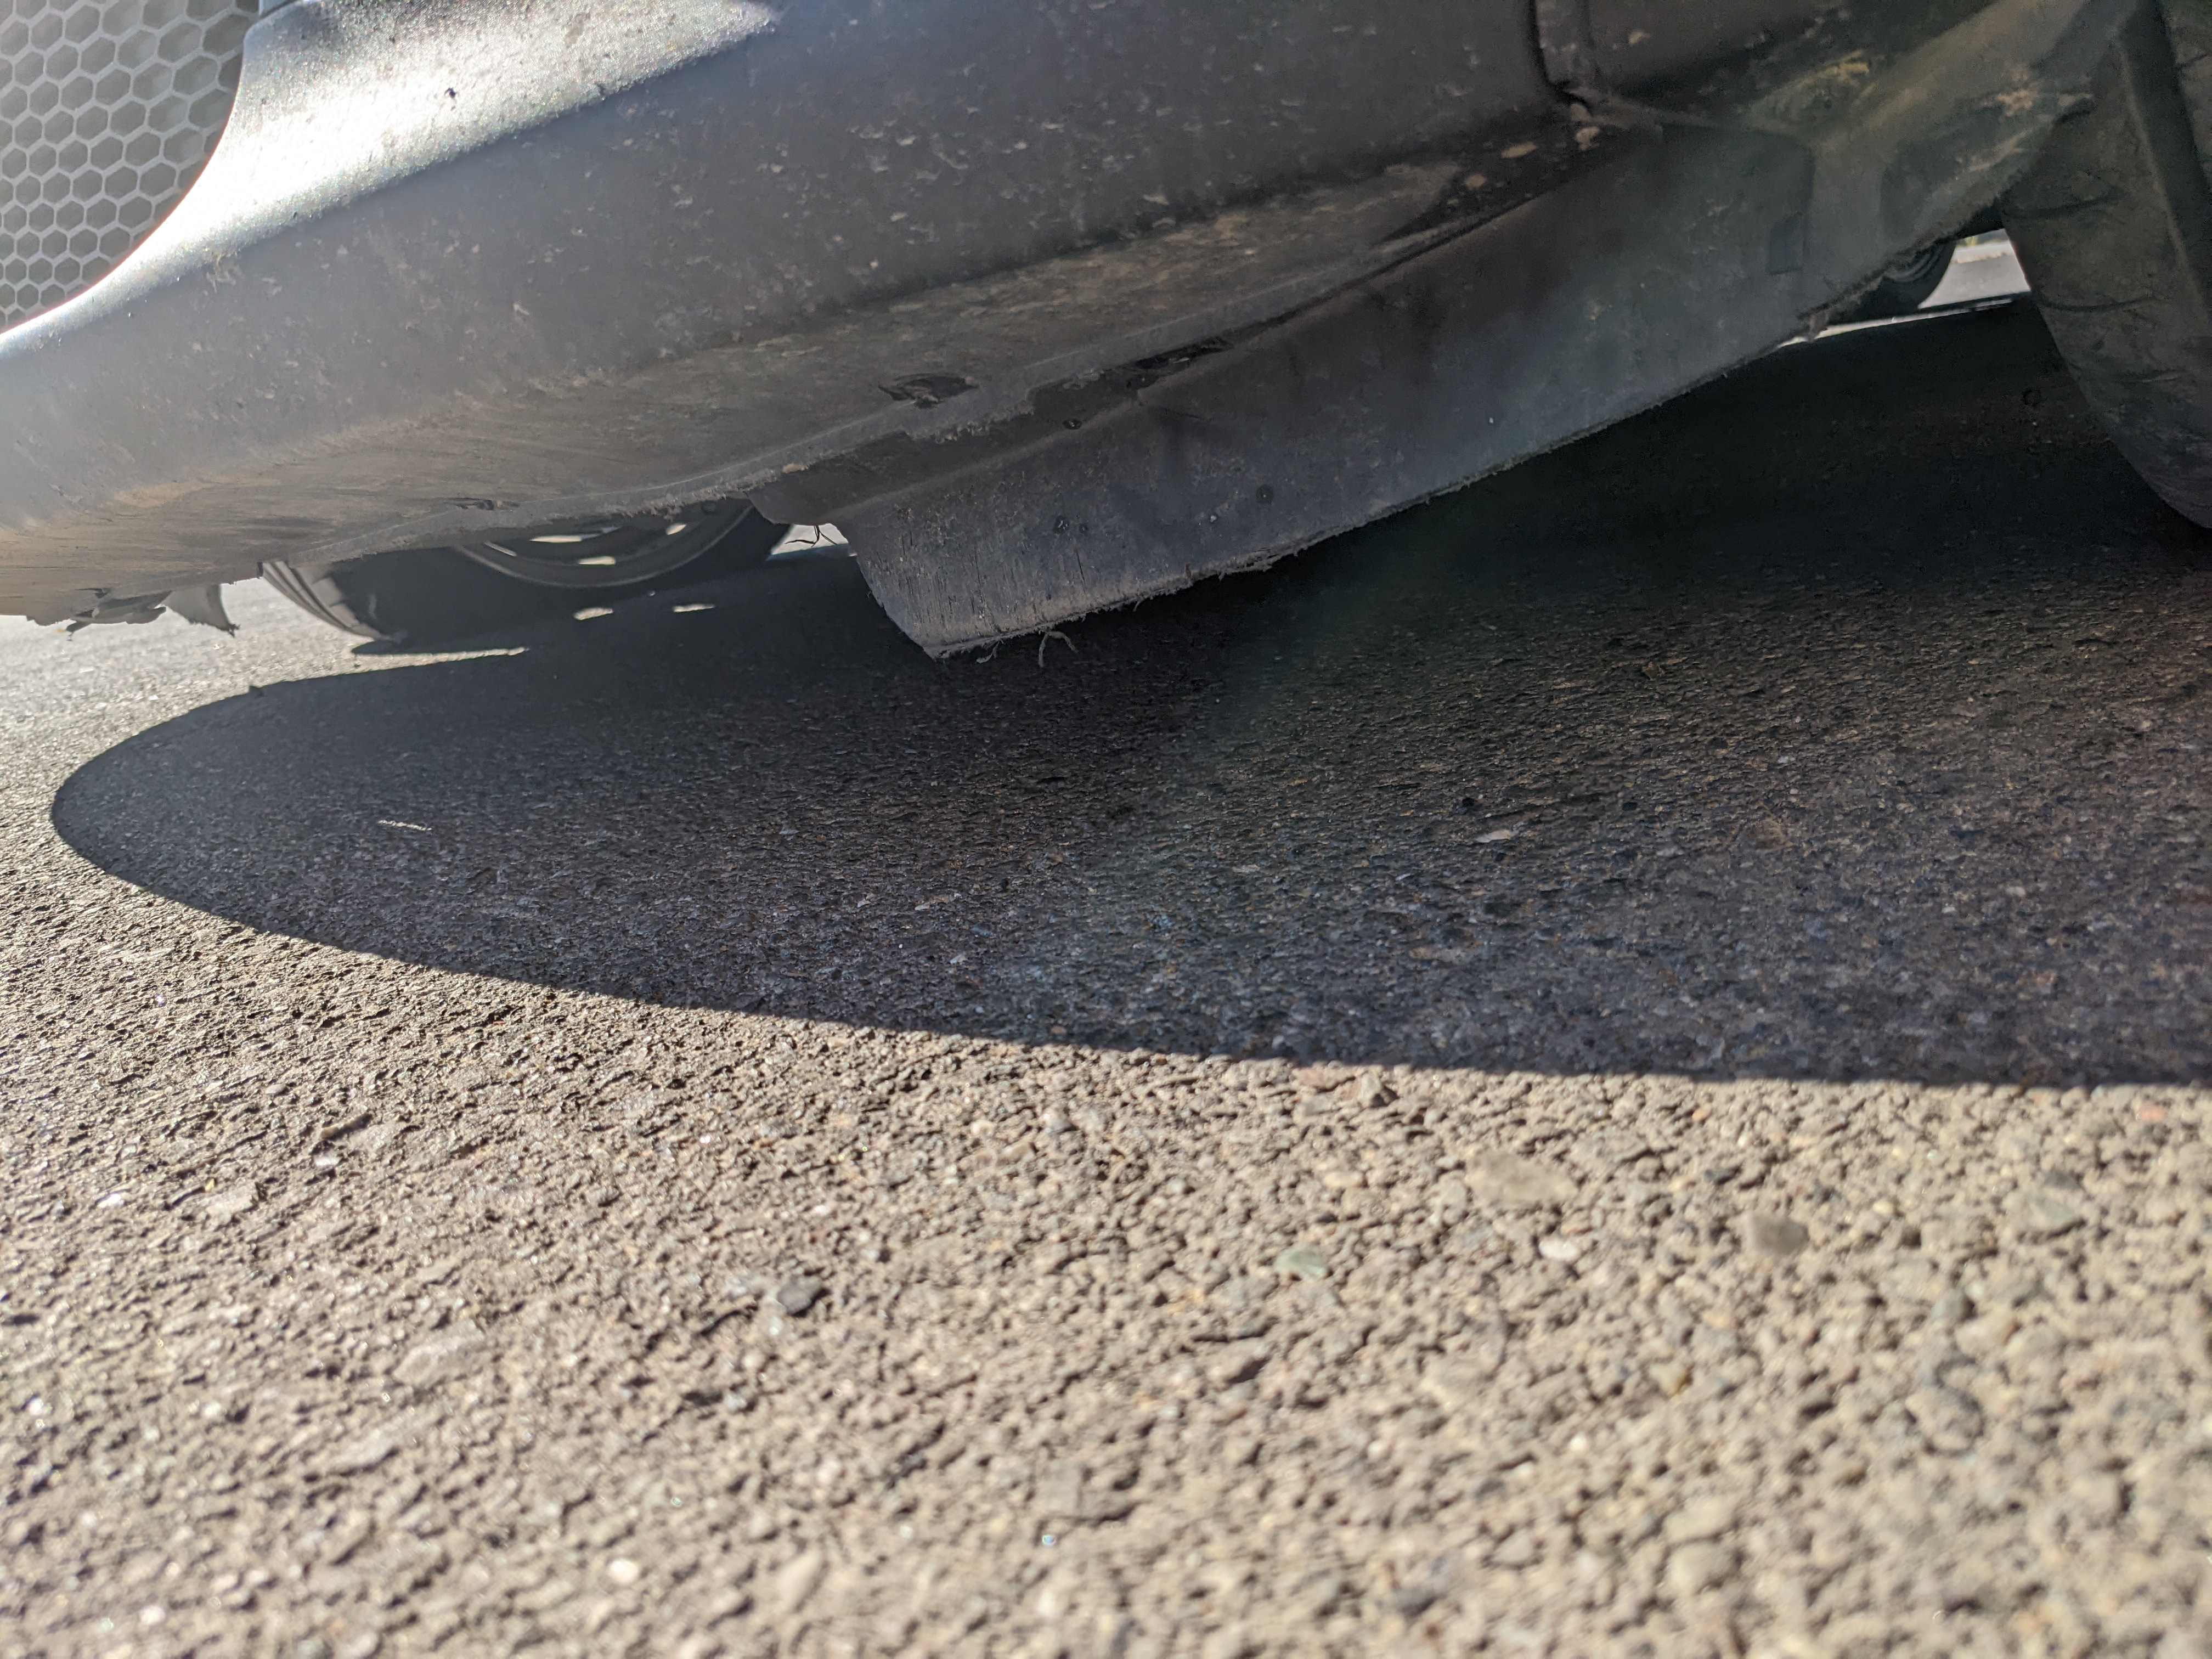
Services Performed: Tough day for the Mini today. Owner states hit a massive pot hole on secondary road West of Fresno, CA, and blew out the right from tire and damaged the right rear tire. Stranded roadside. AAA flat decked the car 45 mins to Les Schwab tire service in Los Banos, CA. Replaced the damaged right side tires only at Stefano’s request with the least expensive options in stock so Owner can limp the car home. They fitted house brand Velozza ZXV4 205/45R-17XL 88W tires to replace the damaged Michelin Pilot Super Sports. Once back to Stefano’s we’ll replace these with new Michelin’s and inspect the rims and suspension, etc. Stefano will fix. The AAA tow truck drive also damaged the front under tray wind deflector tearing a portion of it. Here are pictures of the various bits of damage from the scene.


Date: 2021
Mileage:
Performed by: Marco Polo BMW Service in La Jolla, California (San Diego area)
Services Performed: Annual Oil Change/Mini Service. Covid times, hardly any miles on the vehicle since last service. Marco Polo BMW performed:
- A basic oil/filter change service.
- Flushed the brake fluid
- Replaced an O2 sensor they said was triggering a code. I don’t know if this was the upstream or the downstream. The downstream had already been replaced by Stefano in the July 2018 major service.
Date: December 14, 2020
Mileage:
Performed by: AAA Mobile Battery Service
Services Performed: The Battery has given up. Isn’t lasting 2 weeks without getting boosted to start the car. Left Angus stranded today, and a boost wasn’t enough. Voltage measured as 1V, must be failed internally. AAA mobile battery service came to Angus’s apartment in San Diego and swapped the battery in the field. All good to go now with a 6 year AAA replacement warranty.
Date: September 8, 2020
Mileage: 158,479
Performed by: Stefano
Services Performed: Right rear brake light out, replaced bulb. Checked tire pressures (38/38 F/R). Cleaned windows. Topped fluids (washer, oil). Vacuumed interior. Note: A small amount of ‘whining/whirring’ can be heard from the interior blower fan on lower speeds. More than when the car was younger. Replacing the blower motor on an R53 mini is insanely difficult, requires entire dash system as a whole to be removed (not just some panels).

Date: July 29, 2020
Mileage:
Performed by: Stefano
Services Performed: Front End Accident Repair. Involved in freeway stop & roll accident, tagged the back of a Porsche 911 (the Mini won). Damaged license plate frame, cracked paint on bumper cover, bent impact beam which slightly bent A/C radiator (still works) and pushed it into main radiator (still works). Cracked plastic frame that holds radiator to car (servicable). Purchased a used bumper beam from auto recycler (Volvo, Saab, BMW, Mini Recycling in Rancho Cordova). Purchased new license plate mount. Reassembled. All the shunt lines are still good as new. Beam did its job. Only residual sign of damage is the cracked paint on bumper cover (minor) and bends in radiators. All fine for now.
Date: June 13, 2020
Mileage:
Performed by: Stefano
Services Performed: Annual Service which included:
- Oil and Filter Service (Castrol Edge 5W-30)
- Front Brakes nearly worn out – replaced w/Wagner Thermoquiet
- Running light out – replaced
- RF headlight out – replaced both Headlight bulbs with Philips Crystal Vision H7 Halogen
- Screw in sidewall of RR tire plus they were 25% life left – replaced all four tires (Tire Rack 205/45ZR-17 MICHELIN PILOT SUPER SPORT XL). Mount and balanced (Les Schwab). Super cleaned rims inside and out (Stefano). Set tire pressures to 38 psi all around.
- Boot lid gas struts unable to keep hatch up properly – replaced with OEM new (ECS Tuning)
- Interior clean. Vacuum, wipe down, windows.
- Snow foamed, washed, Clay barred and polished finish. Ceramic coated paint and plastics

Date: December 1, 2019
Mileage: 150,972
Performed by: Horizon Smog
Services Performed: Star Smog Test performed. Passed.
Date: July 26, 2019
Mileage:
Performed by: Award Interiors
Services Performed: Sagging interior headliner replaced.
Date: July 19, 2019
Mileage: 148,476
Performed by: Neillo Mini
Services Performed: Four wheel alignment performed. Rear suspension bolts upgraded to allow for adjustment (later model upgrade).
Date: July 16, 2019
Mileage: 148,529
Performed by: Stefano
Services Performed: Annual Service Performed including:
- Oil and Filter Service (5W-30 Castrol Edge and OEM filter)
- Replaced Left Front Marker Bulb.
- Replaced Left and Right Engine Mounts.
- Right Rear jacking point block missing. Replaced with OEM (Mini Mania)
- Rear brake pads down to wear marker. Replaced (OEM – Mini Mania) including rear wear sensor and cable.
- Reverse lights both not working. Diagnosed as failed reverse light switch on transmission. Replaced with OEM (Mini Mania).
- Rear bumper clear coat failing. Removed bumper and had repaired and repainted at Natomas Auto Body.
- Front Super Charger Inlet clear coat failing. Removed and had repainted at Natomas Auto Body.
- Waxed new painted parts.
- Added Paint Protection Film (PPF) to rear bumper hatch opening (3M from InvisibleMask.com).

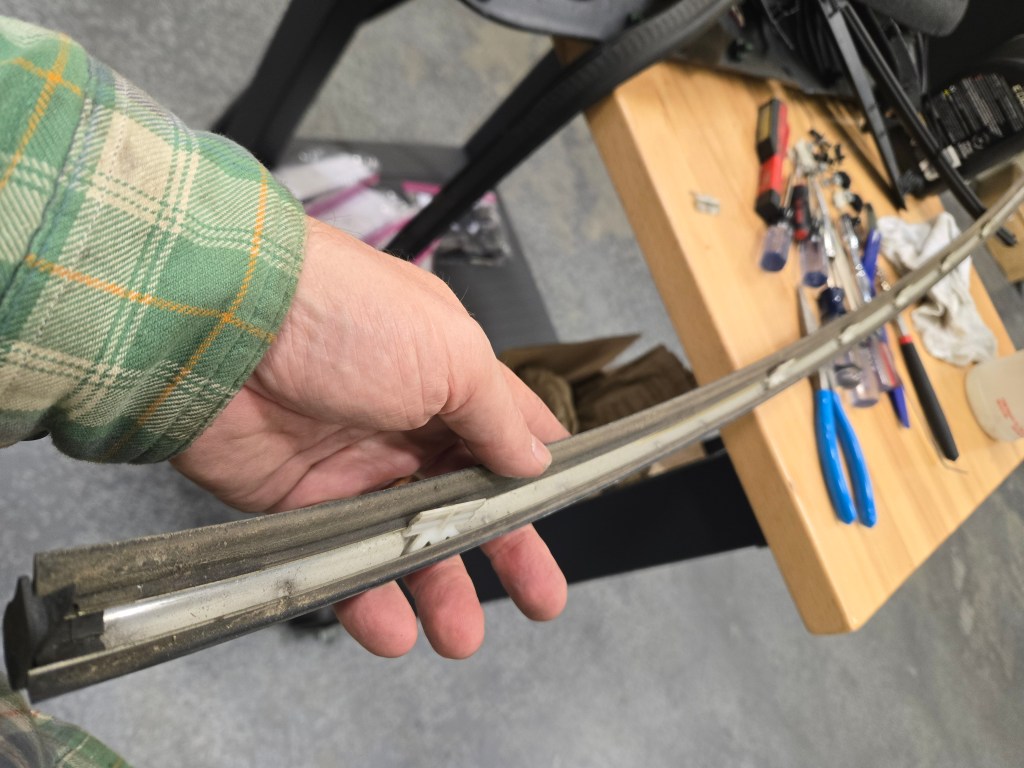
Date: January 23, 2019
Mileage:
Performed by: Angus
Services Performed: Both Front Wiper Blades failing. Replaced with OEM (Mini Mania).
Date: December 7, 2018
Mileage:
Performed by: Stefano
Services Performed: Removed OEM floor mats and replaced with WeatherTech floor mats for Front and Rear seats.
Date: November 23, 2018
Mileage:
Performed by: Stefano
Services Performed: New JVC Stereo Head Unit install to add streaming, AUX in, Bluetooth and hands free (Kit from Crutchfield). Kept old head unit.
Date: August 8, 2018
Mileage:
Performed by: Stefano
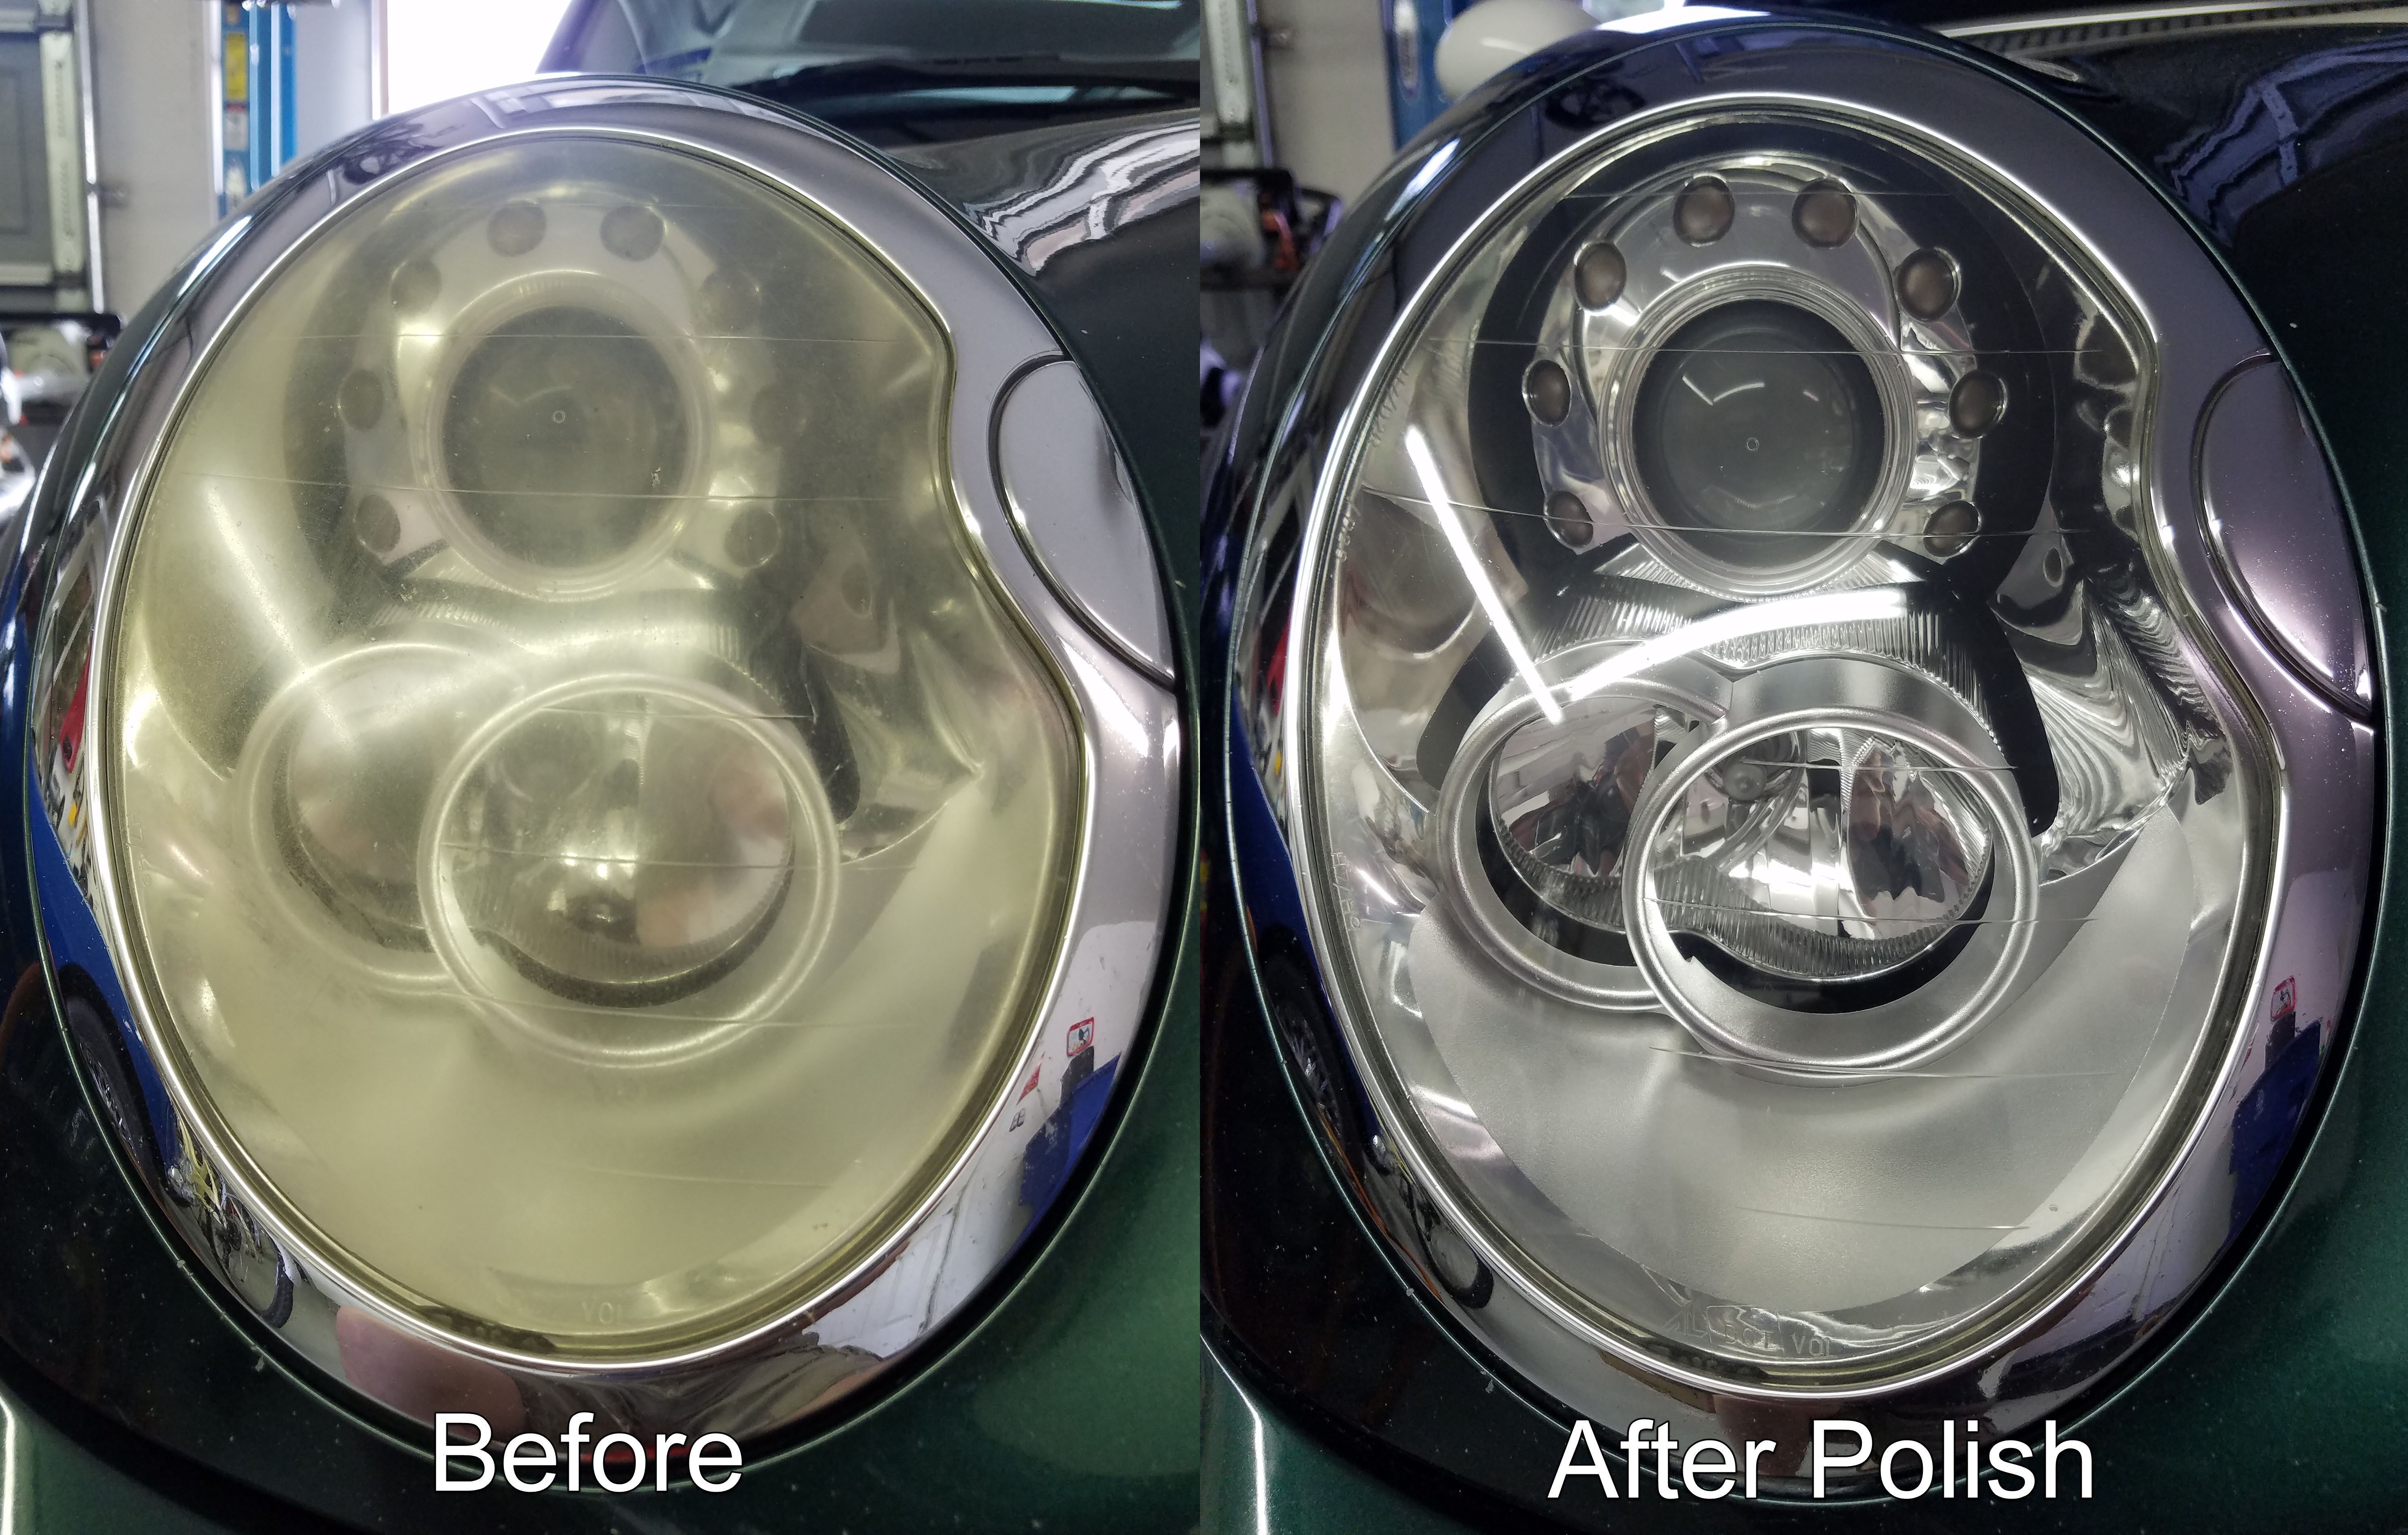
Services Performed: Restored Headlights using Chemical Guys sanding and polishing system. Amazing result!
Date: July 4, 2018
Mileage: 139,000
Performed by: Stefano

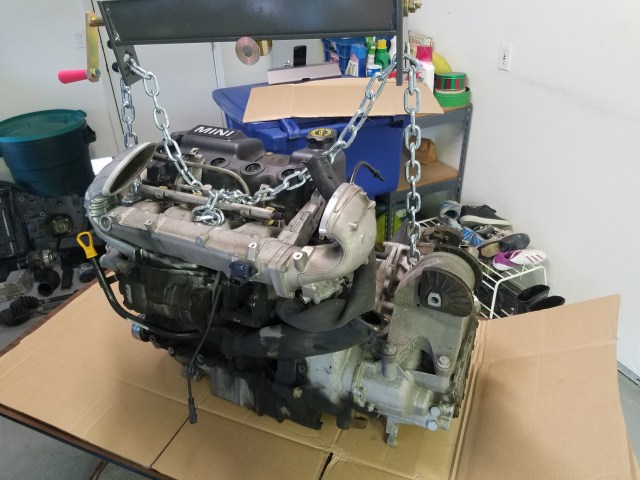
Services Performed: Major service. Inspired by Ant Anstead on Wheeler Dealers episode doing the 100K mile major service. Inquired for full service records from Original Owners who got a complete set from his dealer (thanks Ken!). The 100K was never done. Decided to go full monty, pull the engine and trans completely and do it all up right.
Major Service Included:
- Brake fluid flush with 1 litre of Motul RBF600
- Bled the Clutch
- Bled all four brakes
- Replaced coolant with 50/50 mix of official BMW/Mini Coolant
- Upgraded super charger pulley to 15% smaller Craven speed
- Changed accessory drive belt to new size to match pulley change (Gates Micro-V K060535)
- Tensioner not changed since changed previously at ~110K miles
- Changed Super charger oil in front and rear chambers with correct GM oil
- Changed Super Charger inlet and outlet gaskets
- Changed Intercooler inlet and outlet flex pipes
- Changed Intercooler to inlet manifold gasket
- Changed Throttle Body to Super Charger Inlet O-Ring/gasket
- Cleaned Throttle Body butterfly
- Changed small hard plastic vacuum line
- Cleaned and re-oiled the existing K&N Air Filter
- Changed Water pump (OEM)
- Changed Thermostat (OEM)
- Changed Oil Filter
- Changed Fuel Filter
- Changed Oil with Mobil 1 5W-30 synthetic
- Changed Oil Drain Plug
- Changed Manual Transmission fluid
- Changed Oil Filter Housing Gasket
- Changed Oil Pan Gasket
- Changed Crank Position Sensor O-Ring
- Changed Rear main crank seal
- Changed Clutch, Flywheel, and Throw out bearing with Valeo clutch kit
- Changed Exhaust Manifold Gasket
- Changed Exhaust Manifold Bolts
- Changed Post Cat O2 Sensor
- Changed Battery
- Changed Ignition Coil with MSD aftermarket
- Changed Spark Plug Wires with MSD aftermarket
- Changed Spark Plugs with 1 step cooler NGK plugs to match supercharger upgrade
- Changed Left Front Sway Bar Drop Link
- Changed Left and Right front suspension Inner Ball joints
- Changed Left and Right front suspension control arm bushings with new aftermarket Polyurethane bushes
- Changed Left and Right Front drive axles and CV joints (complete assemblies)
- Changed Left and Right side mirror mounting gaskets
- Changed Cabin Air Filter with aftermarket Activated Carbon version
- Degreased Engine, Engine Bay and Subframe
- Dealer performed computer wheel alignment after work was complete
- Replaced “McEvoy” Driver Decal


Date:
Mileage:
Performed by:
Services Performed:
Date: August 20, 2016
Mileage:
Performed by: Stefano
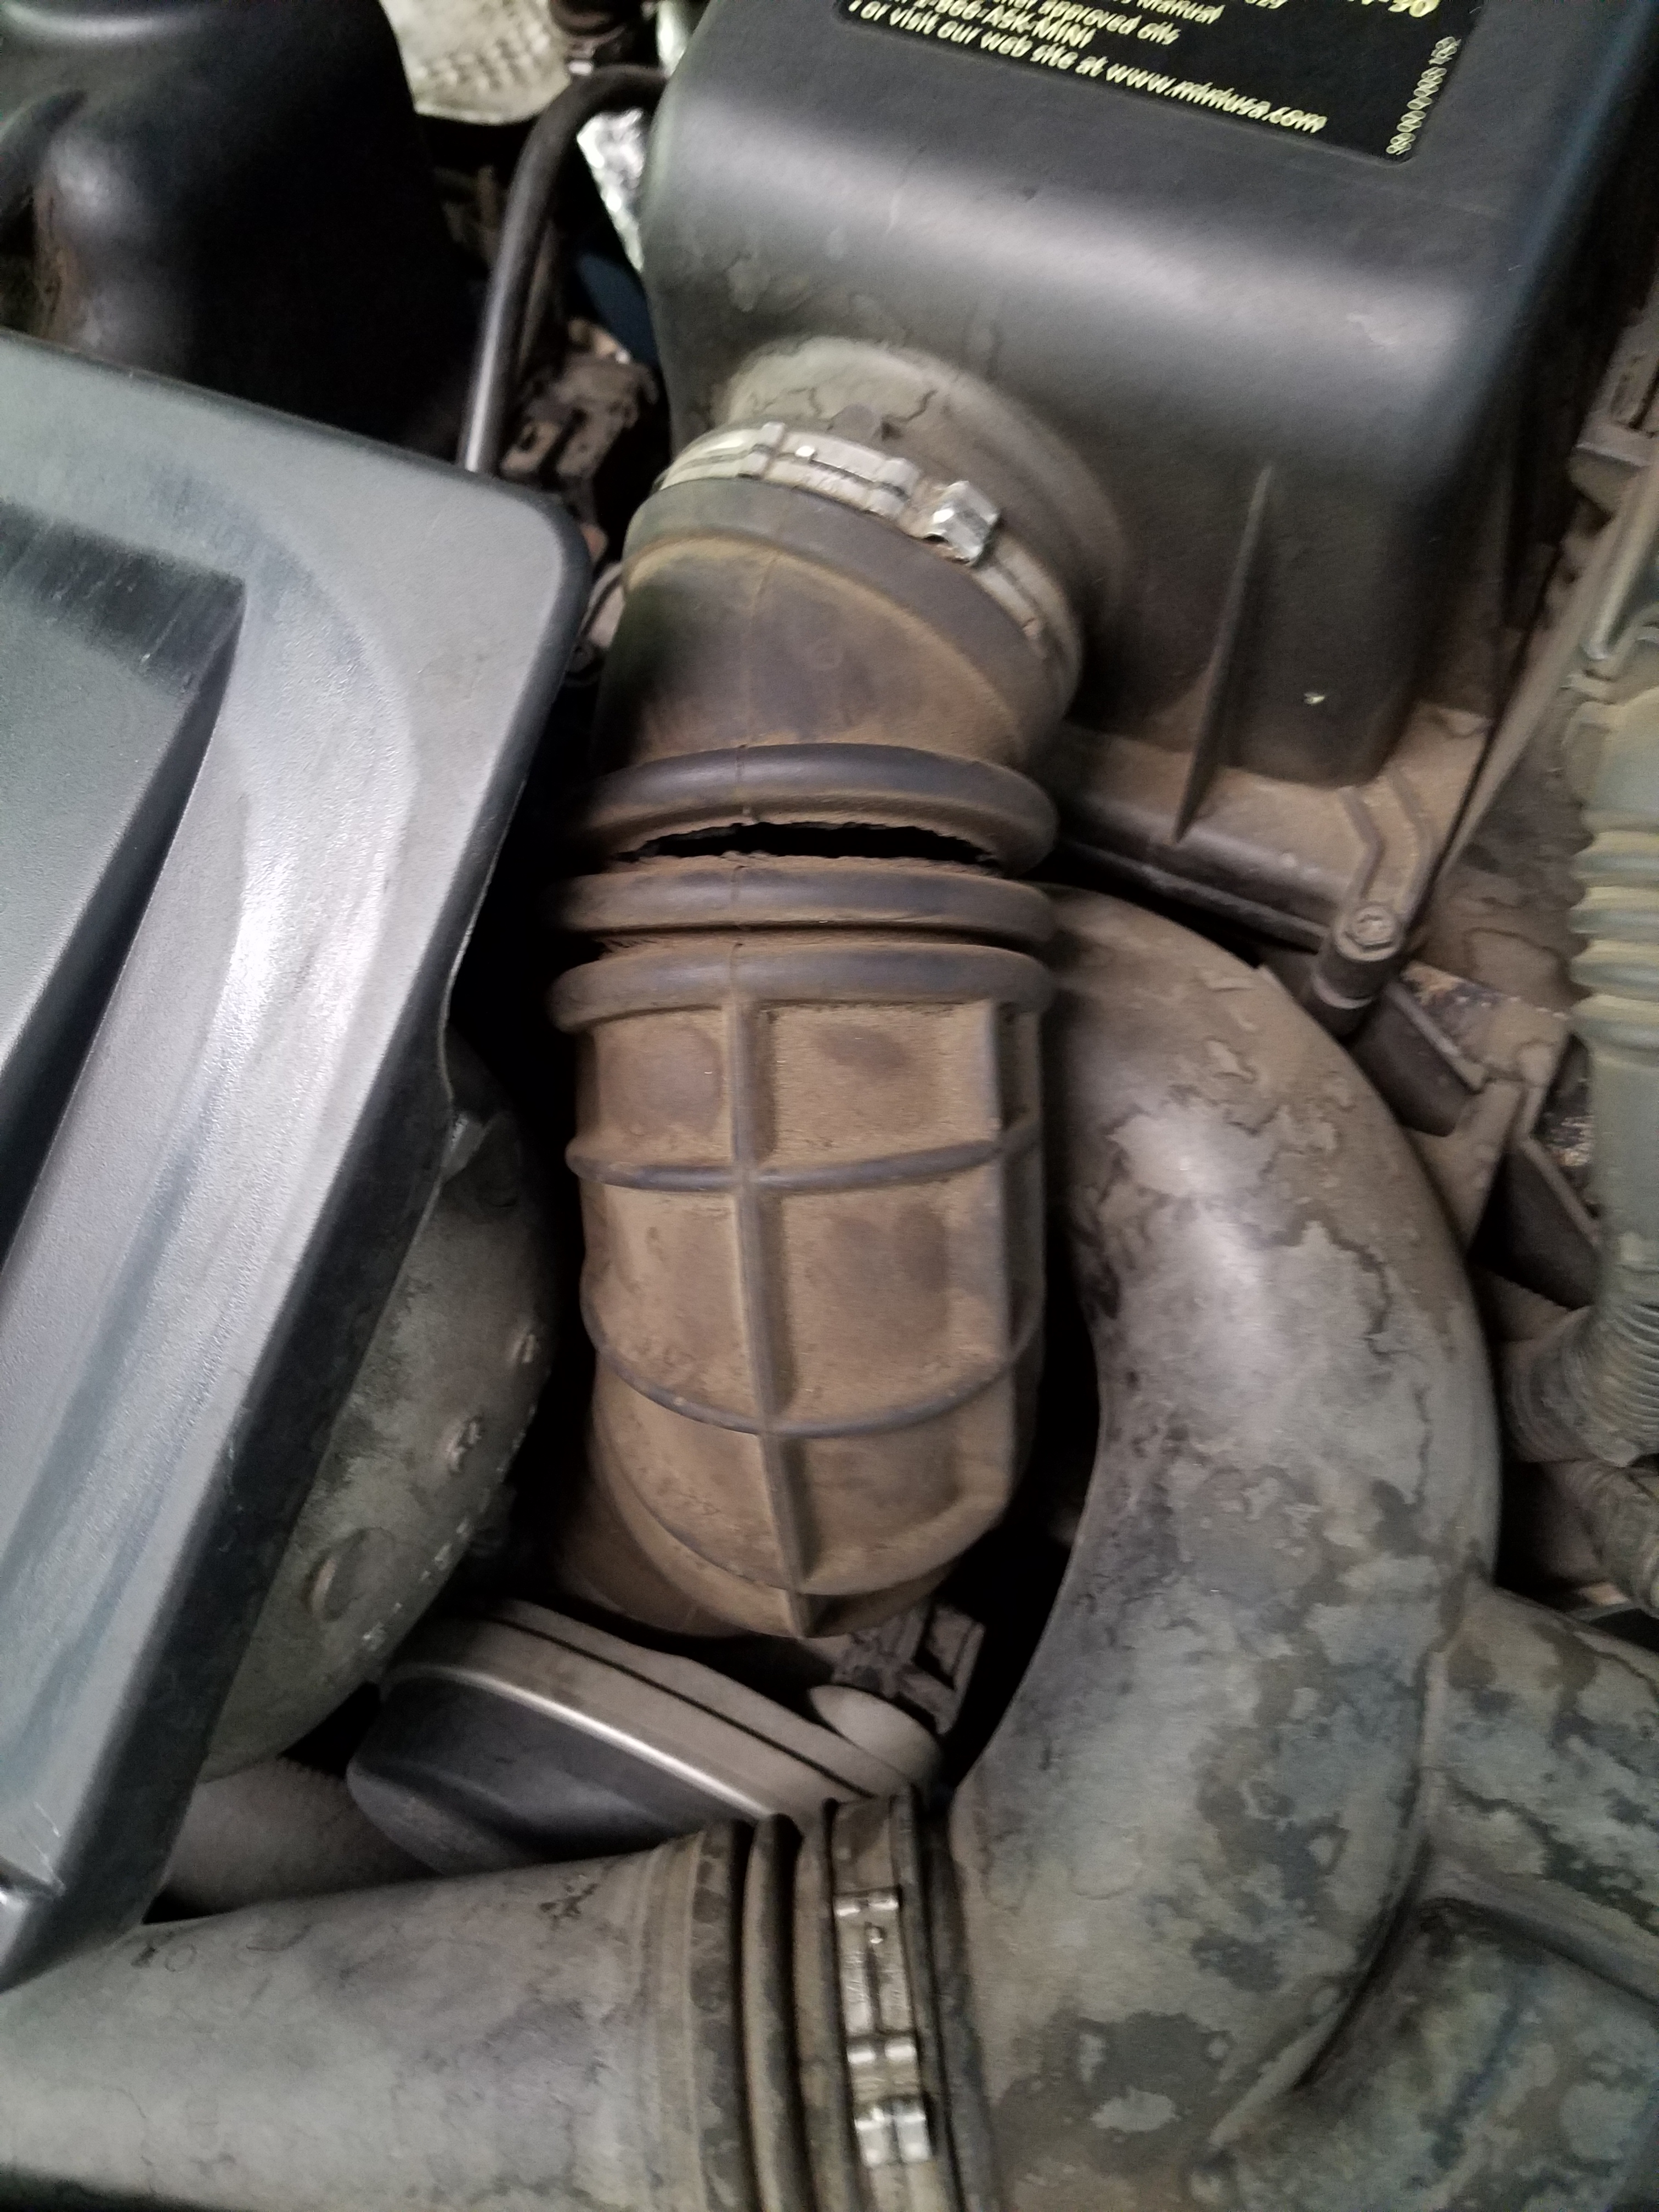
Services Performed: Airbox to Supercharger piping split. Right hand hydraulic engine mount failed. Replaced both.
Date: June 12, 2015
Mileage:
Performed by:
Services Performed: Harmonic Balancer Separated and engine stopped working close to home with Mom at the wheel. AAA towed home, and then to shop for replacement.
Date: August 25, 2014
Mileage:
Performed by:
Services Performed: Sister was driving the Mini to School and accidentally nailed a bollard while on-ramping to I80 in a construction zone. Dented in the bonnet. Hired paintless dent removal expert to work the dent out since it wasn’t creased. Perfect repair.
Date:
Mileage:
Performed by:
Services Performed:
