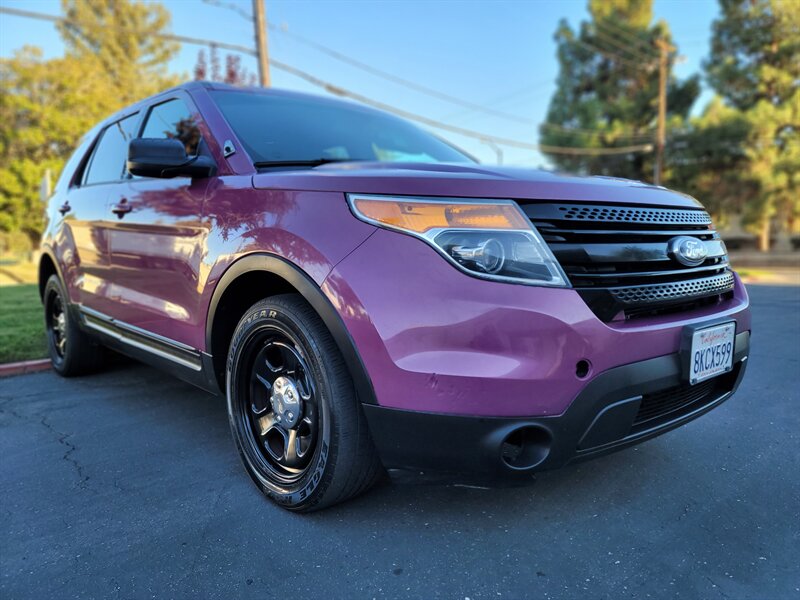
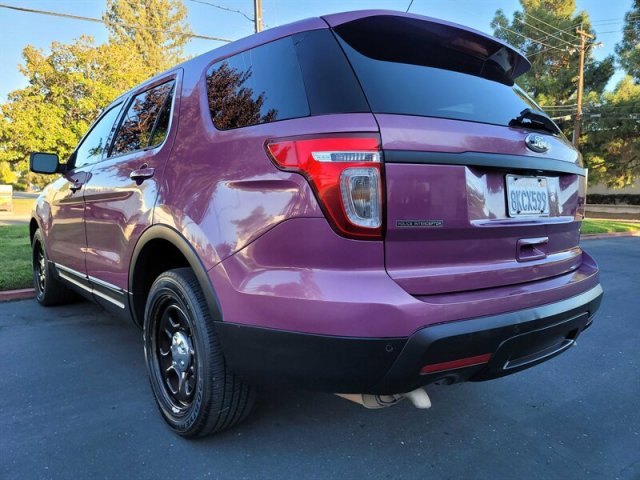
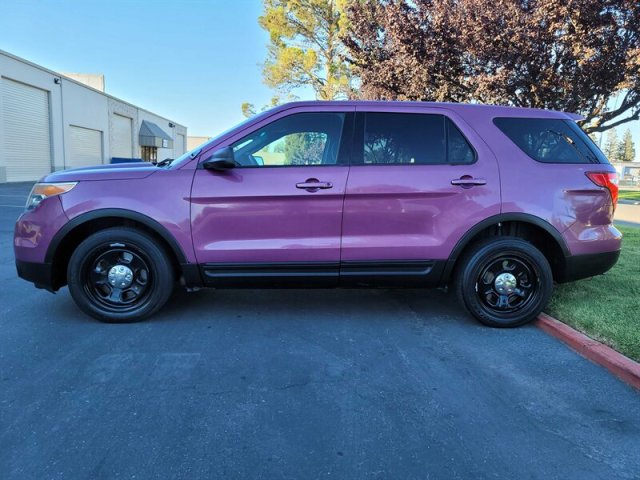
Cop tires, cop suspension, cop brakes, and a cop engine. What else do you need?
Vehicle Details
- Make – Ford
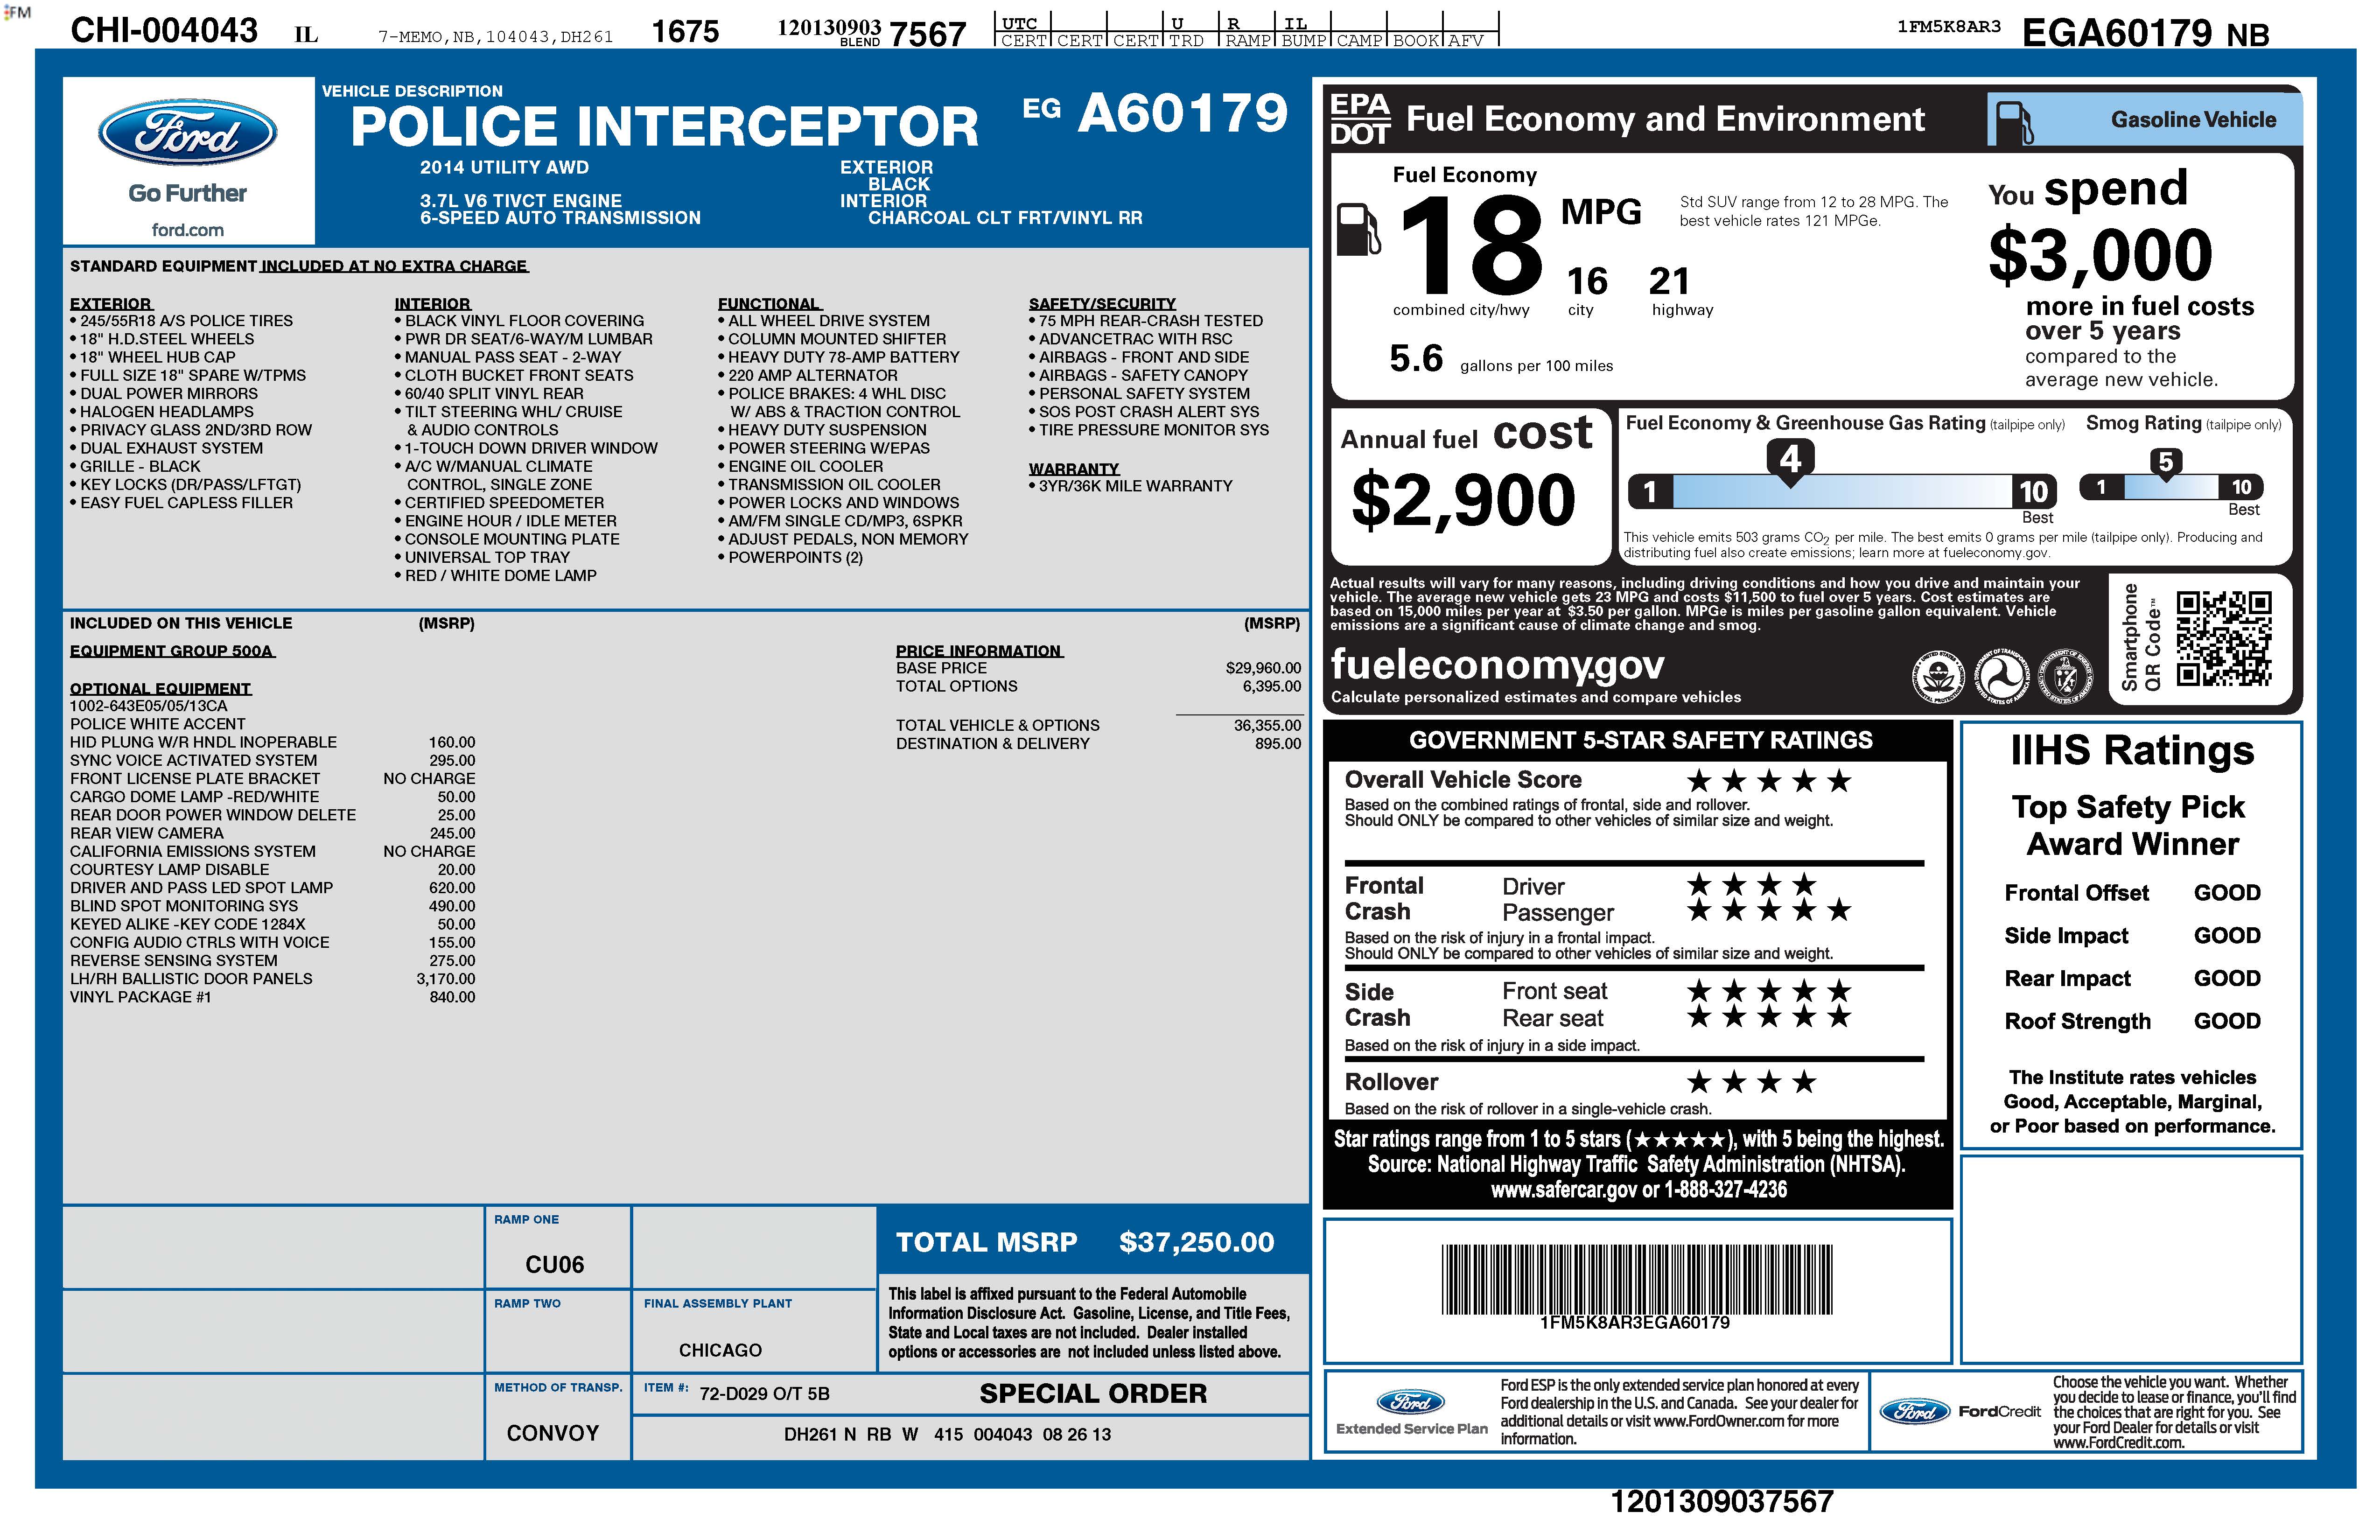
- Model – Police Interceptor Utility (PIU)
- Model Year – 2014
- Options – Equipment Group 500A (see window sticker)
- Engine – 3.7 liter Cyclone (Duratec) V6 engine (304 bhp)
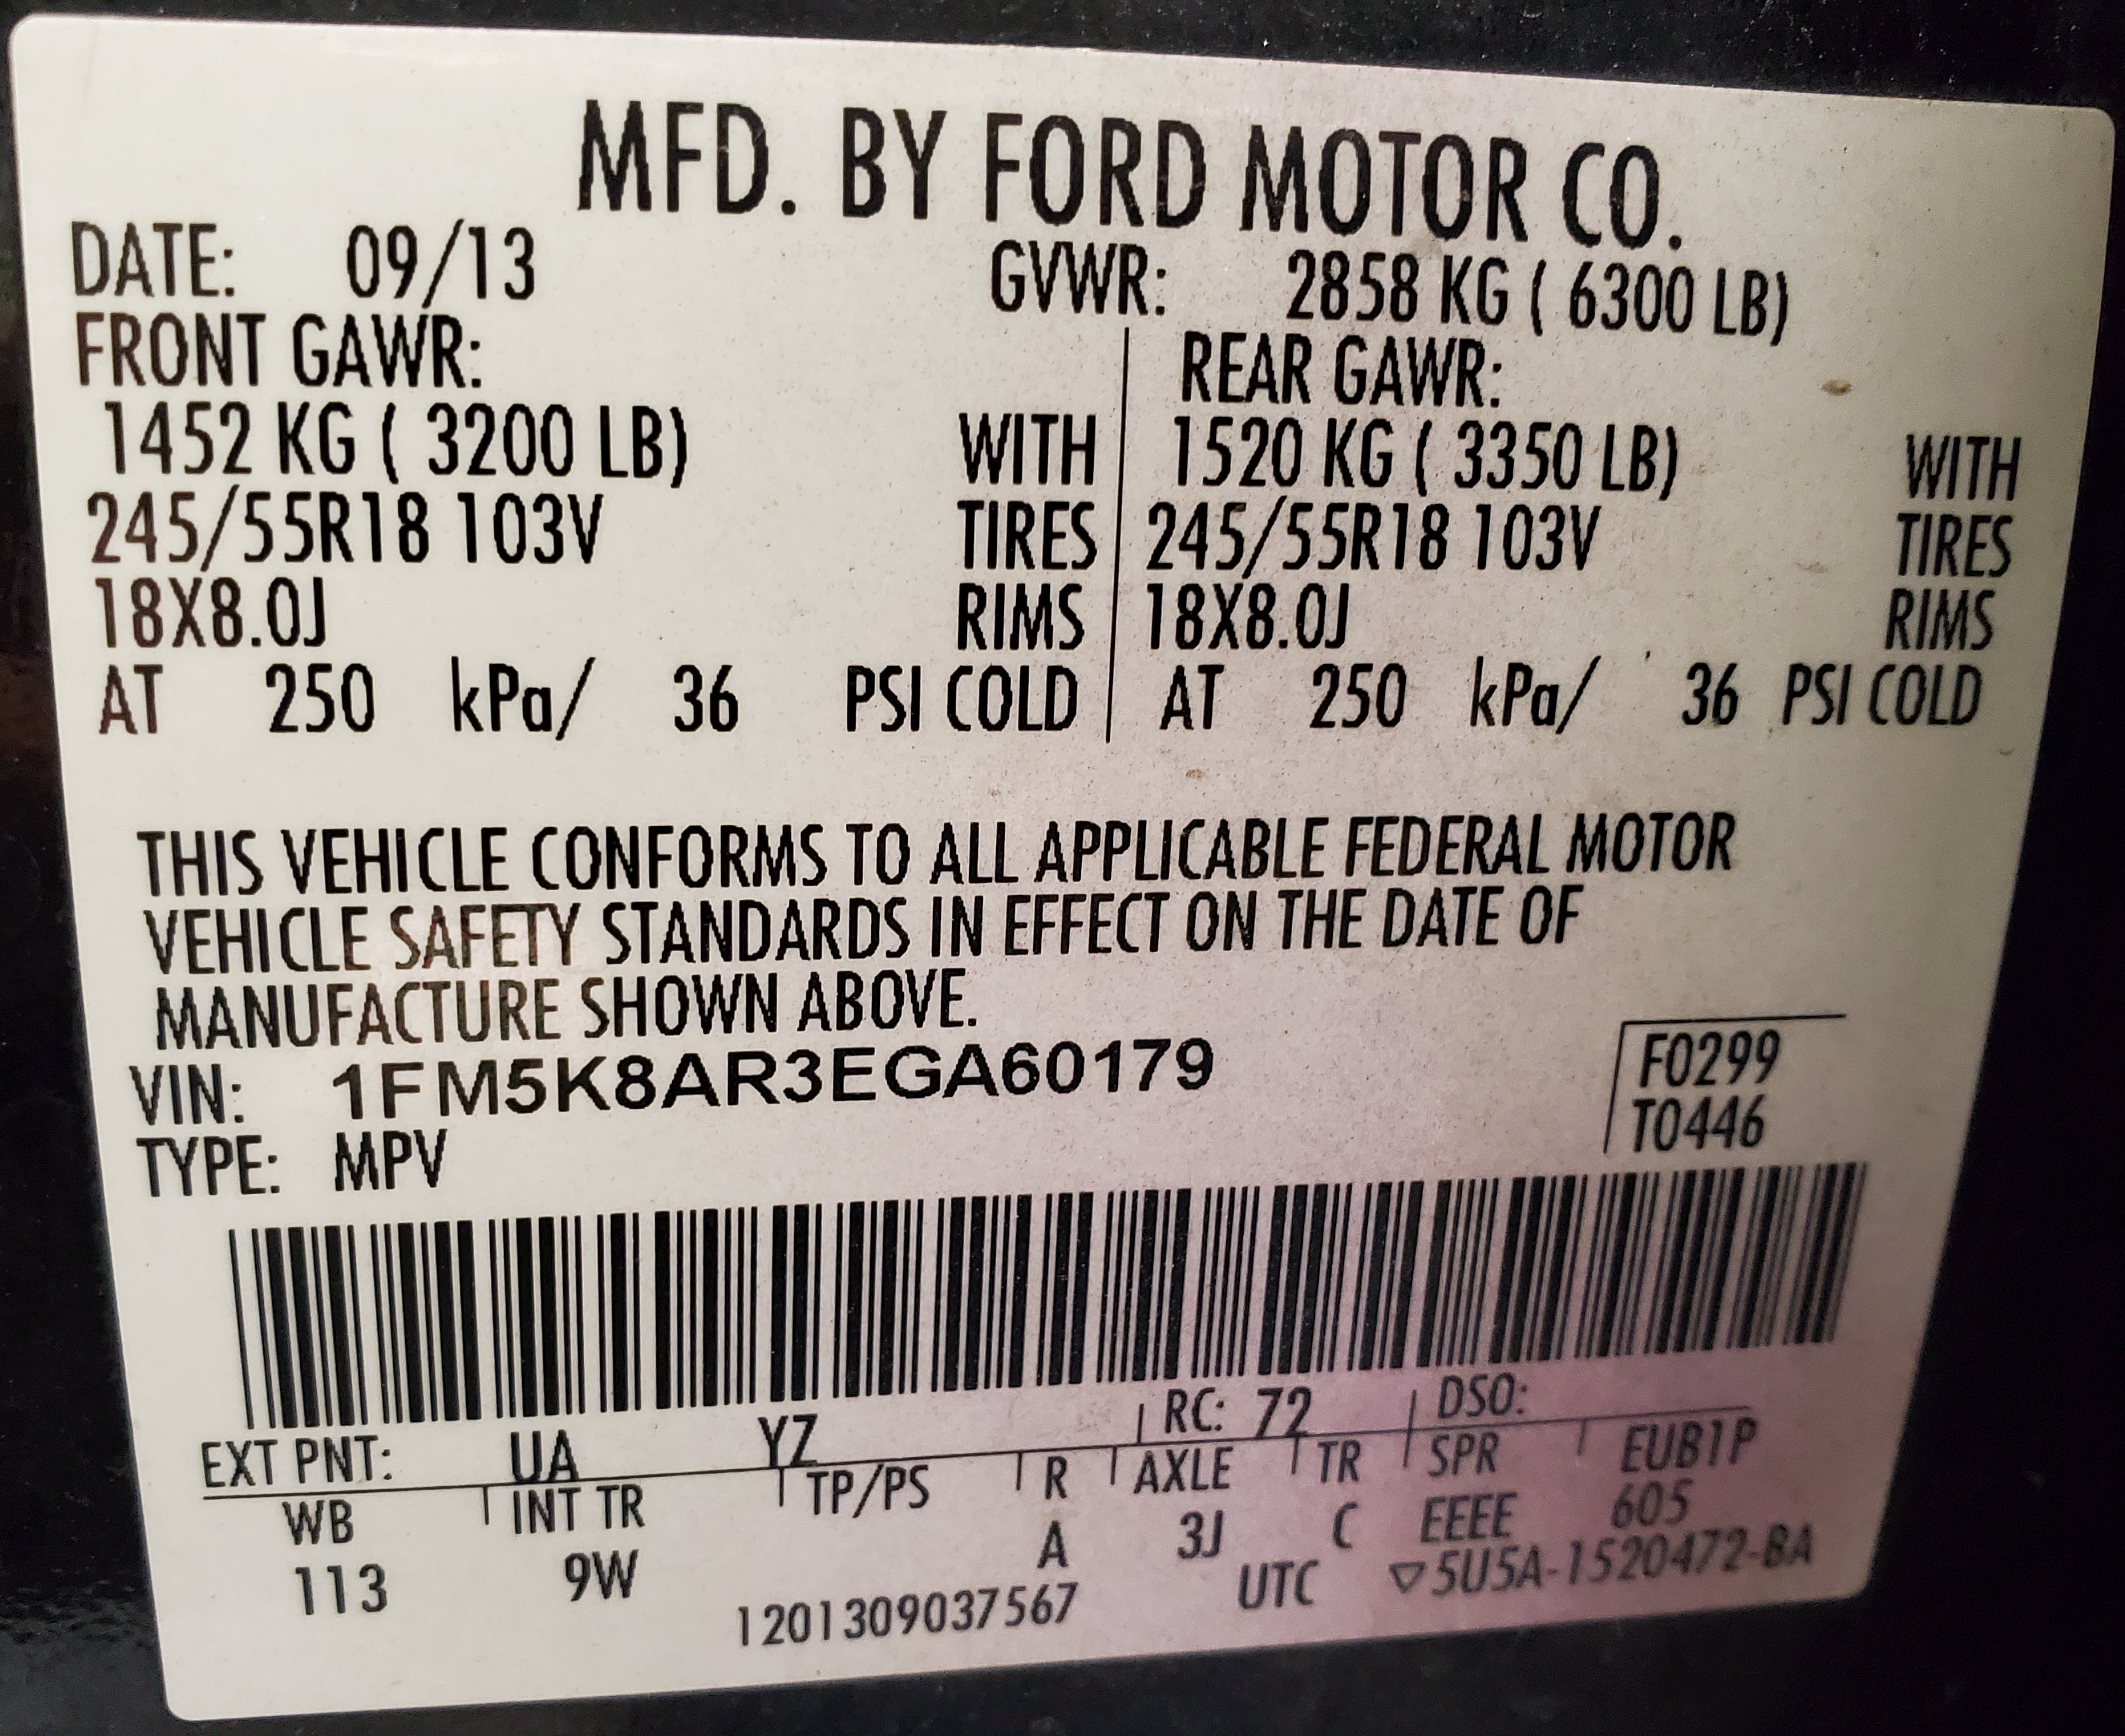
- VIN – 1FM5K8AR3EGA60179 (VIN Decoder here)
- Purchase Date – November 12, 2022
- License Plate – 8KCX599 (California) (SMOG Lookup here)
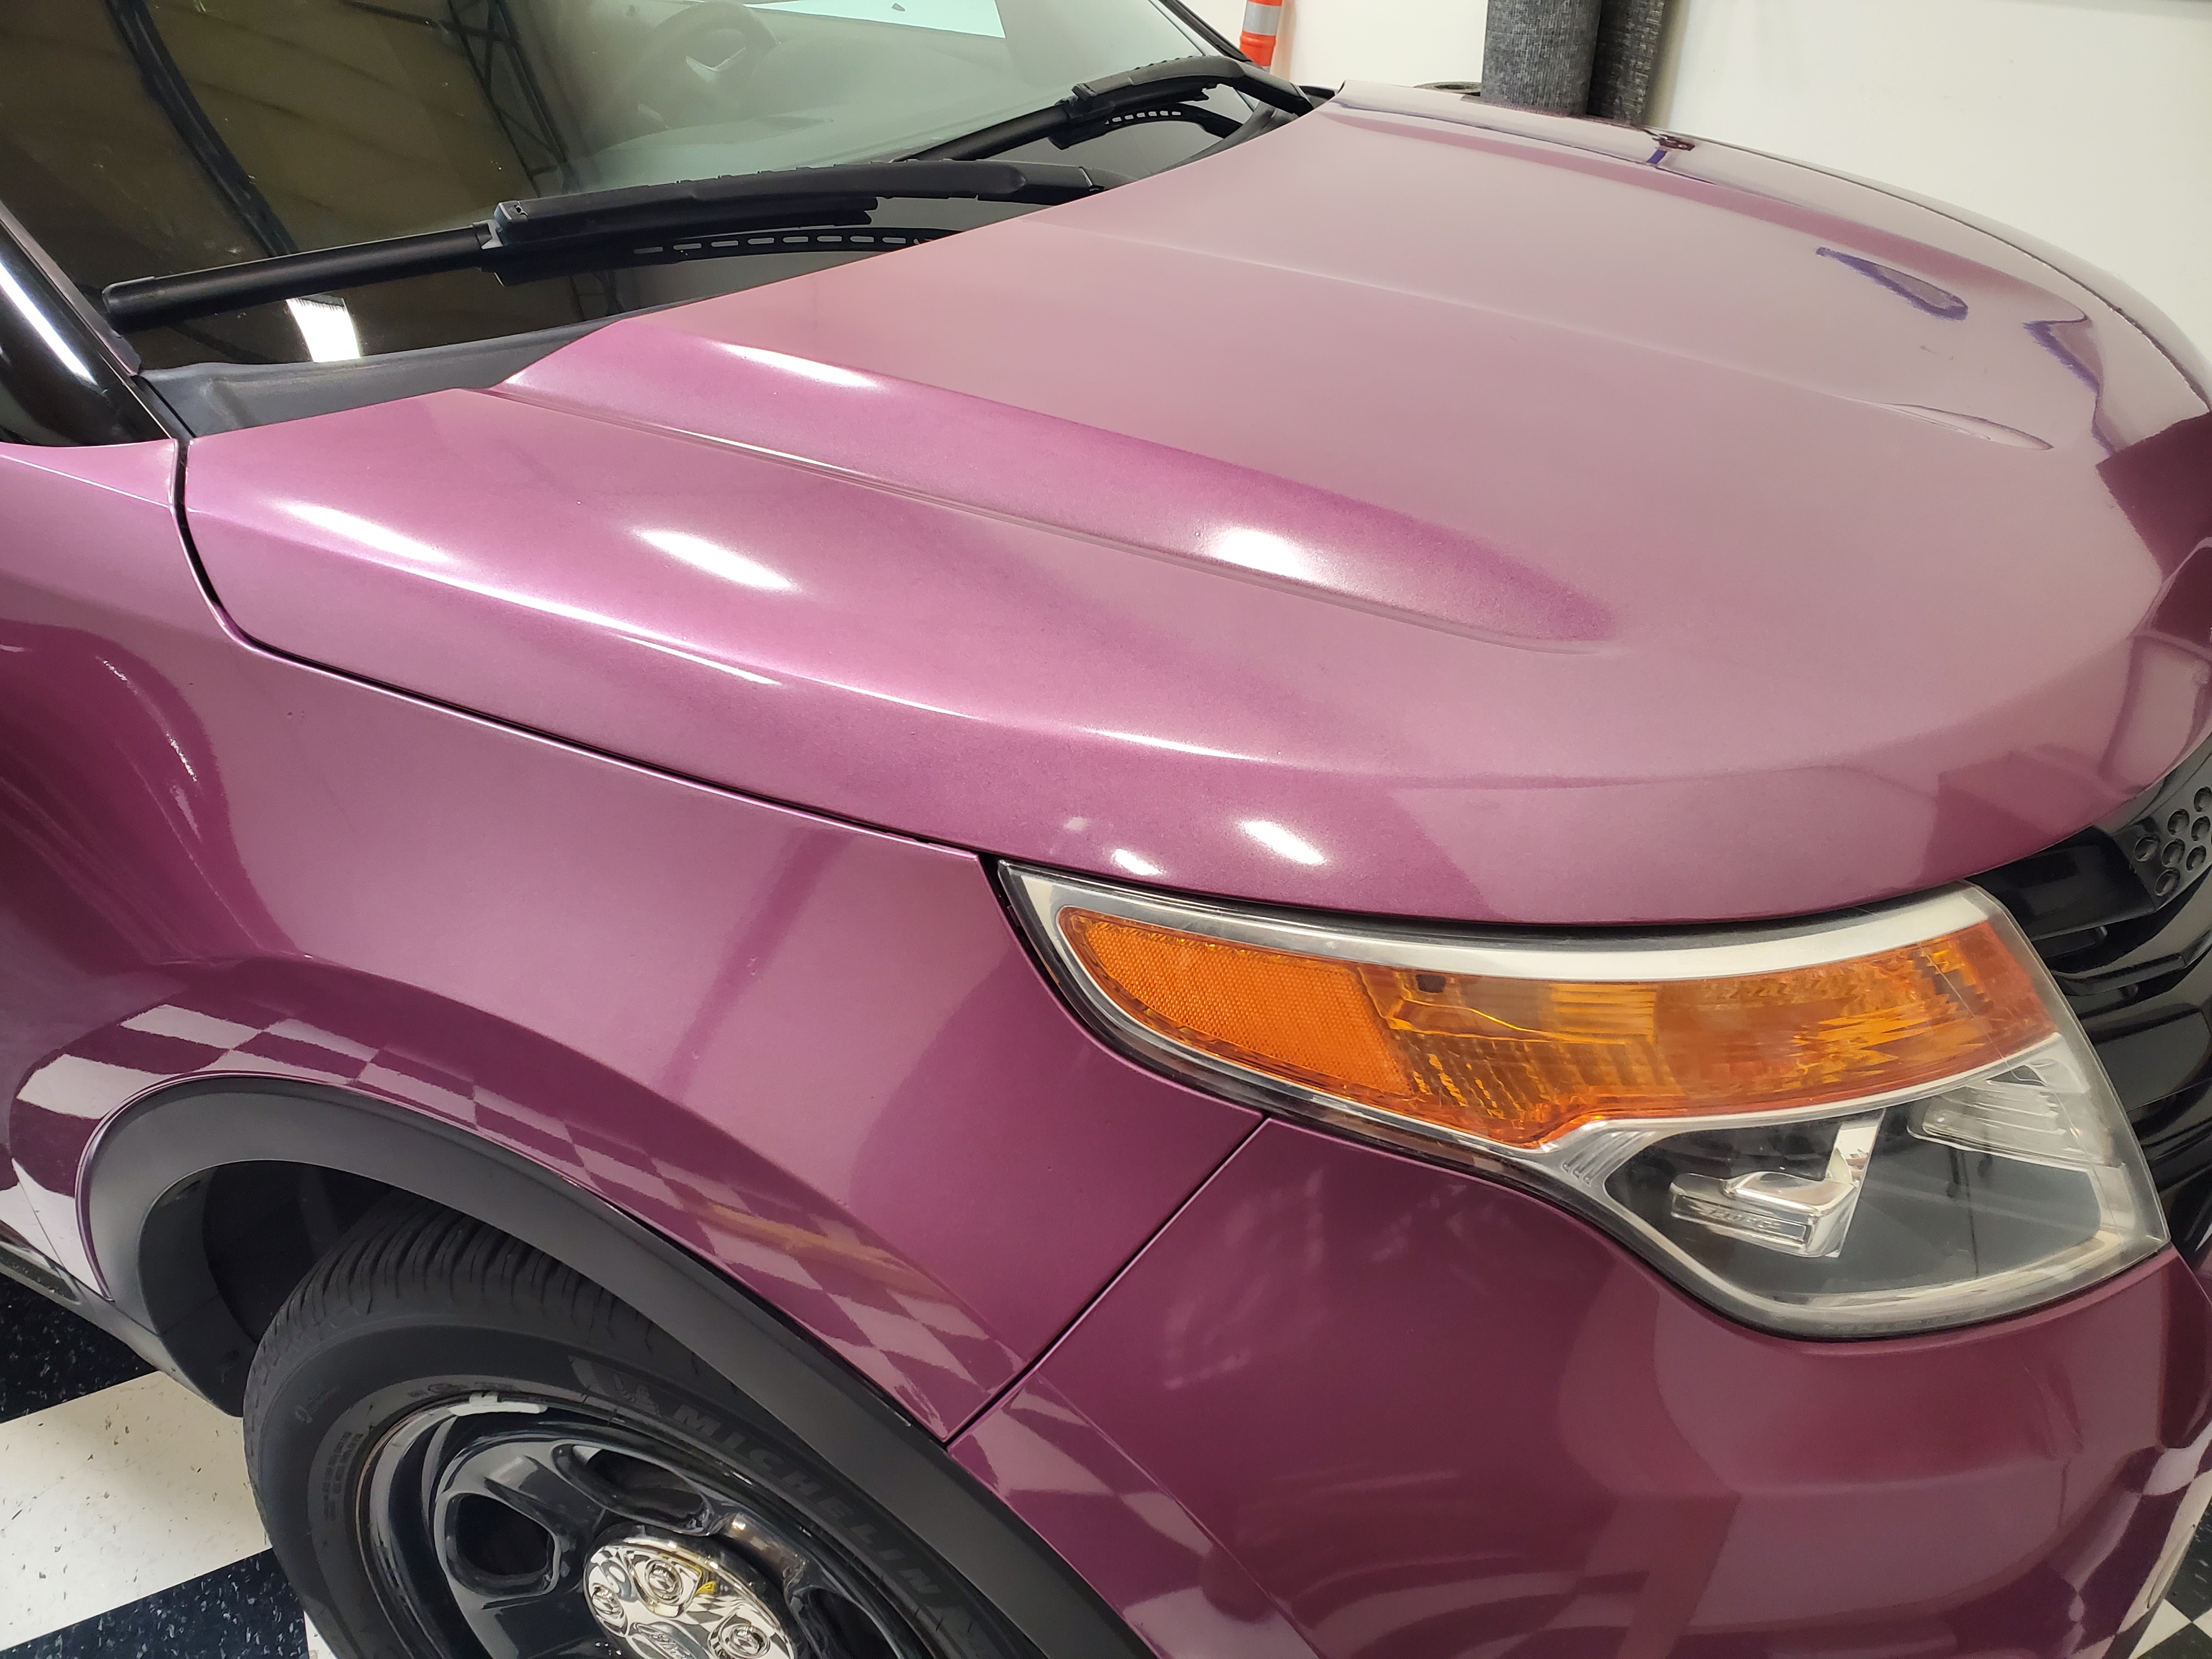
- Color – Purple (Original Color was code UA – Black, Ebony and a second code is listed YZ that is Oxford White – presumably the doors were painted white)
- Transmission Code – C – 6-speed automatic transmission 6F55
Meet ‘Barney’ when he was new (to us)!


Additional Specs online here and Wikipedia background on the Interceptor version can be found here
CarFax report from the time of purchase can be found here..
MyCarFax Records here (logged in as Stefano)
Dissecting the VIN against the service manual we can learn:
- 1FM – Ford Motor Company, USA, MPV. (Utility)
- 5 – Active safety belts, all positions, driver and front passenger airbags and side impact airbags – all positions. (Utility)
- K8A – Explorer, AWD, Police package
- R – 3.7L, V6, Ti-VCT
- The ninth VIN position is the check digit code (0-9). This is s 3 in our case.
- E – 2014 Model Year
- G – Chicago Assembly Plant (Chicago, Illinois)
- A00001-L99999 Production Sequence Number. Since A60179, does this mean it is the 60,178th Ford Explorer that year? Or ever?
Service History
Date: June 12, 2025
Mileage: 186,700
Performed by: Stefano
Services Performed: Performed a quick service look over prior to it heading back up into the Sierras next week:
- Quick Interior Clean – AMMO Lather front door cards and dash. Wiped out door sills. Emptied trash from center console ‘box’.
- Cleaned exterior glass.
- Cleaned interior glass of front doors and windshield
- Charged the jump pack and stored back in spare tire area
- Checked one quart of extra oil in spare tire area
- Set tire pressures 36 psi front/rear/spare
- Checked fluids. Engine Oil, Coolant and Brake Fluid all OK. Added about 4 oz. of washer fluid.
- Vacuumed leaves off the skuttle panel
- Noted insurance slip was expired. Printed new one and replaced.
- Noted that one of the glove box retaining pins was just sitting loose in the glove box. Reinstalled, but noted the glove box hinge plastic is split where pin goes through it. Unfortunately it might need a replacement box. Try gluing the split part first next time we have in shop.
Date: May 5, 2025
Mileage: 186,320
Performed by: Stefano
Services Performed: Stefano followed up on the recommended work for the rear suspension:
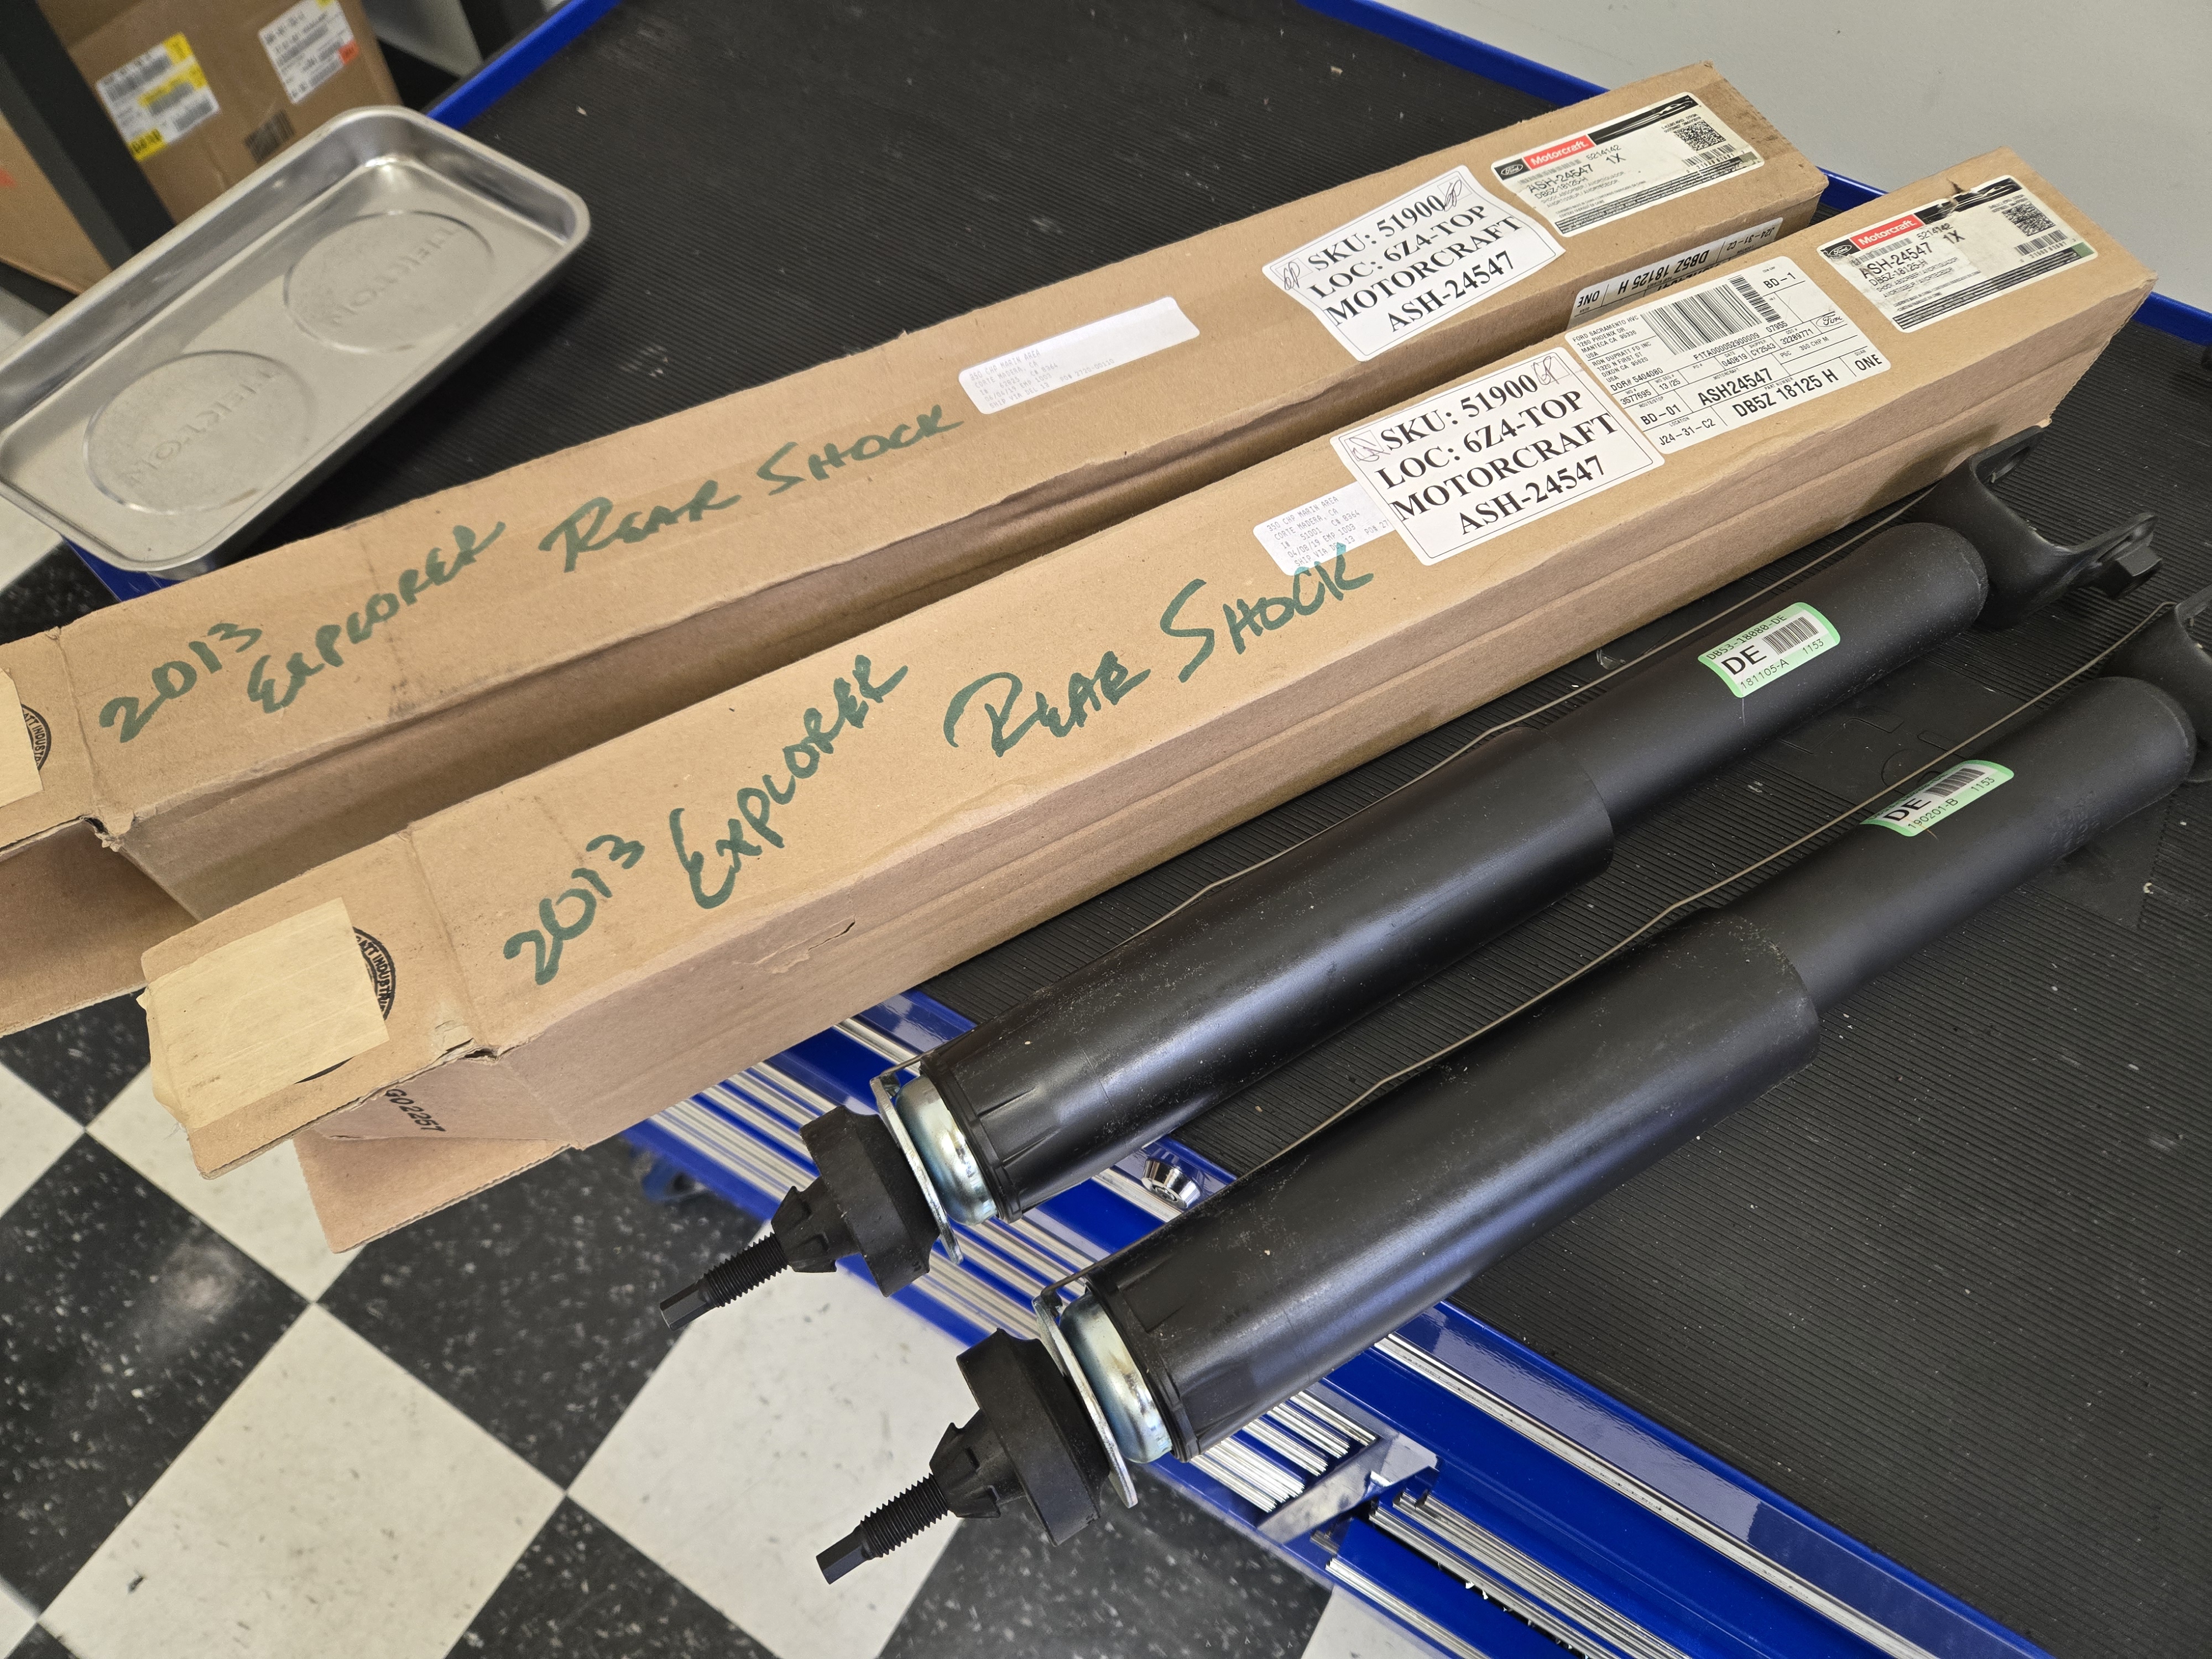
- Purchased two new Motorcraft OEM rear shock absorbers (Ford p/n DB53-18080-DE). Found NOS on eBay.
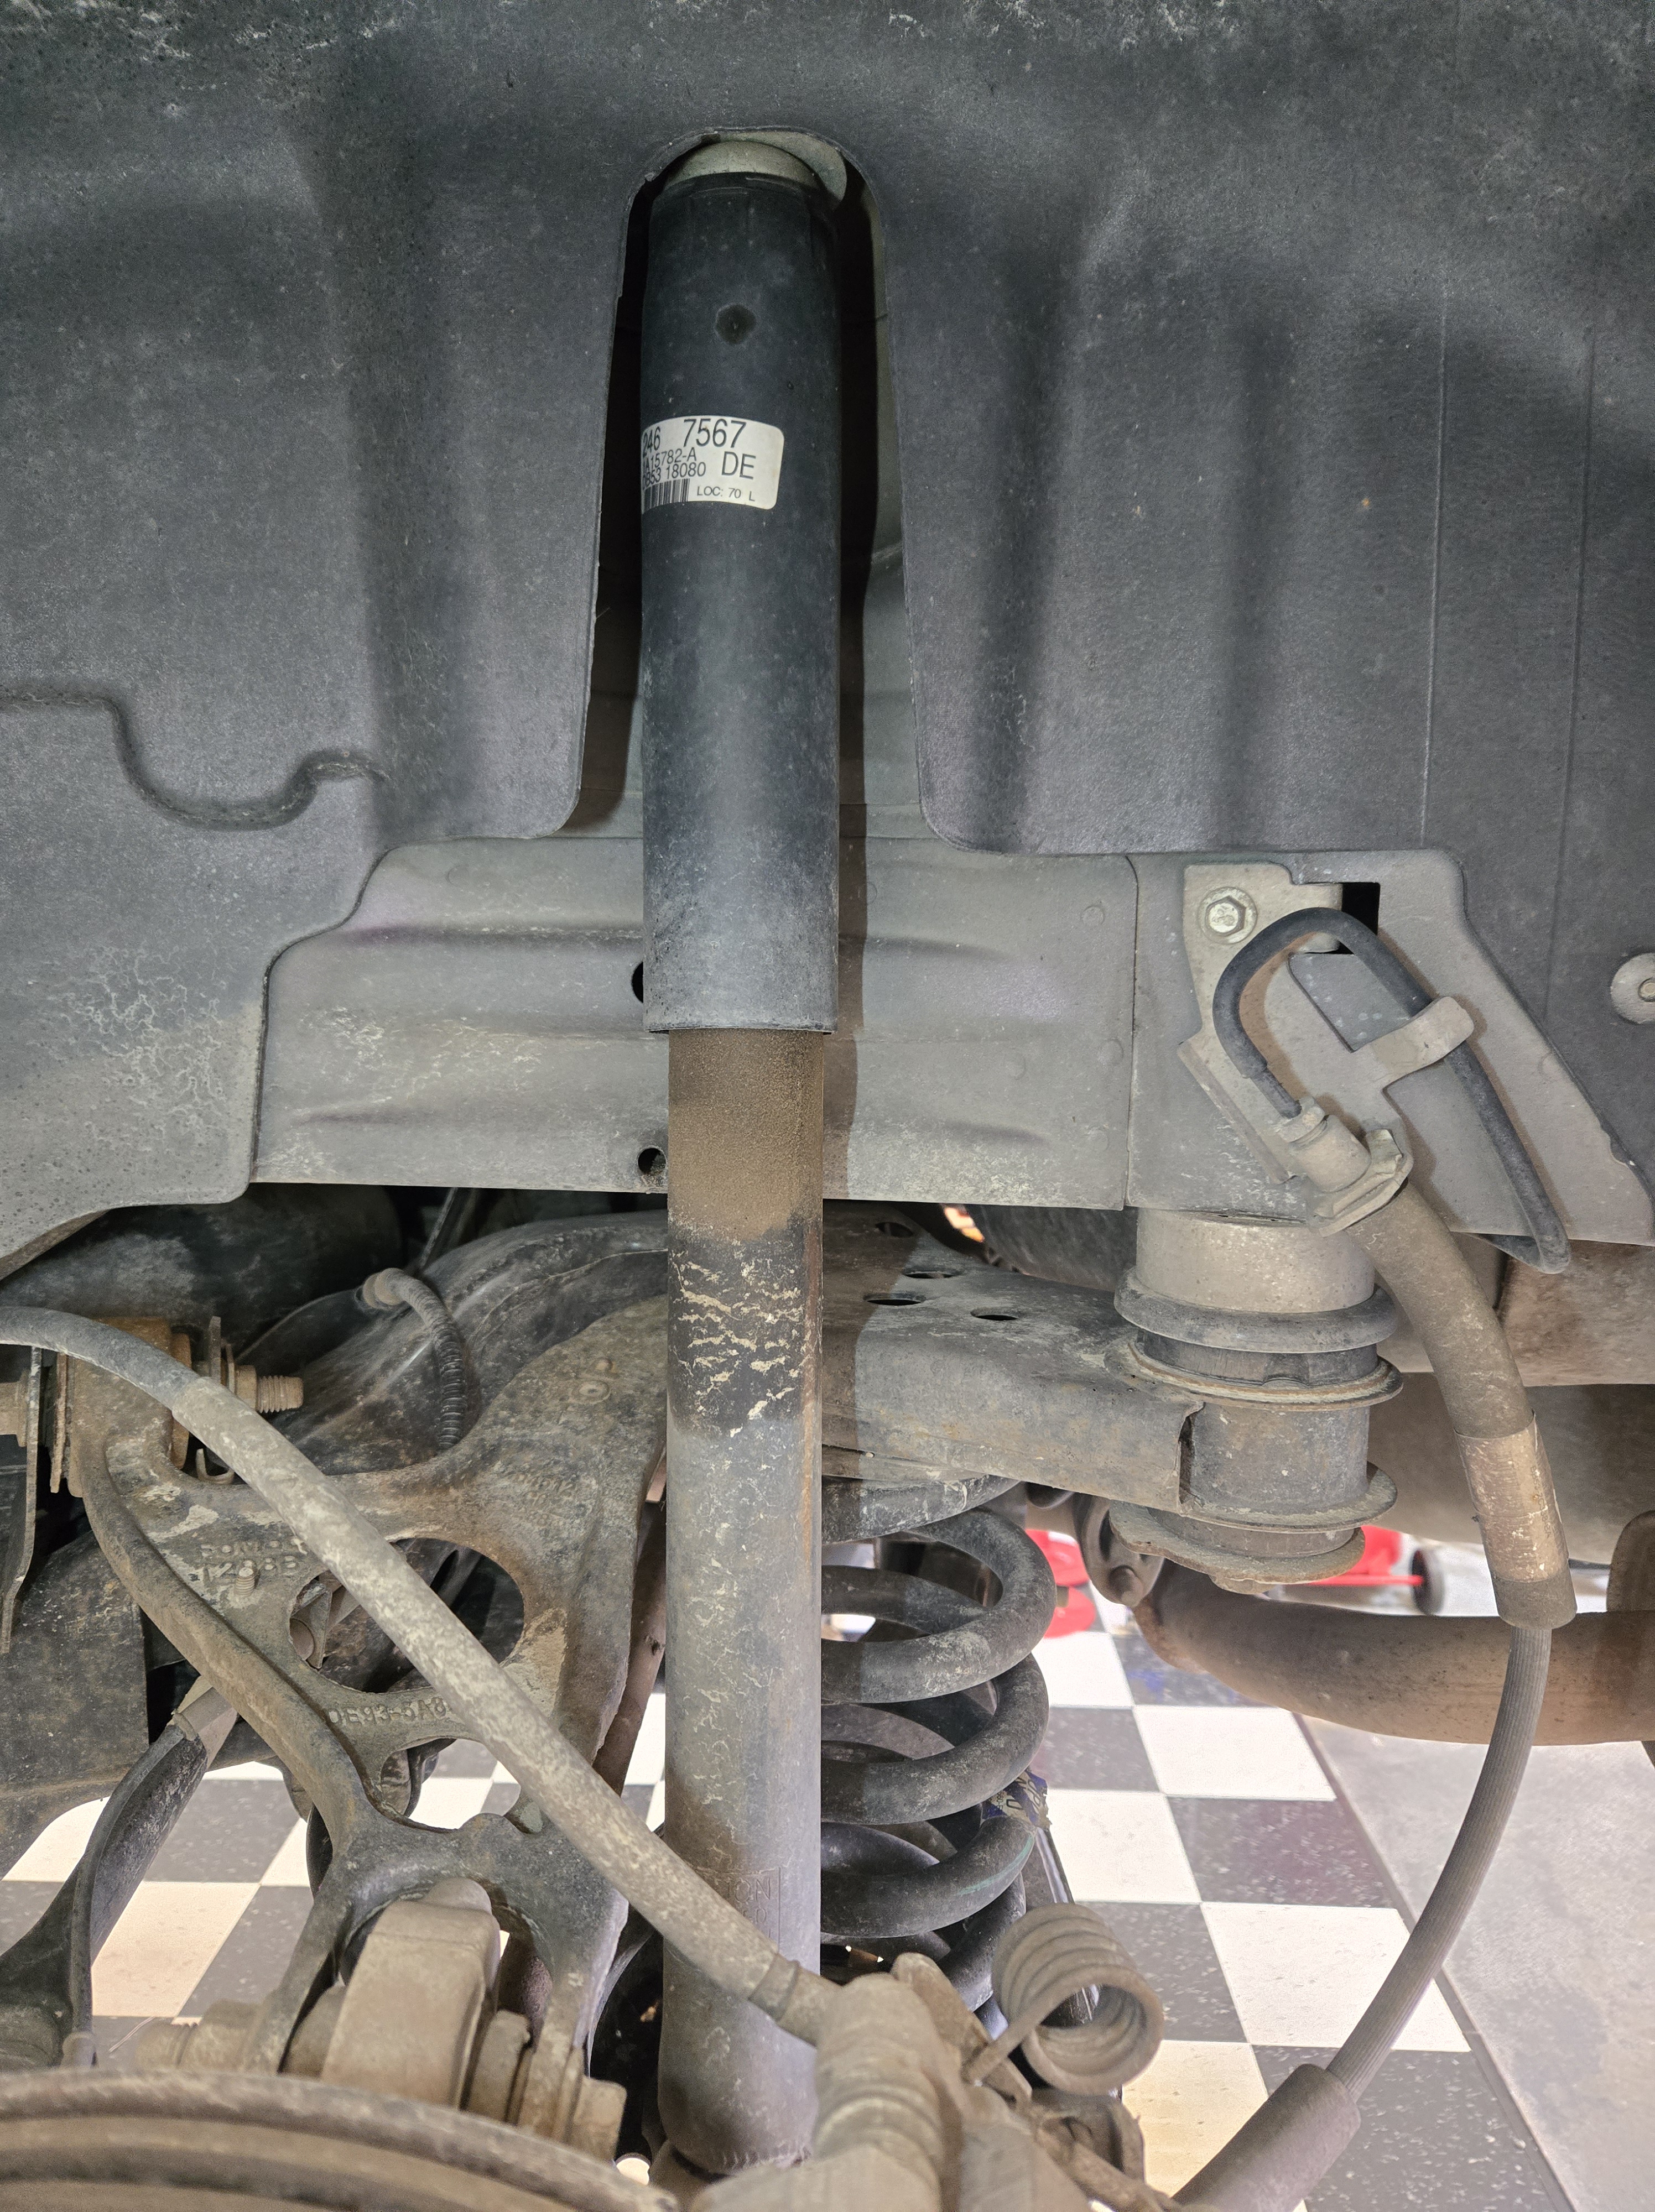
- Removed rear wheels.
- Removed the old shocks. They were bagged.
- Installed the new shocks. Torqued upper shock nut to spec (45Nm) and lower bolt to spec (175Nm).
- Had to buy a special shock top nut deep socket (18mm) to allow for a wrench to hold the shaft while nut is torqued to spec.
- Reinstalled rear tires and torqued to spec (115 ft-lbs)
- Still need to road test to see if this cured the mysterious rear ‘Clunk’
Date: April 20, 2025
Mileage: 186,289
Performed by: Stefano
Services Performed – Stefano did the annual service today after its been off with Angus for a while.
- Changed the Engine Oil.
- Added about 6 quarts of Castrol Edge 5W-20
- Recommend replacing the drain plug next service. Rubber gasket is likely due soon.
- Changed the Engine Oil Filter.
- Installed a Wix XP 57502XP from O’Reillys
- Topped off fluids
- ~1/2 gallon summer washer fluid
- few ounces of engine coolant
- Not sure where this is going each time. Worry about Water pump leak into timing cover case area, or a head gasket leak. Monitor.
- Small amount of DOT4 brake fluid
- Inspected Tires
- Fronts – OK
- 7.5/32″
- Inners a bit thinner that outer edges on all tires, but only about half a 32nd.
- Pulled a short bit of screw out of RF tread near outer sidewall. Not deep enough to penetrate.
- Rears – OK
- 8/32″
- Noted both L & R front rims had a ‘wow’ to them. Like they ran over a curb at speed and it bent in the steel. Not sure if was there before. Would have been a heck of a hit, and the paint isn’t damaged, and no sign of impact on tires. Cop car.
- Rotated tires front to rear, same sides
- Torqued wheel nuts to 115 ft/lbs
- Set pressures to 36 psi
- Dressed the tires with Adams Graphene
- Fronts – OK
- Inspected Brakes
- Front – OK
- Rotors 31.9 mm
- Pads 7-8 mm remaining
- Rear – OK
- Rotors 18.9 mm
- Pads ~9 mm
- Front – OK
- Inspected Exhaust – OK
- Noted broken strap on heat shield wrap near front PTU. No real need to fix.
- Looking a bit crusty overall, but still solid front to back.
- Connected Forscan to read codes
- Just the usual HVAC, APIM, GPM, and Headlight module codes same as previous services
- Cleared codes.
- Reset Oil Life via dash interface
- Inspected Engine.
- Noted a fair weep at the previous locations noted between the rear of the engine and the transmission. Engine oil for sure. Guessing rear main seal is weeping a bit more. Cleaned off and will continue to observe.
- Inspected Drive line
- driveshaft – center bearing support still ‘soft’ as noted previously. No notable change.
- CV boots look OK front and rear.
- Inspected Wiper Blades – All OK
- Inspected Exterior Lights – All OK
- Inspected Suspension
- Front Suspension all OK
- Rear Suspension is generally OK, but still makes a clunk when pulling out over a driveway exit. Noted the both rear shocks have a crud build up as if they had been leaking, dirt got on them, and now completely try. Consider replacing them both since the need it anyway, and see if it influences the clunk.
- Inspected Body
- Front tow hook cover is missing after a recent ‘bump’ in traffic. Recommend replacement again.
- Light scuffs in the front bumper cover near the tow hook, from the same bump in traffic I suspect. Just blends in with Barney’s other flaws.
- New impact crack in rear bumper tow cover area. Like something wanged into it.
- Passenger front door seal keeps drooping.
Barney is still going strong at 186K.
Recommendations:
- Replacing both rear shocks with OEM for the PIU
- Order and replace the front tow hook cover (again)
- Ford has an open recall for exterior A pillar trim replacements. Take to Ford dealer to have done.
- Use adhesive to mount the front door seals.
- Flushing brake fluid next annual service
- When is the rear differential fluid due for service? Hasn’t been done by Stefano.
- Inspect Air Cleaner and Cabin filter next annual service. Replace if needed.
- Deep cleaning the interior again, still filthy after last summers trips.
- Remove the remaining ballistic panel in RF door. Sell off the pair. Enjoy the lighter weight and mileage improvement!
- Has an open recall to replace the exterior A pillar plastic trims. Called local Ford Dealer (Future Ford) and told them to order the parts. They (David in Service) said it would be a few weeks and they would call when arrived and would schedule install then.
Date: April 13, 2024
Mileage: 178,???
Performed by: Stefano
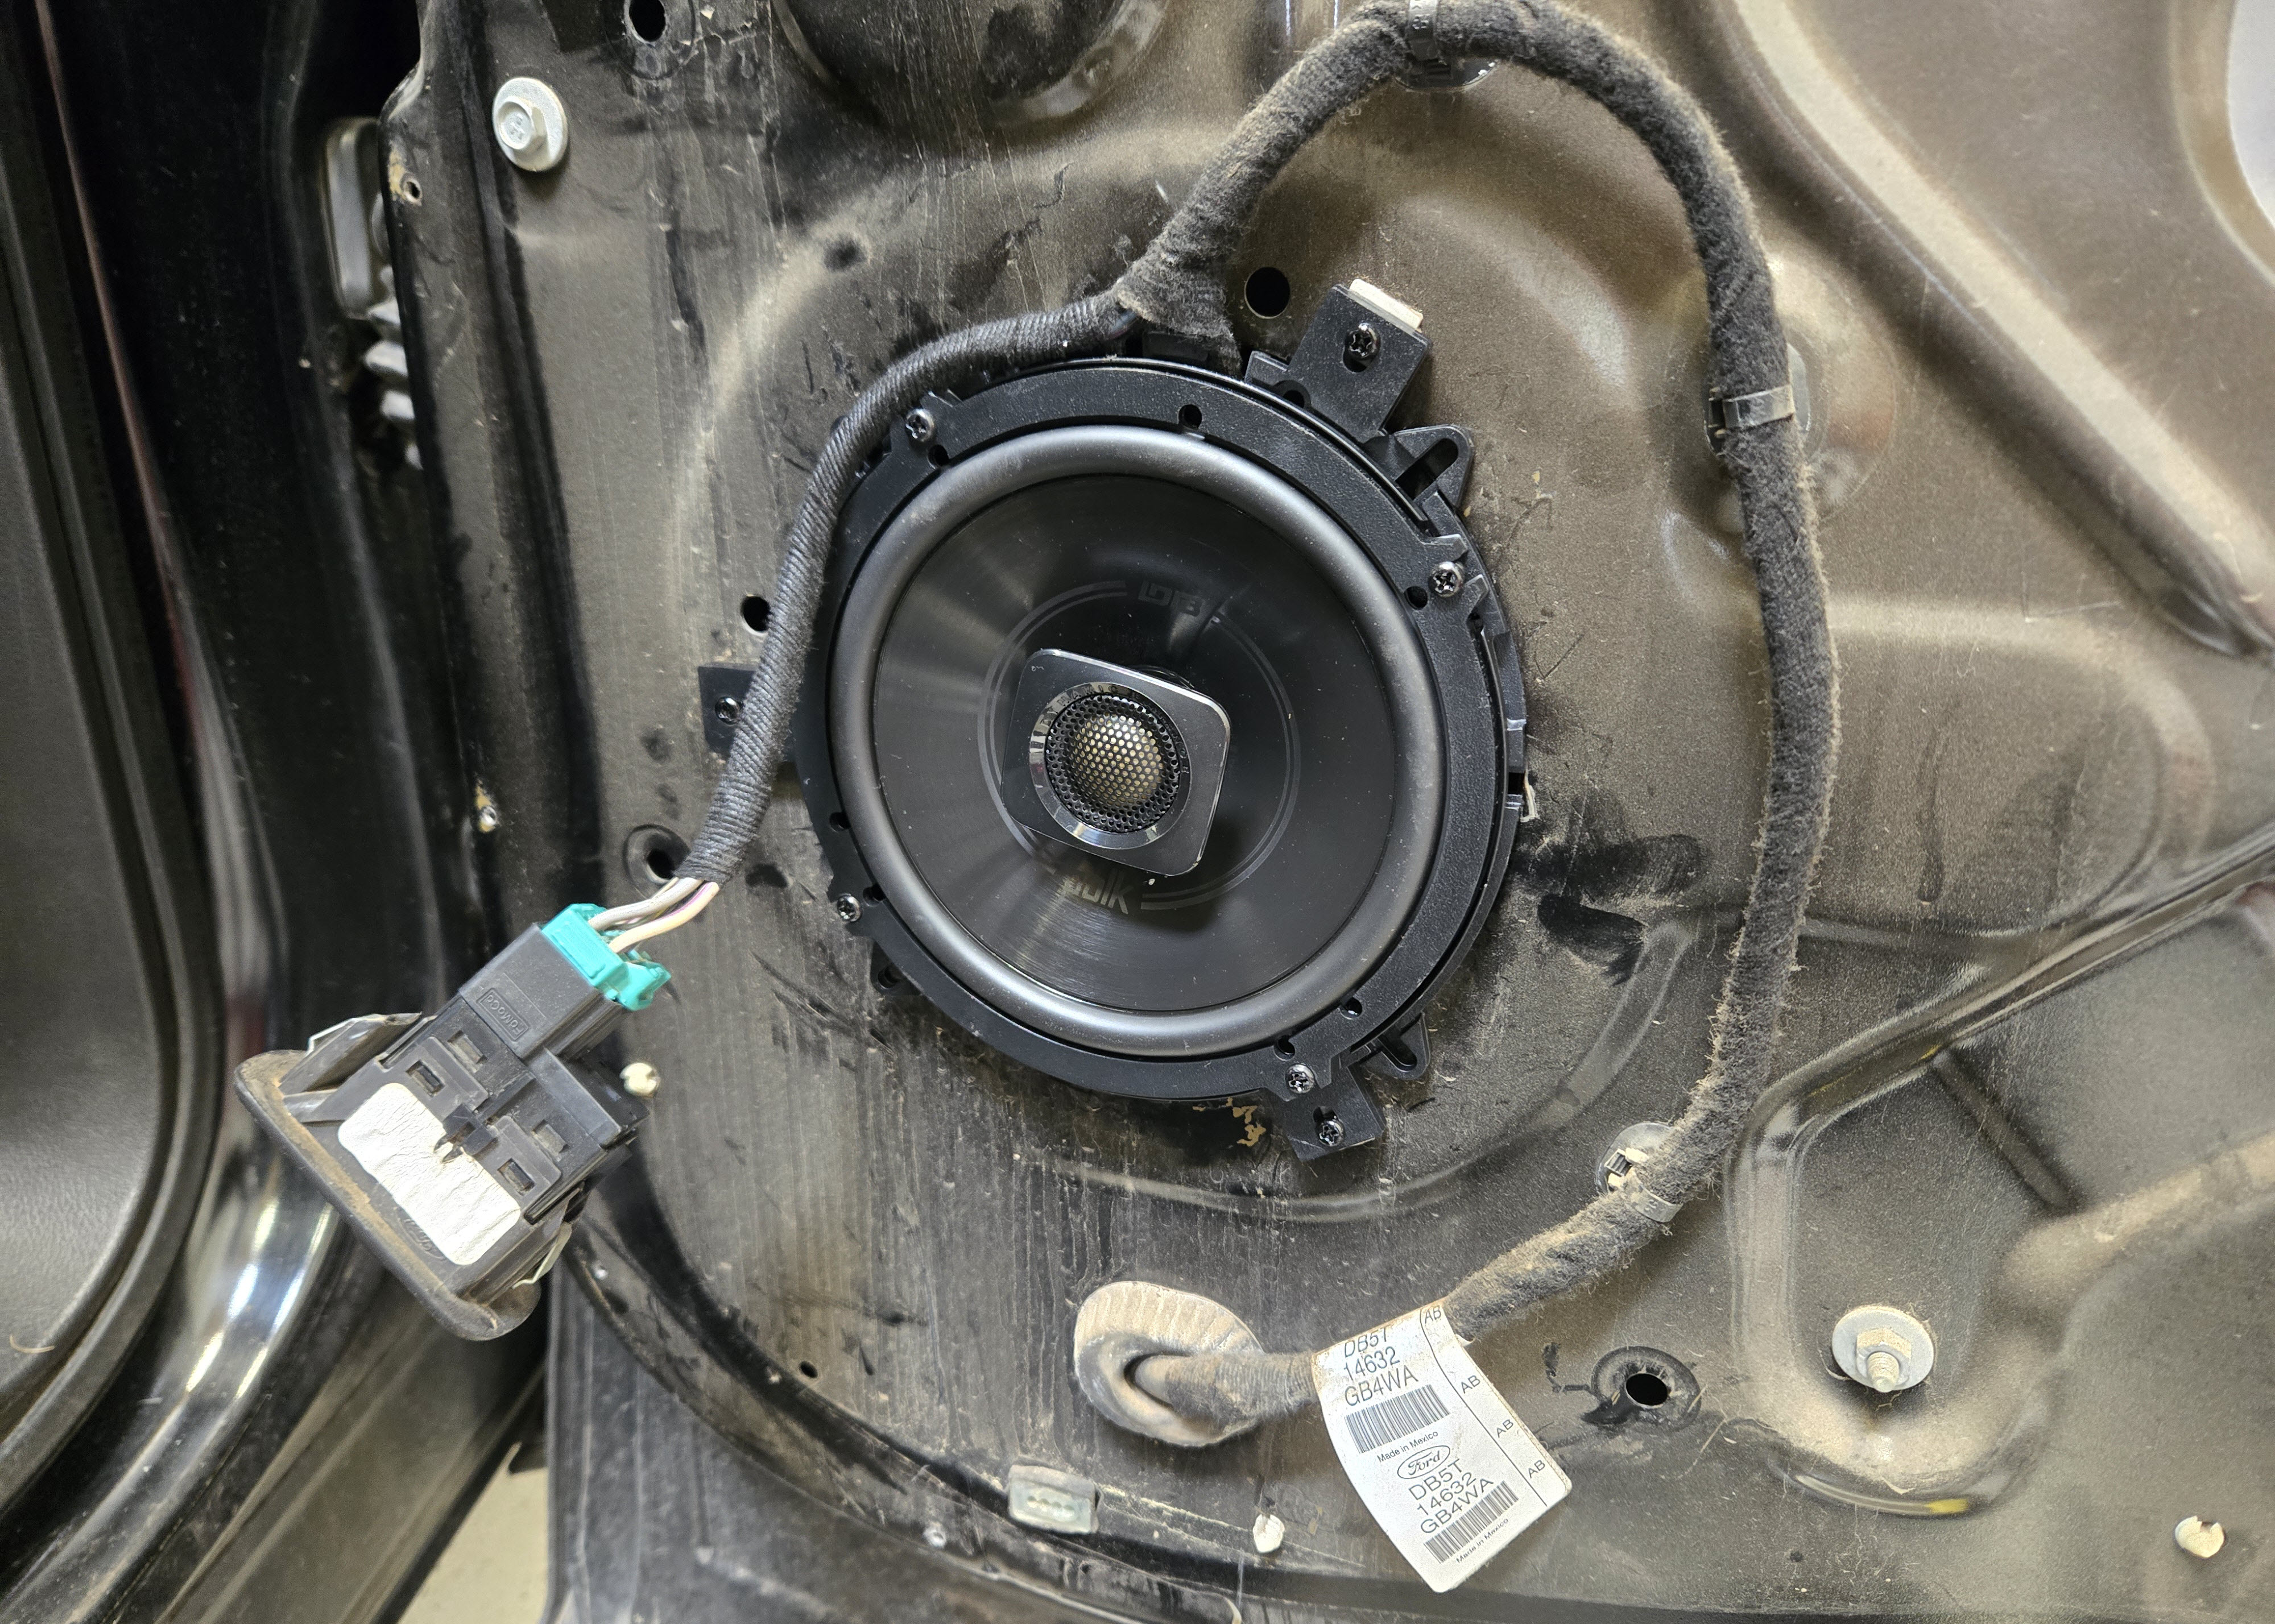
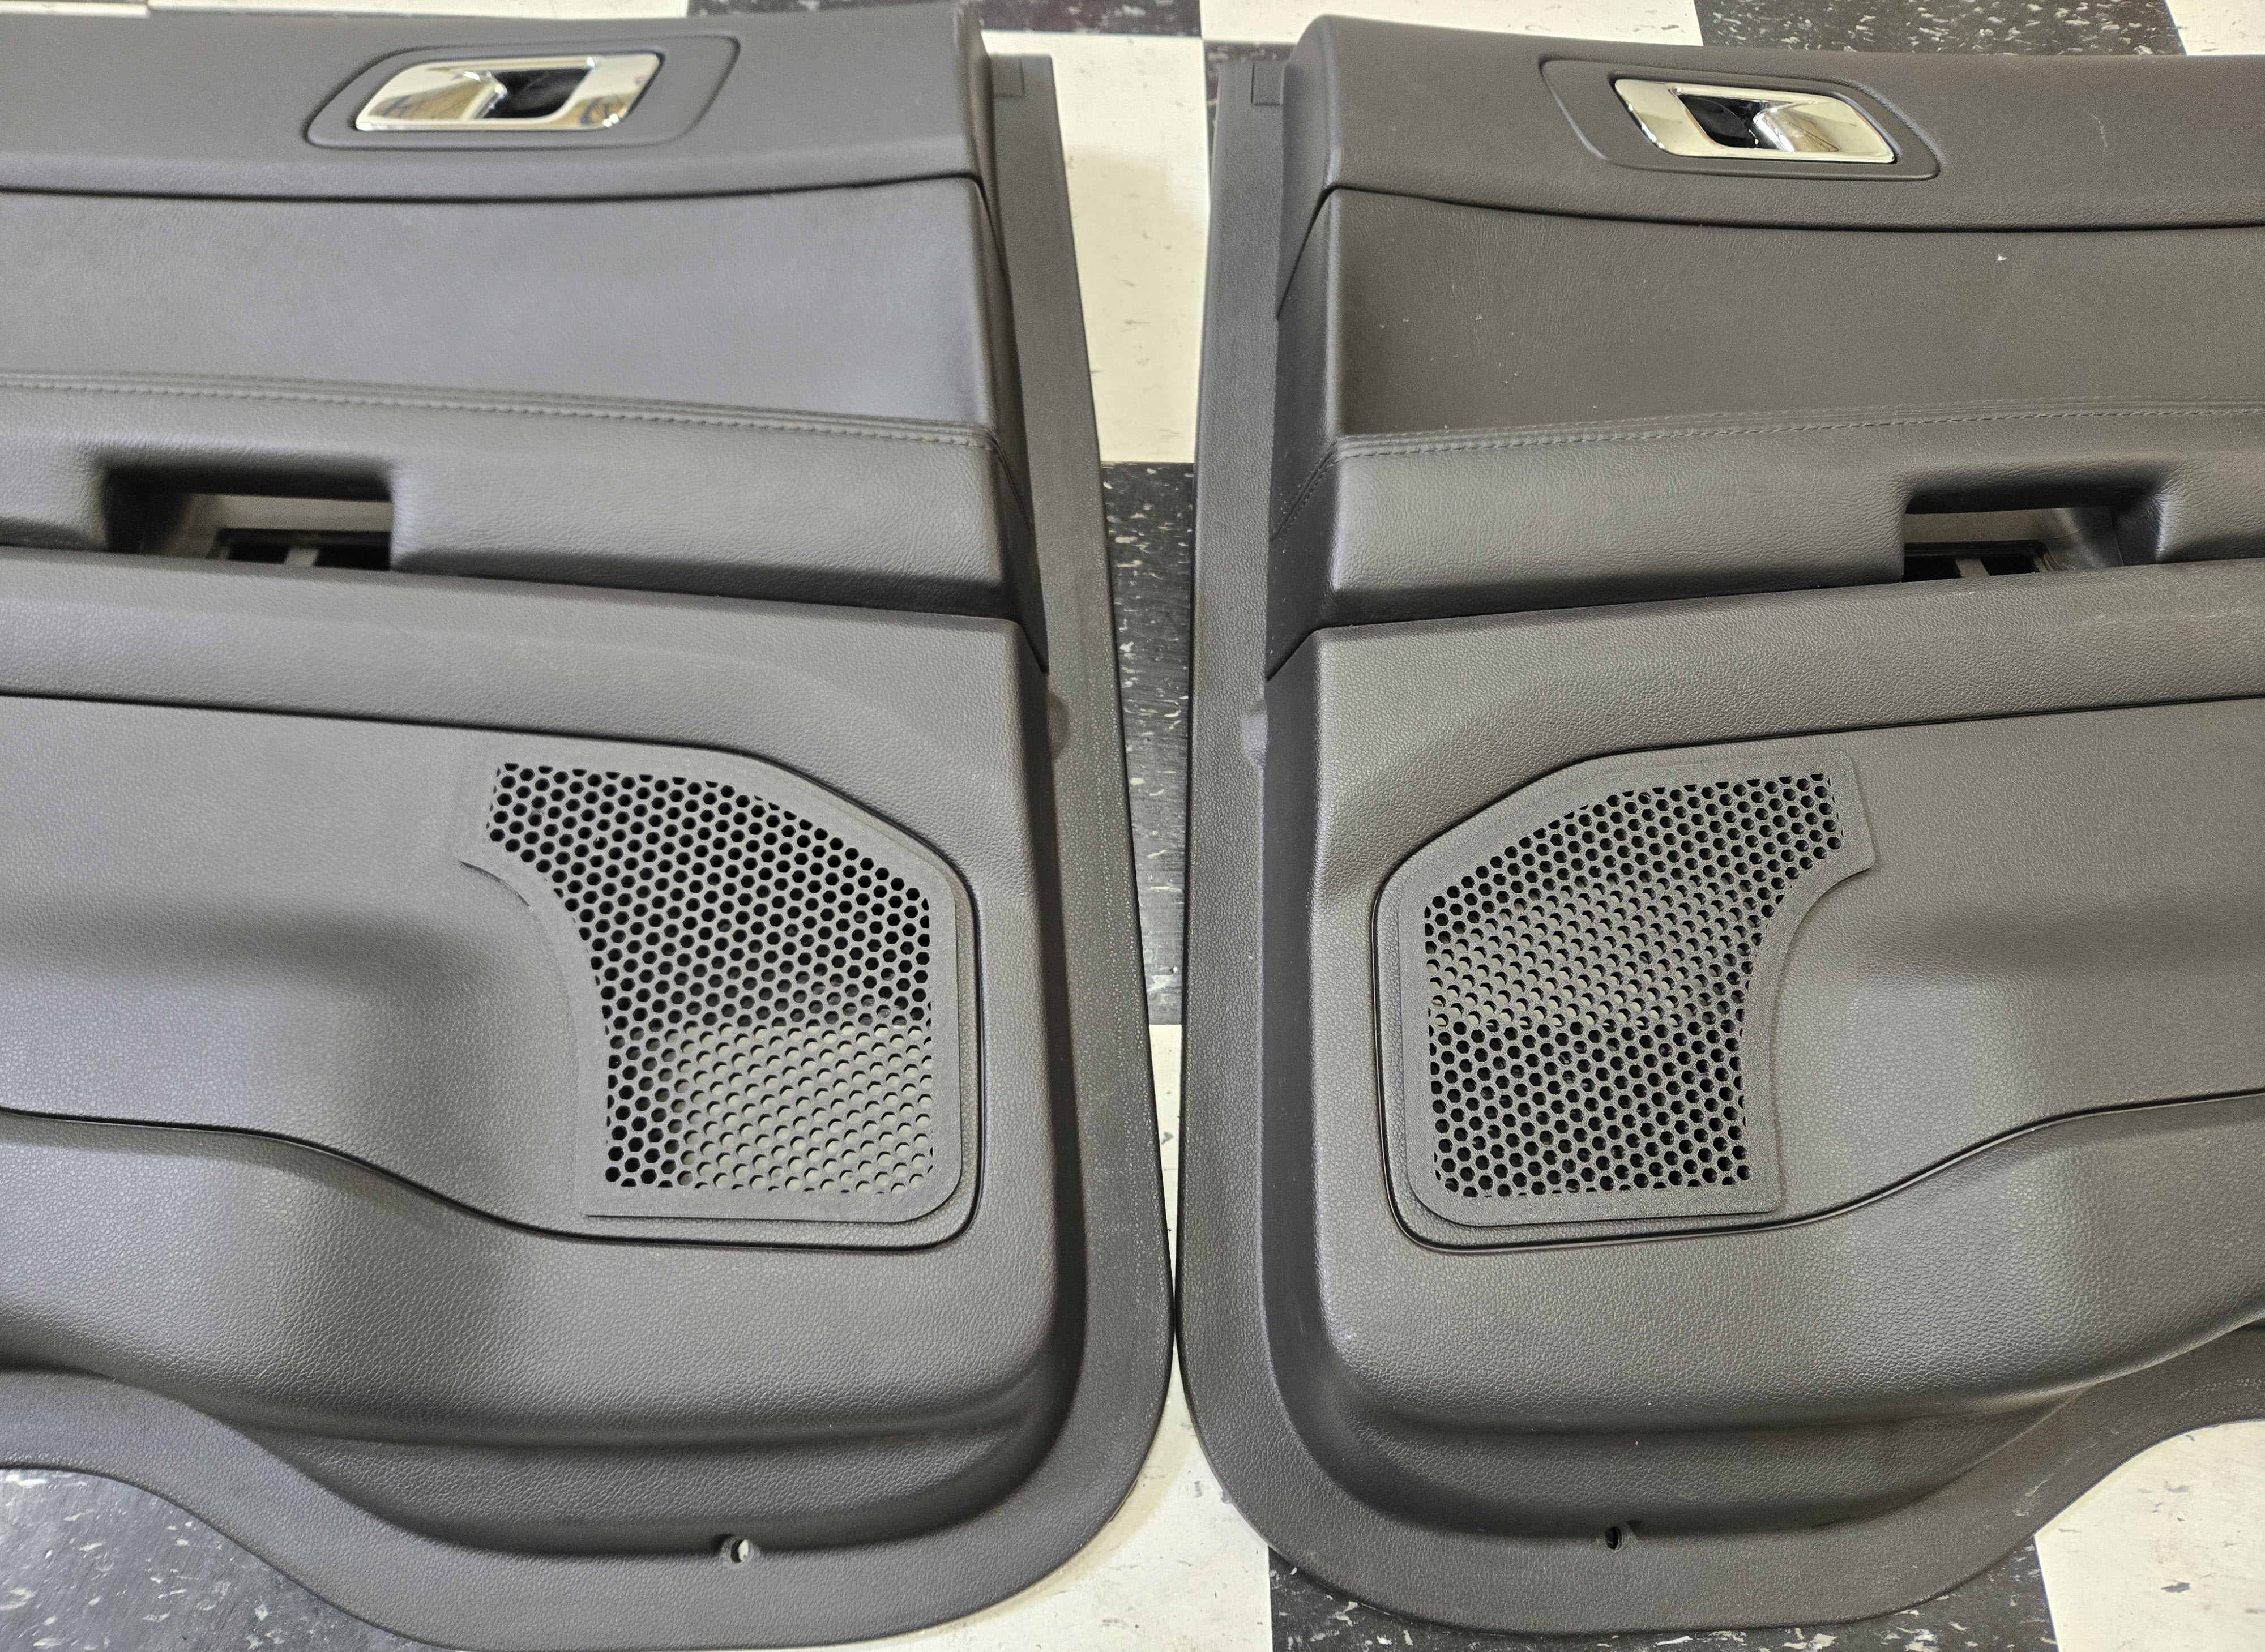
Services Performed – Stefano fitted speakers to the rear doors and chase a rattle in the drivers from door:
- Ordered a set of JBL 6-3/4″ two way speakers for rear doors from Crutchfield.com. Kit came with speaker frame adapter and a wiring adapter for the existing Ford wiring plugs.
- Ordered a set of 3D printer speaker grills from 3Dub who has the De-Policify YouTube channel. Has a great video on how to solve the issue of no speaker opening in rear doors.
- Removed the rear door panels and installed the speakers and tested with stereo. They are a bit quite compared to the front, but working fine.
- Followed the instructions of the video and cut the openings in the rear door panels and epoxied in the grills. Let dry for a few days.
- Wiped down the dust, etc. off the door frames to clean it up nicely before reinstalling.
- Ordered replacement Door Panel clips from eBay to replace the couple that were missing or broken off.
- Scraped off the foam perimeter sealing trim around the back of the door panels and replaced with new foam trim. Better than factory now.
- Scraped off the rubber cement sealing bead around the large main door opening, and removed the heavy plastic sheet. Applied a new bead of butyl sealant (from the roll I have) and re-mounted the plastic. Rolled the seal with Dynamat roller to make sure it was solid.
- Reinstalled the door panels with all the clips and foam back in proper place. Wiped it all down and cleaned up.
- Removed the Drivers front door panel in search of a new rattle since it came back from Mt. Hood
- Found the upper window regulator 10mm bolt was super loose. Took at least 6 full turns to tighten it back up. Hopeful, but this wasn’t the rattle amazingly. A clonking noise closing the door is gone now though.
- Found the forward window track was a little loose and could potentially rattle. It just has a push fit over the interior frame, so loosened its lower supporting bolt and pushed up tighter into position so it couldn’t move. Hopeful, but this wasnt’ the rattle either.
- Replaced the missing Drivers door mirror bolt with one ordered from Ford.com.
- Replaced the missing quarter trim clip with one ordered from parts.ford.com
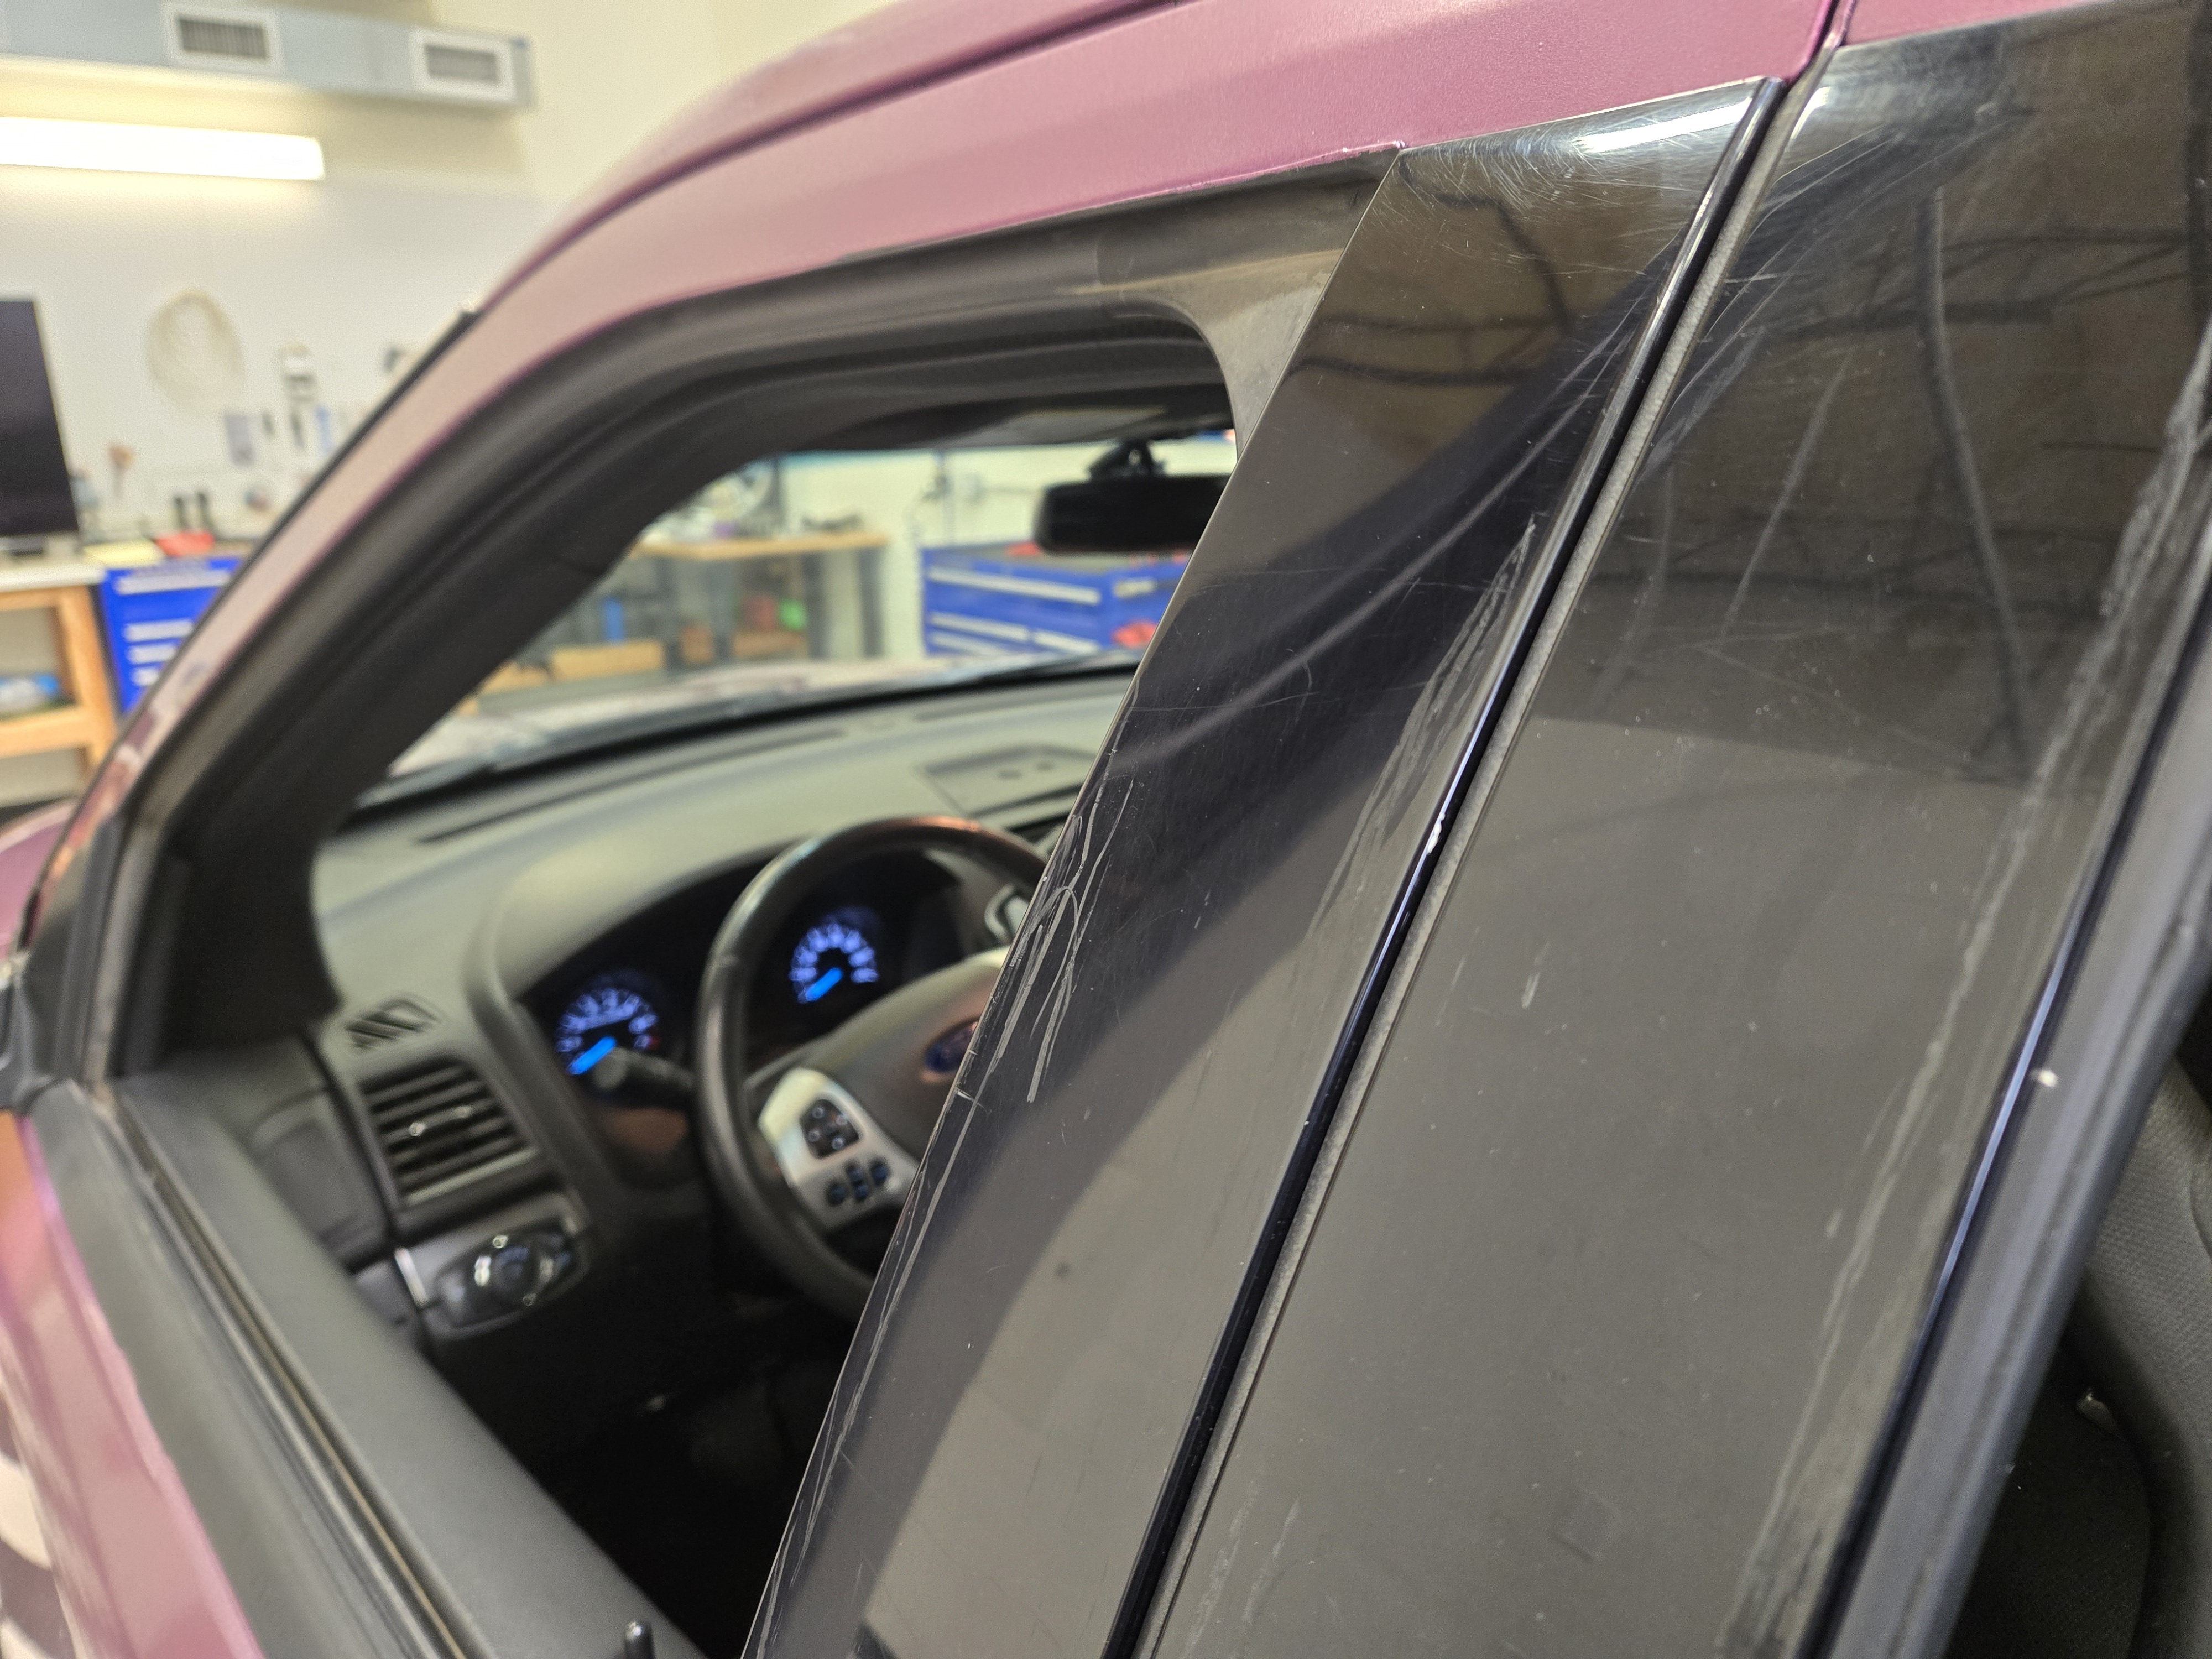
- Found the exterior piano black B pillar trim panel on the window frame was broken away near the top and could flap. Looks like a victim of driver chipping off ice during the winter. Carefully pulled back, cleaned surfaces and applied new 3M exterior mounting tape to reconnect it solidly. Worked perfectly, but wasn’t the source of the rattle.
- Like the rear doors, scraped off the foam perimeter sealing trim around the back of the door panels and replaced with new foam trim. Better than factory now.
- Scraped off the rubber cement sealing bead around the large main door opening, and removed the heavy plastic sheet. Applied a new bead of butyl sealant (from the roll I have) and re-mounted the plastic. Rolled the seal with Dynamat roller to make sure it was solid.
- Reinstalled the door panels with all the clips and foam back in proper place. Wiped it all down and cleaned up.
- Argh!! Rattle is still there. Will need to remove the door panel and drive with it off to narrow down the area of the noise. At this point I think its something loose with the frame-to-glass track, or perhaps the ballistic bulletproof panel. May remove the panel and brackets to lighten the door as well and improve gas mileage.
Date: March 30, 2024
Mileage: 178,???
Performed by: Stefano
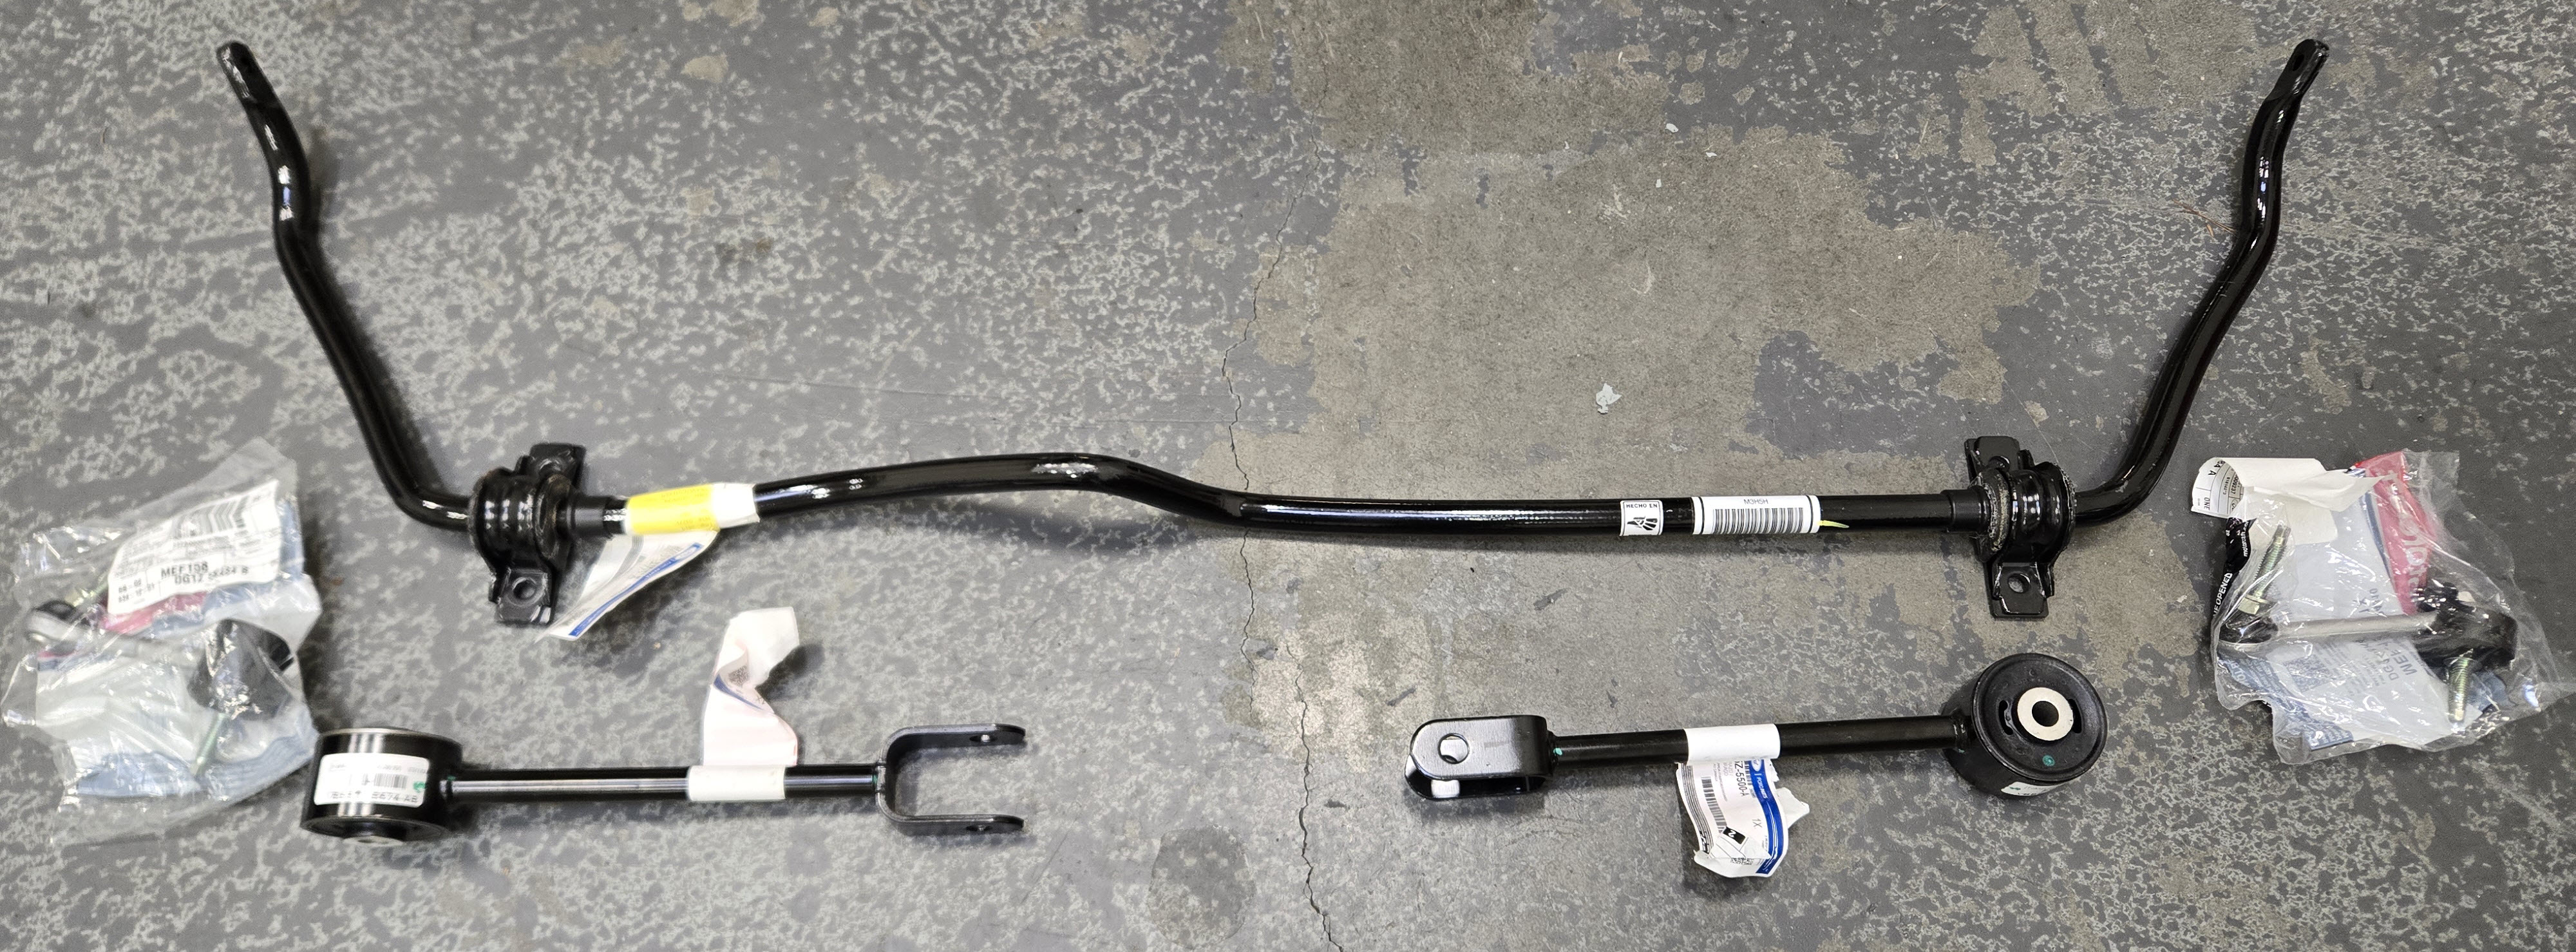
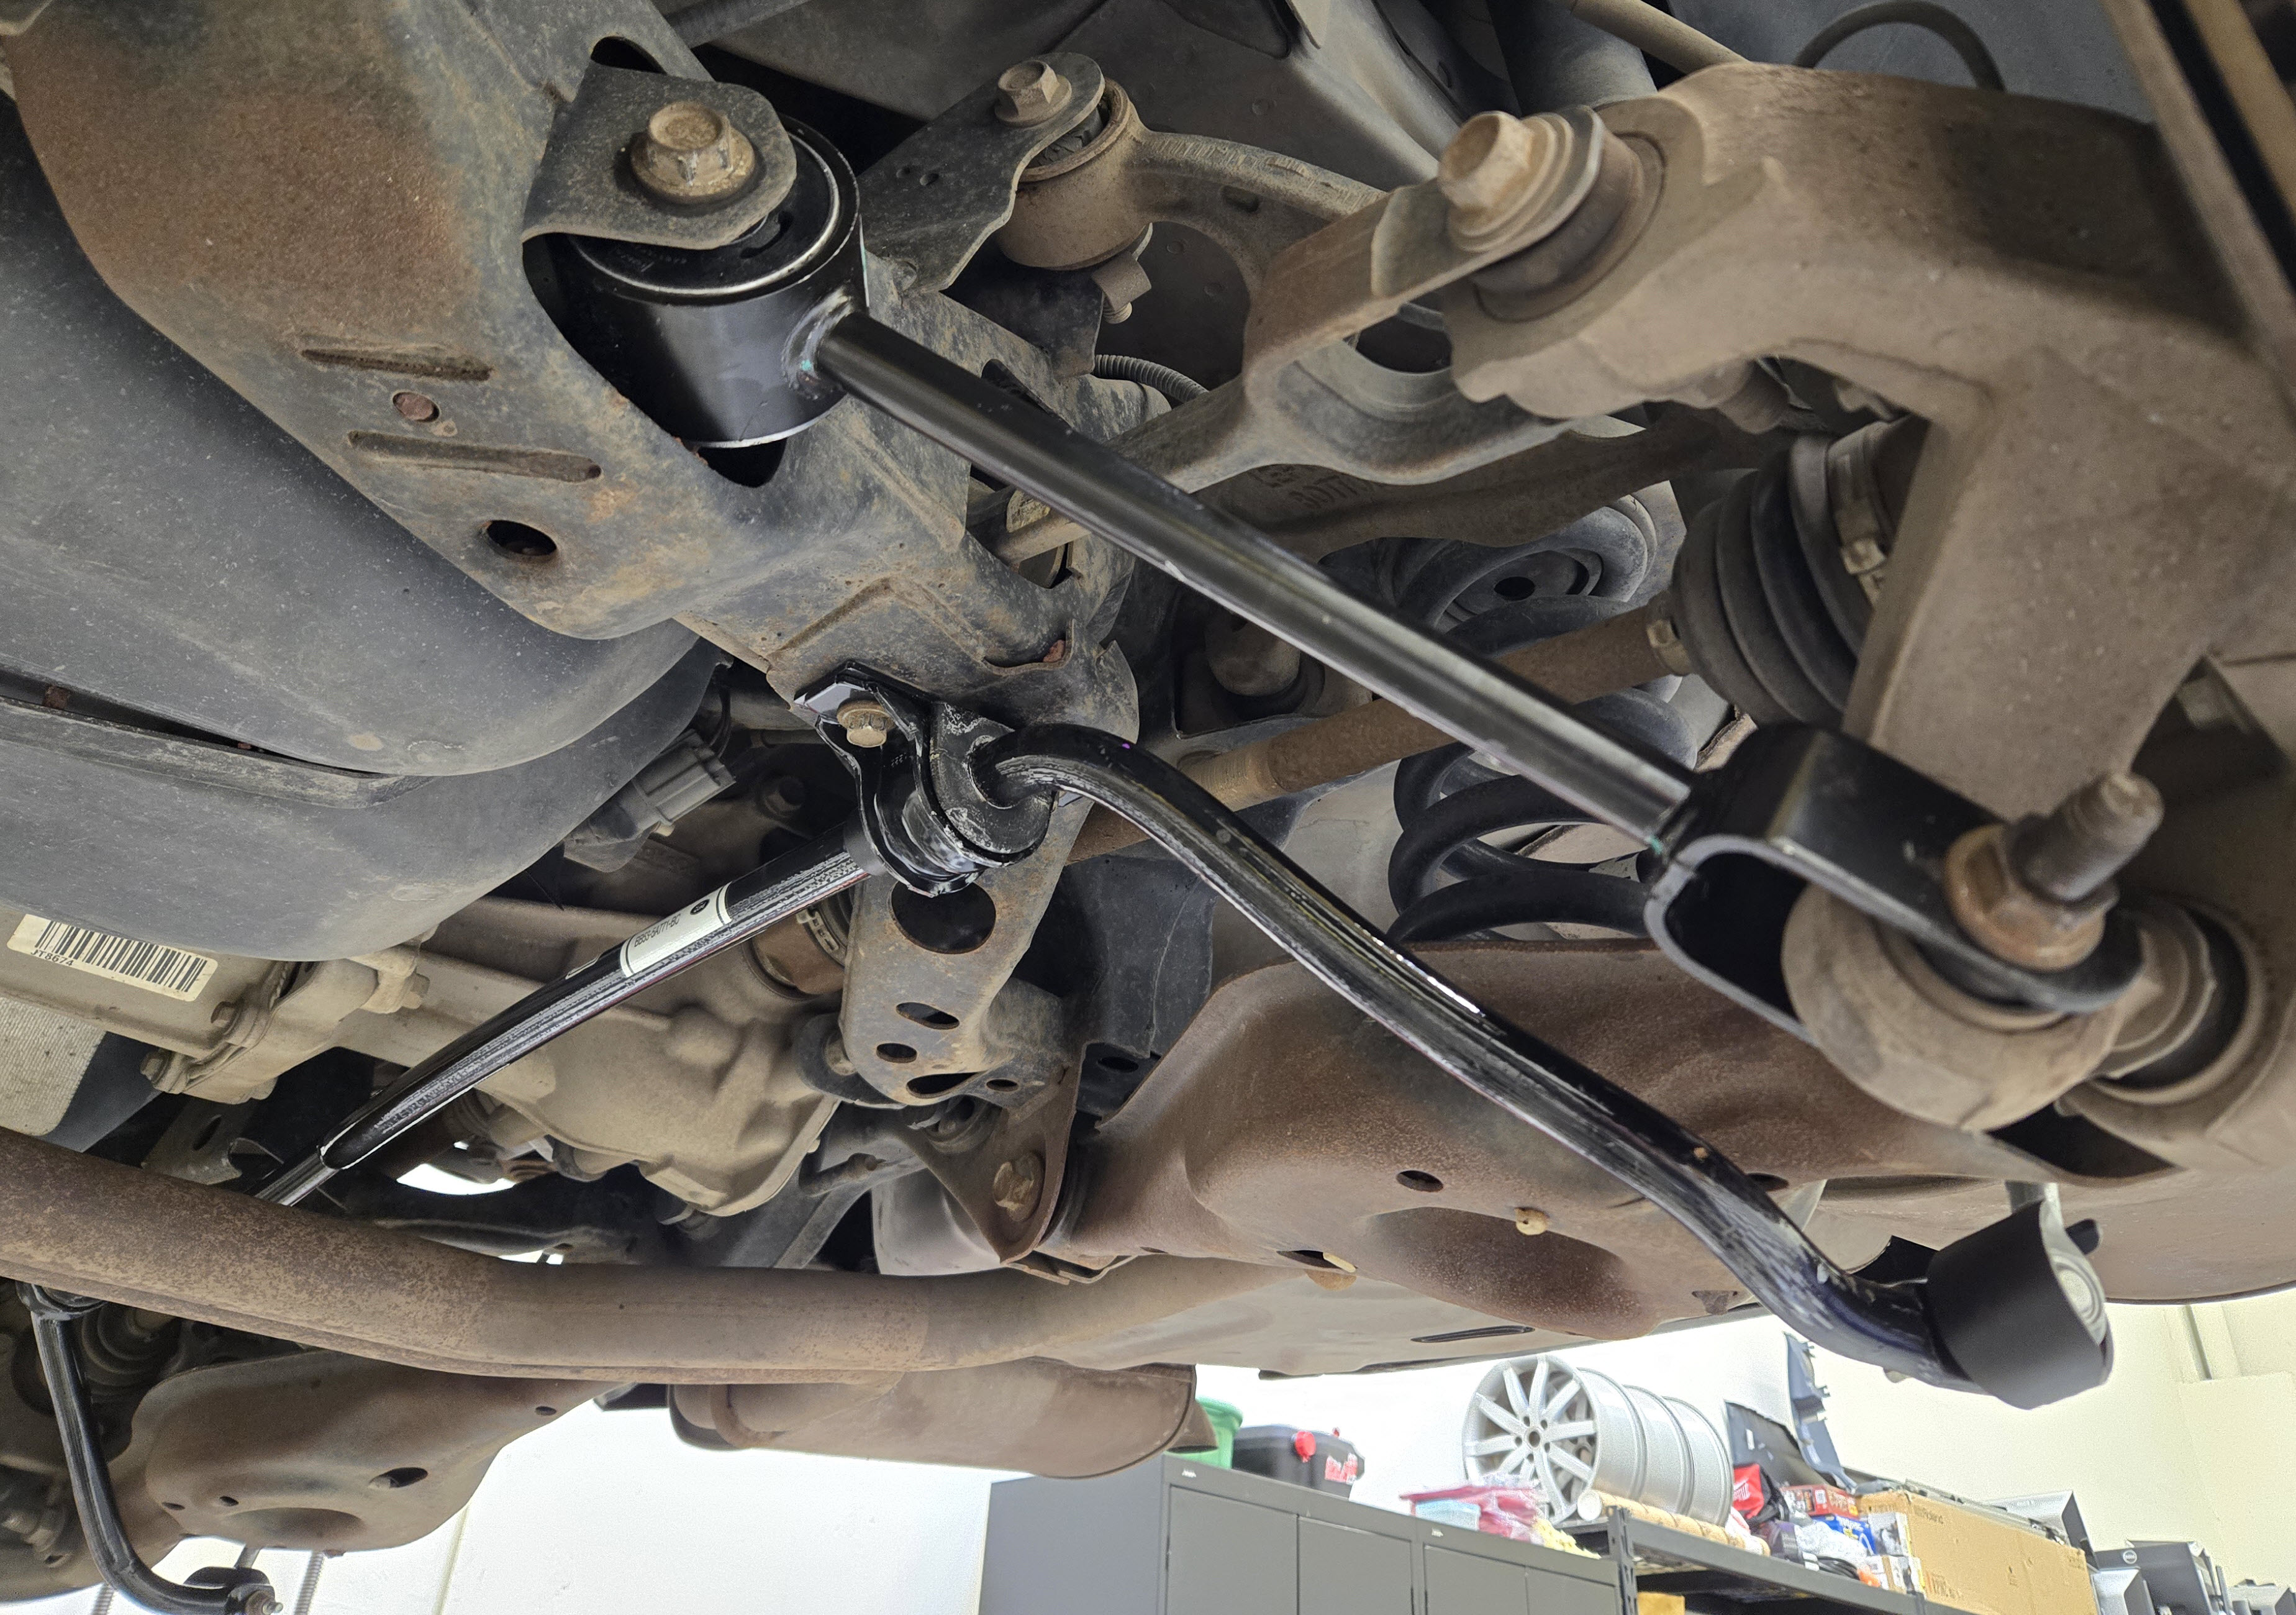
Services Performed – Tackled some rear suspension work to try and eliminate the clunking noted in the March 23rd service. Included:
- Ordered the following parts from local Ford dealer:
- Rear swaybar. Had to get the entire swaybar just to replace the bushings.
- Rear drop links.
- Rear control links
- Installed the rear control links (left and right) to resolve the perished and cracked bushings. Torqued to spec.
- Installed the rear swaybar to resolve the soft bushings. Torqued brackets to spec.
- Installed the rear swaybar drop links (left and right) to resolve the loose feeling. Torqued to spec.
Suspension feels ‘better’ but I think there is still a clunk going over driveway entrances from the right rear. Further inspection shows most of the rest of the bushings are soft and worn to a degree too. Upper control arms, hub carrier (has three bushings), and lower control arm. Rear shocks look like they were slightly damp at one point, but they seem to still be working (this would be my next choice for replacement since a wear part and already changed front struts). Plus the entire rear subframe mount. Looks like I can get just the bushing for the lower control arm (and press it in) but the rest of it all requires replacing all the parts. Might pick away at this as I get inspired.
Date: March 23, 2024
Mileage: 178,433
Performed by: Stefano
Services Performed – Stefano did the annual service today plus a few extras. Barney is back from 3 months of daily drives up and down Mount Hood, OR.
- Changed the Engine Oil.
- Added about 6 quarts of Castrol Edge 5W-20
- Changed the Engine Oil Filter.
- Installed a Wix XP 57502XP from Amazon.
- Replaced the Serpentine Belt. Was showing some cracks on the ribs.
- Installed a Dayco 5060450 6PK1145 from Amazon.
- Installed new Spark Plugs. Was uncertain about the last plug change (not in service history)
- Installed six new NGK Iridium IX plus model LTR6IX-11 6509
- Set gap to 0.051″ per manual
- Torqued to 15 Nm per manual
- Cleaned Throttle Body while I had it removed doing the spark plugs
- Tested opening the PTU fill plug to make sure it opened.
- Used 1/4″ allen wrench.
- Next step here is to drill and tap a drain hole and add drain plug.
- Topped off fluids
- ~1/2 gallon winterized washer fluid
- few ounces of engine coolant
- small amount of DOT4 brake fluid
- Tires
- Front and Rears at about 8+/32ndths overall
- Inners a bit thinner that outer edges on all tires, but only about half a 32nd.
- Set pressures to 36 psi including spare
- Front and Rears at about 8+/32ndths overall
- Reset Oil Life via dash interface
- Inspected Wiper Blades – All OK
- Inspected Exterior Lights – All OK
- Inspected Suspension
- Front Suspension all OK
- Rear Suspension has a clunks still, and noted three things to start with:
- LR Control Link Rubber is perished/splitting. RR is deteriorated. Recommend replacing both.
- Rear Sway Bar bushings are soft. Recommend replacing.
- Rear Sway Bar drop links move super freely. Makes me worried they are worn. Recommend replacing when sway bar bushings are changed.
I’d recommend cleaning the interior again and then doing the PTU oil change and rear suspension work noted.
Date: November 25, 2023
Mileage: 173,762
Performed by: Stefano
Services Performed – Stefano made a few adjustments to the software using Forscan today. I was following up on the Auto headlamp switch addition, and wondered if I could enable the timeout adjustment in the dash display. I adjusted four settings overall today:
- I changed the ‘Autolamp Delay Menu’ from Disabled to Enabled using the Forscan IPC menu. My hope was that this would make it a setting on the dash display that could be adjusted there, but it didn’t appear (sadness). My guess is that it requires that the whole autolamp setup needs to be ‘enabled’, but I didn’t want to do that since the Sun sensor wasn’t installed. Afterwards I compared to the IPC As Built block data and noted that it changed the first digit of 720-01-01 from original value 2 to new value A (2C0A 0023 to AC0A 0023).
- I changed the first number of IPC As Built Block 720-01-02 from the original value of 8 to B (eight to Bee). 8E11 4C03 to BE11 4C03. This enabled the Intelligent AWD status screen on the dash display under information. Shows where the car is sending the torque to each wheel.
- I changed the vehicle Drivetrain Type from ‘Incorrect value or not configured’ to AWD using the Forscan IPC menu. Afterwards I compared to the IPC As Built block data and noted that it changed 720-01-01 block eighth digit from original value 3 to new value 2 (AC0A 0023 to AC0A 0022). Not sure if this matters at all.
- I changed the ‘Remote Start – Rear Defrost’ from Disabled to Enabled using the Forscan IPC menu. This in theory would kick on the rear defroster when the car is remote started, presumably warming up on a frozen day before coming out to drive it. Figure it makes sense to thaw the rear window. Afterwards I compared to the IPC As Built block data and noted that it changed 720-01-03 block second digit from original value 0 to new value 8 (C0F3 0000 to C8F3 0000).
Date: November 25, 2023
Mileage: 173,762
Performed by: Stefano
Services Performed – Stefano wanted the headlights to come on automatically when the car was running. Ford offered this as an option – Auto Lamps. Found a video of someone upgrading a 2013 PIU (view here) and he laid out the parts needed (sort of). He listed a replacement headlamp switch module (FLM) and a Sunlight Sensor. I did a bit of research on my own and determined there were two FLM modules, one with Fog Lights and one without. I looked in Barney’s fender wells and there is no fog light wiring harness, so I opted to get the FLM module without it (Ford p/n CT4T-13D061-BA used from eBay for about $37). I also got the sunlight sensor new from eBay for about $32 (Ford p/n DG9Z-13A018-E).
- I removed the existing headlight module and installed the ‘new’ one. Easy task. As soon as I started the car and set the light switch to ‘Automatic’ they headlights come on when the car starts, and turn off 20 seconds after the car is turned off. Success. The 20 second time period is changeable up to 3 minutes, but I left it stock.
- I went to add the Sunlight sensor and removed the filler plug on the center of the dash, but was disappointed to find there was no wiring harness attached to it. Looked around in the hole, no luck. So, it won’t be able to tell if it’s dark or light, and won’t automatically turn the lights on/off based on the light condition. Not a big deal, I prefer them on like DRL anyways, but the side effect is that it turns the dash to ‘night mode’ even if its day. This dims the instrument cluster and puts the Sync 3 display into night mode. Not ideal.
- Next up I should spend some time to see if anything is needed in the software for the car by using Forscan.
Date: November 24, 2023
Mileage: 173,755
Performed by: Stefano
Services Performed – Stefano noticed that the headlight brightness seem a little wimpy. Halogen headlight technology from the 2014’s. I did a little research and saw there was a factor HID option (but that’s a lot of work to swap entire headlamp unit and wiring, plus costs $$$). To get the most out of the existing Halogen system the forum’s were recommending switching the bulbs to the Sylvania 9005 SilverStar Ultra bulbs. Apparently white light and as bright as allowed for Halogen. Ordered a pair off Amazon for $24 each.
- Removed the old bulbs and stored as spare parts. They weren’t matching brands. Go figure.
- Installed the new bulbs.
- Noted that the Left headlight bulb cover boot is missing. DPO.
- Noted that the Left headlight pig tail is not original, and is a difficult fit to get the bulb in/out. It works fine, but I can see the wire splices. Not sure why this needed replaced at one point. Accident damage?
- Aligned the headlights following the Ford procedure in the Workshop manual for VOR headlights.
Is it massively brighter? Not sure. Isn’t worse, and I would say probably a bit brighter.
Stefano also finally tracked down and fixed an annoying metallic ‘Rattle’ that could be heard at medium speeds on bumps. Turns out the police never bolted the rear row of seats down tight. The right rear seat could rock/vibrate on a bump, causing a metallic clank. Torqued down all the 21mm bolts anchoring this. I suspect they were using a simple electric impact driver and the resistance on these nuts was quite high near the bottom, and I had to use a large handle ratchet to get them to properly bottom out and torque up. Quiet again.
Date: November 17, 2023
Mileage: 173,???
Performed by: Les Schwab Tires
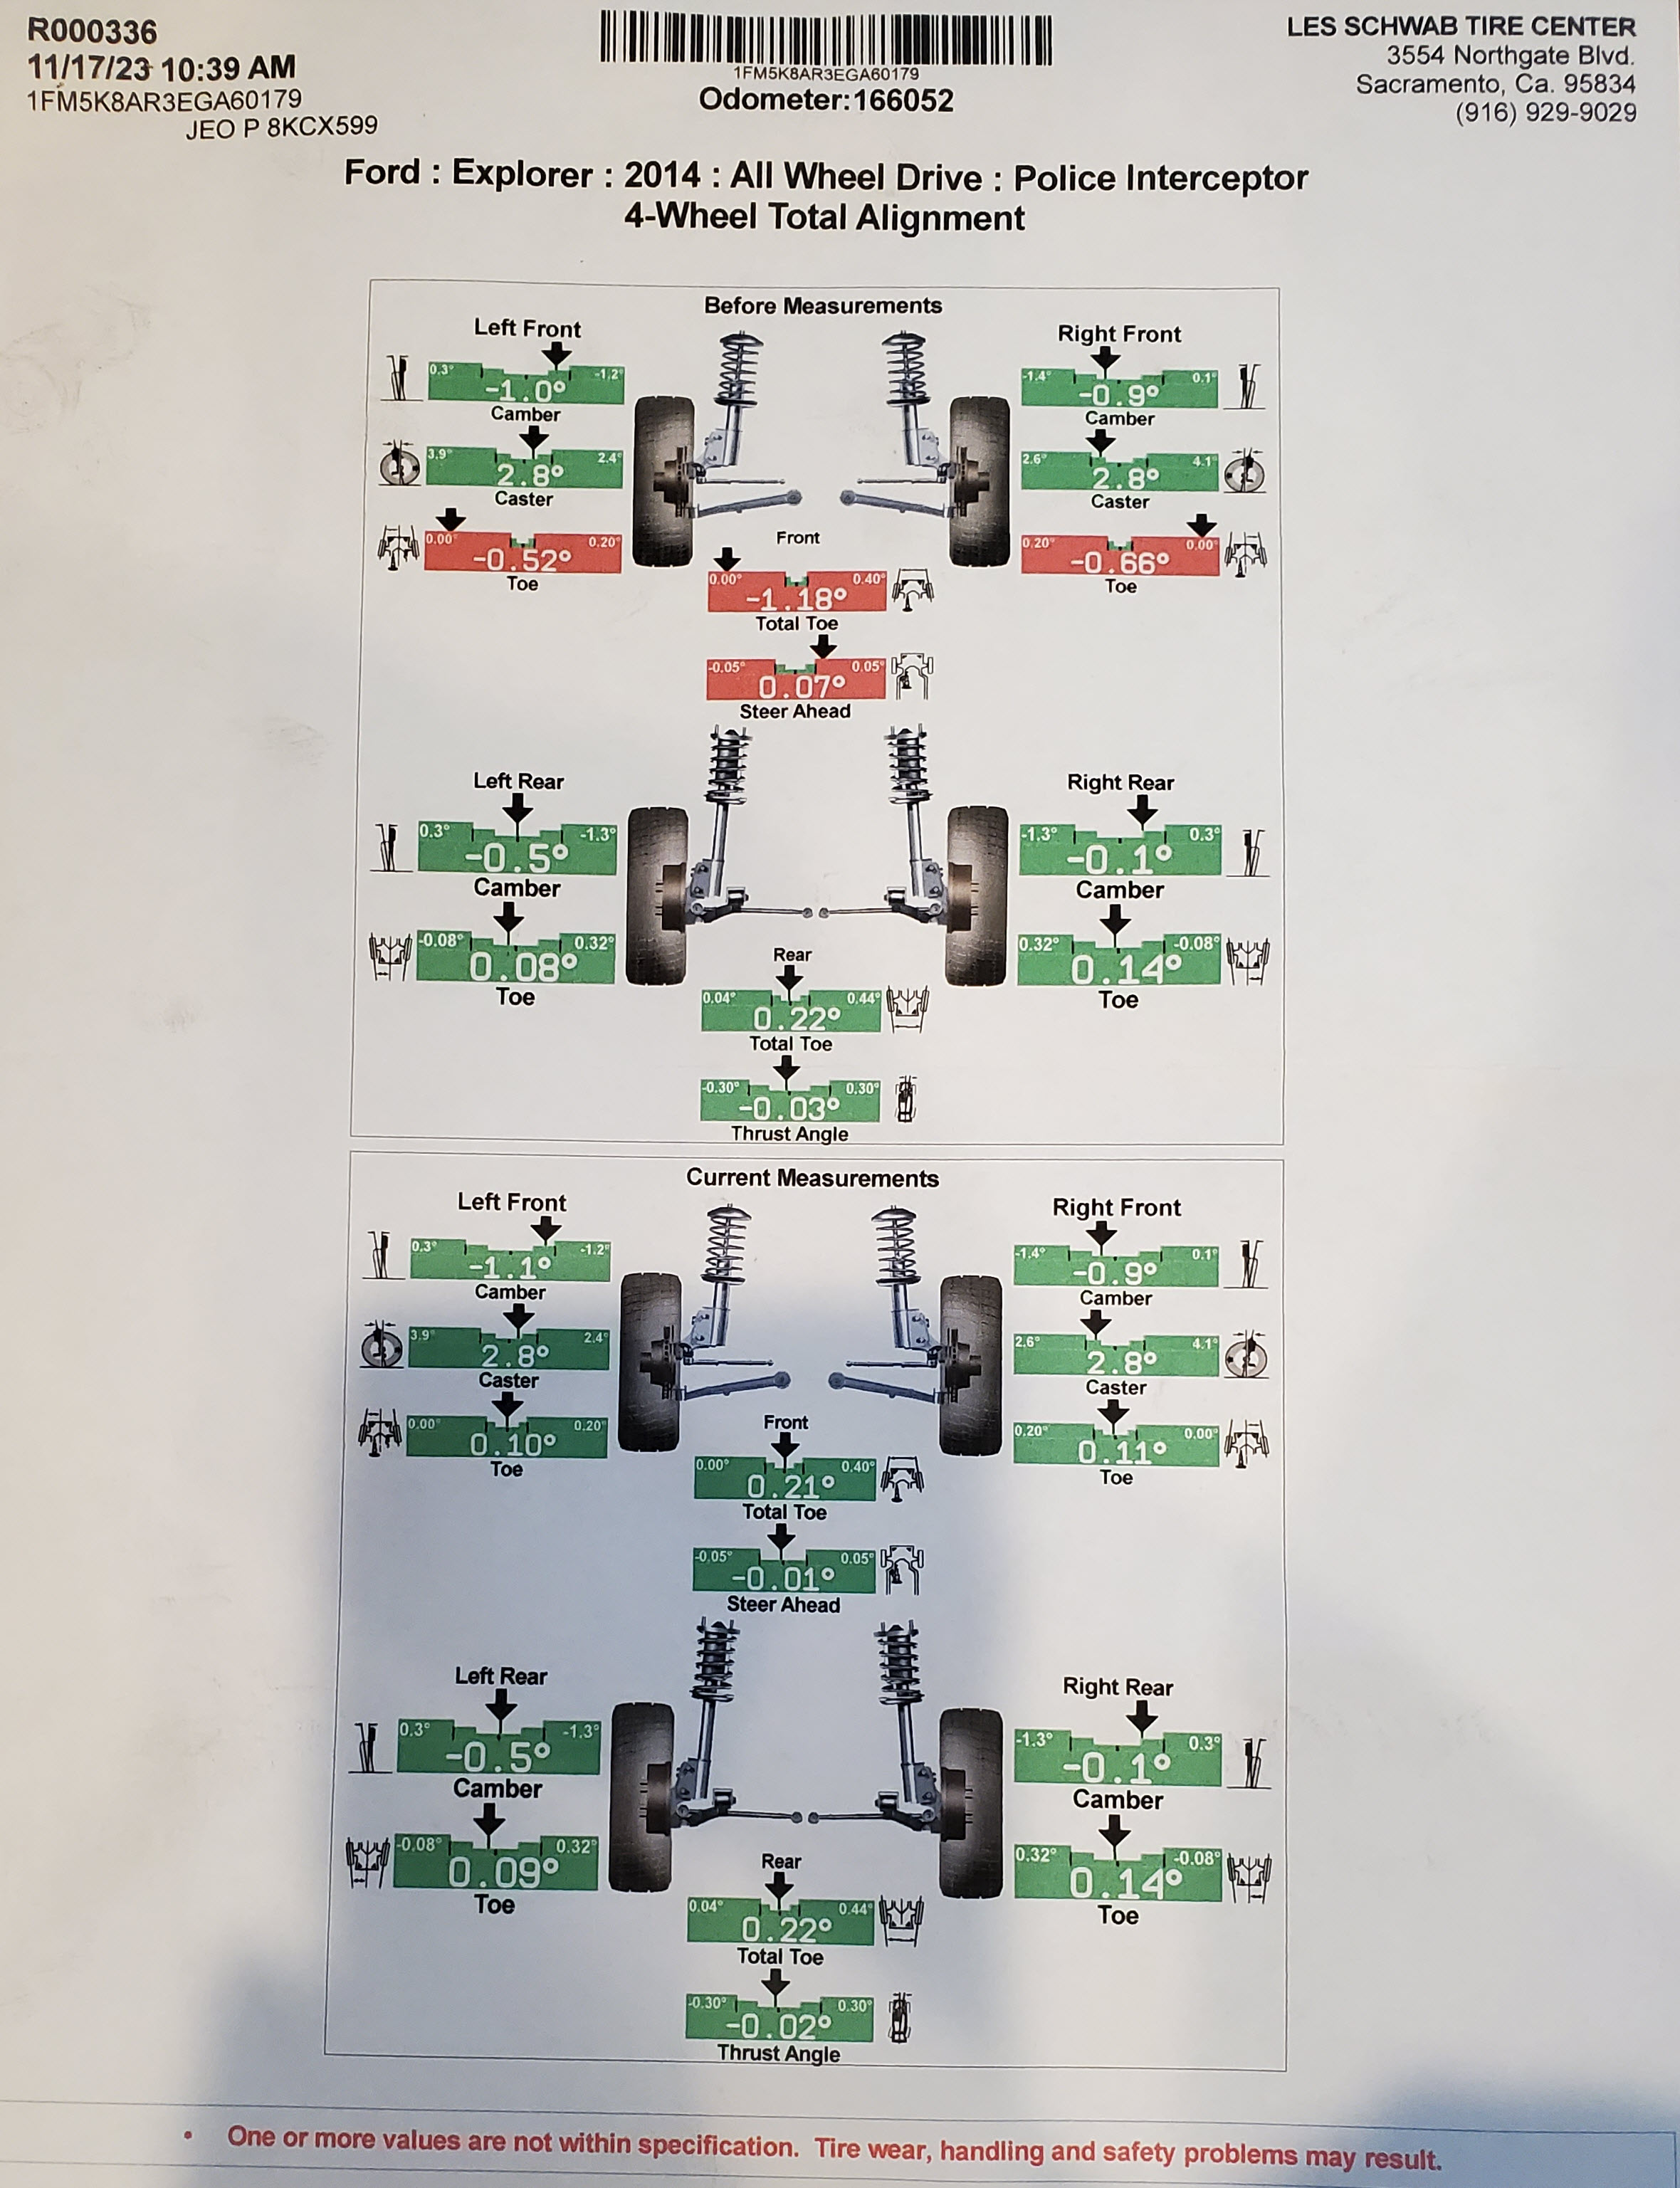
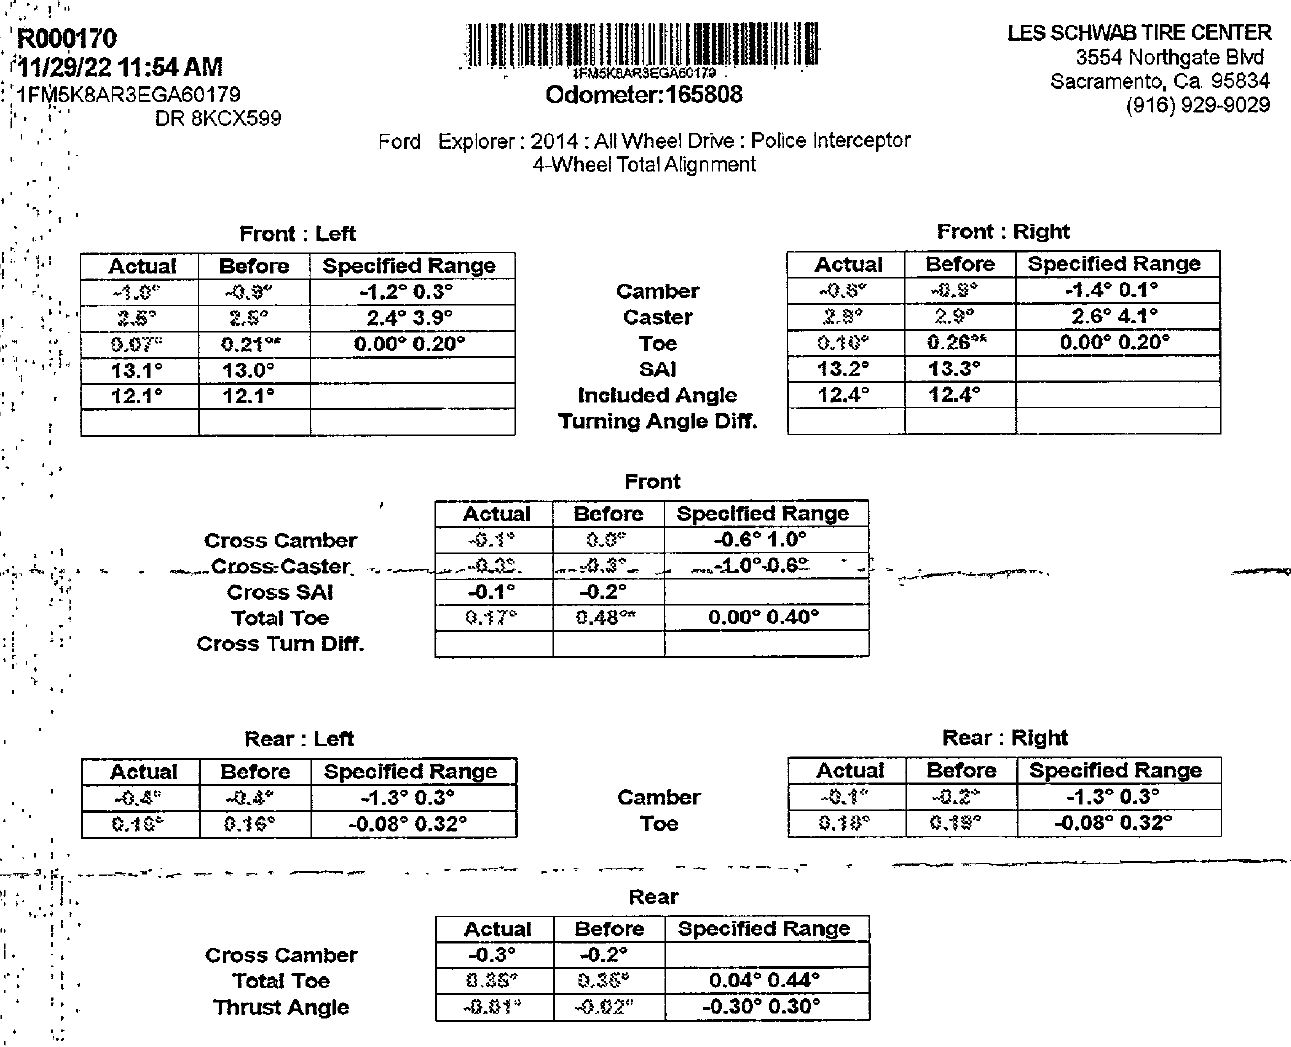
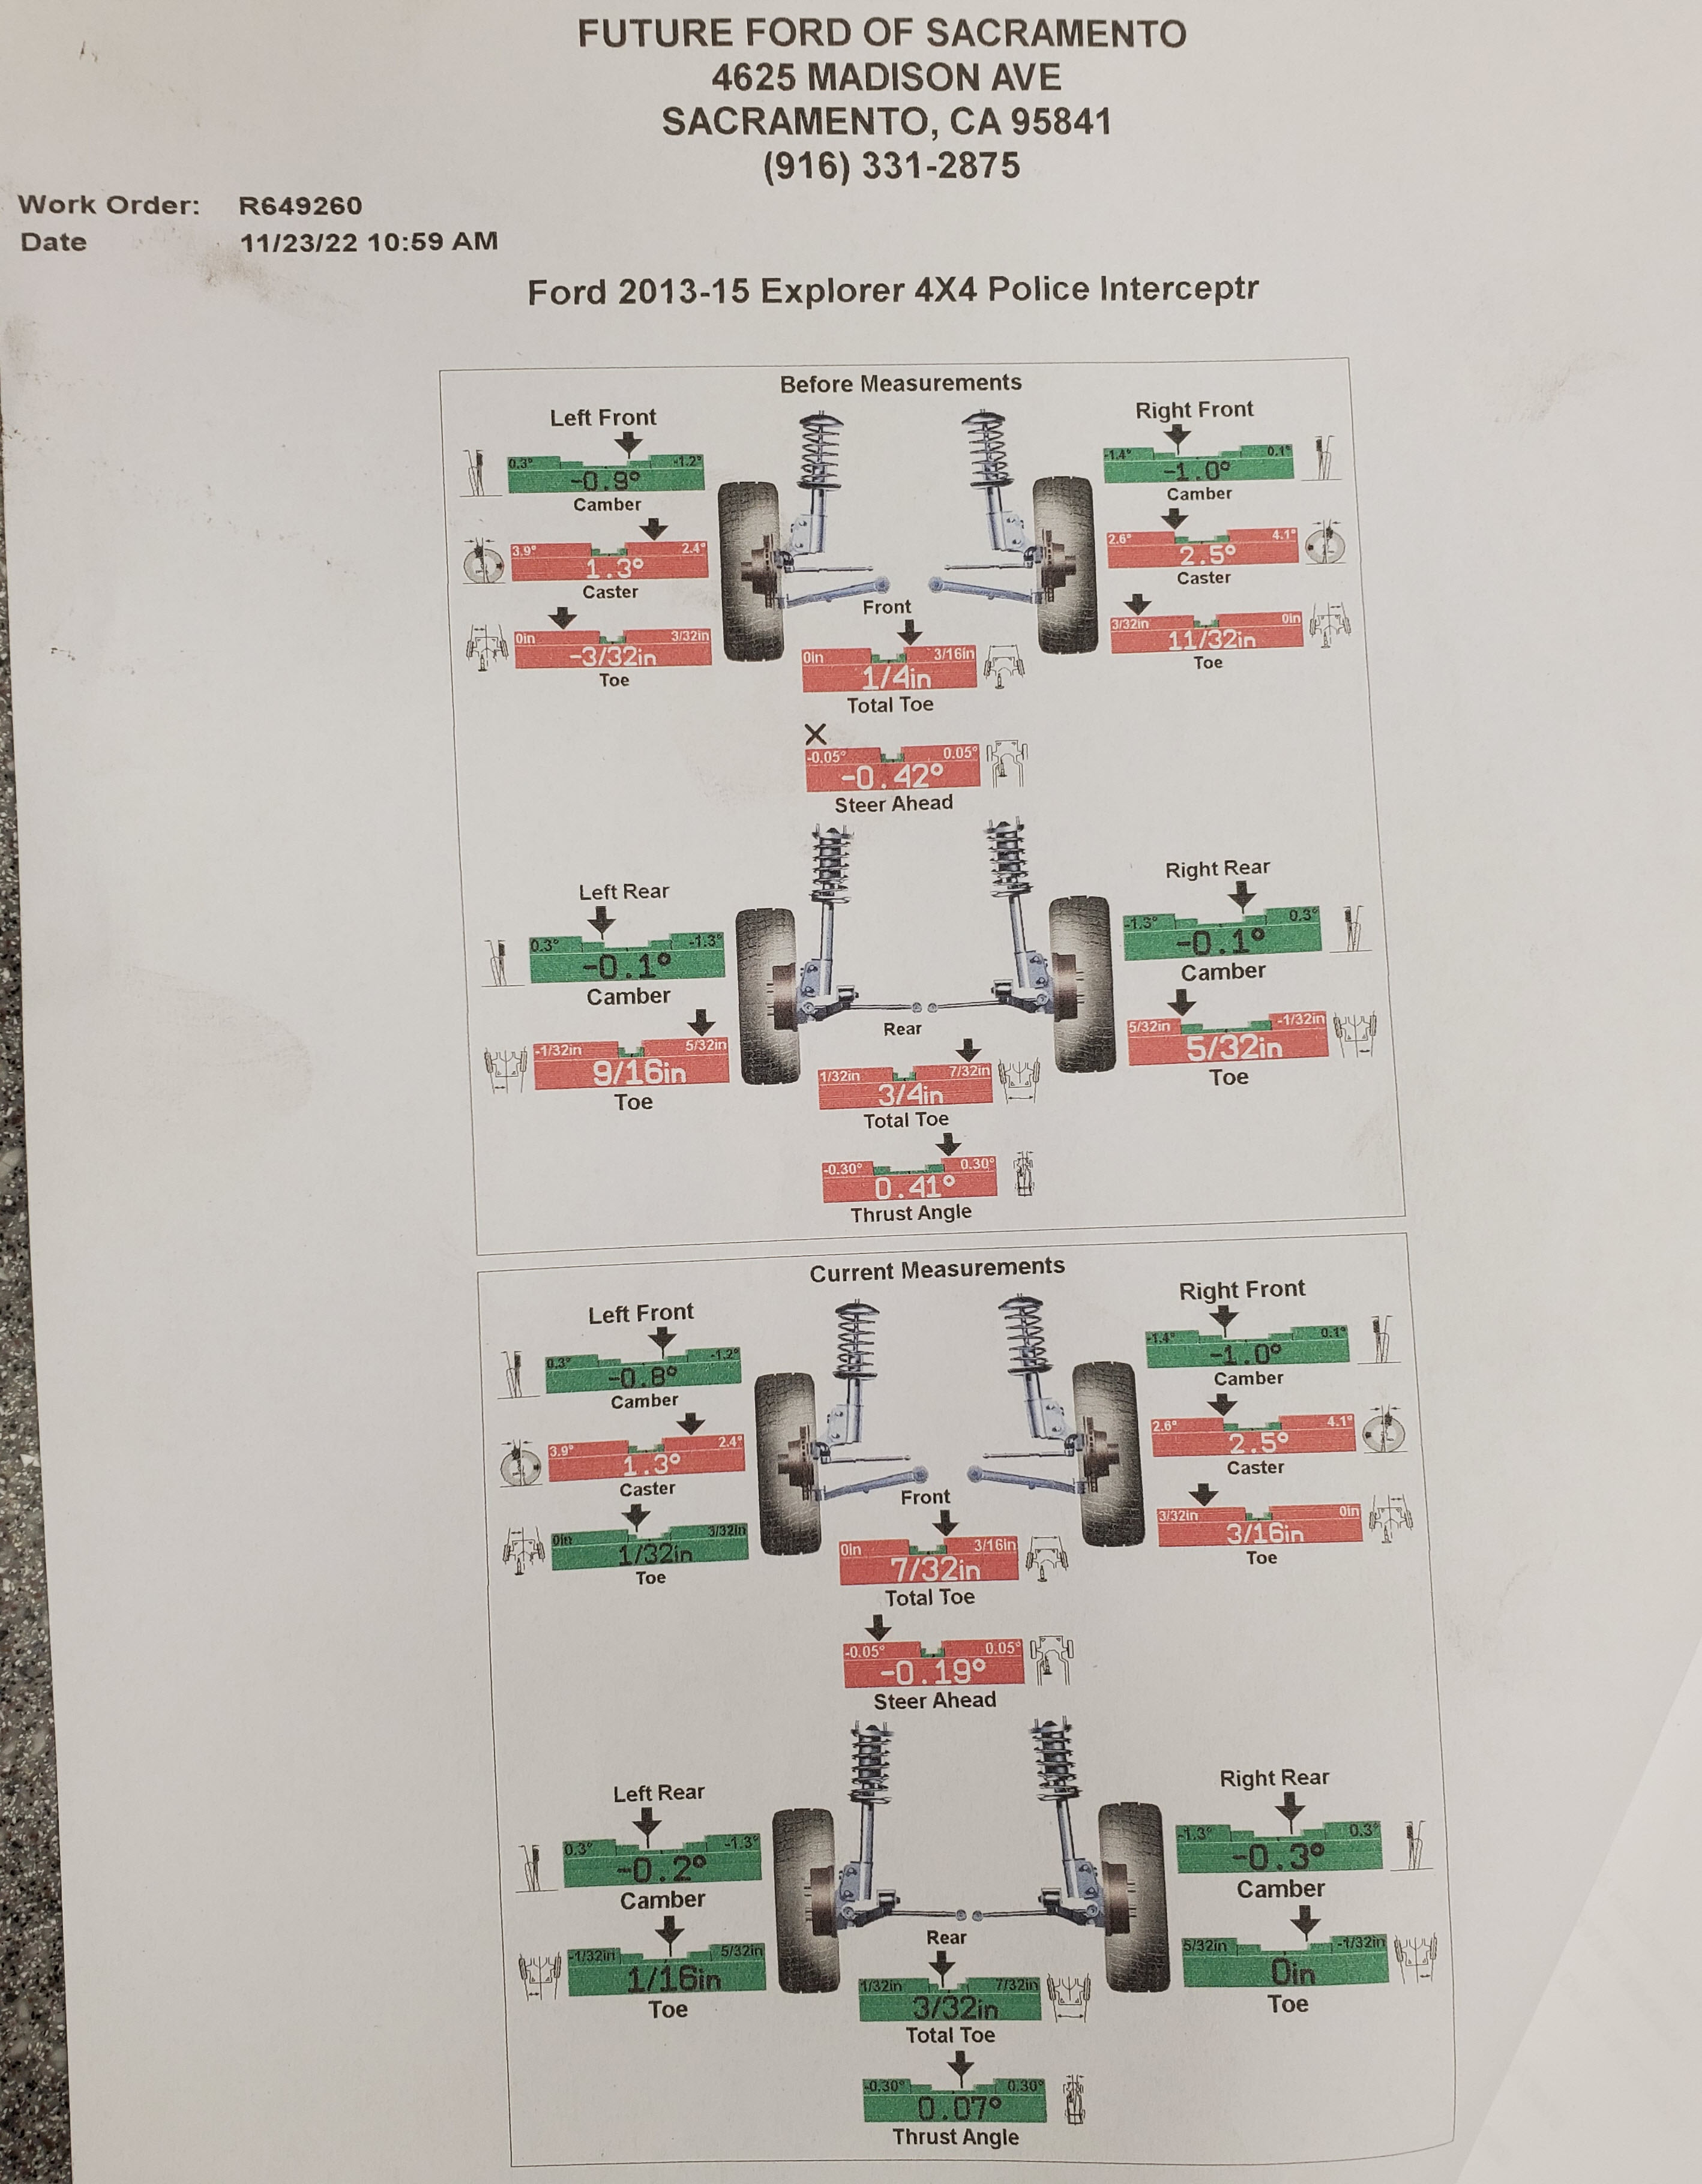
With the front suspension rebuild complete all that was left was getting the front end alignment done. Took back to my local Les Schwab tire center and they gave it a four wheel alignment. The rears were still a full pass to start with (they were aligned by the dealer a year ago during recall). The newly overhauled front suspension camber and caster were within spec, but Toe was a mile out. They aligned that and now things are great.
Date: November 11, 2023
Mileage: 173,???
Performed by: Stefano
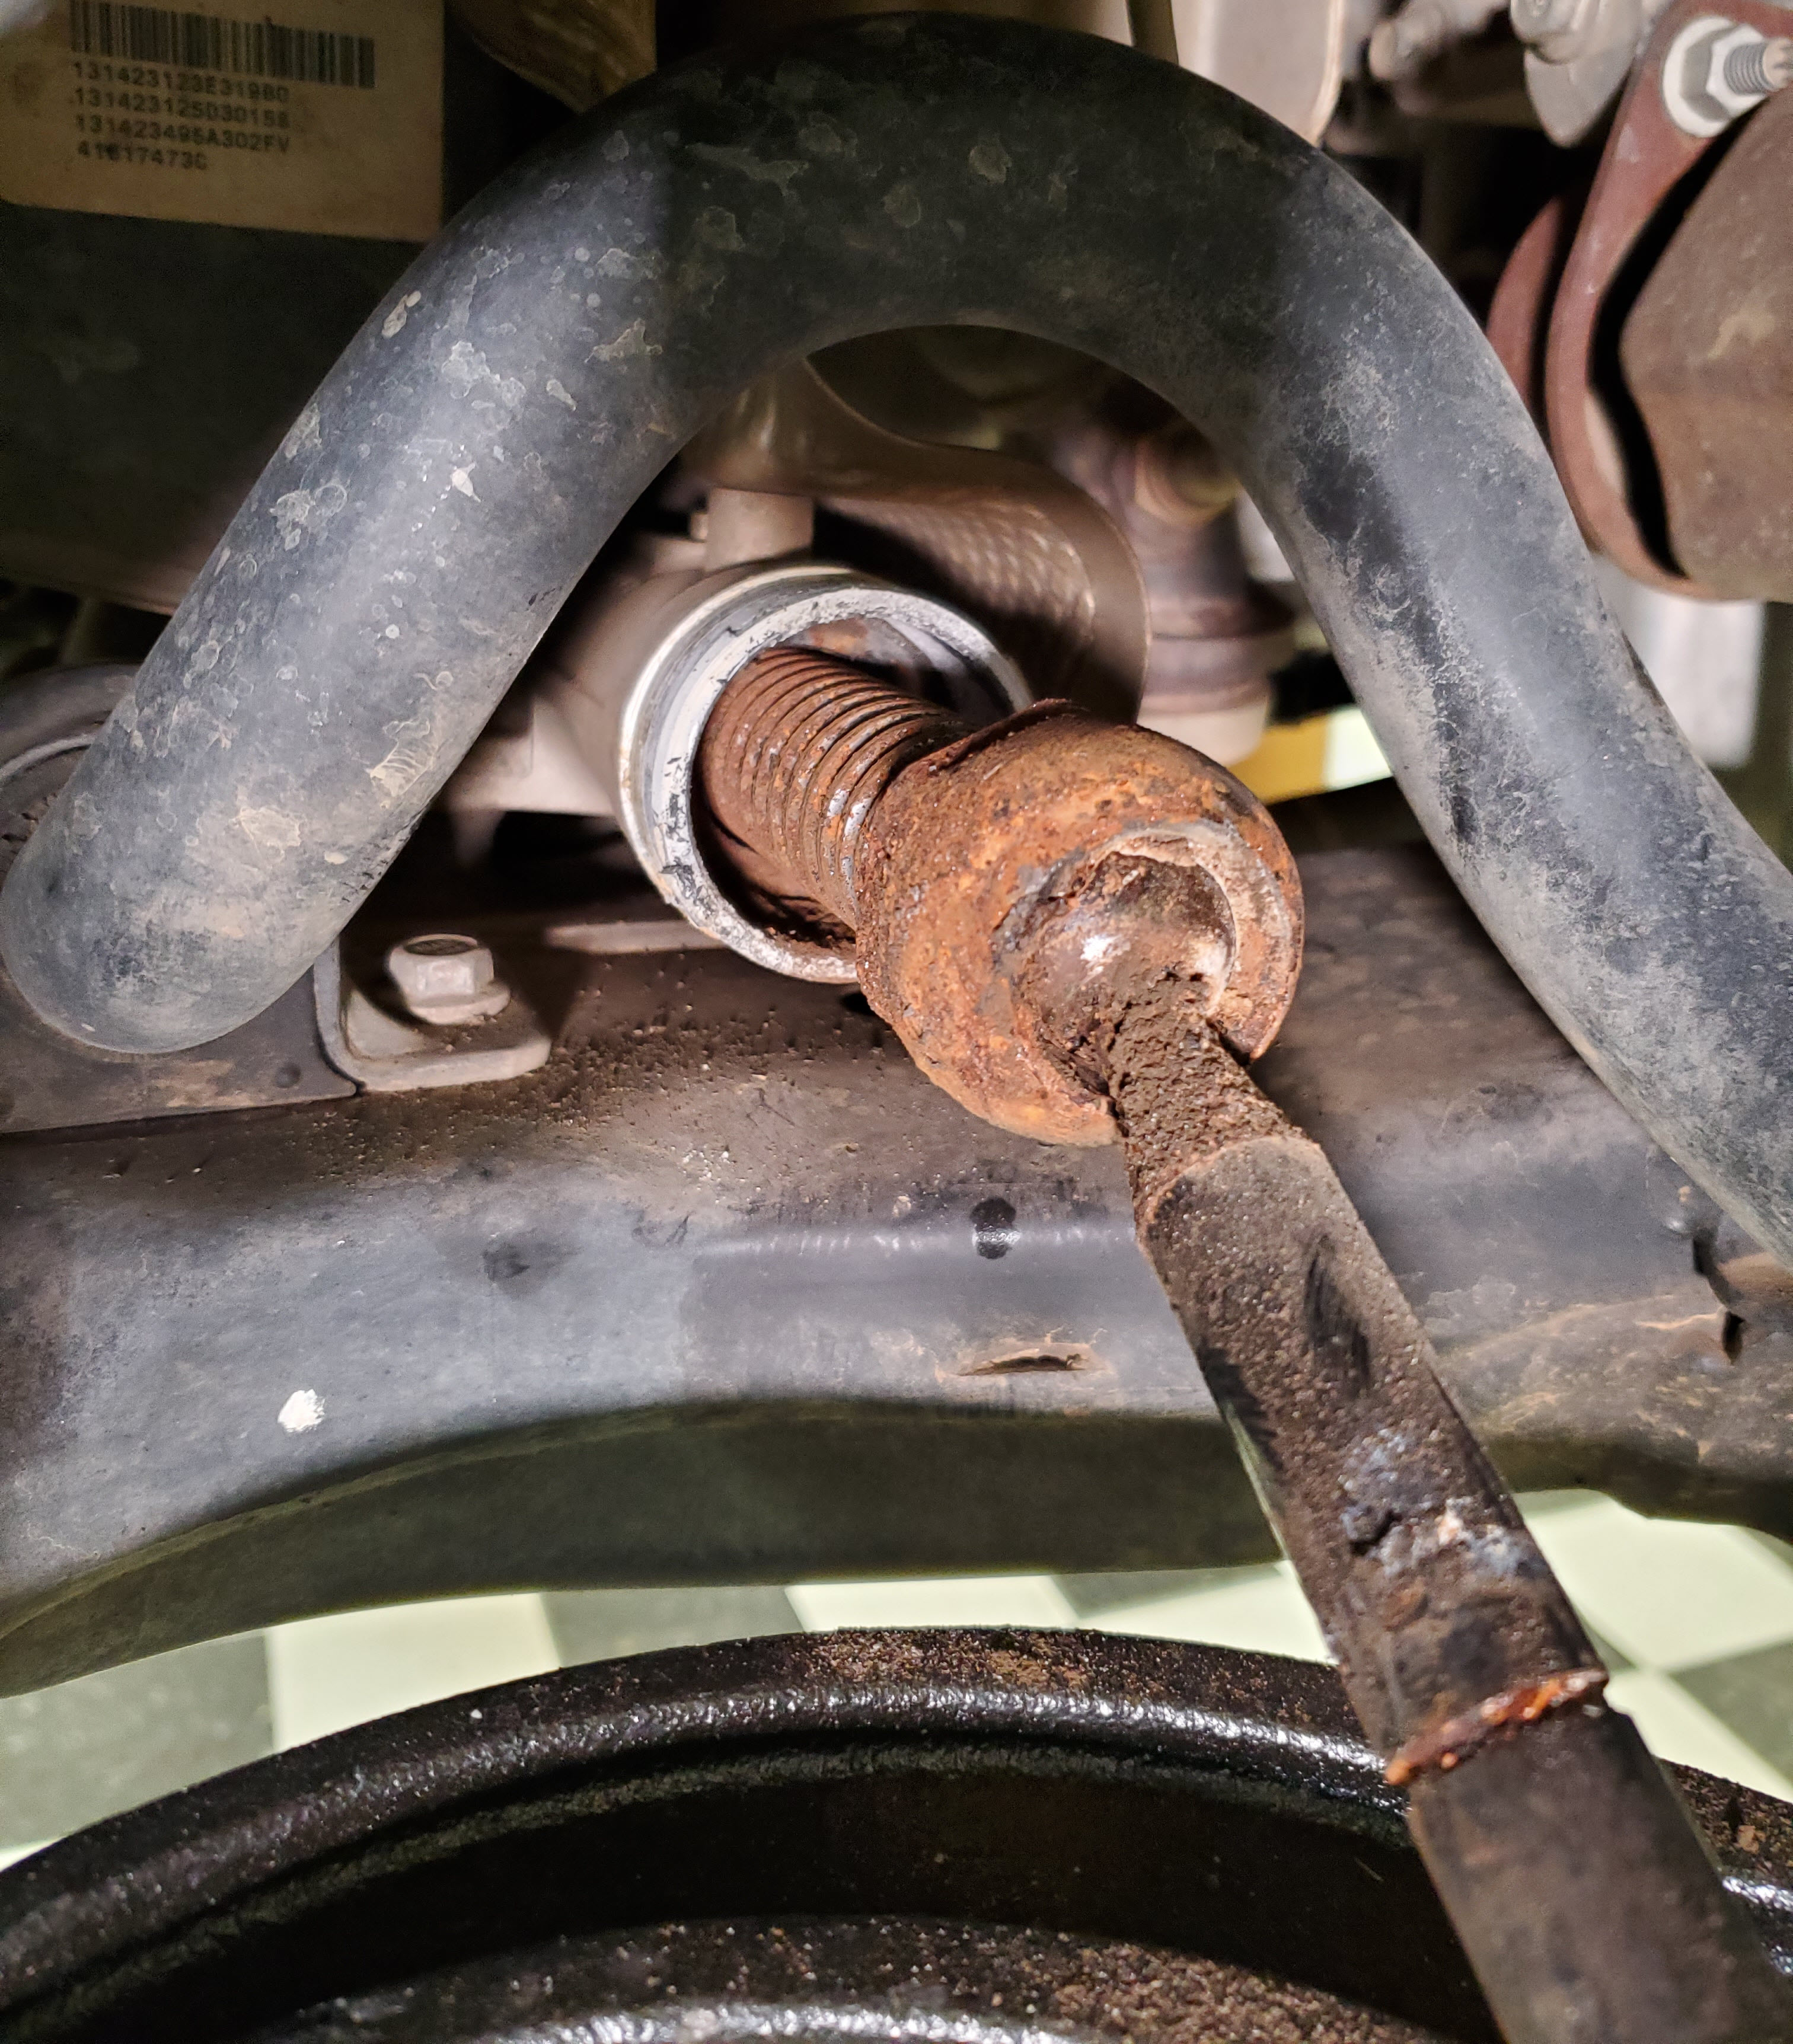
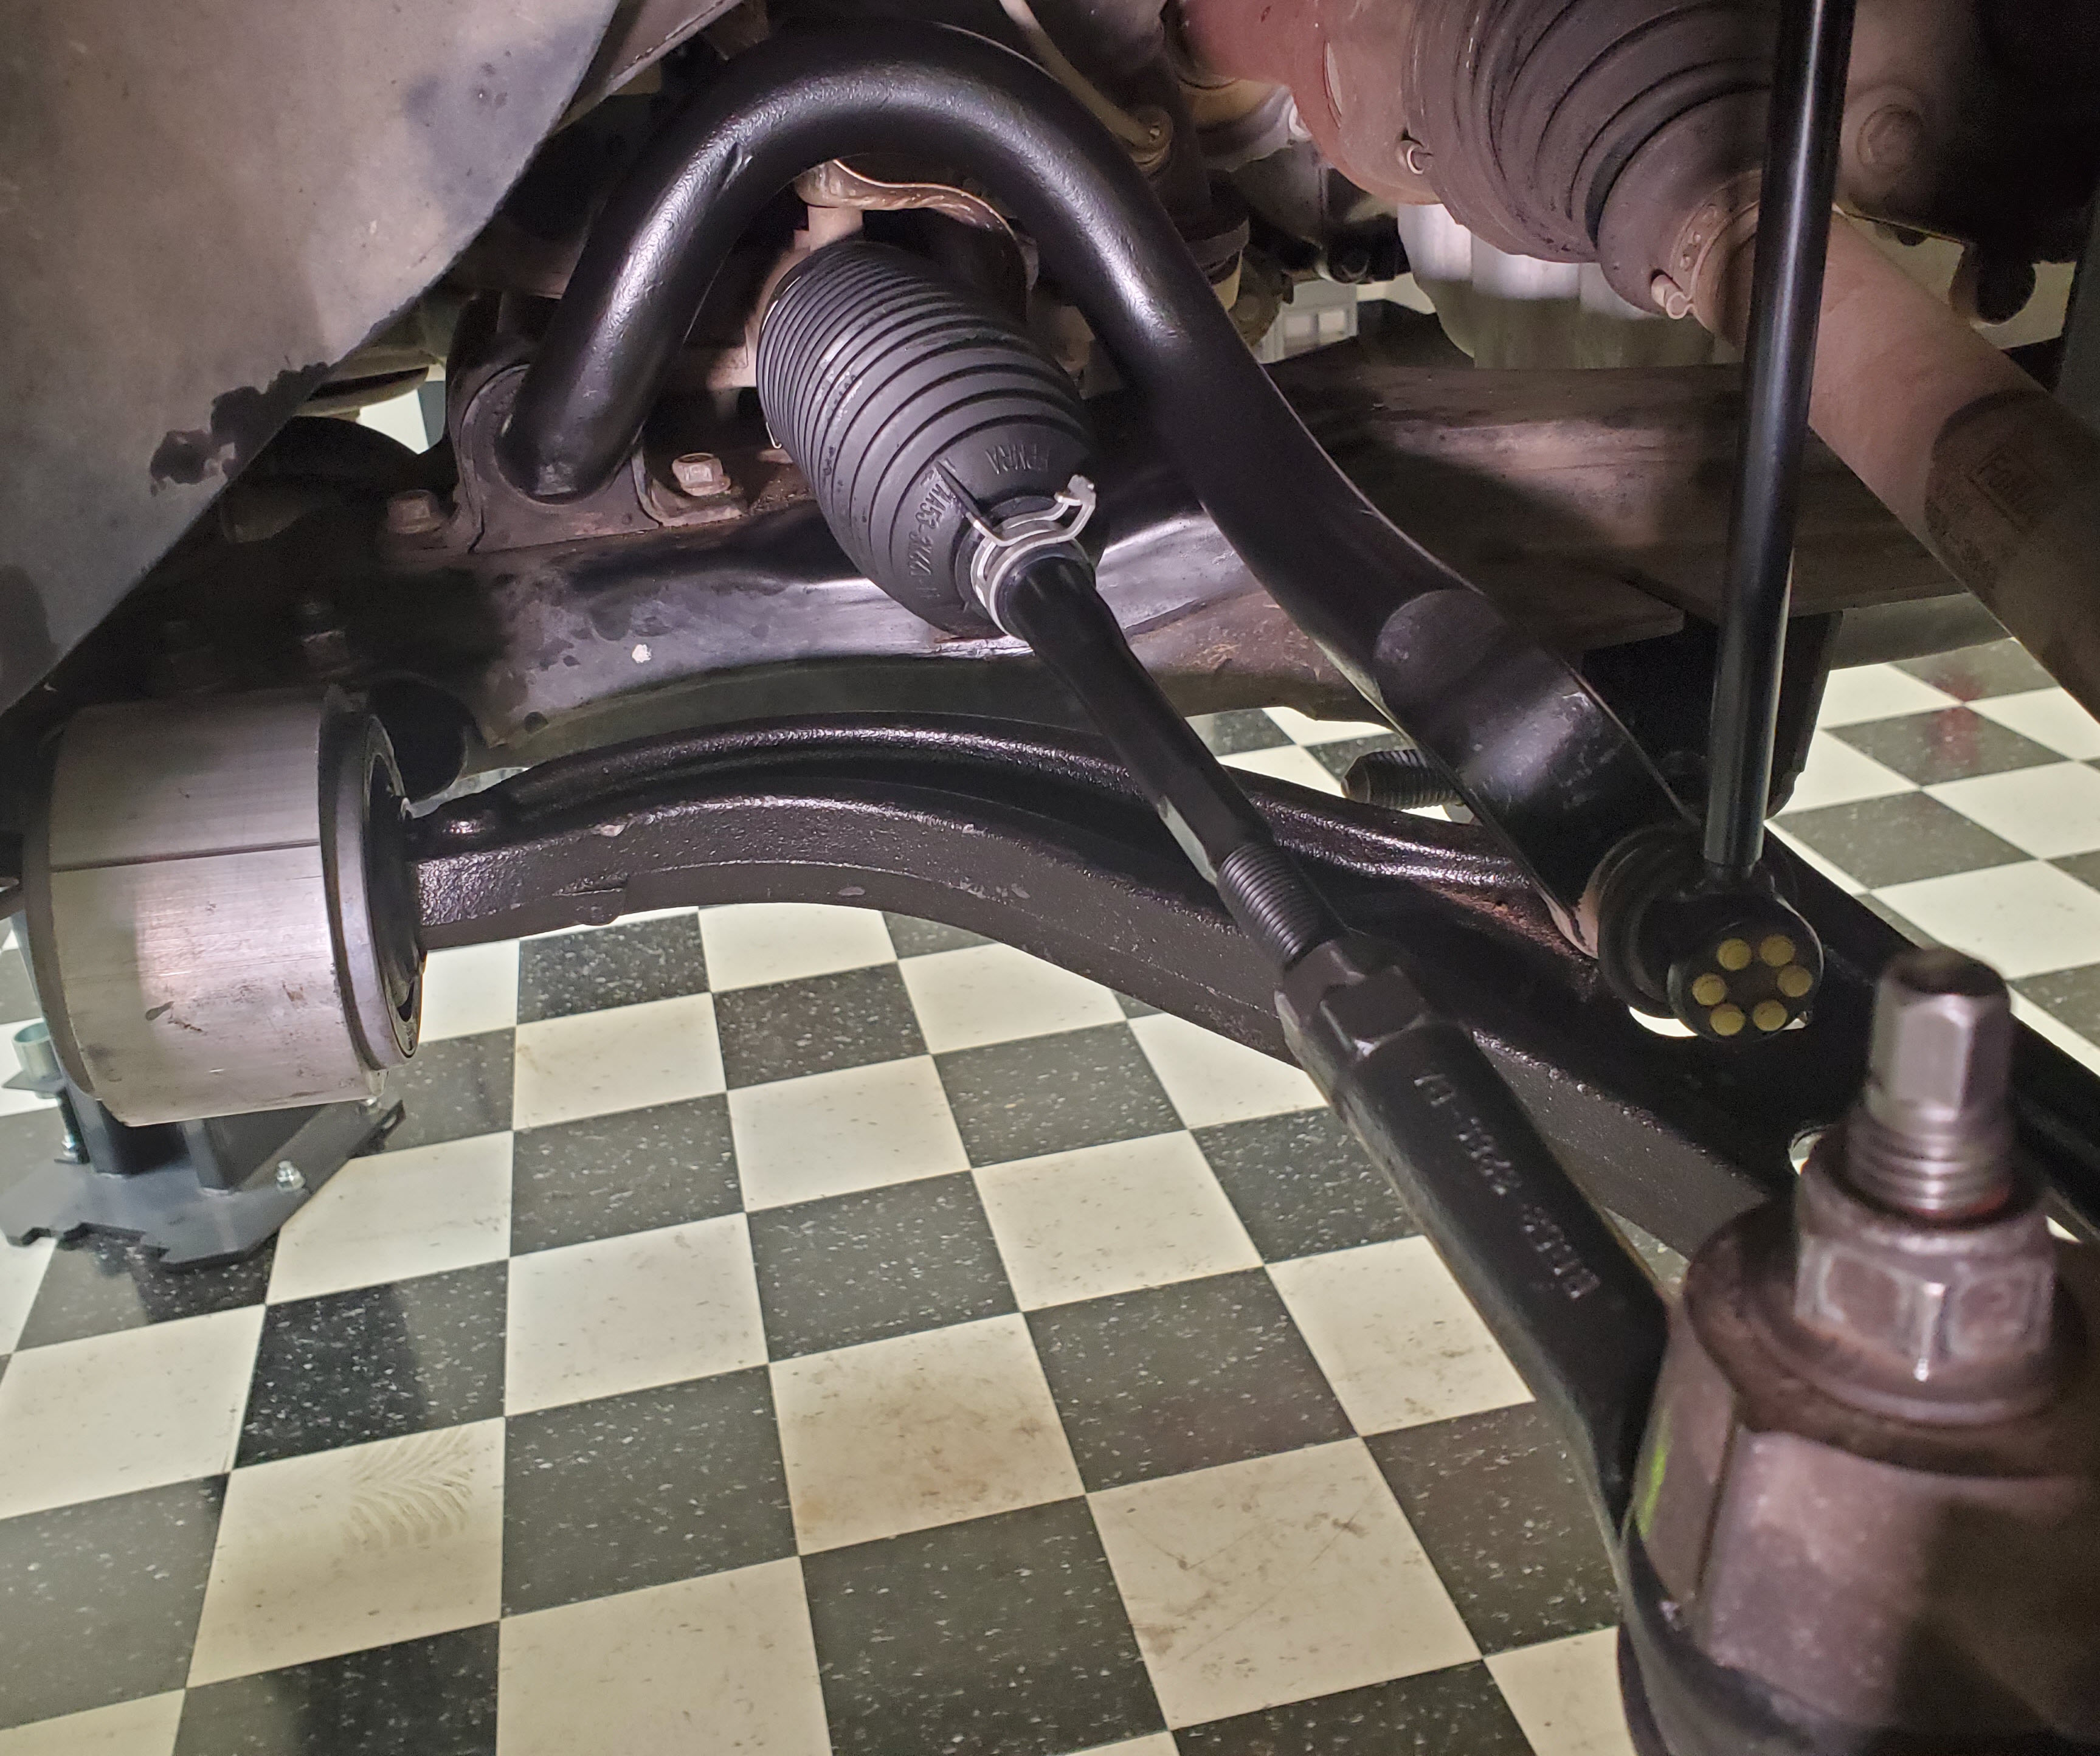
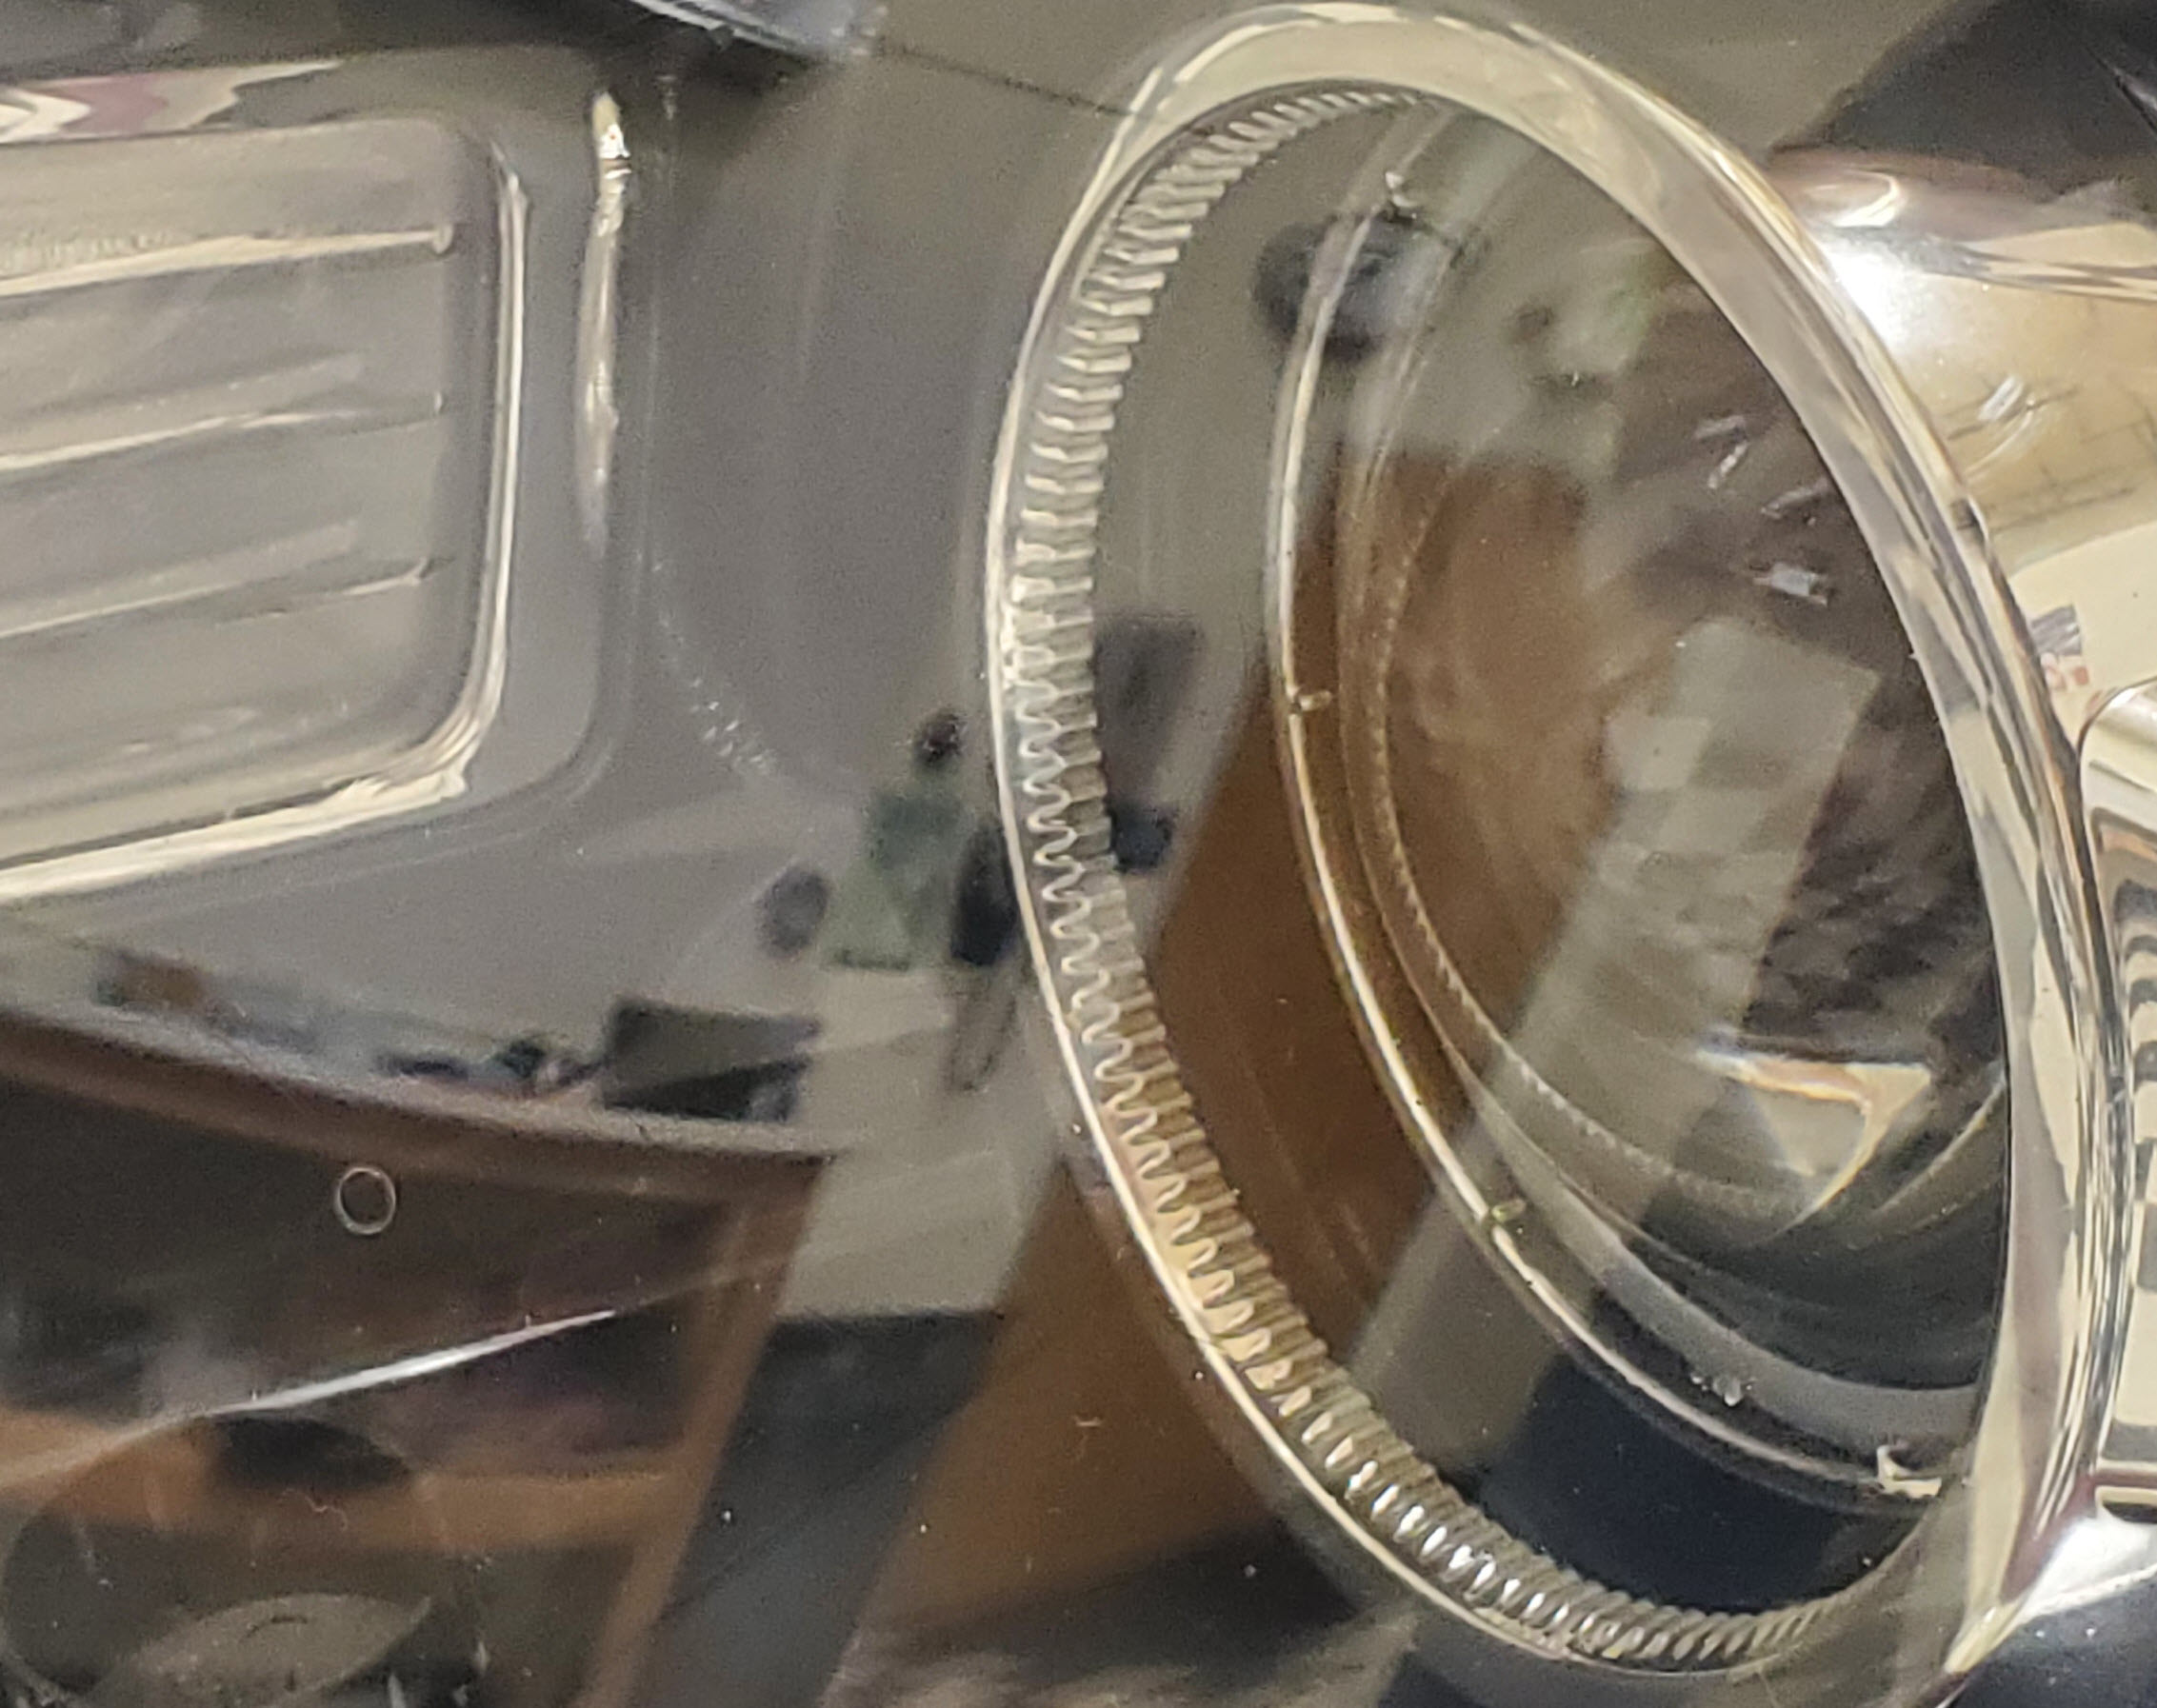
Completed the front suspension work by replacing the right front inner tie rod end and boot. Upon removing the old boot it was clear why the steering rack is starting to feel notchy – the rack was full of rust and corrosion. Here is the stunner of a photo.
It was a bear to break the old inner tie rod end loose. The tool I had couldn’t budge it. I had to break out the Map gas torch and cameraman Rob’s pipe wrench with a snipe to get enough torque. “Ping” and it was loose. After that it was all by the numbers. Torqued the new Ford OEM inner tie rod end to 66 ft-lbs and then the outer to 150 Nm. New boot and I got to use my new Oetiker clamp pliers.
All that is left is to get the front end alignment done.
Date: November 10, 2023
Mileage: 173,???
Performed by: Stefano
The front seat upholstery has seen better days. Its dirty with many years of sweaty cops and donut crumbs embedded in it. The car had a bit of a funky smell still left over, and I suspected it was from the seats.
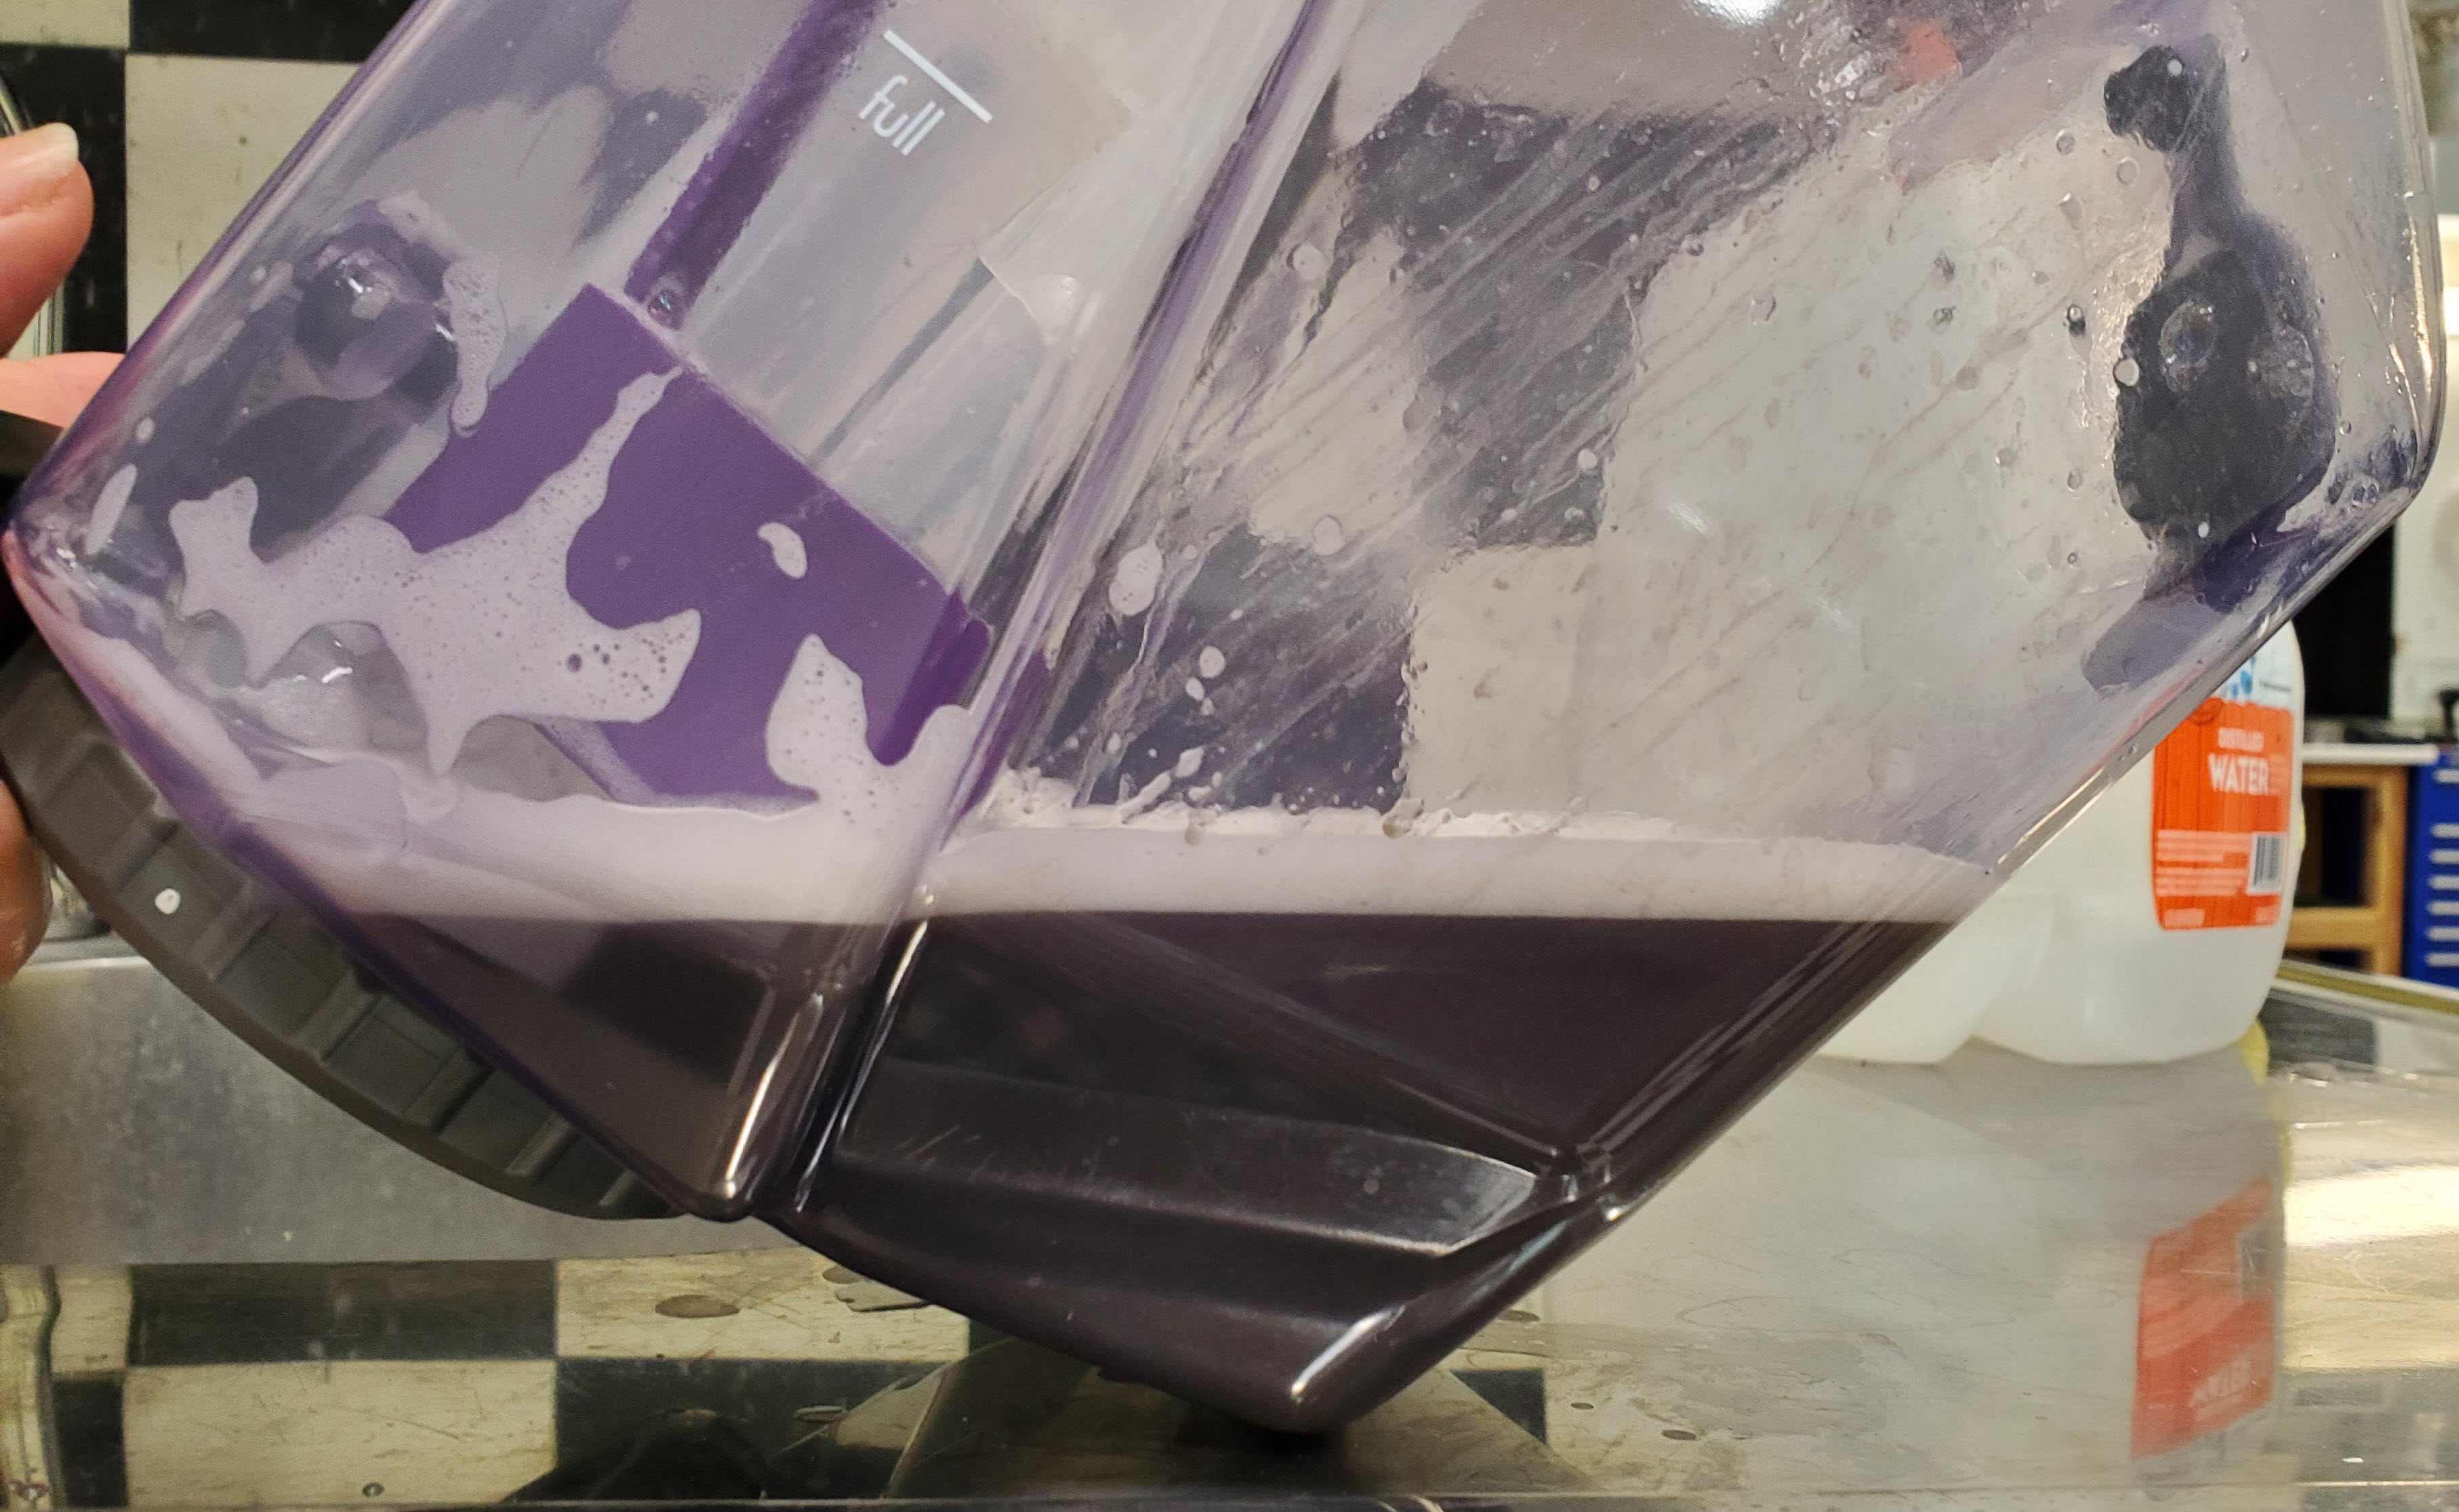
Attacked it with my new Bissell Pro Clean 2 carpet and upholstery cleaner tool. It has an 8ft hose attachment. I used Bissell Oxy Pro clean solution with hot water as a pretreat. Then I used Chemical Guys Carpet and Upholstery cleaner spray at an 8:1 dilution and applied liberally. Then I used a stiff bristle brush pad in my drill to agitate the fabric. Finally I used the Bissell to suction clean the solutions out of the fabric.
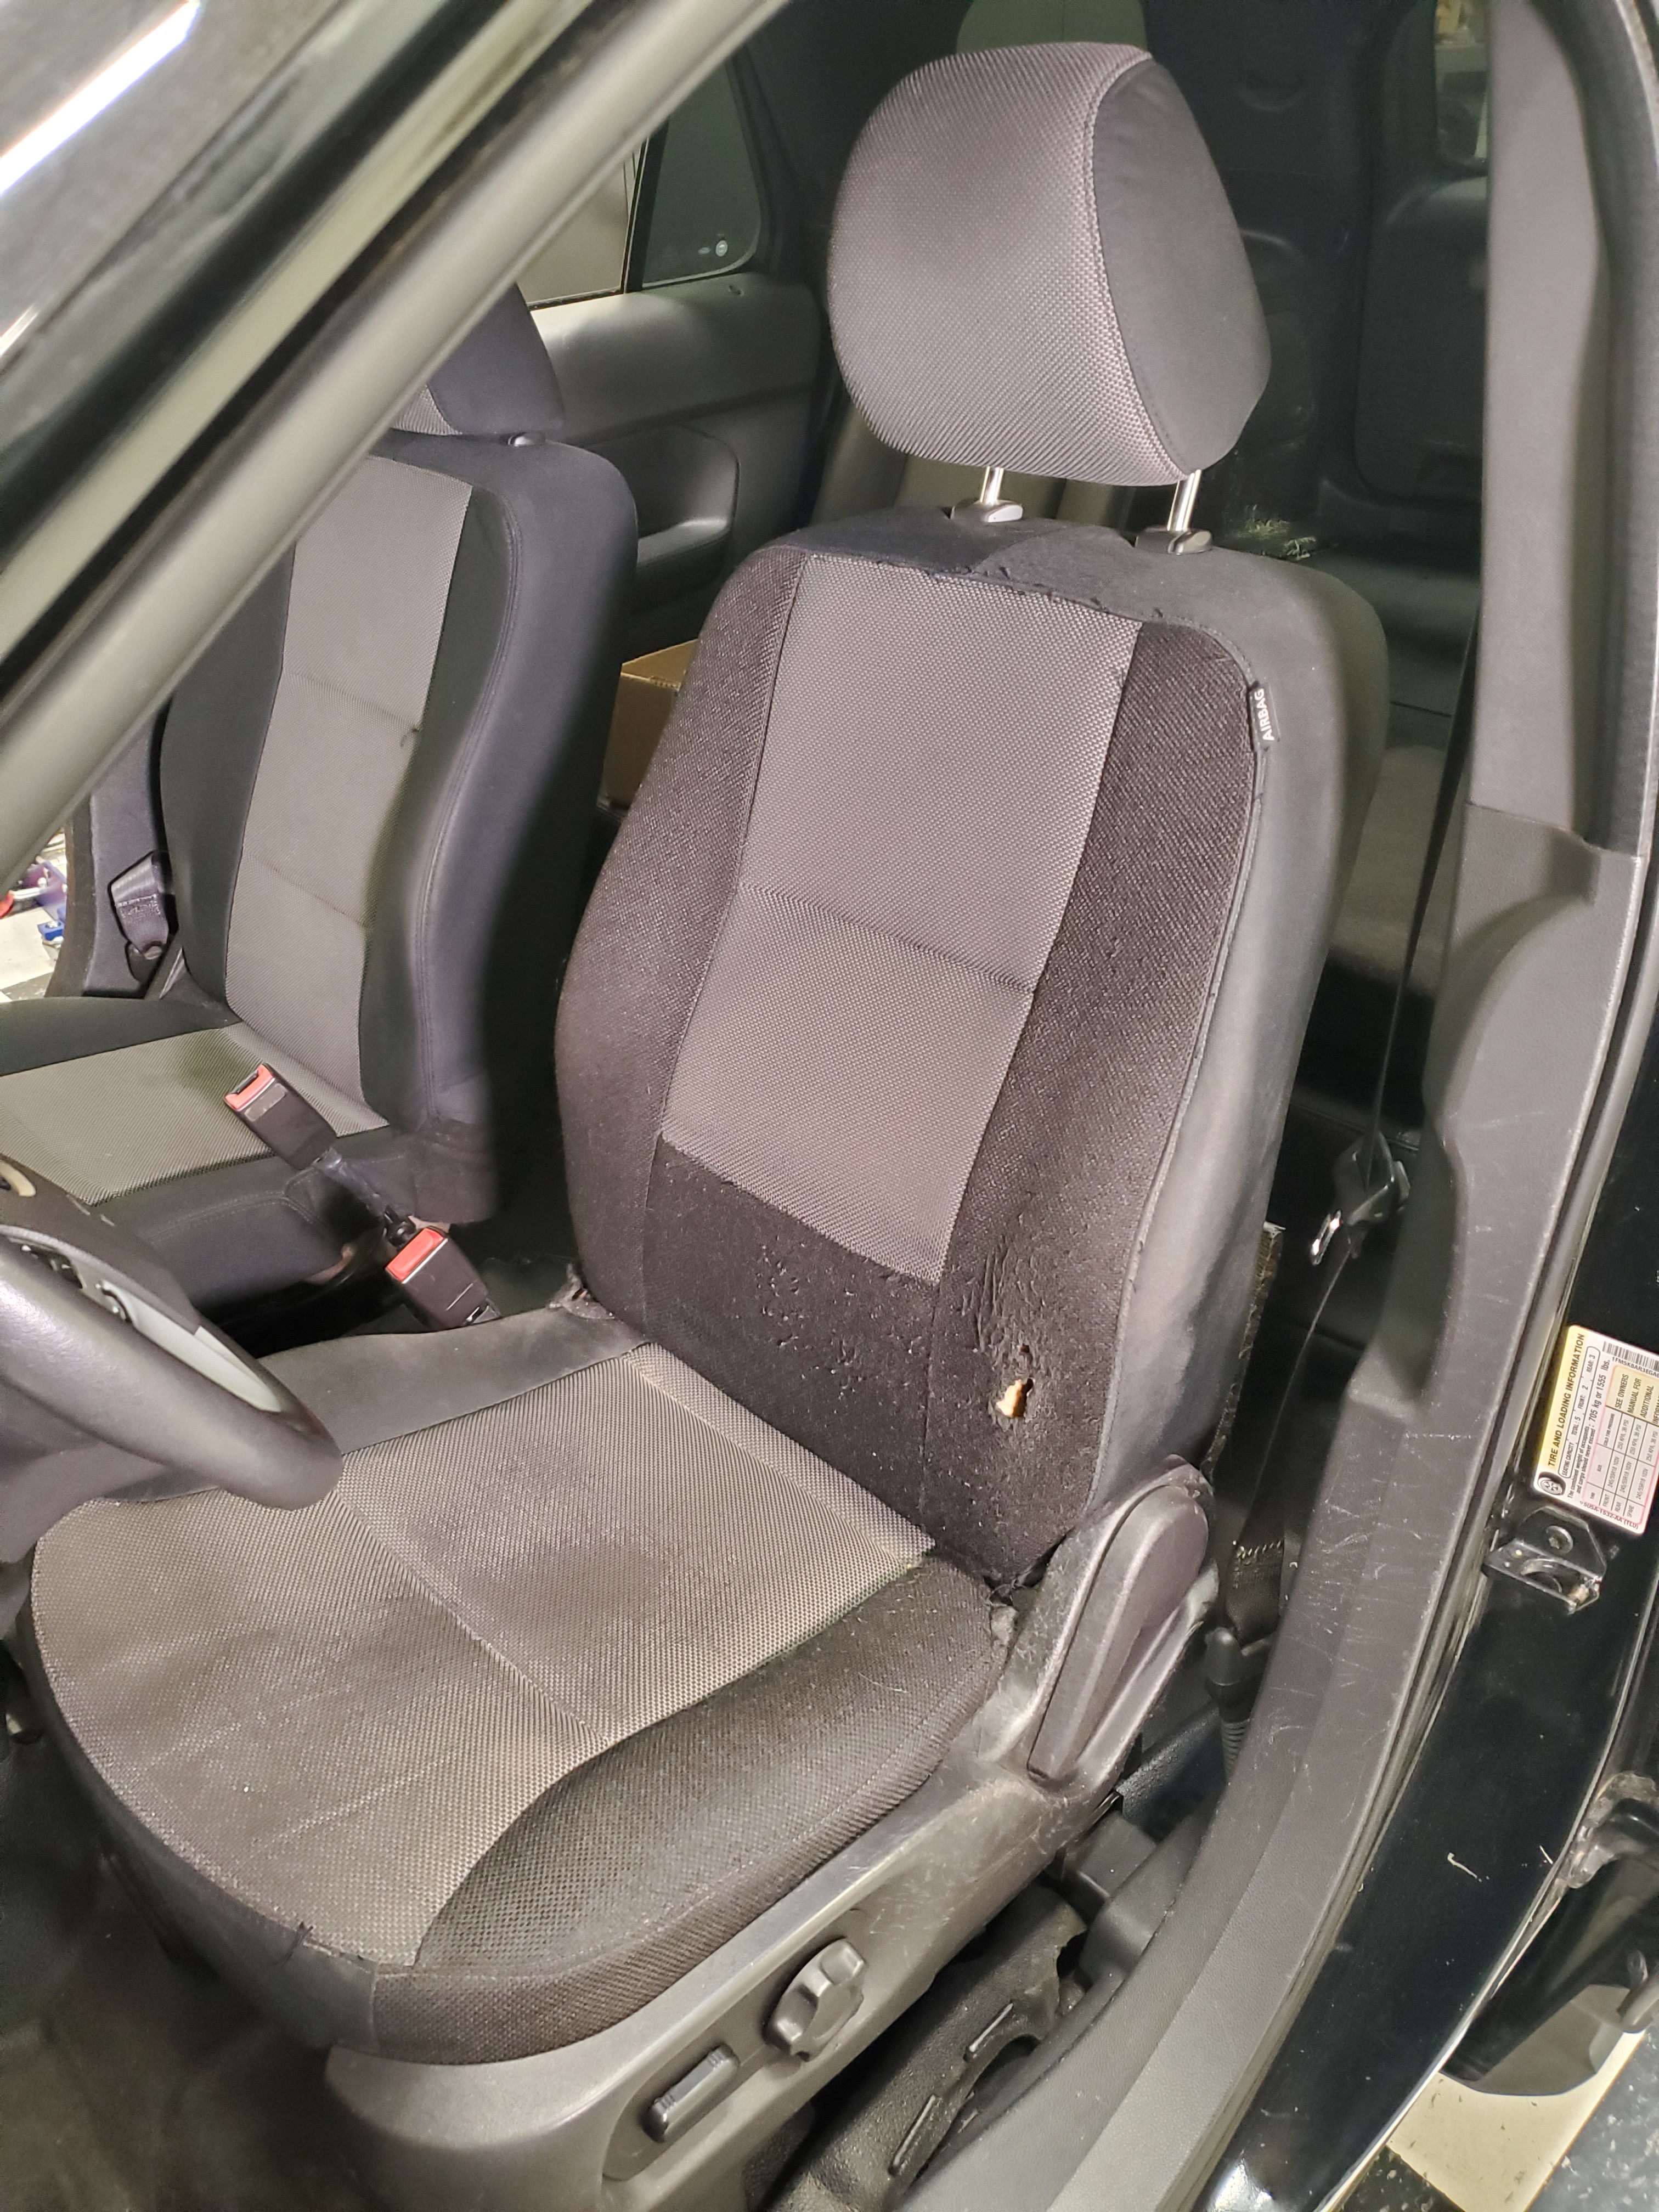
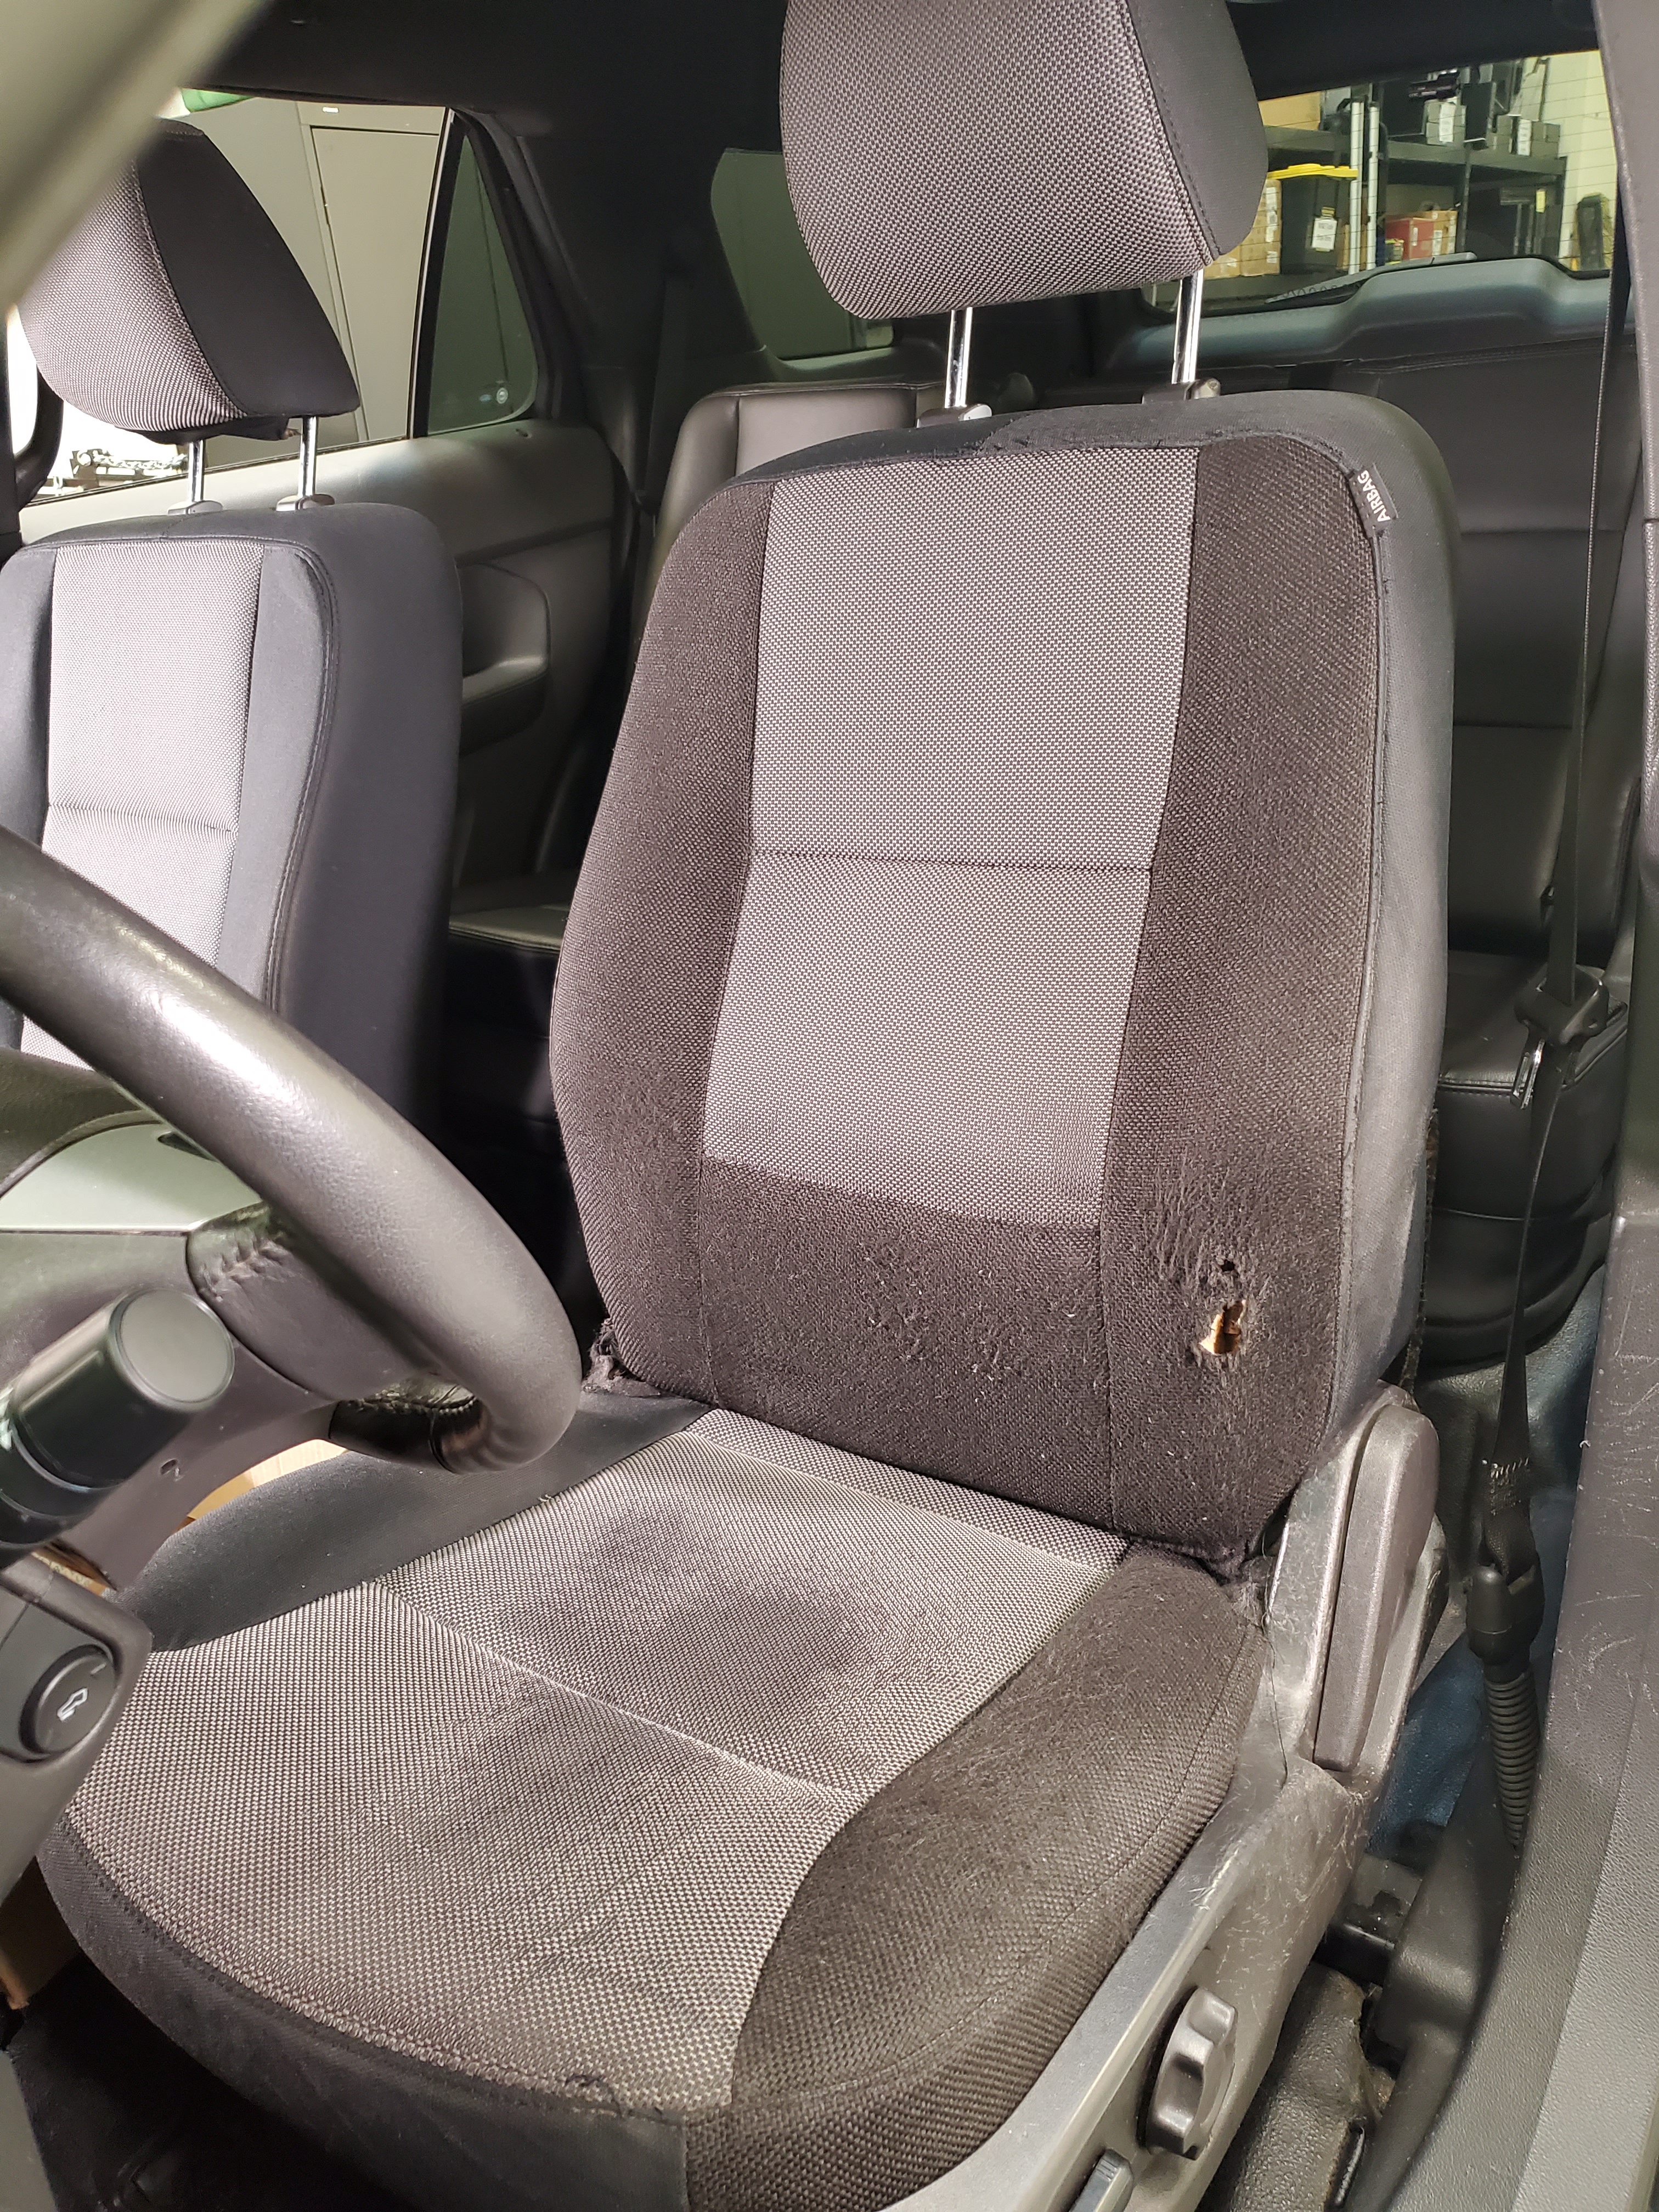
The resultant used water was GROSS! Dark and thick like chocolate milk. The visual of the before and after doesn’t change a whole lot, but the smell is gone and the fabric does look noticeably cleaner in person. Not perfect at all, the drivers seat is well worn, but now there is peace of mind it is a lot cleaner.
Date: November 4, 2023
Mileage: 173,593
Performed by: Stefano
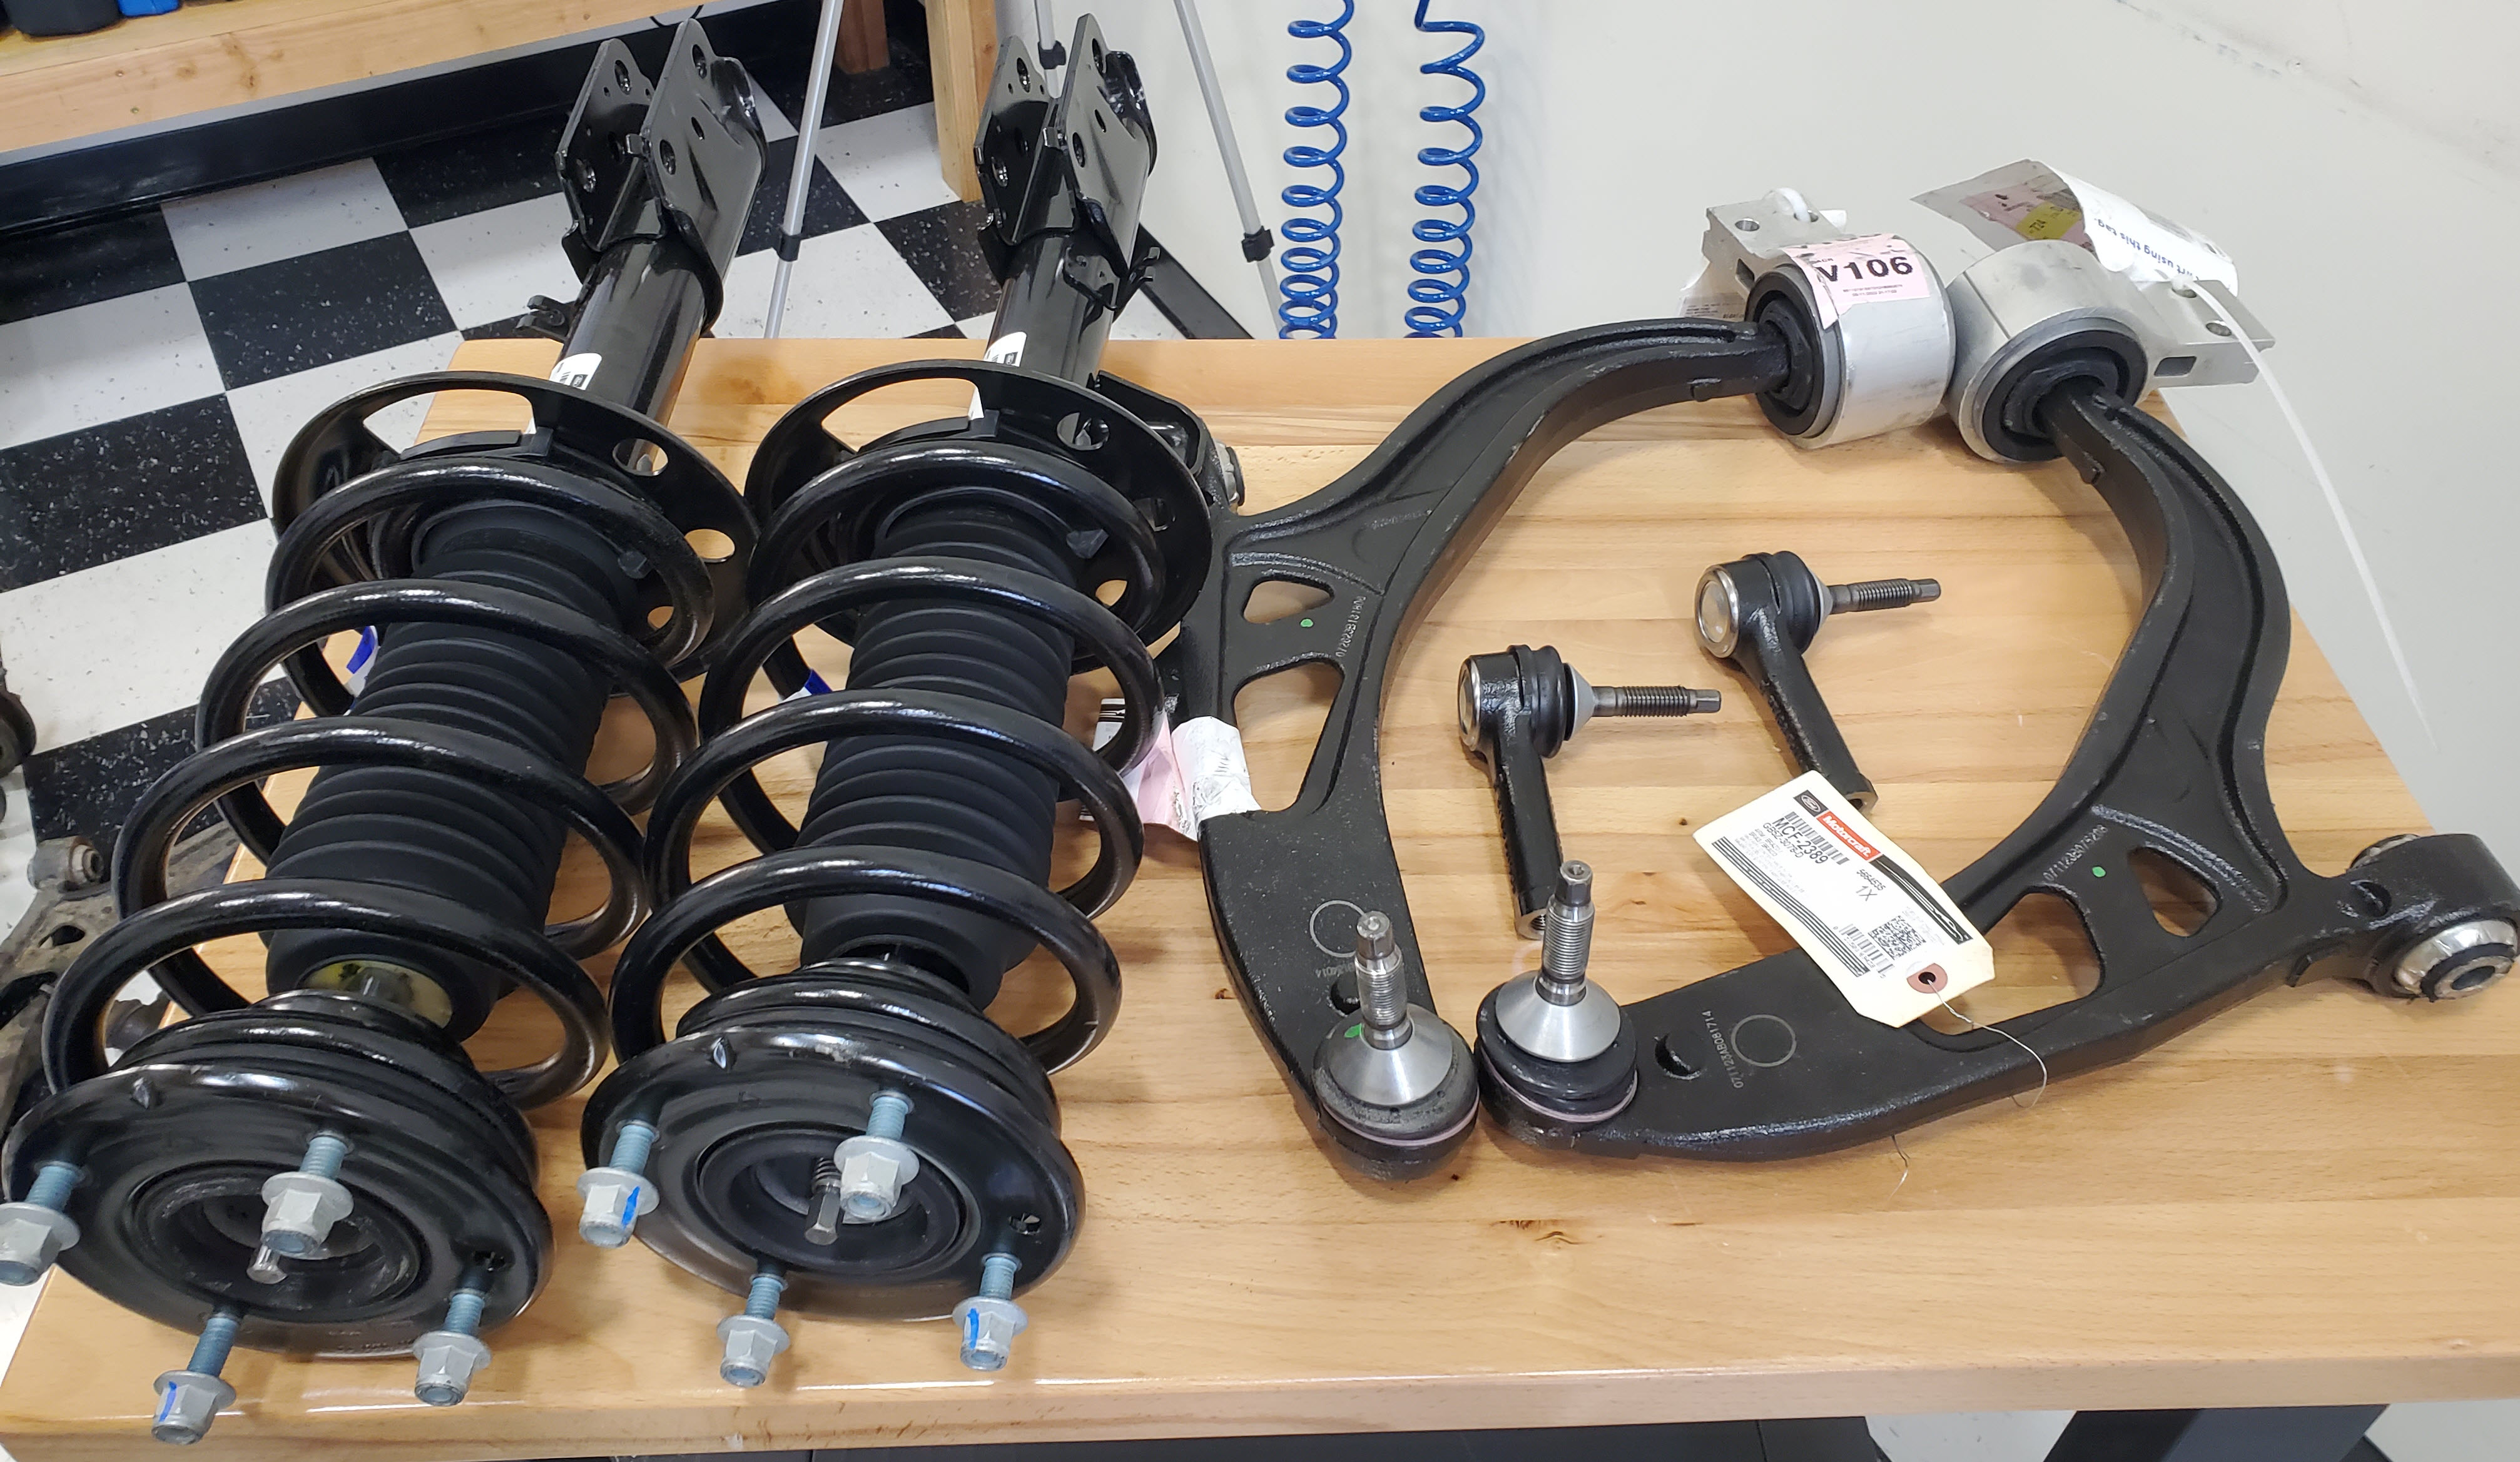
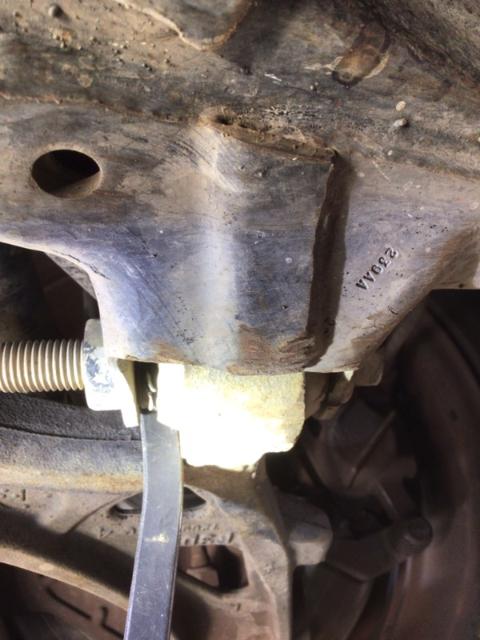
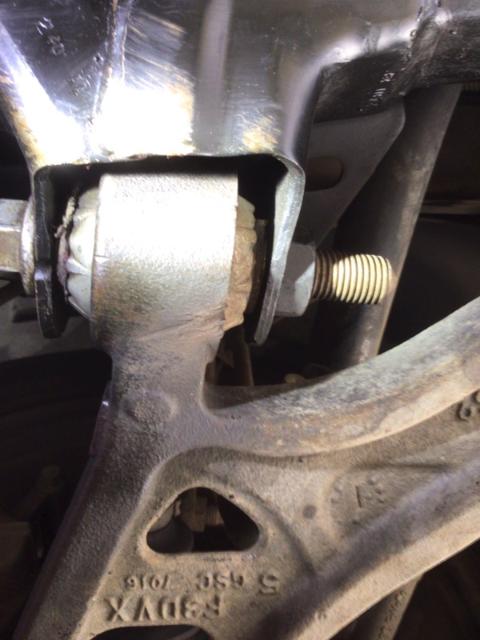
The Front suspension had 173K miles on it and was loose and clunky as noted in previous posts. Along with the Annual regular service undertook a complete front end suspension replacement. All the work completed included:
- Ordered new parts direct from Ford:
- Front Lower Control Arms (both left and right)
- Includes new bushings and lower outer ball joint
- Loaded Front Struts that included everything:
- Strut
- Spring
- Top Bearing Cap and Nuts
- Outer Tie Rod Ends (2)
- RF Inner Tie Rod (hadn’t arrived yet, so still need to install this).
- The Front Drop Links and Sway Bar Bushings were replaced a year ago when the first round of service work was done after purchase.
- Front Lower Control Arms (both left and right)
- Removed the old suspension parts and replaced with new. Was a big job, these bits were heavy. Was awesome that it’s a California vehicle, all the bolts came undone properly. On reassembly reviewed the factory workshop manual and torqued all the fittings to spec:
- Drop Link upper nut – 150 Nm
- Lower control arm rear bushing bolts – 99 Nm
- Ball joint – 200 Nm
- Lower control arm front inner bushing (tightened while on ground under full load with suspension settled) – 265 Nm
- Strut to Knuckle bolts – 250 Nm
- Top Bearing plate nuts – 55 Nm
- Outer Tie Rod Nut – 150 Nm
- Tie Rod Jam Nut – 63 Nm
- Remounted front tires and torqued to 149 Nm (110 ft-lbs)
- Tires had be recently rotated F/R with the brake service a few months back.
- Checked and Set tire pressures to 36 psi (Front and rear)
- Changed Engine Oil and Filter
- Used ~6 liters of Castrol Edge 5w-20
- Used a Wix XP 57502XP Oil Filter sourced locally instead of the OEM. I think it might be a better filter based on reviews.
- Checked Fluids
- Topped off Engine Coolant with a few ounces of matching 50/50 premix
- Topped off Washer fluid with about 1 liter of Winterized Blue
- Brake Fluid OK
- Connected Autel OBDII tool and review various codes. A fair number from the APIM and HVAC upgrades, but the PCM was clear. Cleared all accumulated codes.
- Reset the Oil Reminder due (was at 4% left) using the dash menu.
Need to get the RF Inner Tie Rod installed, and then take it for a Front End alignment. The notchy-ness of the steering rack still needs to be dealt with, but the rack (Ford part number EB5Z3504Q I think) is on nation wide backorder still. Not going to worry about it this winter unless it gets worse.
First driving impression even without the alignment is that it feels tighter and no clunks.
Date: September 14, 2023
Mileage: 173,269
Performed by: Natomas Automotive
Took Barney in to have the AC system professionally recharged. I noted that the Ford workshop manual specifies 26 ounces of R134a refrigerant. They recharged it and its blowing cold again. Yay! They noted the low side pressure was 35 psi and high side was 165 psi at 75 deg ambient. Vents blowing 55 deg. They also noted that they added UV dye to the system in order to be able to detect any leaks in my work ;>) Now we wait to see if there is any pressure loss in the next weeks/months.
Date: September ??, 2023
Mileage: 173,???
Performed by: Stefano
Forgot to document the details of when, but was somewhere around this time. A couple of pending interior items completed:
- Replaced the steering wheel with good condition leather wheel salvaged from the same vehicle the HVAC module came from. Cleaned and leather conditioned it. Looks great. After install, the right hand button pad is now consumer Ford Explorer, but they still don’t control the stereo or the cop accessories.
- Replaced the steering wheel clock spring. This was causing the left button pad and horn to not work. OEM Ford p/n DB5T-14A664-AA
- Restored the original horn wiring and removed the stupid extra button mounted to dash. When clock spring was worn, they opted to fix the horn but cutting its feed wire to the clock spring and wire in a separate button. Removed all that, soldered in a new stretch of wire, re-taped wiring harness. Works perfect now.
- Replaced Turn Signal Stalk so that it would work properly again. OEM Ford p/n EABT-13K359-ABW.
Date: September 9, 2023
Mileage: 173,240
Performed by: Stefano
Stefano no likey driving it without AC. Time to get it fixed.
Services Performed:
- Took Barney to Natomas Automotive and had the AC de-gassed.
- Ordered a new OEM Motocraft AC compressor from RockAuto.com
- Picked up an AC Service kit from 1-800-Radiator (local store) that included the drier, filter, seals, schrader valves and PAG oil.
- Changed the AC compressor. Per the Ford workshop guide I added 2 ounces of PAG oil to it to compensate for the remaining areas of the system I am going to access.
- Changed the AC drier and filter that are integrated into the Left Hand side of the AC condenser.
- Changed the schrader valves for the low and high pressure ports
- Inspected and then changed the seals at the firewall connection to the Thermo Expansion Valve.
All the repairs went well. Noted that the Serpentine belt has very minor cracking and should be replaced at the next major service.
Date: August 26, 2023
Mileage: 173,126
Performed by: Stefano
Barney is back from a summer in the mountains and camping around California. Time for an inspection and a few upgrades.
Services Performed:
- A/C not blowing cold. Need to inspect.
- Stefano is no A/C expert, but armed with 3.5 hours of YouTube knowledge thinks it is the AC compressor is weak and needs replaced. Why?
- There is coolant gas. Static pressure is about 100 psi on the low pressure port
- The A/C clutch is engaging. Visually confirmed and also using Forscan.
- The vents are blowing a lot of air, just ambient
- The Dynamic low pressure is a bit high, around 42 psi, and I think this should be 25-35psi. The Dynamic high pressure is low, just 100 to 110 psi in an 80 deg shop, and I think should be close to 200. Its literally just marginally more than the static pressure.
- The compressor isn’t pulling in hard enough to drop the low pressure, and isn’t compressing hard enough to make the high pressure.
- Recommend replacing the compressor and having the system recharged.
- Stefano is no A/C expert, but armed with 3.5 hours of YouTube knowledge thinks it is the AC compressor is weak and needs replaced. Why?
- Vibration under braking. Need to inspect for warped rotors.
- Right Front Outer Brake pad was visibly moving in Caliper. Need new front pads
- Right rear brake rotor is warped. About 0.020″ of runout. All other rotors near perfect. Recommend new rear rotors.
- Right rear brake pads only 2mm left before warning level. Left rear was about 4mm. Right was wearing faster. I think the park brake stuck or was left on, and overheated the rotor and warped it an wore out the pads. Recommend new rear pads.
- To fix all this Needs new Front brake pads, new rear pads and rear rotors. Ugh.
- Inspected suspension. Noises and clunks galore.
- Right front strut leaking significantly. Recommend replacing both front struts
- Lower control arm rear bushings weak on both left and right. Front left inner lower ball joint has motion. Recommend replacing both front lower control arms.
- Right front inner tie rod end has motion (steering rack end). Recommend replacement
- Drive shaft center bearing carrier rubber is soft and allowing deflection. Recommend replacement
- Rear differential rubber mounts are soft and allowing the diff to flex/wind up during power application. Looks like they are non-serviceable and part of the rear subframe only.
- Recommend alignment when front suspension replacement s are done.
- Inspected Tires
- Front 8.5 32ndths. Rear 9 32ndths
- Overall tires are great condition.
- Rotated Front to Rear
- Set tire pressures to 36 psi
- Torques wheels to 110 ft lbs
- Fixed rattling hub cab by adjusting metal tabs that grip wheel nuts.
- Knocked out dent in RF cap and reinstalled all caps
- Power Steering Noises
- Definitely something wrong here. Notchiness in the level of assist sometimes
- Kind of a graunchy bearing noise as you move the wheels right to left and back. All the way through the stroke.
- Assistant Rob moved the wheel while I listened with Stethoscope. Noise seems to be near the electronic power assist module. Hard to tell exactly, but it would be my guess.
- This can’t be cheap to fix. Might be a good choice for a wrecker.
- Ordered New (refurbished) leather steering wheel from consumer explorer
- New (refurbished) turn signal stalk (from same donor vehicle as steering wheel and previous HVAC module) (ended up not working since it had two stalks like a normal explorer where the PIU has a right hand transmission shifter)
- Definitely needs a bath, dusty as heck from living in the woods. Some tree sap to remove.
- Snow foamed and exterior washed with Angus.
- Vacuumed out debris
- scrubbed out floors (literally with brush and bucket)
- Wiped out entire interior with damp rags
- Microfiber wiped out front dash and cleaned windshield glass
- Pressure washed the engine bay
- Used compressed air to blow out vent ducts and crevices in the dash
- Potentially annual or mini service if mileage due.
- Topped off fluids
- Added 1/2 quart Castrol Edge engine oil
- Brake fluid OK
- Added about 1 gallon of winter grade blue washer fluid
- Coolant was OK at Max
- Topped off fluids
- Serpentine Belt looks OK.
- Kind of a brutal list off this inspection. Will prioritize and move forward.
Date: May 29, 2023
Mileage: 170,194
Performed by: Stefano
Barney is about to start its next great adventure for the summer season up near Yosemite. One last check over:
Services Performed:
- Topped fluids (only needed washer fluid)
- Set tire pressures to 36 psi (all were within 1psi)
- Charged GooLoo booster pack and stored in spare tire wheel well with other supplies that included 1qt of oil, latex gloves, shop rags, roll of shop towels, snow brush, bottle of water. In side cubby there is a long set of jumper cables.
- New insurance slip in glove box along with LED work light
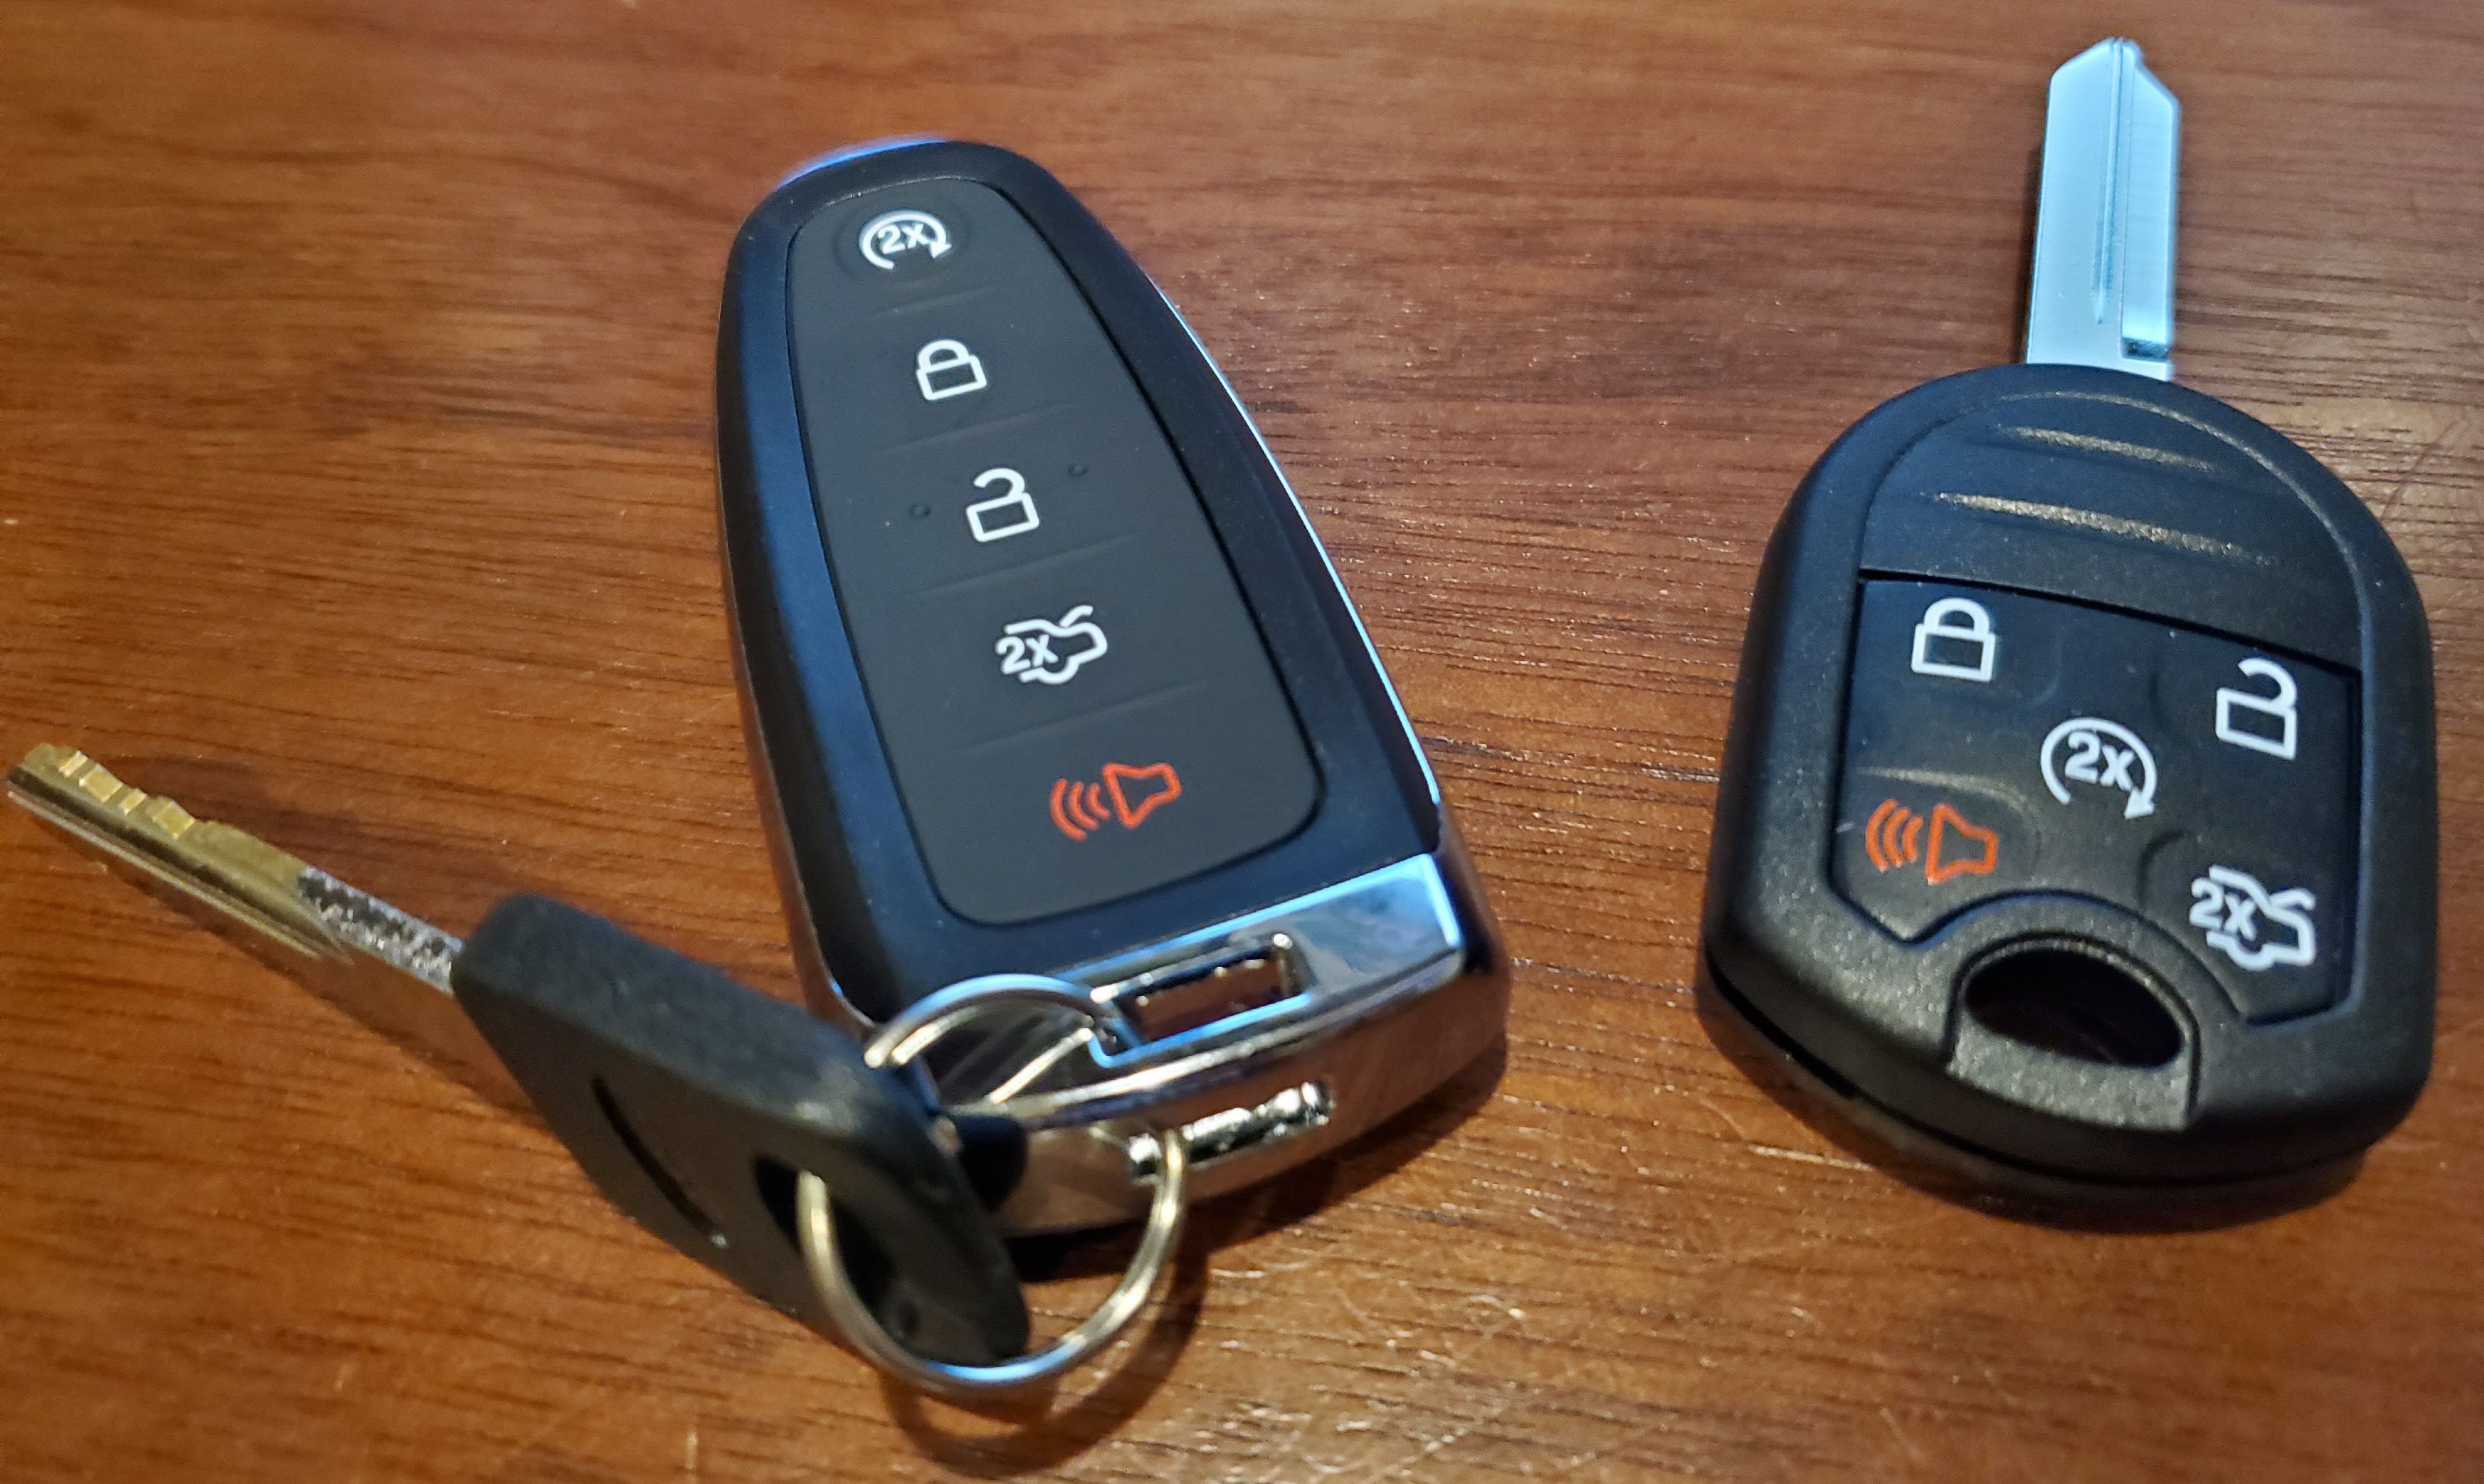
- Fitted a hidden steel key on vehicle
- Finally had the additional fob key cut with the fancy remote head (purchased back in March). Bode & Bode in Sacramento cut the key to the original steel key.
- Refitted the lower drivers dash panels. One green clip insert missing. One screw missing. DPOs
While its away going to shop for rear speakers, front center console, turn signal stalk, maybe regular Explorer leather wrapped steering wheel and radio switches, and maybe a factory trailer hitch and roof rack rails. Probably want to get the front cloth seats power scrubbed and cleaned when it comes back.
Date: May 17, 2023
Mileage: 169,863
Performed by: Stefano
Services Performed: Stefano for the Win! Solved the parasitic draw issue. It was the incorrect HVAC module model as Stefano suspected.
- Continued to suspect it was the -DB module designed for heated seats as the issue.
- Researched and found that the -AD module was likely the latest offered in the 2014/15 MY cars. This is the non-heated, non-cooled, non-heated steering wheel module that was available in the Base model Explorer.
- Searched Google and eBay looking for that p/n. Almost none out there. Was worried that a brand new one ($250) also wouldn’t work since the Factory AS-BUILT would still need to be flashed into it, and since my car has a Manual HVAC stock, I’d not have any AS-BUILT to use.
- Finally found an auto dismantler in XXX that had the module. $50 plus ship ($65 total).
- Installed all the original hardware first (manual HVAC, 4″ Screen, etc.) removing all the Infotainment.com gear entirely so I can confirm no parasistic draw from other sources (dealers suggestion). No problems, system drops to <30milliamp after about 10 mins.
- Connected Forscan software to car, reviewed existing DTCs, module firmware, and AS-BUILT codes for the original setup while it is not having draw issues.
- Removed all the original stuff again, installed the Infotainment.com screen with APIM Sync 3.0 and their cabling.
- Installed the used (salvaged) Automatic HVAC control (for non-heated seats). and then just let the car go to sleep over 10 mins. Worked! Draw dropped just like stock bits (<30mA). Had not started the car yet.
- Turned on the car and tested stereo, HVAC controls, etc. All working.
- Connected Forscan and reviewed modules and DTCs. There are new DTCs in the used HVAC module, but these are just complaining that solar sensors and rear controls are not connected/present. Not interfering with operations.
- Documented the AS-BUILT data for the used HVAC module. It still has the donor cars VIN embedded, but this hasn’t seemed to matter.
- Cleared all the DTCs. A bunch remain, some likely in the BCM and IPC are from me fiddling with other stuff. Will need to reset those to AS-BUILT and then more selectively add features back. See if DTCs clear. I think my fiddling in those modules has them thinking other features should be available and they aren’t. Likely not actual faults.
- Reassembled the center stack, carefully wiring all the Infotainment.com stuff.
- Reassembled the Glove Box and related dash panels. Hmm, did I do up the blend motors mounting screws?
In the future I will start to chase down each of the remaining DTCs and see if I can resolve through programming.
Took Barney out for test drive. All good!
Now what to do with the APIM Sync 3.4 and -DB HVAC module. Hold, return, try the 3.4 with the new setup to see if it works even better and adds GPS?
Date: May ??, 2023
Mileage: 169,???
Performed by: Stefano
Services Performed: Still fighting the parasitic draw. Infotainment.com without talking to me sent along a new APIM. Just arrived, no instructions, no email, nothing. Stefano tried:
- Removed the touchscreen/APIM package and changed the APIM module out
- The first APIM was Sync 3.0.xxx
- The Newer APIM was from 2021 and was Sync 3.4
- Installed into Barney
- New APIM worked fine, and even had full GPS. But, it could NOT talk to the HVAC module at all. “Climate” screen was all greyed out options. If I used the front control panel the HVAC was still working, but the touchscreen interface was not having it.
- Just to test anyways, tried to let Barney sleep to see if the parasitic draw issue was actually gone. Nope. The same issues, zig-zig of both recirc and temp blend doors, plus a quiet pip sound from the speakers every 10 secs or so.
- Striking out again
Date: May ??, 2023
Mileage: 169,???
Performed by: Stefano
Services Performed: Still unable to resolve the parasitic draw issue Stefano fought better instincts and booked Barney into Future Ford of Sacramento to try and resolve. Asked them to:
- Update the module firmwares (they refused as all they could do is reflash the factory AS-BUILT config, but since the modules weren’t the same, they couldn’t)
- Reinitaialize the existing HVAC module and somehow tell it what options were in Barney (same story, they can’t)
- They dicked around for 2 hours of investigation just to tell me that this was a bad idea and their advice is to put back in the origianl equipment and verify the parasitic draw goes away so that we can be sure it wasn’t some new issue (dinged wire, etc). I declined for them to do this.
- I explained the notion that I thought it might have the wrong model of module for my accessories. They said unless I had the VIN of the donor car for the modules the can’t do anything.
$400 poorer I picked it back up in the exact same condition. Ford service can’t think outside the box even the slightest.
Date: April 30, 2023
Mileage: 169,750
Performed by: Stefano
Services Performed: Stefano is still battling the parasitic draw (and getting frustrated). Many things have been tried so far, but essentially it is narrowed down to the HVAC module. If its connected, the ~1.0 amp draw happens and if I disconnect it, the issue clears.
- If I completely disconnect everything else that came with the Infotaiment.com kit (Touchscreen, CD player and new fascia) the issue CONTINUES. To me, that means it won’t be some interaction with those devices, or the firmware of the other devices.
- I might also be hearing the smallest perceivable ‘pop’ from the front speakers about 1 sec before each blend door cycle when the issue is happening. Maybe a clue to something?
- I have contacted Infotainment.com several times, support is crappy at this point. Got a couple of responses on last attempt, they thought the HVAC module p/n was fine for this fitment (I am not convinced), and had me send them the software revision of the APIM (screen). They thought it might be the APIM, and said there were going to send one, but then went dead air. Argh.
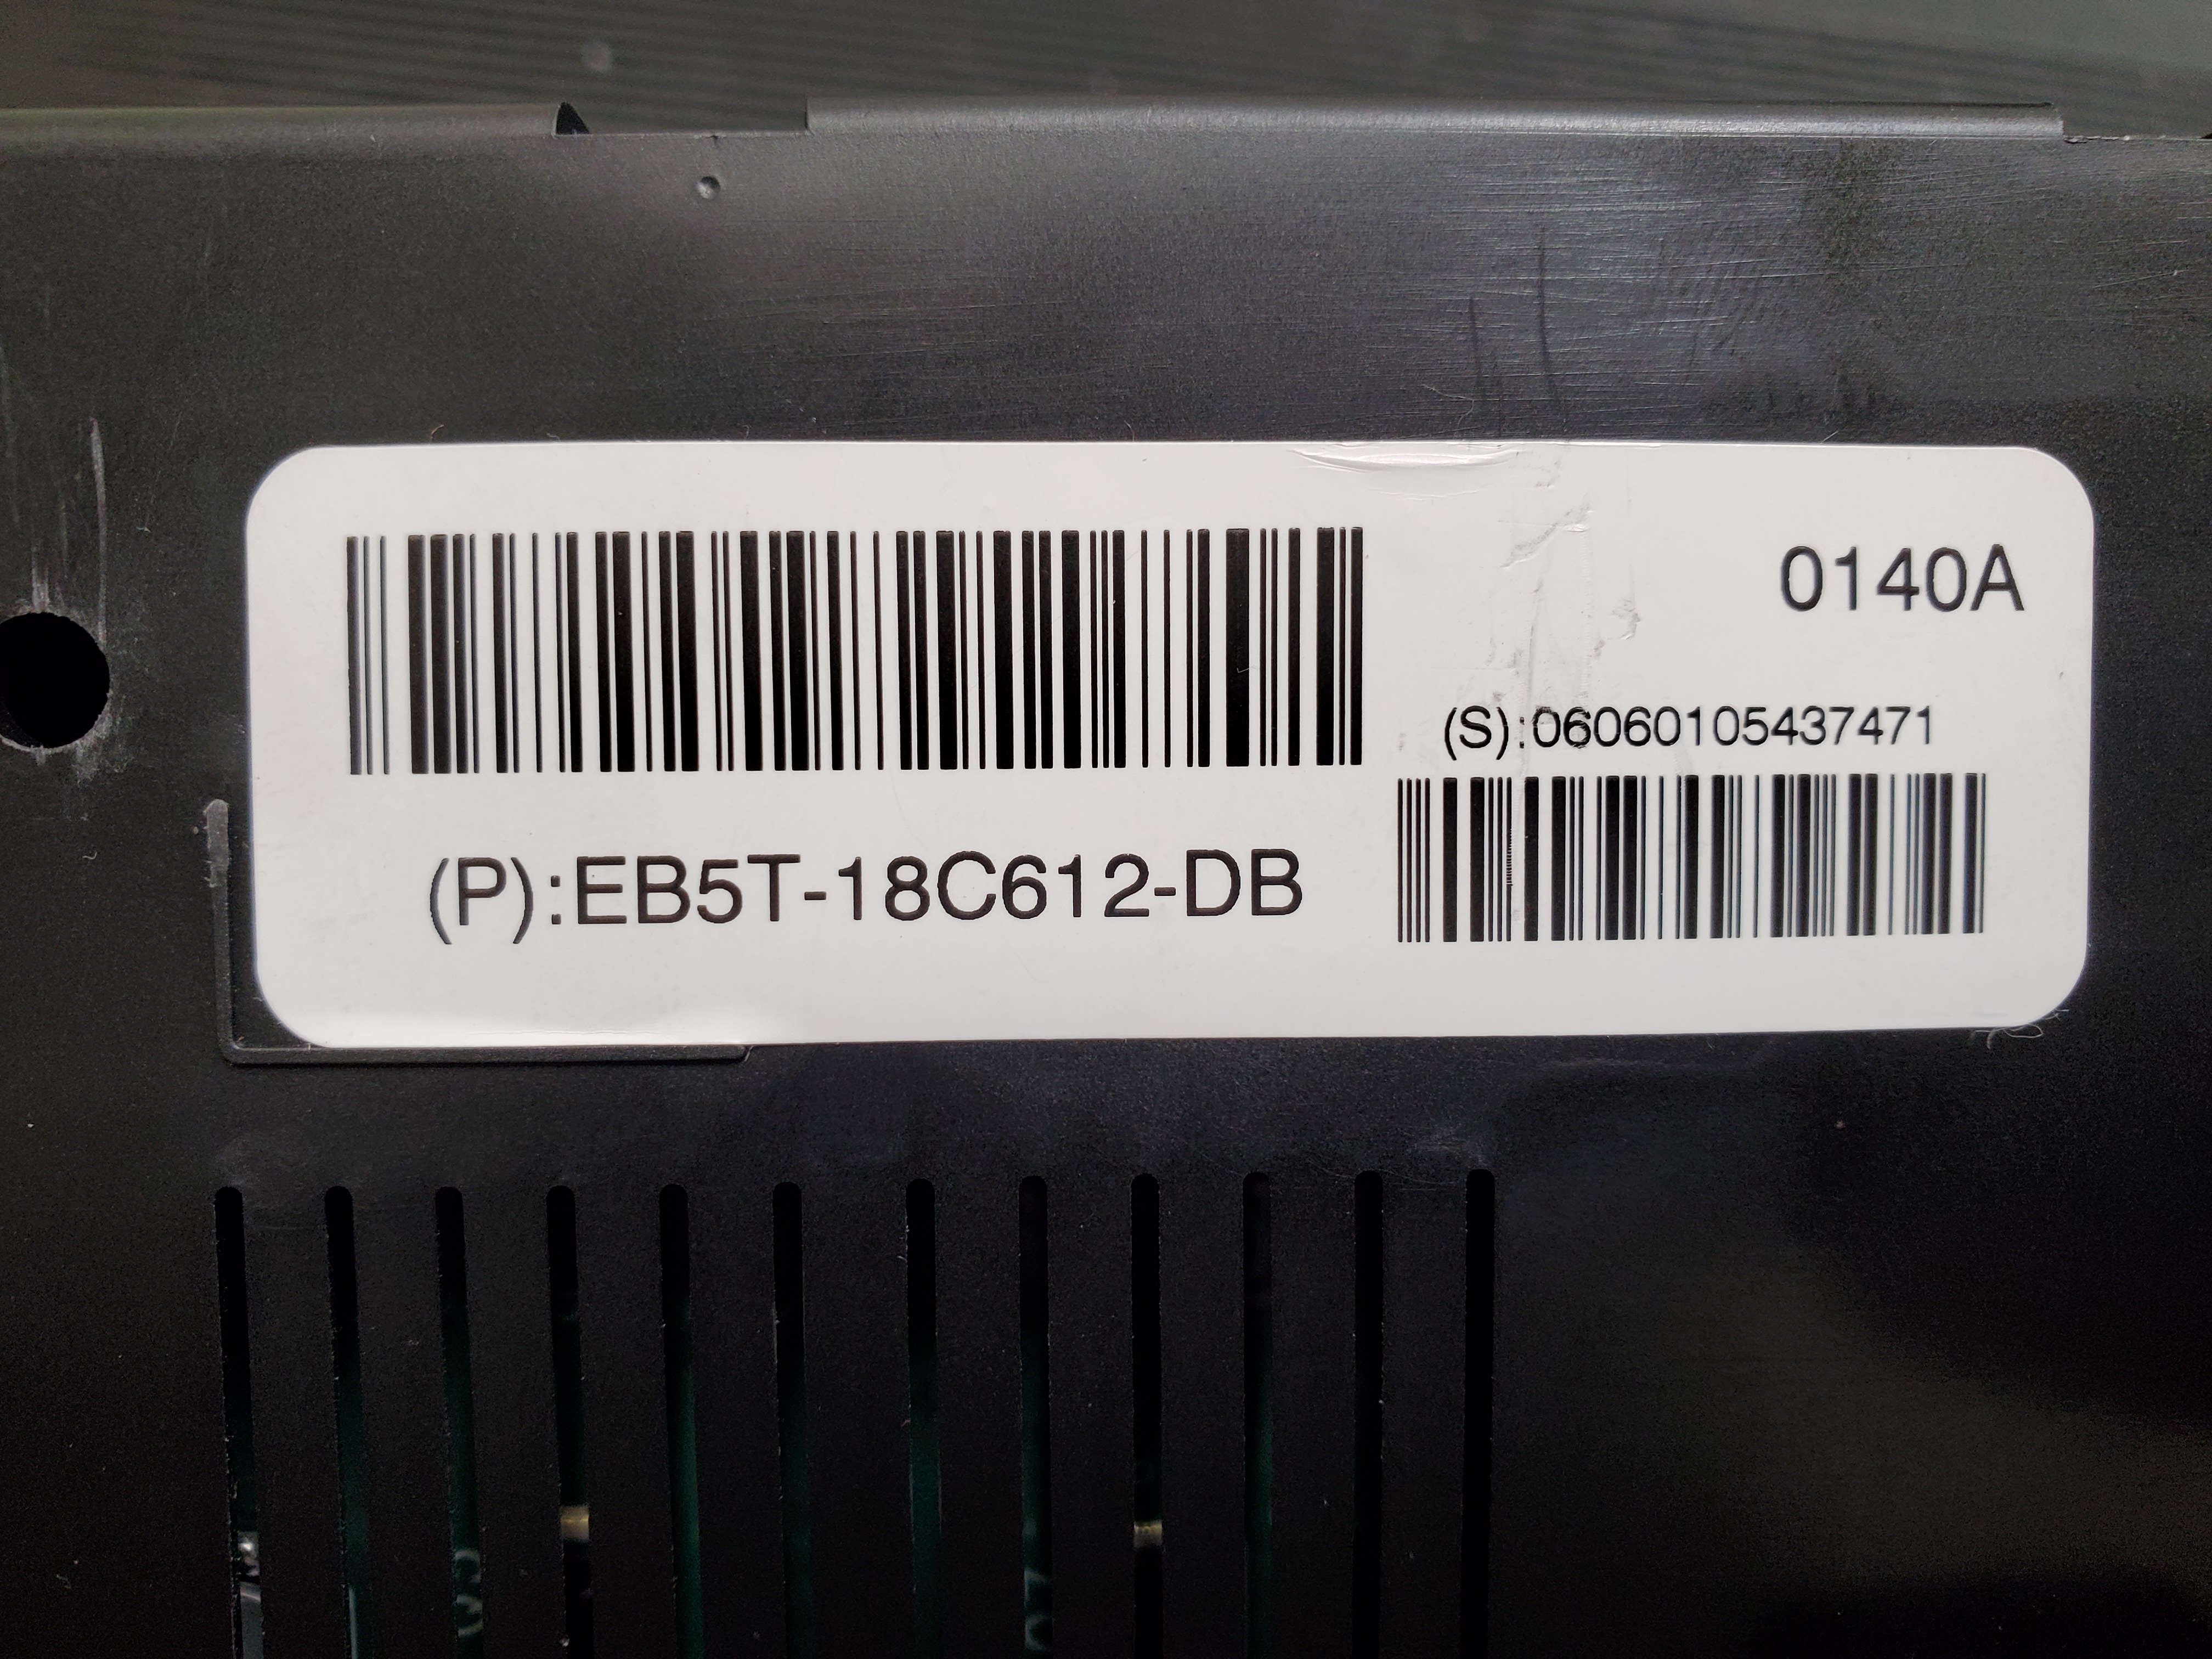
- The Infotainment.com suppled HVAC module is Ford p/n EB5T-18C612-DB
- Looking at parts.ford.com they have multiple versions of the module depending on options
- p/n EB5T-18C612-CB for vehicles with
- With Drivers Heated And Cooled Seat.
- Human Machine Interface 4
- p/n EB5T-18C612-DB for vehicles with
- With Drivers Heated Seat [This is the module Infotainment.com sent and may be incorrect?]
- Human Machine Interface 4
- p/n EB5T-18C612-AB for vehicles with
- Not For (Temperature Control Driver Seat). [I think this describes Barney]
- Human Machine Interface 3 [But -this worries me since the other options are HMI v4]
- Some additional Googling shows up some p/n’s that EB5T-18C612-BA or BB or BC or BD and they say they are for w/o Cooled seats, heated seats, w/o Sony stereo (not sure if that means with or w/o heated seats). Seems like there are then -A, -B, -C and -D iterations for various configurations and the final letter is the revision.
- p/n EB5T-18C612-CB for vehicles with
- Seems like I might need a different automatic HVAC module, one that is setup for my particular set of options (no heated seats, no heated steering wheel). But I am worried about the HID 3 vs. 4 stuff. I called my local Ford dealers parts desk, and they were zip help. If they can’t look it up by VIN (which I explained was the old manual system) then they said they wanted the p/n off the existing module (sent by Infotainment) but I gave up on them since that module may be incorrect.
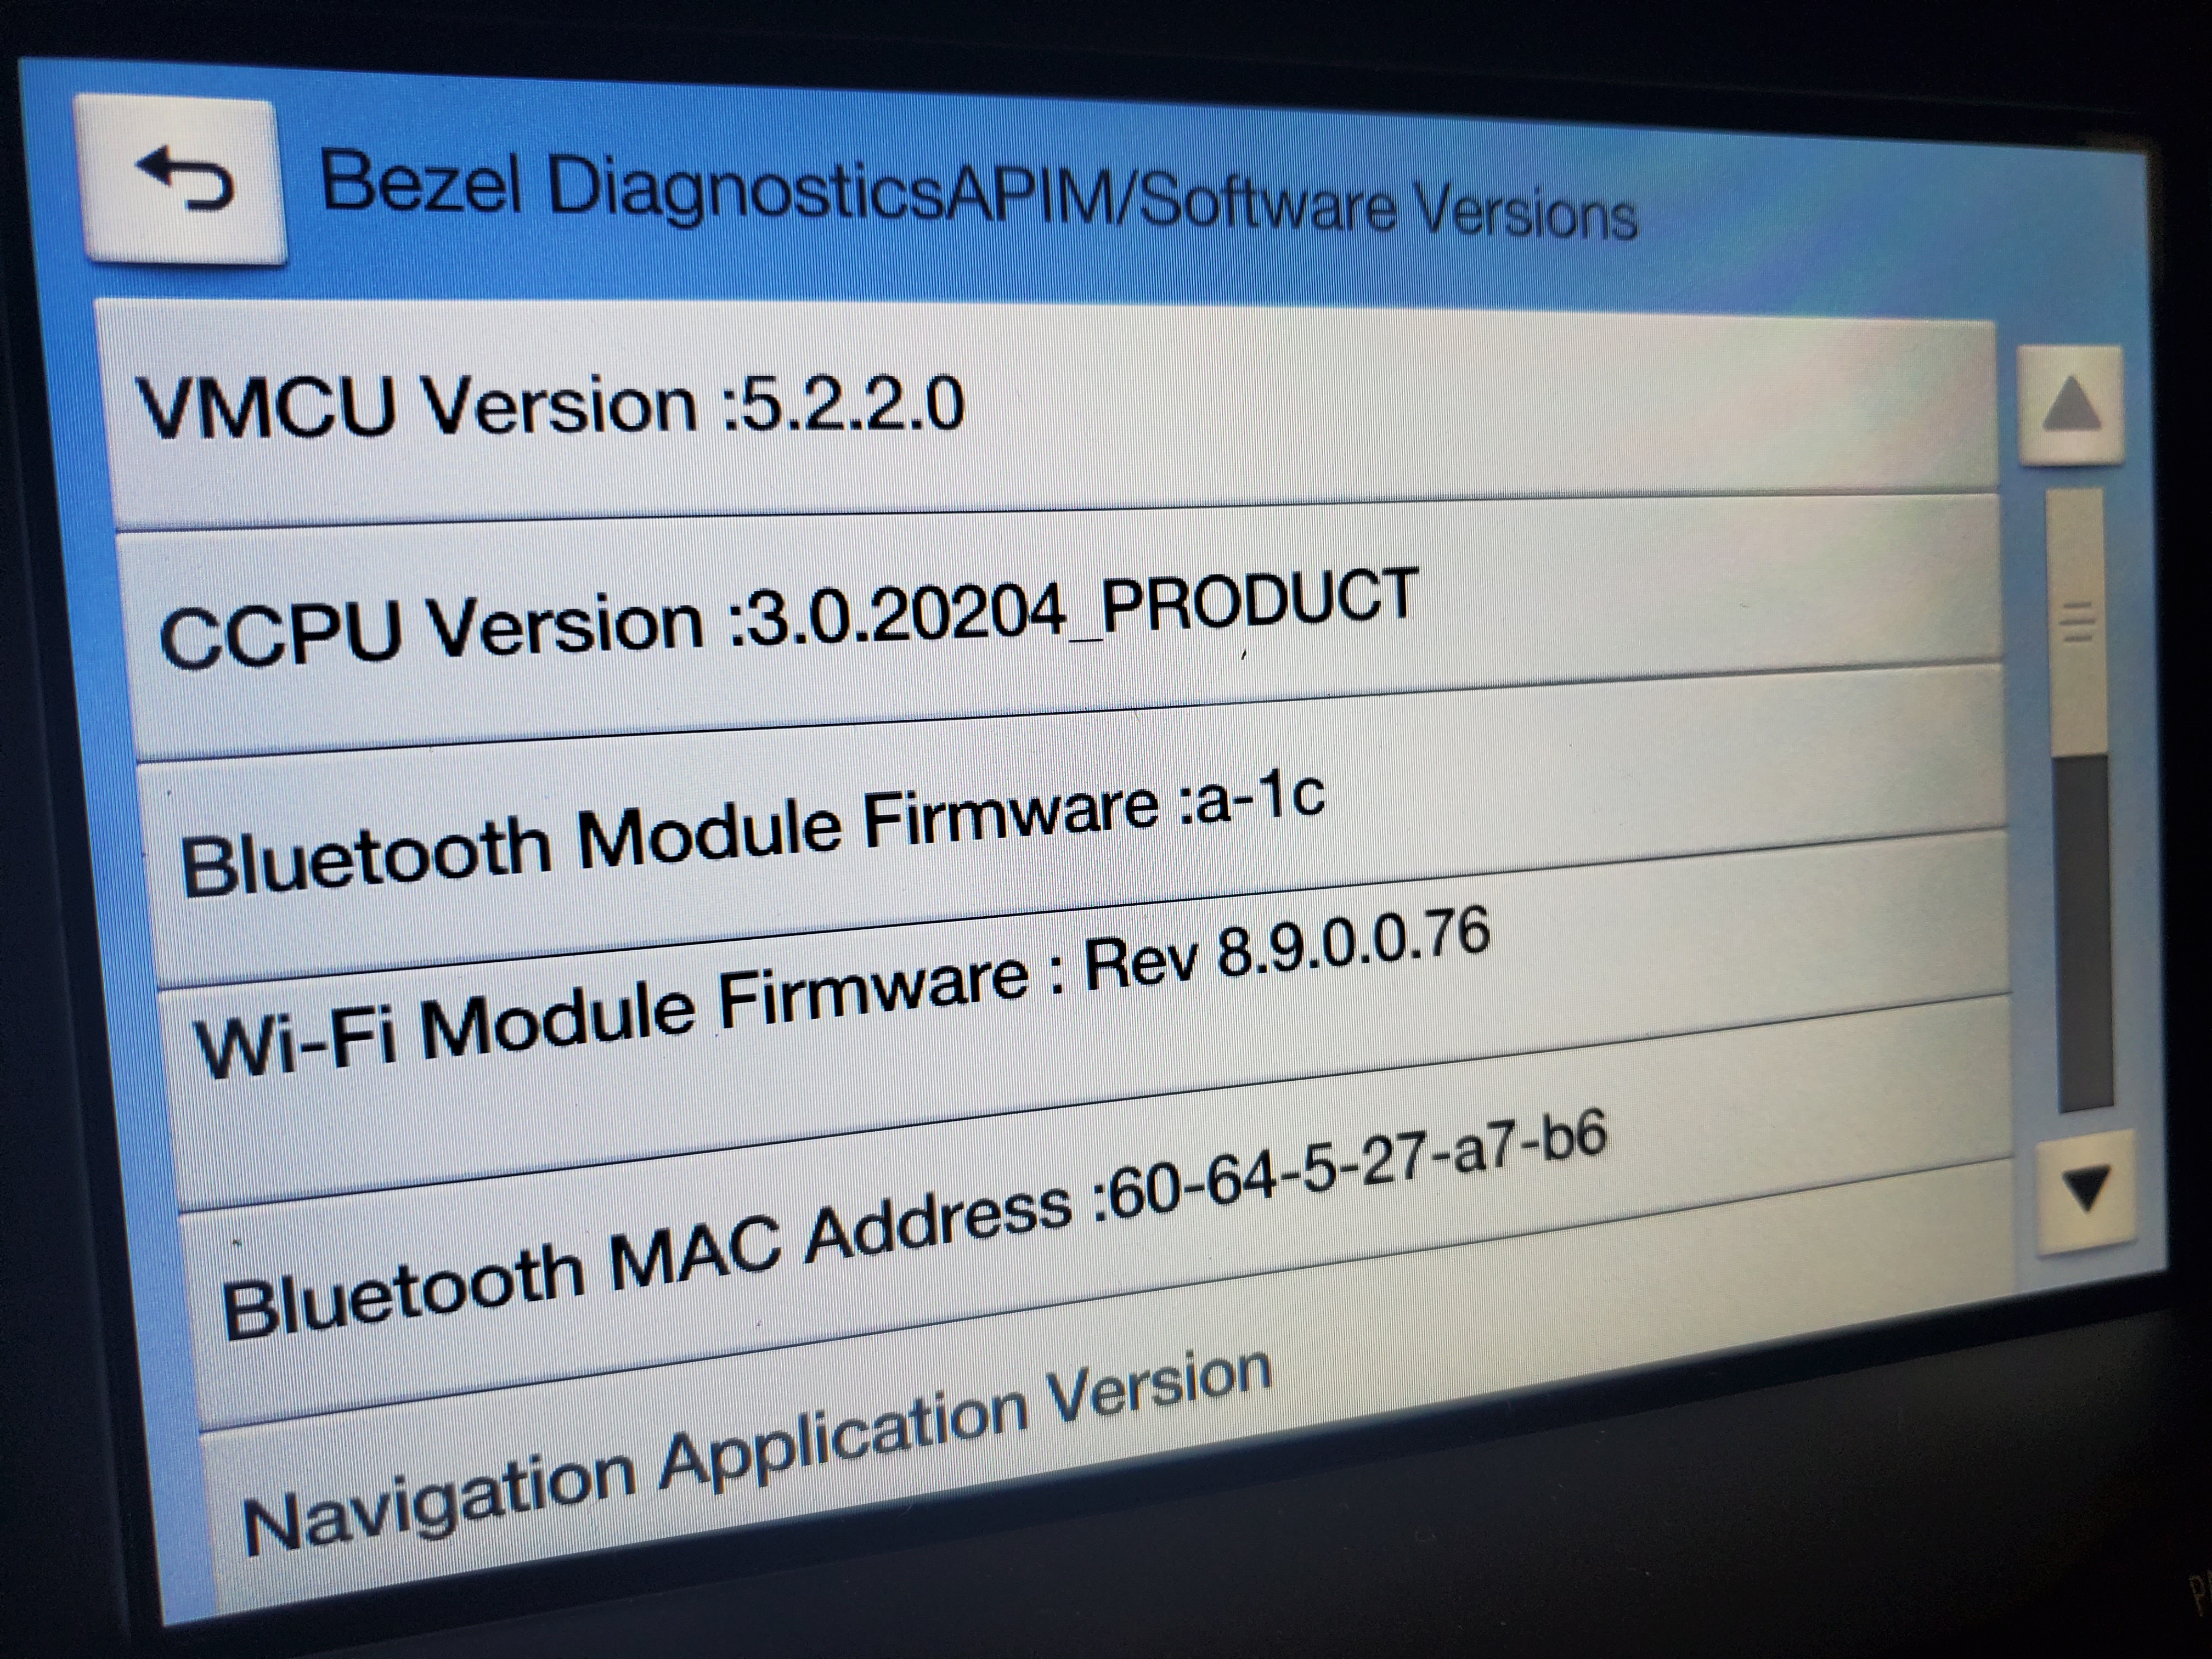
- Using Forscan I pulled the module config information. You can see the entire list here. The APIM and HVAC modules:
- APIM
- APIM – Accessory Protocol Interface Module
- Part number: HP5T-14G371-BAG
- Calibration level: HP5T-14G371-BCH (latest known: HP5T-14G371-BGG)
- Strategy : GB5T-14G374-CB
- Calibration: GB5T-14G375-BA
- VIN: 1FM5K8AR3EGA60179
- HVAC
- HVAC – Heating Ventilation Air Conditioning
- Part number: EB5T-18C612-DB
- Calibration level: EB5T-18C612-DB (latest known: EB5T-18C612-DG)
- Strategy : EB5T-18D619-AA
- Calibration: EB5T-18D620-DA
- VIN: 1FM5K8AR3EGA60179
- APIM
- Using Forscan I conencted and looked for any DTCs. There were several, including in the APIM and HVAC modules.
- HVAC U2100:00-0A – Initial Configuration Not Complete
- Does this mean something more needs to be configured in the module? Hope?
- APIM U0155:00-0B – Lost Communication with the Instrument Panel Cluster (IPC) Control Module
- IPC U0241:00-0A Lost Communication with Headlamp Control Module A
- Headlamps working fine. Don’t know what this is about.
- HVAC U2100:00-0A – Initial Configuration Not Complete
- I wonder if the HVAC module needs to be configured by the dealer for my car. Maybe there is an initial setup that you can tell it what features are in the car. For example, we don’t have dual climate zones, or a rear console control interface.
- I found this link to Forscan programing tips for the Explorer. I figured perhaps I could review the block data of the Infotainment.com sent module, and see if its setup for my car (and compare to the Ford Asbuilt data that would have been in the original module). Of course, you have to trust this online lists information.
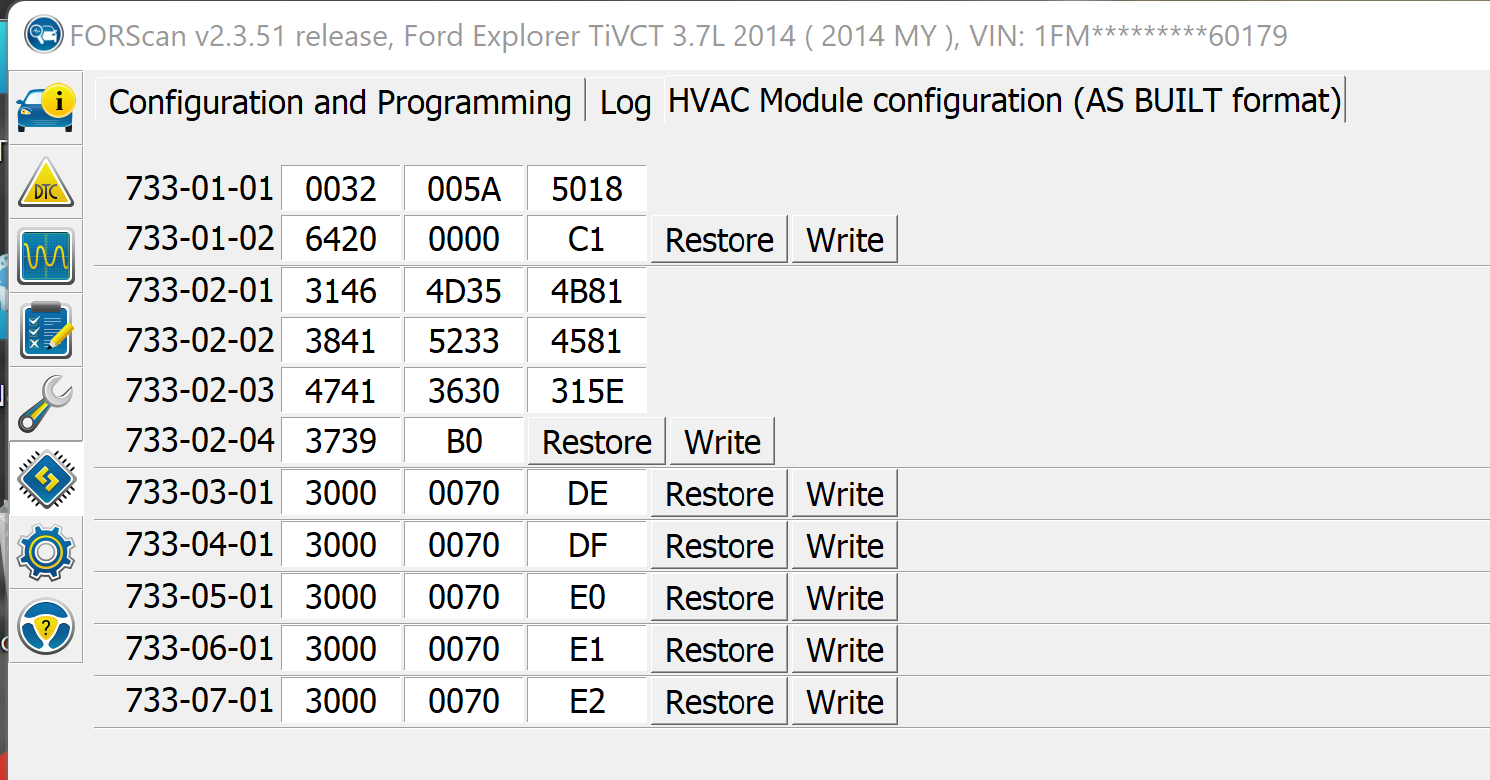
- HVAC Module
- 733-01-01 block was 0032-005A-5018
- the 2nd digit is a Police Option to only allow and was a ‘1’ in the old module
- the 4th digit defines the powertrain and A/C system, and the 2 means a 3.5L with compressor (incorrect). Looking at the spreadsheet a B means 3.7L with variable A/C compressor, and this is what the old module had.
- the 5th and 6th digits define the upper temp limit for the heated seats, and since both old and new matched with 00 we are fine
- The 7th and 8th digits define the lower temp limit for the heated seats. No idea what 5A of new module vs. 64 of the original module means, but opting to go for origianl module setting.
- Using Forscan changed this block to 013B-0064-xxxx (last four get calculated as checksum by Forscan during the save).
- 733-01-02 block was 6420-0000-C1
- The 3rd digit is about the rear HVAC control. Barney doesn’t have one. The new module had a 2 which meant ‘manual’ and the original module had a ‘0’ that meant Disabled (which is probably correct)
- Used Forscan and changed this to 6400-0000-xx (last two are checksum that Forscan sets during save)
- Wrote the config, powered OFF and back ON. Turned car off, locked, waited a few mins, and the Zig-Zig noise is same. No change – ratz.
- 733-01-01 block was 0032-005A-5018
- APIM Module
- For fun, using Forscan I changed block 7D0-02-01 positions 5 and 6 from ’01’ to ‘0B’. This changed the touchscreen splash screen from the standard Ford logo to the ‘ST Performance’ logo on boot up. That worked. Could have done it via the Forscan options menu too. Originally I tried option 12 for Explorer, but that didn’t do anything. I think that code may only work in later model firmware or Model Years.
- IPC Module
- Reviewing that list of Forscan hacks, I saw that the Instrument Cluster could potentially show the Remote Start stuff. It said to edit block 720-01-03 to C8F3 (which was for base model PIU w/o heated seats or heated steering wheel). Wrote the block, powered on/off and on the dash options under settings now there is a disabled option for Power Liftgate now. Ratz. I was dumb, and didn’t record the old setting of the block before I overwrote it. I could go back to Asbuilt, but that might disable the remote start stuff again. Going to leave it for now.
- HVAC Module
So, today was a bust. Unless I get feedback from Infotainment.com I think I am stuck taking to a Ford Dealer to try and have them sort out if the module is incorrect or if it needs programmed or if its something else. Will ask them to:
- Update the firmware in ALL the vehicles modules to the latest builds possible. Maybe this will sort it
- Reset and program the existing infotainment.com HVAC module for my options (if this is a real thing)
- Review the DTCs
- Replace the HVAC module with new?
- Chase the issue down otherwise….
- [seems like a money pit about to open at a stealership]

Date: April 15, 2023
Mileage: 169,750
Performed by: Stefano
Services Performed: Barney has developed a parasitic draw that is wiping out the battery in one or two days. Likely one of the mods Stefano’s done has upset the apple cart, and now we have to chase this down. Issues like this are a bugger to solve.
- Purchased a simple clamp on amp meter from Amazon
- Measuring around the two cables that link to the negative post of the battery, there seems to be a whopping 1.5 amps of parasitic draw. The goal is for <0.050 amps, or under 50 milliamps is normal in most vehicles.
- When sitting in the car after key off, you can hear a quiet zig-zig sound from behind the glove box area. Every 9 seconds, or multiples of 9 seconds like 18 or 27.
- I found this YouTube video that talked about a common problem with Explorers and the fresh air inlet (recirc) blend door actuator. Here is another video where he explains more about the Blend Door Actuator internals and failure points.
- I removed the glove box and surrounding panel to reveal the blend door motor and I removed the cabin filter to inspect the blend door and look for debris, etc.
- I shot a video of it misbehaving. This is probably 5 mins after key off. You can see it seeking closure, etc.
- Disconnected electrical to the module and removed the module to confirm blend door was free to move and could seal properly. No debris blocking it.
- With electrical disconnected the parasitic draw was about the same. Rats.
- While I had my head in the space I could hear a continual super faint humming. Maybe from the center stack. I’m guessing then this means its not the blend door, and they are a symptom of something else that is wrong.
- I can also hear what I think is the temperature blend door occaisionally making a similar noise. Head in the drivers footwell.
- This is leading me to believe that the new automatic climate control module fitted with the new infotainment ssytem might be at fault in some way.
- More Googling also revealed that there is a blend door HVAC calibration procedure (see this YouTube video). Key on (not running), watching climate control screen, pressing defrost and HVAC on buttons simultaneously for 5 seconds, then releasing. Noted that the HVAC temp goes to 90 deg. Then press HVAC on button once. You can hear the blend motors moving around (presumably finding their limits), and eventually after 30 secs everything goes quiet. Pressed Auto on the climate control panel and everything was back to normal on screen. But, checked parasitic draw after and it remained ~1.5amps.
- Researching the Blend Door Actuator replacement part (if that ends up being it, but I doubt it) it is a Ford Part YH1779 (19E616A). Looks like $48 from parts.ford.com online, or half the price for same part on Amazon for $23.
- Next up will be to peel back the Infotainment system and get to the HVAC module and disconnect it to see if the draw stops.
- I also searched online for Wiring Diagrams for a 2014 Ford Police Interceptors and managed to download a complete set of HTML manuals for Service and Wiring Diagrams. Score. I can see the HVAC module 151-21 is powered from the Body Control Module (the under dash fuse box) fuse 46 (10amp). Disconnecting this should at least result in stopping the blend doors cycling, and we may see if this module is the source of the draw. If so, then its a question of whether the module is bad, or something on the CAN Bus is keeping it awake, or if the module needs to be trained to the car since the old module was for manual HVAC control.

Date: April 14, 2023
Mileage: 169,750
Performed by: Stefano
Services Performed: Stefano started to work on a few issues/upgrades today:
- Fitted five new 3/4″ plastic plugs on roof replacing the ones that were older and the one that leaked. Leak tested each afterwards. All good. Will stay dry again.
- Mounted both the front and rear dashcams to glass. Cleaned glass first.
- Reinstalled the headliner and all the seals/hooks/fittings that support it. Also all the wiring harnesses and water feed line to rear wiper.
- Installed new front A pillars purchased from dismantler (no more holes). Looks much better
- Installed B-pillar grab handles purchased from dismantler. Looks good.
- Wired the dashcam to cabin fuse box fuse 38 that is for the rear view mirror and its reverse camera.
- Installed a Littlefuse Mini Add a Circuit
- Removed the existing 10 amp low profile mini fuse
- Installed a 10 amp fuse in primary of add a fuse (this matches the fuse removed)
- Installed a 5 amp fuse in secondary of add a fuse to protect the dashcams
- Crimped 3M 18 Ga. push connectors onto feed line so camera could be disconnected.
- Made a custom dual ground wire to provide ground to dashcam wiring and also to the kludge of the scabbed on horn button.
- Initialized the Blackvue camera, linked to new BlackVue Cloud account.
- Configured with customer string ‘Barney’ to overlay on all videos
- Confirmed date and time
- Turned off all the Voice assist messages
- Set volume of voice assists to zero so she doesn’t speak at all
- Aimed front camera
- Aimed rear camera
- Test viewed a few videos. Working great.
- You can see the users manual for the Dashcam here.
- Removed the manky wiring found near the front right A pillar. Was running under the passenger floor mat to the center console area. Pulled it back and trimmed. Was not carrying power.
- Discovered the manky scabbed in horn wiring is a mess. Will need to review why it was modified and see if I can restore back to original.
Date: April 8, 2023
Mileage: 169,744
Performed by: Stefano
Services Performed: Stefano started to work on a few issues/upgrades today:
- Began fitting a Blackvue DR750-2CH LTE 4K front dashcam with HD rear dashcam.
- Ran the video line from from camera to rear camera location
- Ran the power line from fuse box area to the front camera location
- Zip tied them along the way.
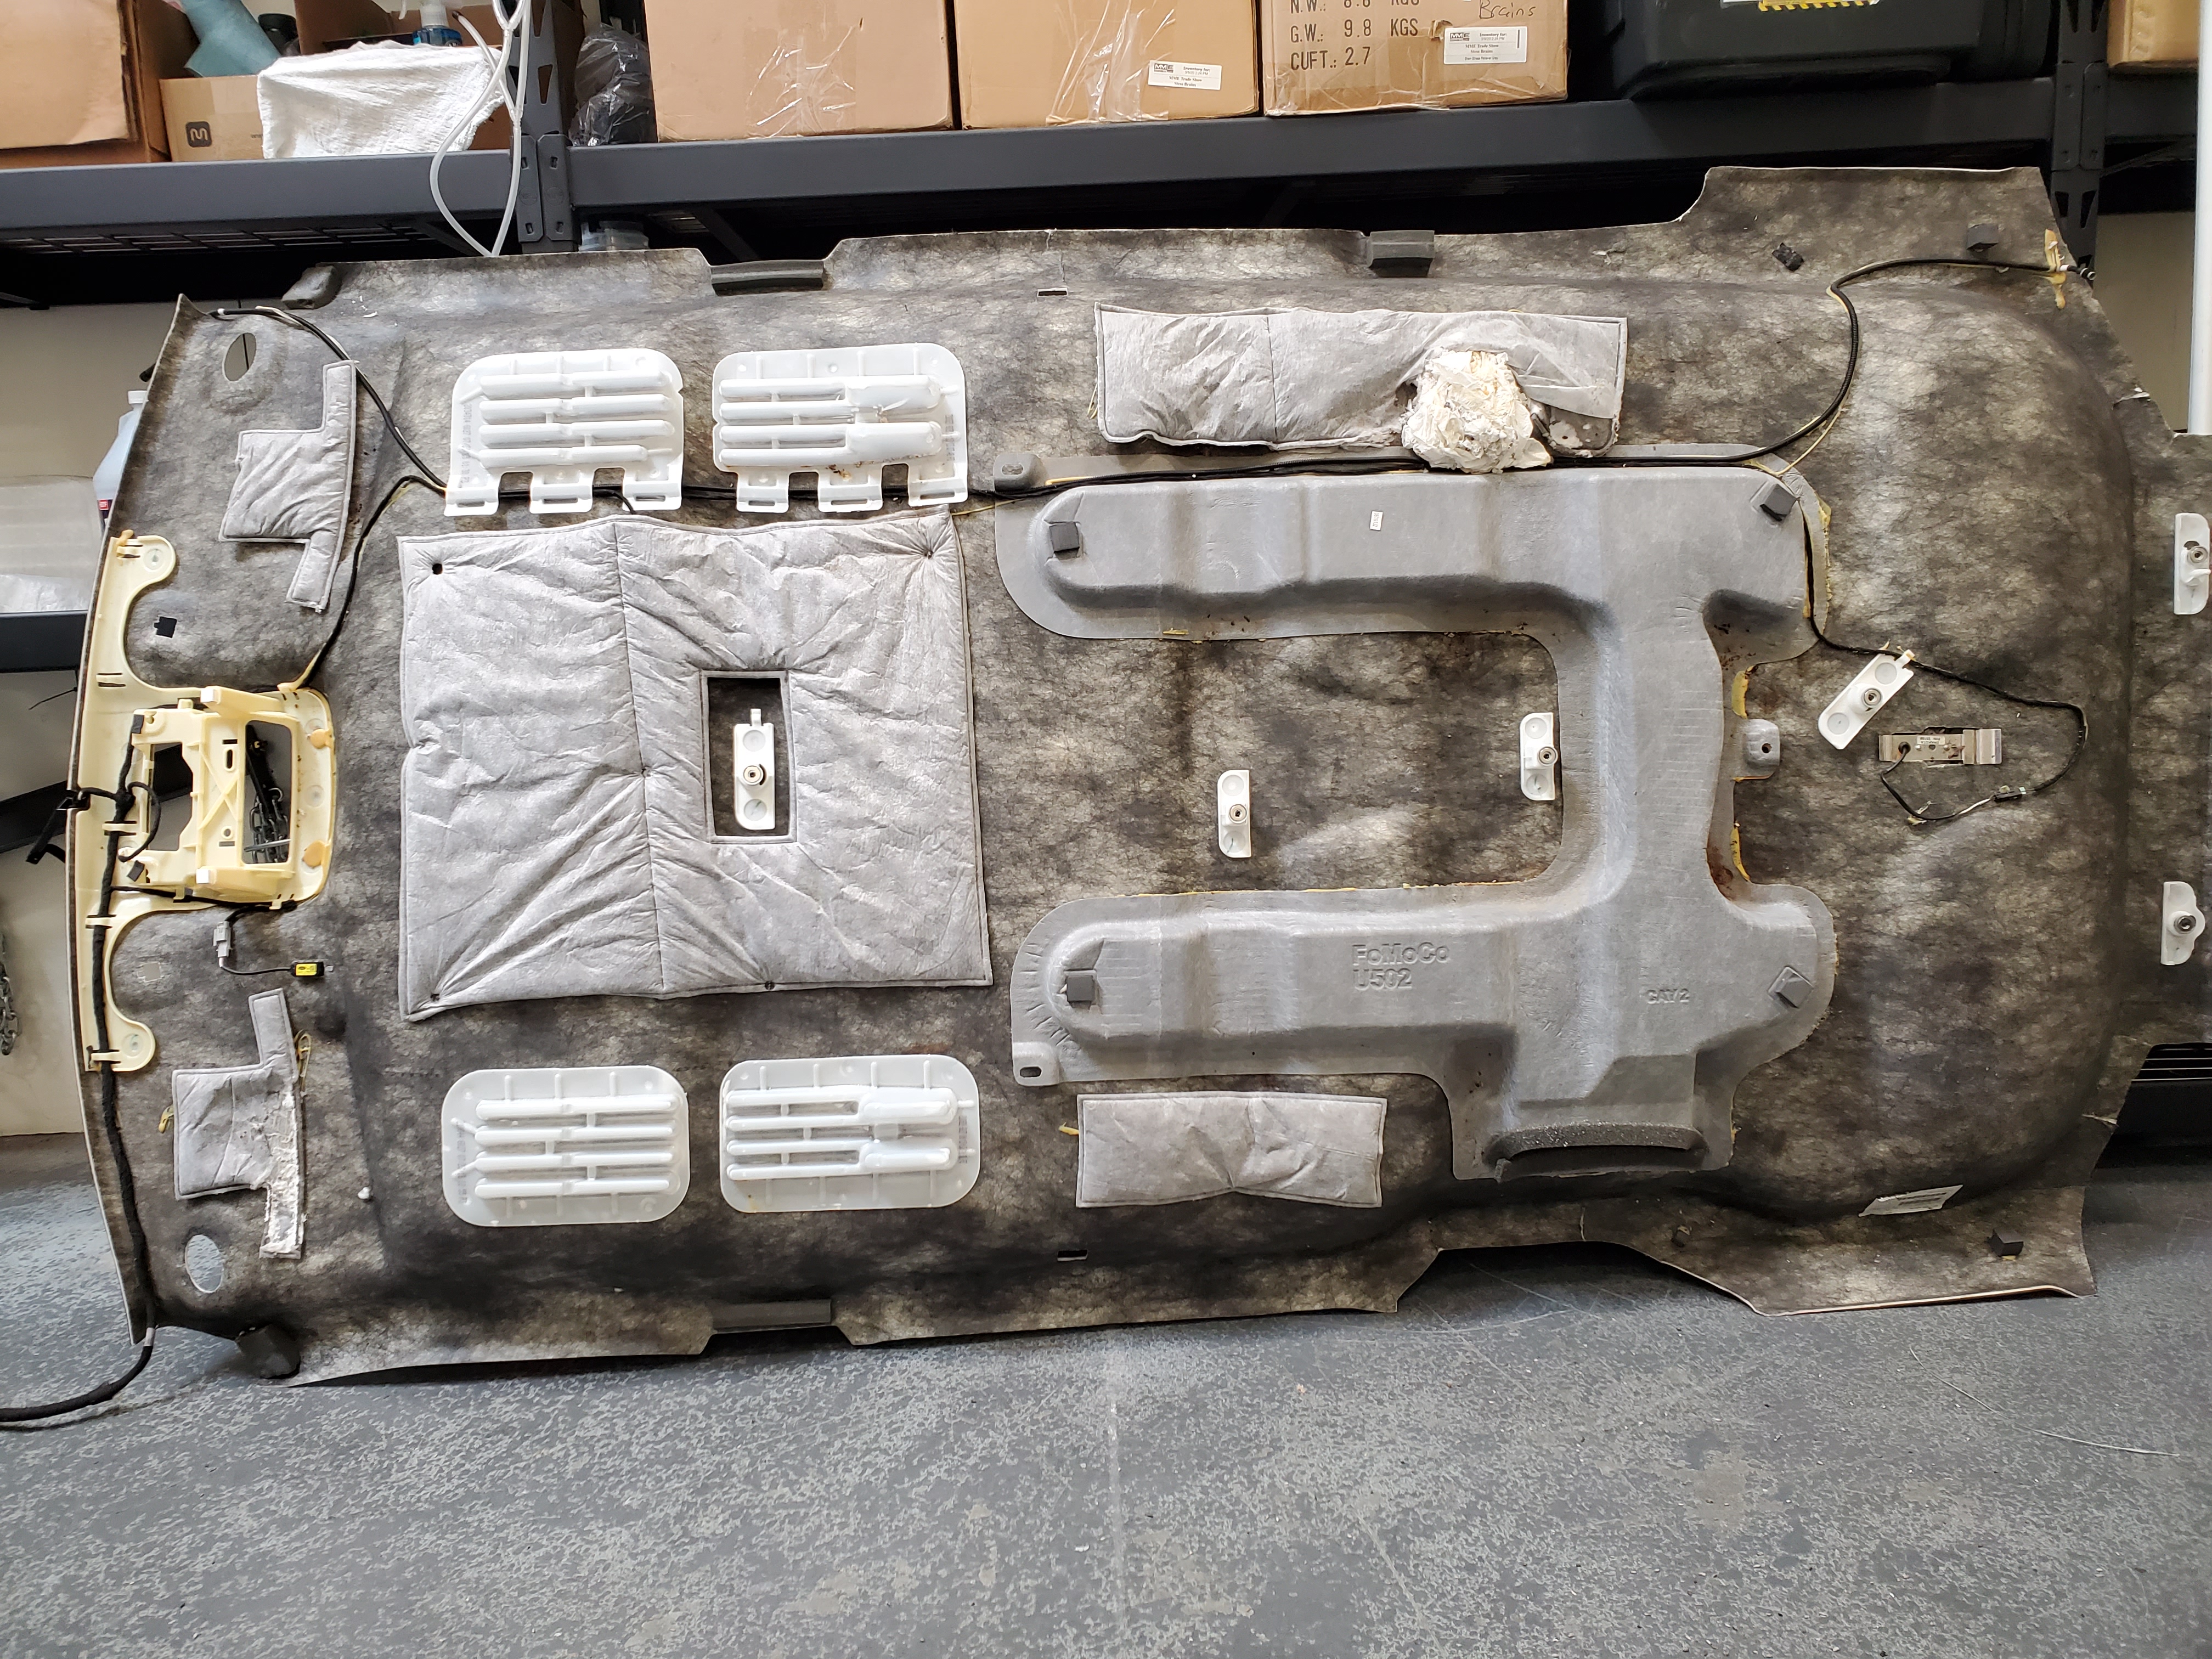
- Removed the headliner. Necessary to do the dashcam wiring.
- This was sloppily reinstalled by the police when decommissioned, so it needed love anyways. Oh-no! Mouse nest was found. Likely from previous owner when we found the missing 1″ hole plug in roof where police gear had been mounted.
- Removed nest and vacuumed the debris
- Inspected the wires and hoses for any nibbles, all good.
- I suspect they didn’t live here long
- Sprayed headliner backside with enzyme cleaner for urine smells (just in case). Then scrubbed with hot water and blotted dry with microfiber towel. Places outside in direct sunlight for 8 hours to dry. Clean and odor free.
- Wiped down interior side of headliner to remove some dust and dirt marks. Cleaned up really well with clean hot water, scrub brush and micro fiber.
- Removed the existing (damaged by police lights) A pillar trims. Will be replaced with ones from a dismantler. These needed to come out for the headliner removal.
- Noted the clothing hanger for left rear row was missing.
- Noted mysterious wiring at front right and front left of dash. Probably some leftover police wiring, but need to chase it back.
- Fitted a plastic 1″ roof plug to fill the hole the mouse entered. Sourced it from Amazon.
- Leak tested the new roof plug (poured puddle of water on it) and observed. All good.
- Leak tested the 5 existing 3/4″ plugs installed by the five oh. As suspected, the one closest to the rear antena mast started to drip very slowly. This is where the water was getting in above the rear dome light and ruining it and collecting.
- Replaced the rear dome light with replacement from auto dismantlers.
- Waiting on replacement 3/4″ plugs (ordered from Amazon)
Date: April 1, 2023
Mileage: 169,736
Performed by: Stefano
Services Performed: Stefano worked on a few issues today:
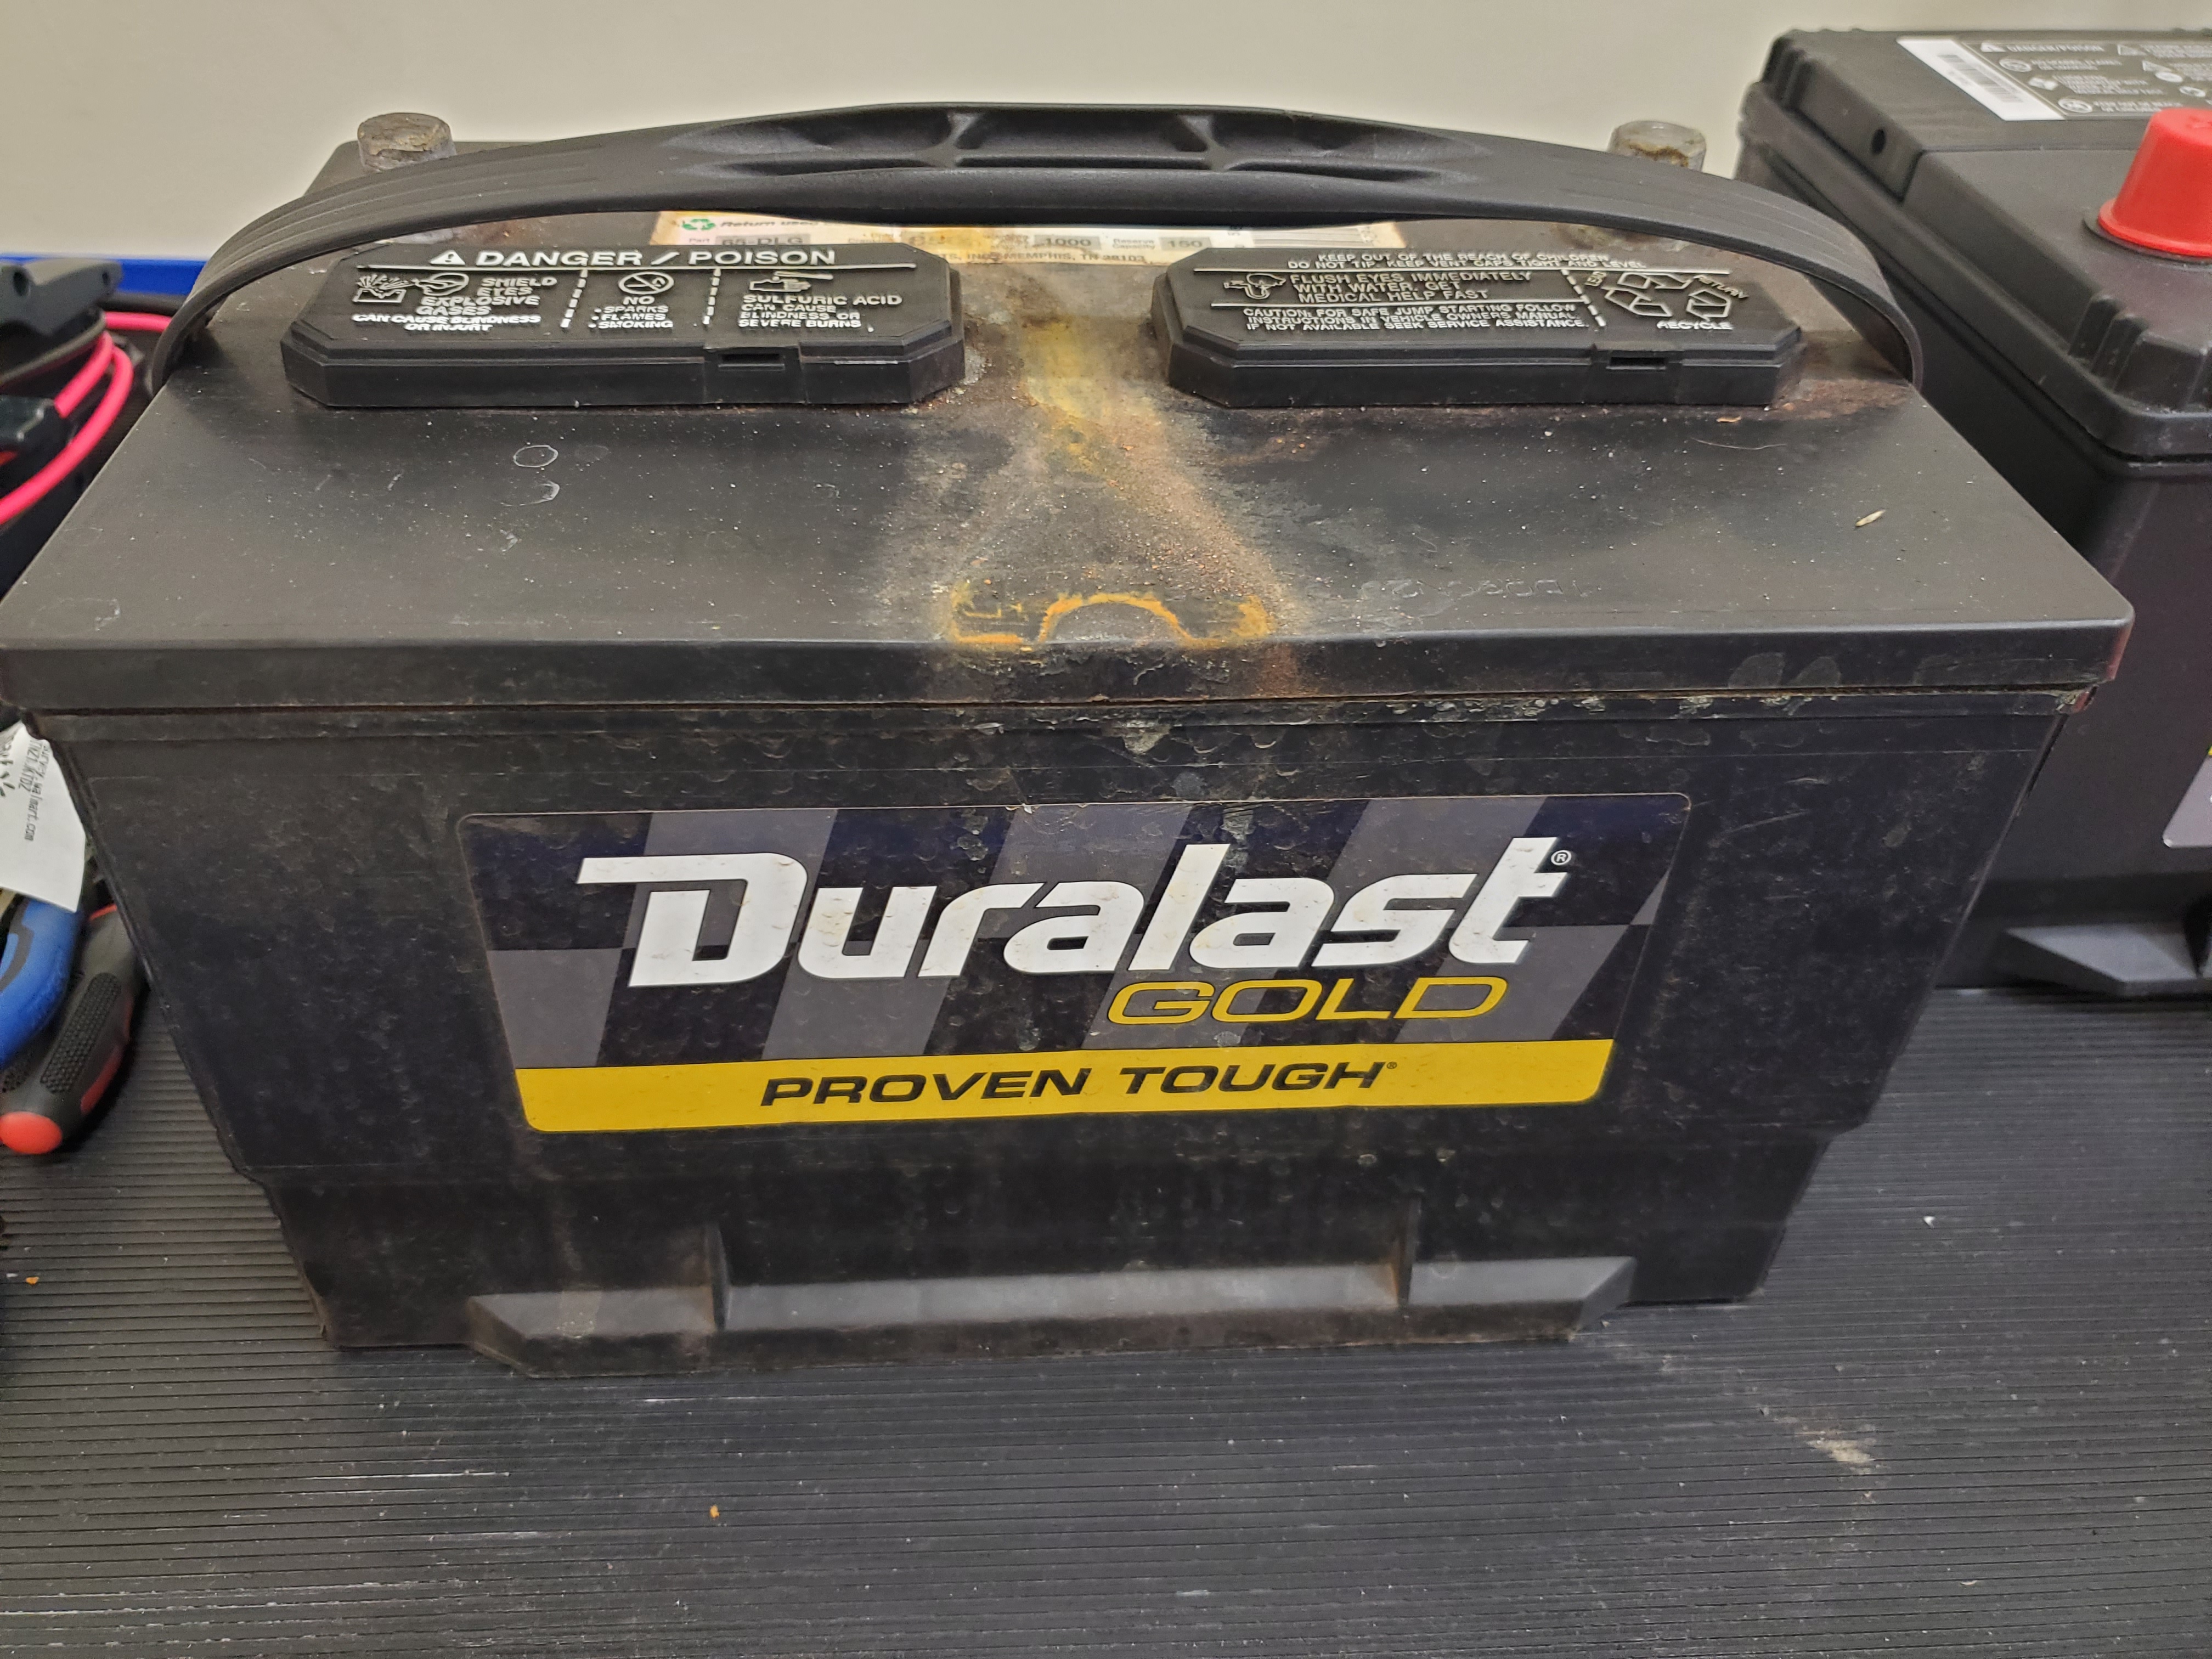
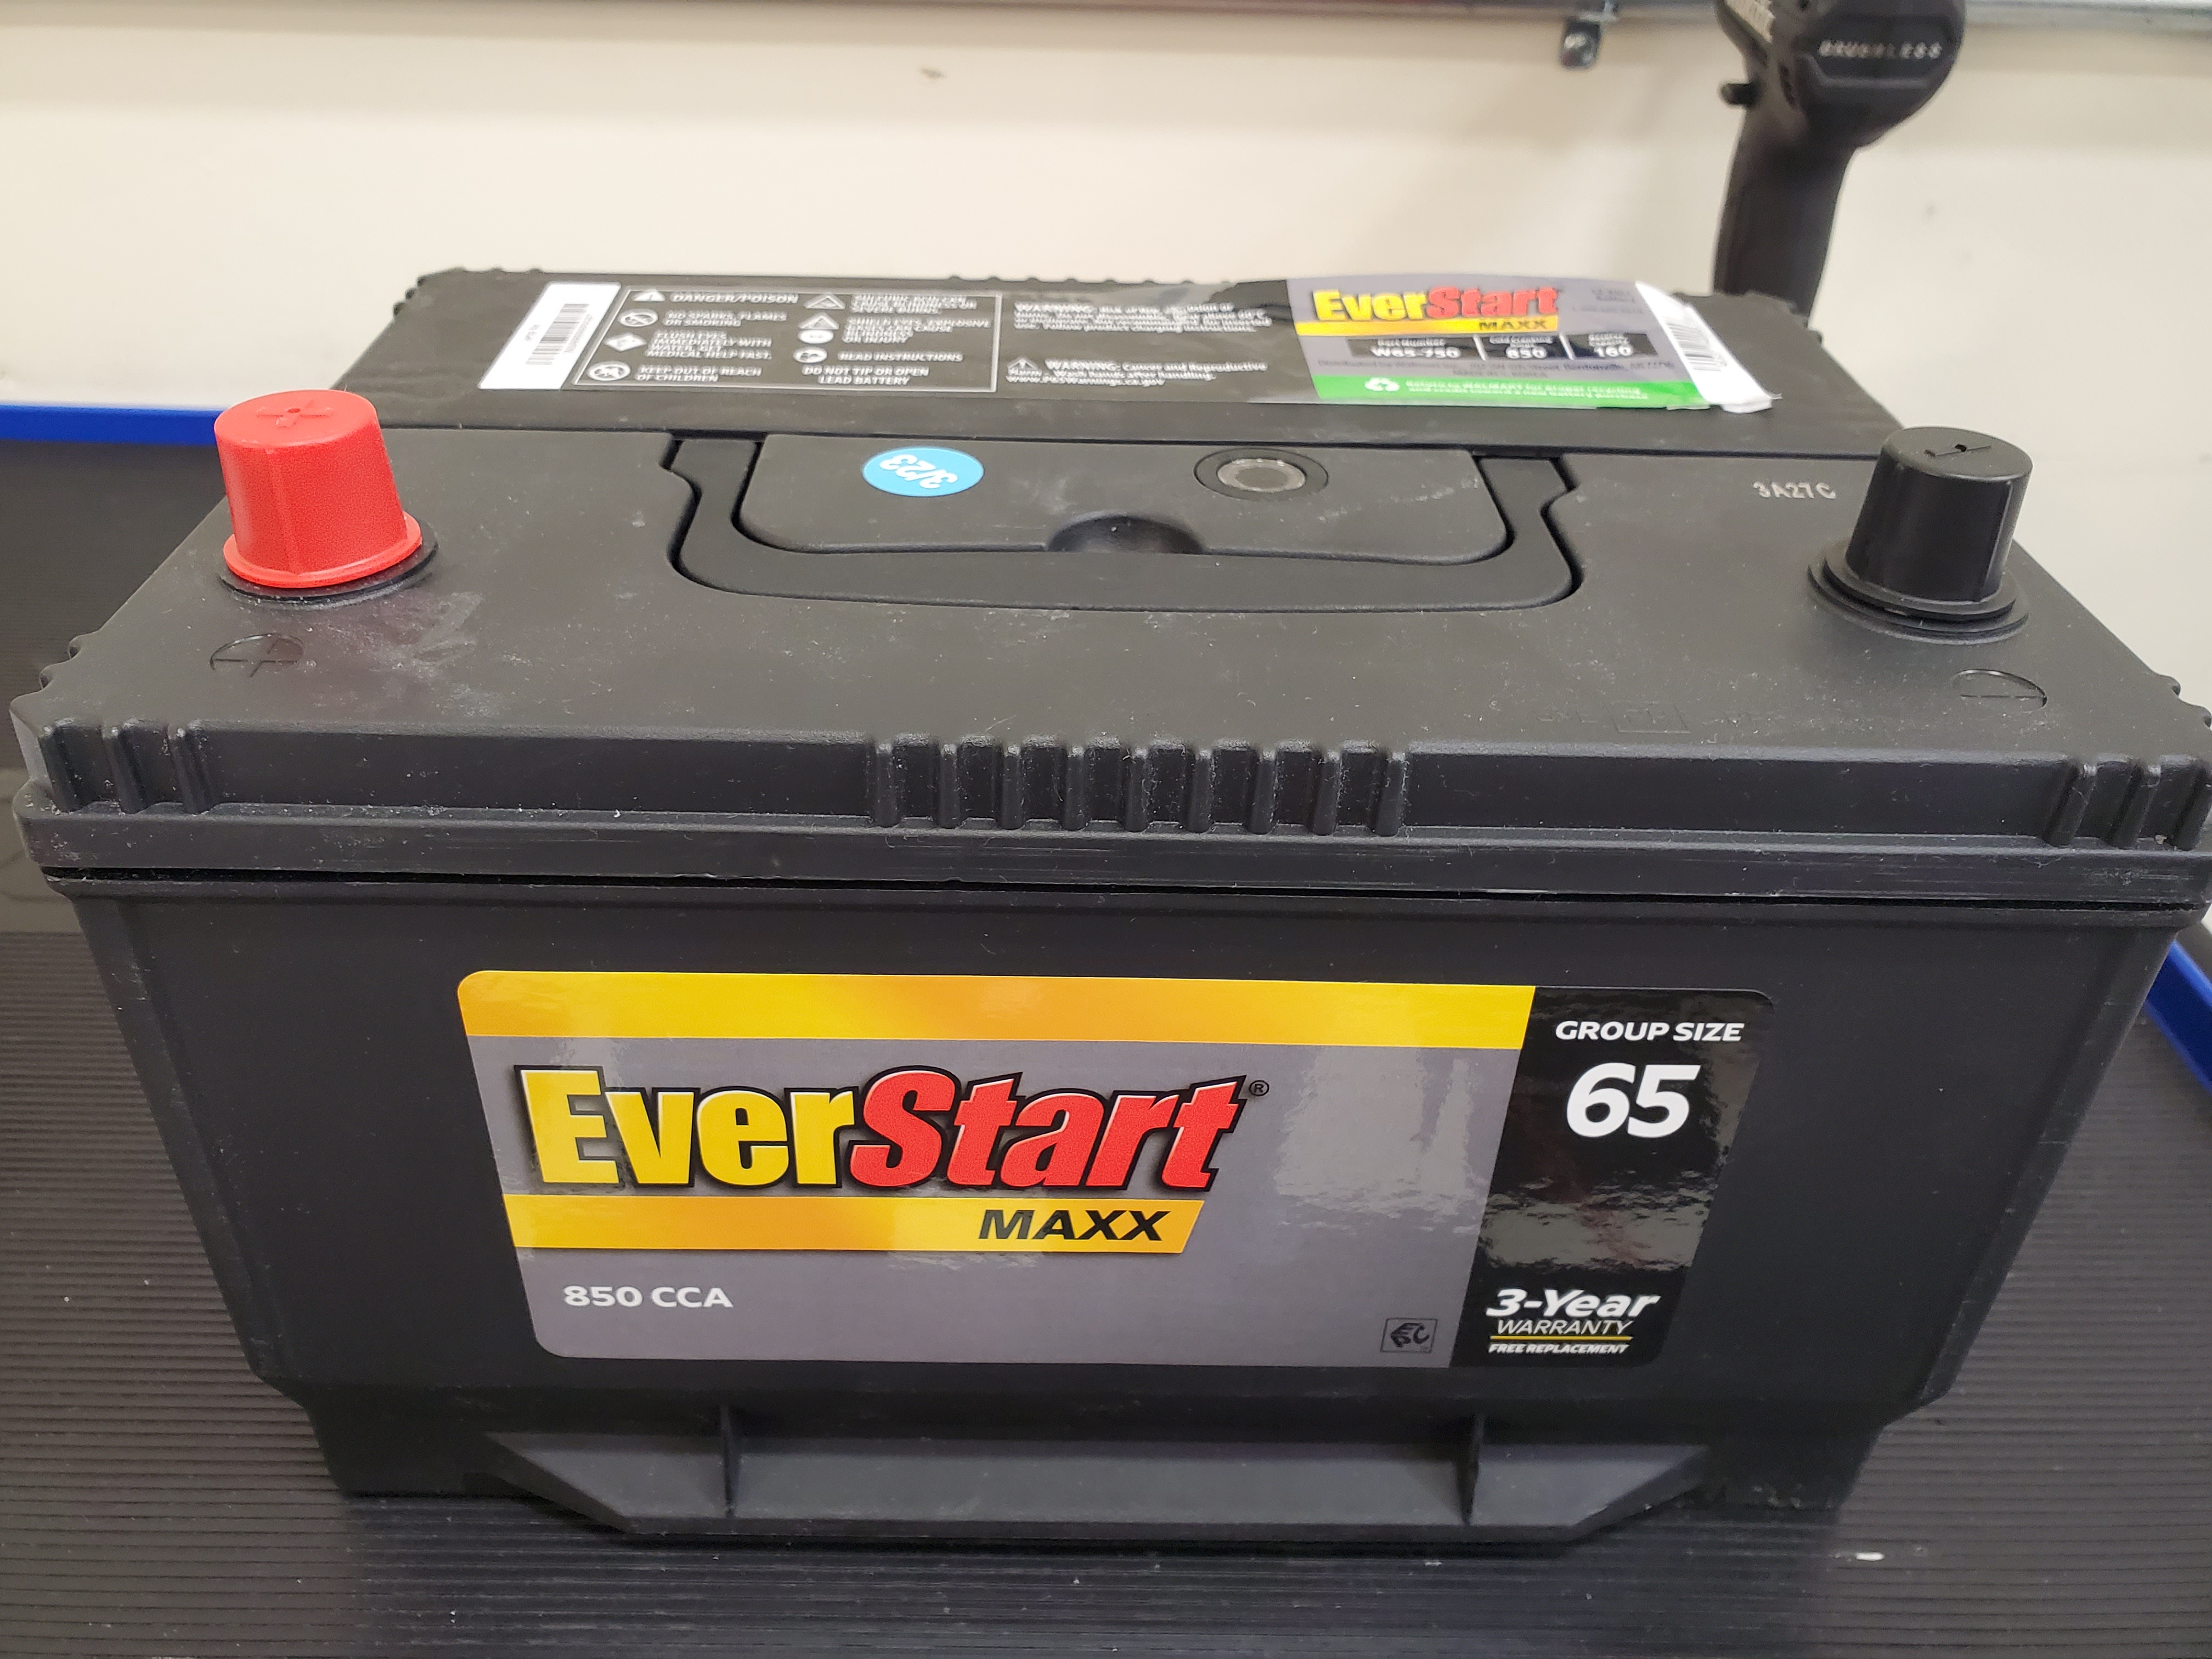
- Barney had two dead battery events this week. Click click click. Used the booster pack to jump to life. Put on the Odyssey charger and in a full day seemed to max out at 60-80% charge. I think a cell might be going. Coming off the charger voltage was 13.6V but by next day was about 12.8V. Stefano uncertain of age of the existing Duralast Gold Group 65 Battery, so opted to purchase a new Everstart Maxx Group 65 battery from Walmart (date code was Mar 23). Changed battery out. Old battery had a date code of April 2021, so fairly new. We’ll need to see if the issue returns and is related to parasitic draw. [updated – as you’ll see above in the other posts, the problem is not the old battery and I have Parasitic draw issue]
- Reset time on new Infotainment system afterwards since battery was disconnected.
- Purchased a Hood Safety Switch from Ford dealer (p/n SW-6169 1X4Z-14018-BA). Was about $22.
- Installed the Hood Safety Switch. Removed the plastic filler, installed the new part, and connected to existing wiring harness. In a PIU this was a deleted feature, and Ford just installed a plastic plug. Harness was all there though. Doing this was necessary for Remote Start to work, it needs to know if the hood is open or closed, and if open it won’t auto start the car (good idea)
- With the new switch installed, tried the Factory Remote Start button on the new keyfob. Success! Lock, then 2 presses of remote start, and she fires up [can Barney be a ‘she’?].
- On a lark, I wanted to see if the partially faded paint on the hood and front quarter panels would polish up.
- First pass – Used the DA polisher and Orange cutting pad with Chemical Guys 34 compound.
- Second pass – Used White polishing pad and Chemical Guys 36 compound
- Third pass – Wiped down with 70% alcohol/water mix to remove any waxes, oils.
- Last pass – Ceramic coated with Avalon King ceramic coating.
- Looking much better now. Still purple!
Date: March 29, 2023
Mileage: 169,730
Performed by: Stefano
Services Performed: Received the new key fobs ordered back on Mar 19th when I went in with Forscan to enable the feature in the computer. Followed the process in this YouTube video to train the new fobs to the vehicle. It worked! But, no joy for the remote start process (yet). Lock, unlock and panic alarm work on both fobs. For the fob I got that is combined with the key, I will need to go get it cut (back to Home Depot I guess).
Date: March 24, 2023
Mileage: 169,700
Performed by: Stefano
Services Performed: Dealing with some of the issues noted during the March 22nd work:
- Replaced the Windshield Wiper Cowl. Ordered for Ford OEM replacement from dealer.
- Removed wiper arms.
- Cleaned trough underneath out and then treated with Meguairs Ultimate Black to bring it back to life.
- While new Cowl was clean and new, used Armor King Ceramic Coating and coated it so it stays black and has UV protection.
- Installed Cowl, clipping properly into place along windshield edge.
- Reinstalled wiper arms, setting into correct position.
- Replaced the wiper arm nut covers both sides as noted below. Ordered Ford OEM part from dealer. Ceramic coated them (plastic) and the entire wiper arm to make it nice and black again
- Cleaned windshield exterior with glass cleaner
- Purchased and installed from bumper tow hook cover. Ordered Ford OEM part from dealer. Was an expensive little bit for what you get. Unpainted, so it will need to get painted or wrapped.
- Vacuumed and wet wiped out the drivers and passenger side footwells.
- Noted that the Clock on the new Sync3 seems to be keeping time better now. Will monitor.
Date: March 22, 2023
Mileage: 169,690
Performed by: Stefano
Services Performed: Dealing with some of the initial issues noted back on the original inspection, getting the rear seating row all tuned up and back to normal:
- Installed the four 10mm bolts that anchor the rear door cards (2 per door). These were missing when vehicle was purchased. Purchased Ford OEM parts. [Stefano over-tightened and broke bolt off on RR door, the bolt at the hand hold area – dang]
- Installed the four 7mm screws that also anchor the rear door cards (2 per door). These were missing when vehicle was purchased. Purchased Ford OEM parts.
- Installed the two trim covers for the rear door cards (behind door pull and door grab handle) that would cover the 10mm bolt areas. These were missing when vehicle was purchased. Purchased Ford OEM parts.
- Installed the upper interior trim covers on the rear doors that sit above the door cards. These were missing when vehicle was purchased. Purchased Ford parts from local auto dismantler in Rancho Cordova.
- Installed the large floor foam insulation piece that sits behind the rear seat row. Included two 10mm bolts and two spacers. This was missing when vehicle was purchased. Purchased Ford parts from local auto dismantler in Rancho Cordova.
- Replaced the right rear door power window control switch. This wasn’t working when purchased. Purchased a used switch from eBay. Swapped the switch, worked perfectly.
- Right wiper blade arm was mounted with the blade parking too low. It was hitting the cowl at the bottom of the windshield smashing up the rubber trim on it. I removed the nut (the plastic cover broke – dang) and I adjusted the arm up a few degrees to fit perfectly. I’ve ordered replacement nut covers and and cowl from Ford. Cowl wasn’t cheap. Future project.
- Ordered a front tow hook cover for the front bumper cover from Ford. Will pop it in when arrives.
- Topped off the washer fluid with about 3 liters of cold weather blue fluid
- Checked engine oil, was perfect.
- Topped off the Engine coolant. Was at the min level. Added more 50/50 premix that was still on-hand from the coolant flush. At max line now. Will monitor in case we are seeing the signs of a coolant leak or worse yet the dreaded water pump leak.
- Added a Serviced by Stefano’s Garage license plate frame to the rear license plate. Still used the theft proof license plate screws.
- Applied the new CA DMV registration sticker for 2024.
Saving changing the A and B pillars and grab handles, and rear dome light until I remove the headliner to look for source of leak near rear dome light. At the same time I will fit the Front and Rear dashcams I have on hand as an upgrade.
Date: March 19, 2023
Mileage: 169,640
Performed by: Stefano
Services Performed: Gearing up to get some remote key fobs working and lay the groundwork for remote start too. Watched a few YouTubes on this, and using Forscan software and OBDII hookup this can be enabled for the PIU. I used Forscan and went into the body module and enabled:
- Remote Entry
- Remote Start
- Remote Start Climate Settings
I let Forscan edit the blocks, but here is the before/after of the blocks the videos talk about for block 726-18-01 (that relate to remote entry). It changed from 0100-0005-4B to 0100-0005-4C. This matched one of the codes shown in the YouTube video (that the dude was a little unclear). I trust Forscan’s built in functions will be more reliable, but we’ll see after I actually have it working.
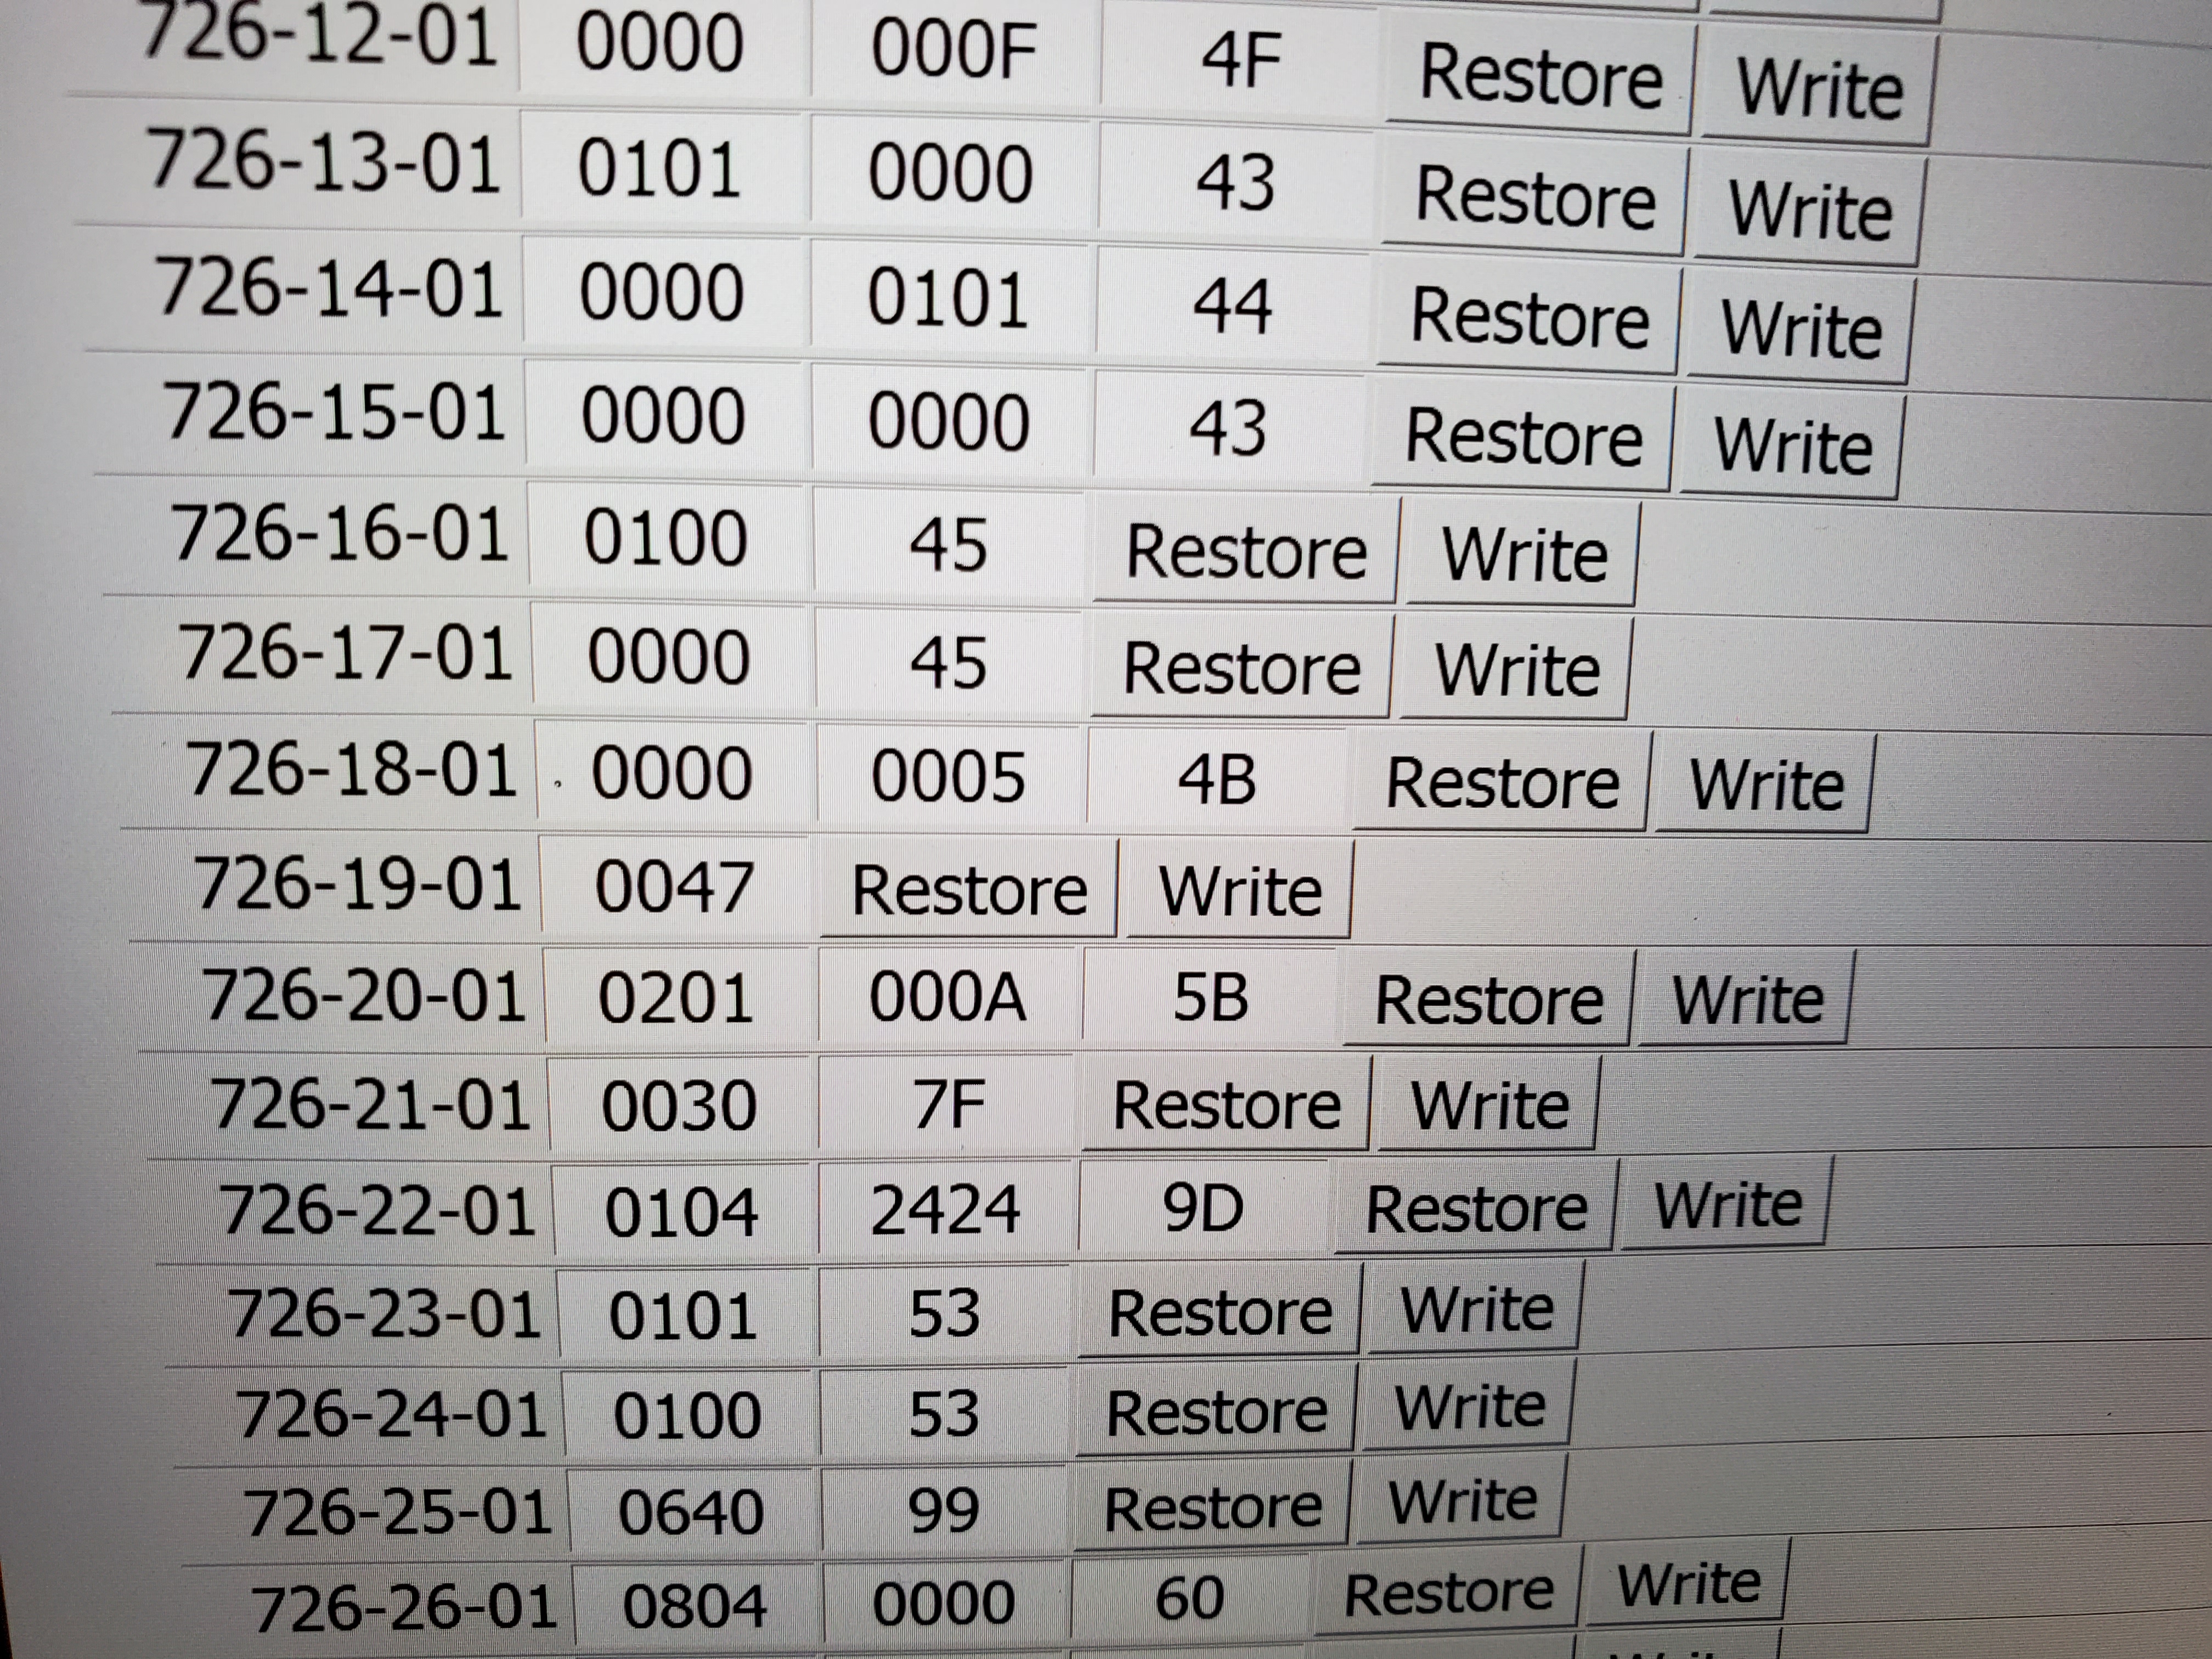
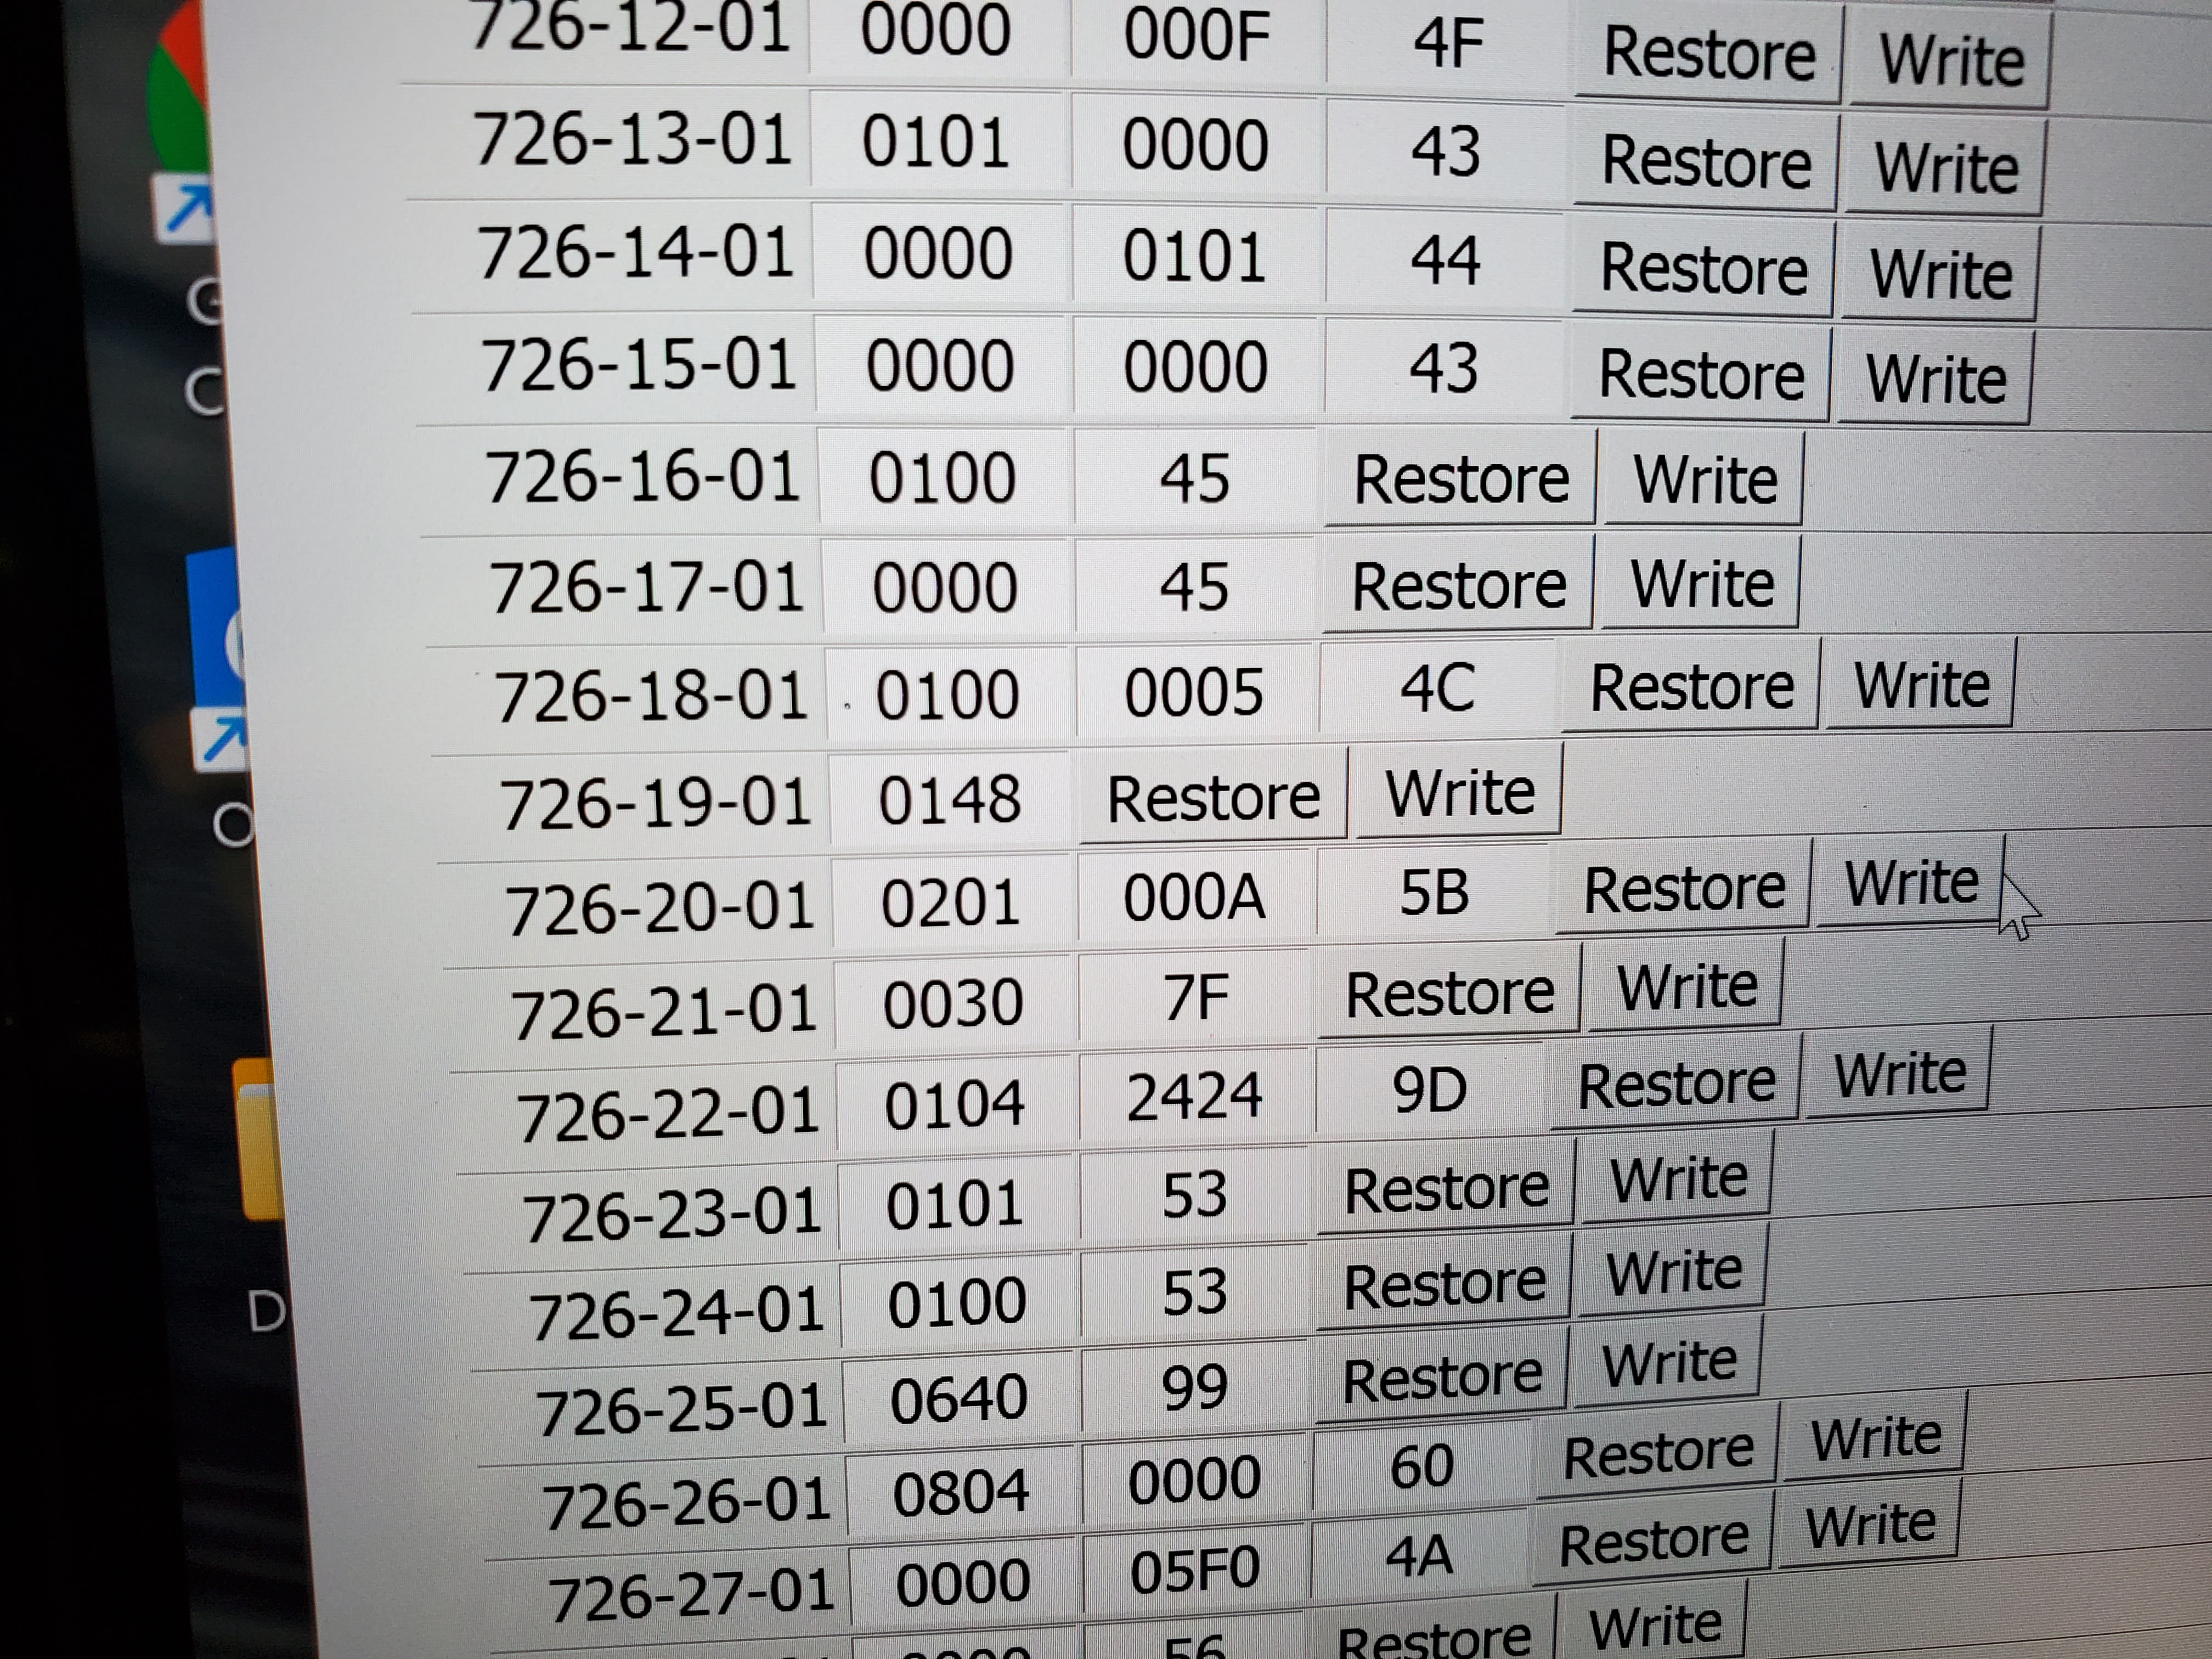
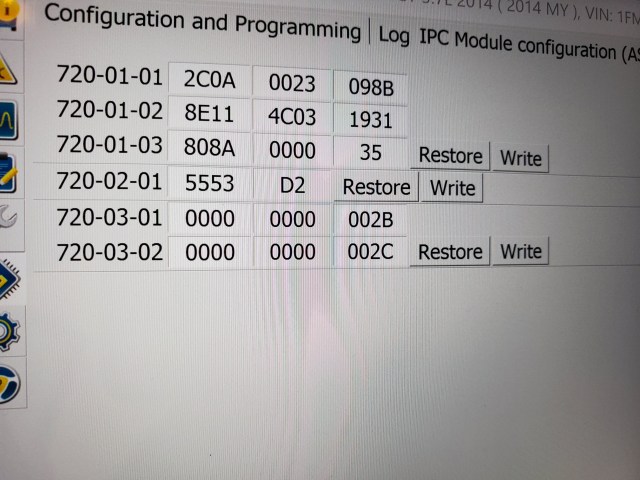
Here is a shot of the IPC module blocks AFTER I had made the change in the Body module. The field 720-01-03 matches what the YouTube video also suggests 808A-0000-35 – assuming that Forscan also modified this when I did the Body block. [Sorry – I didn’t check this before I started]
I’ve ordered two key fobs from CarandTruckRemotes.com for $76 USD (incl. tax and ship) and they arrive in a week or so. 5 button models with remote start as well. Hoping I’ll be able to code them to Barney.
Date: March 17, 2023
Mileage: 169,632
Performed by: Stefano
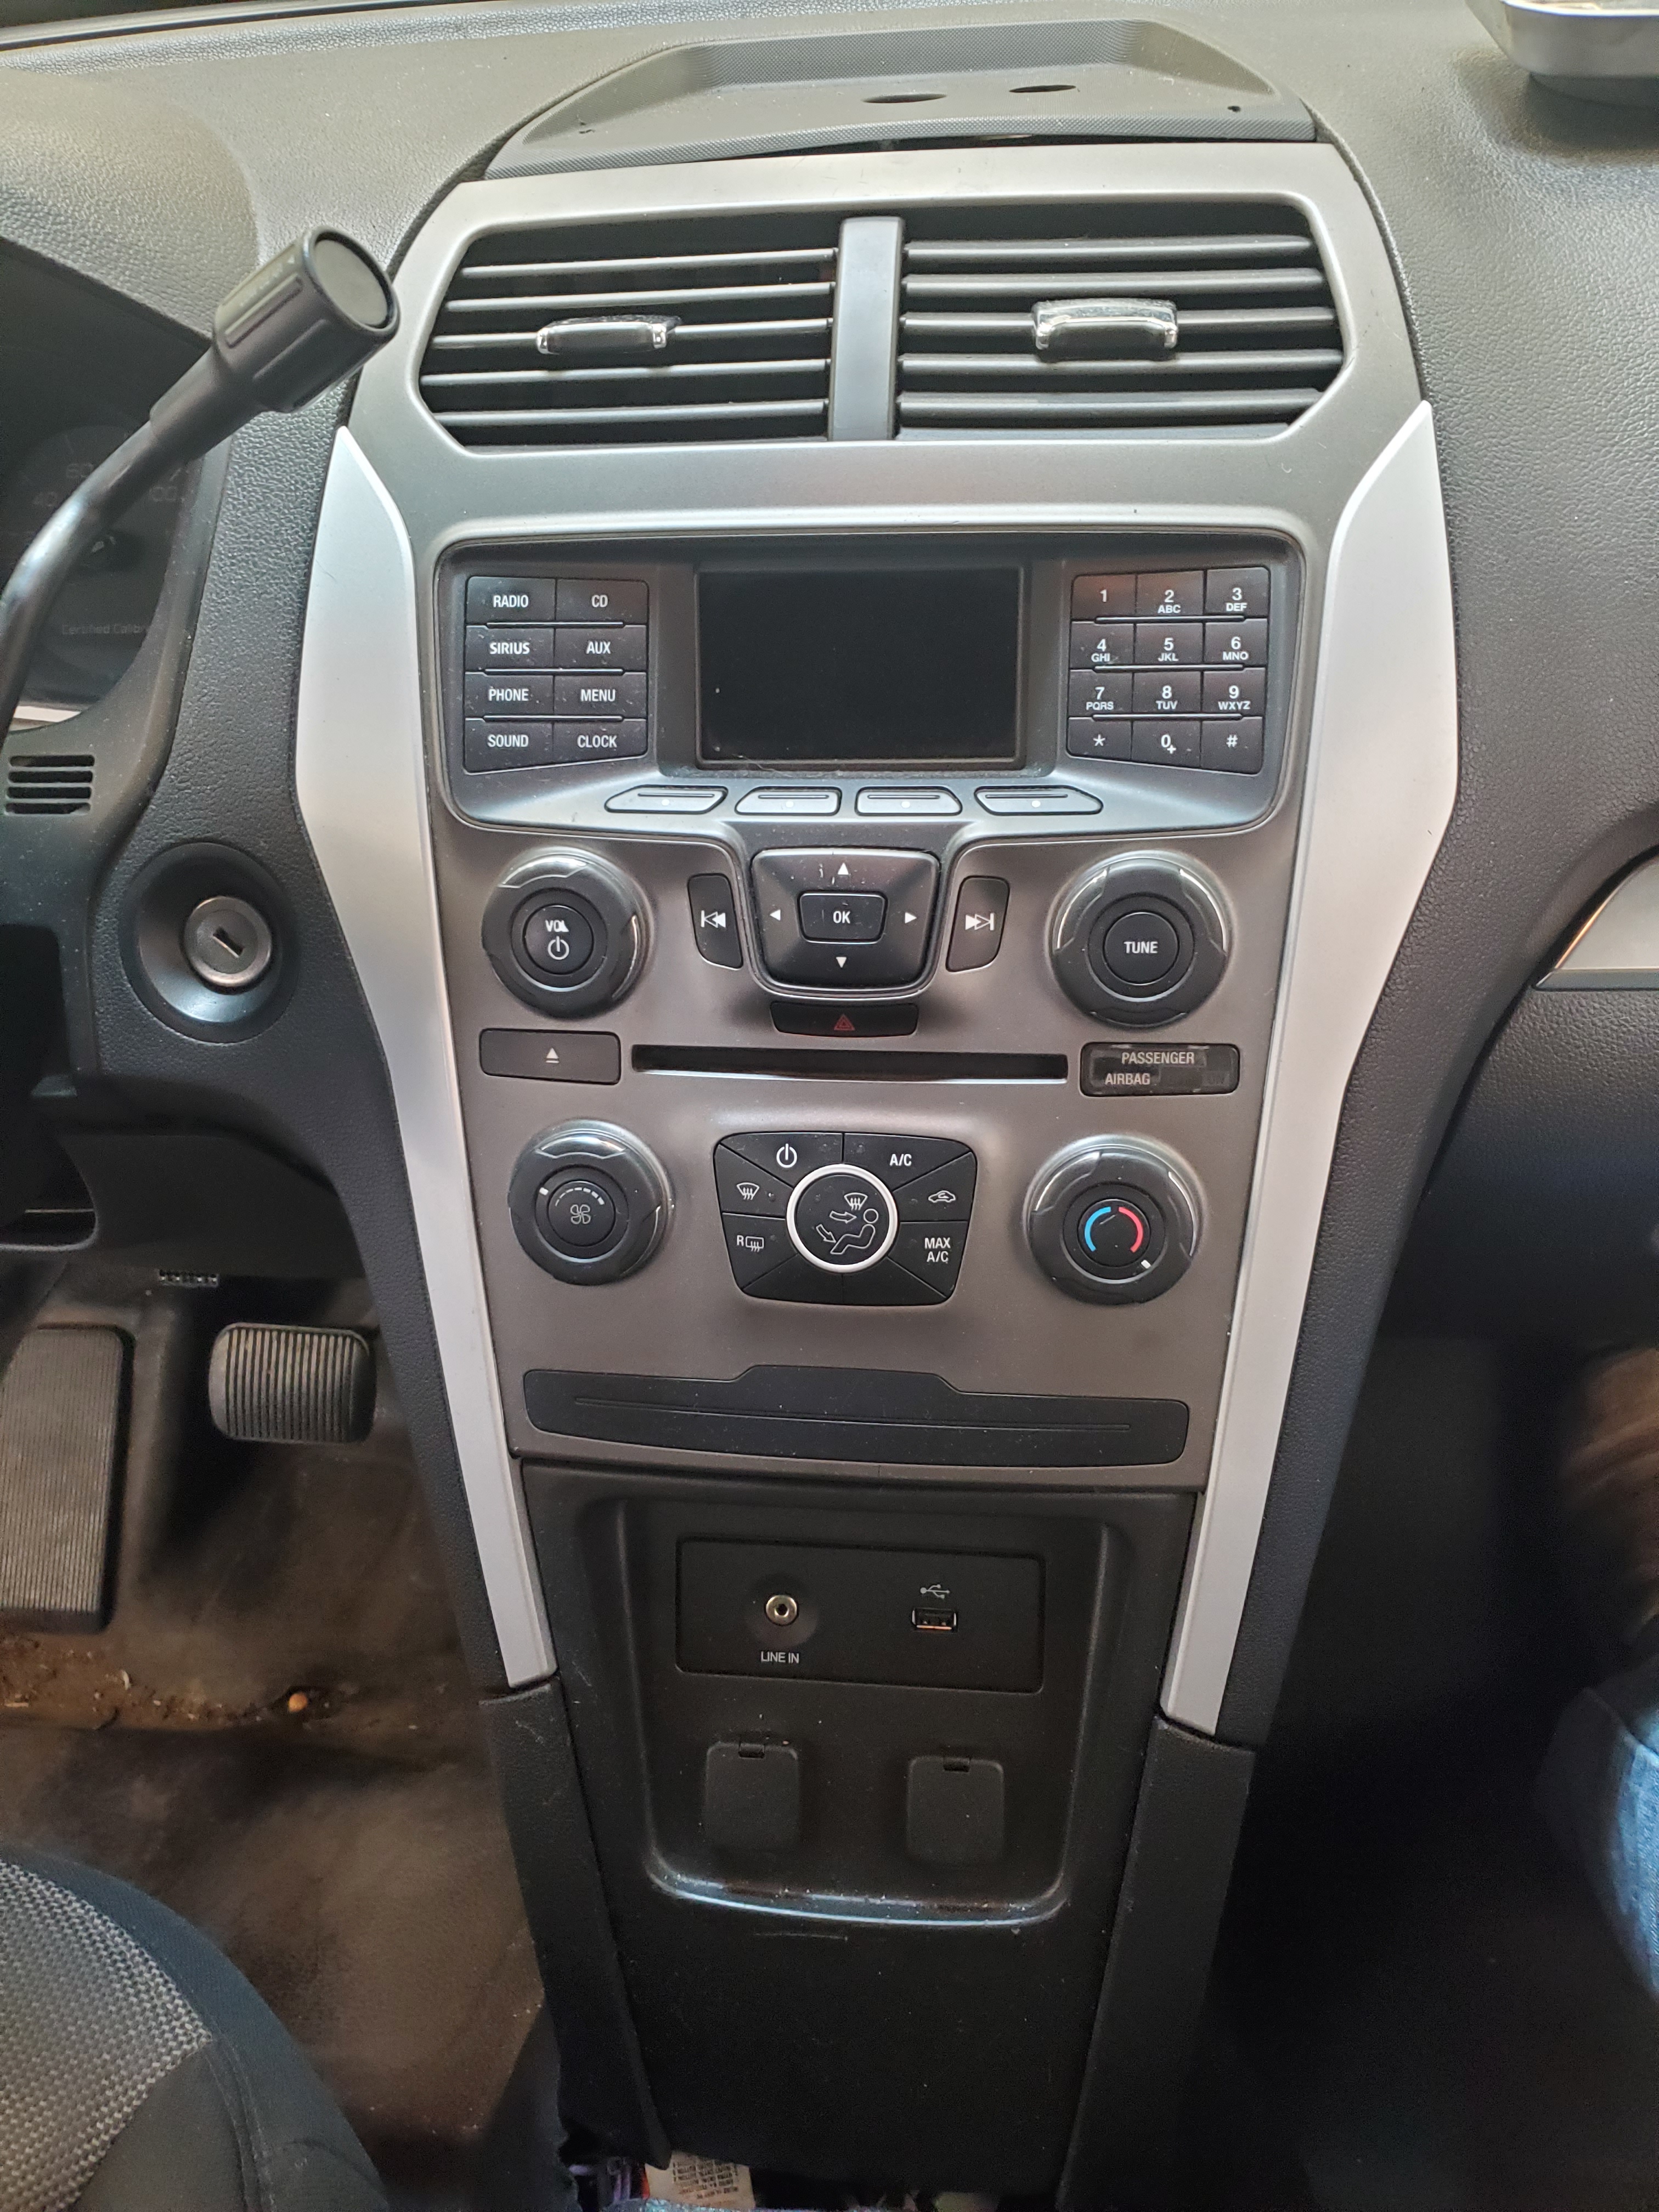
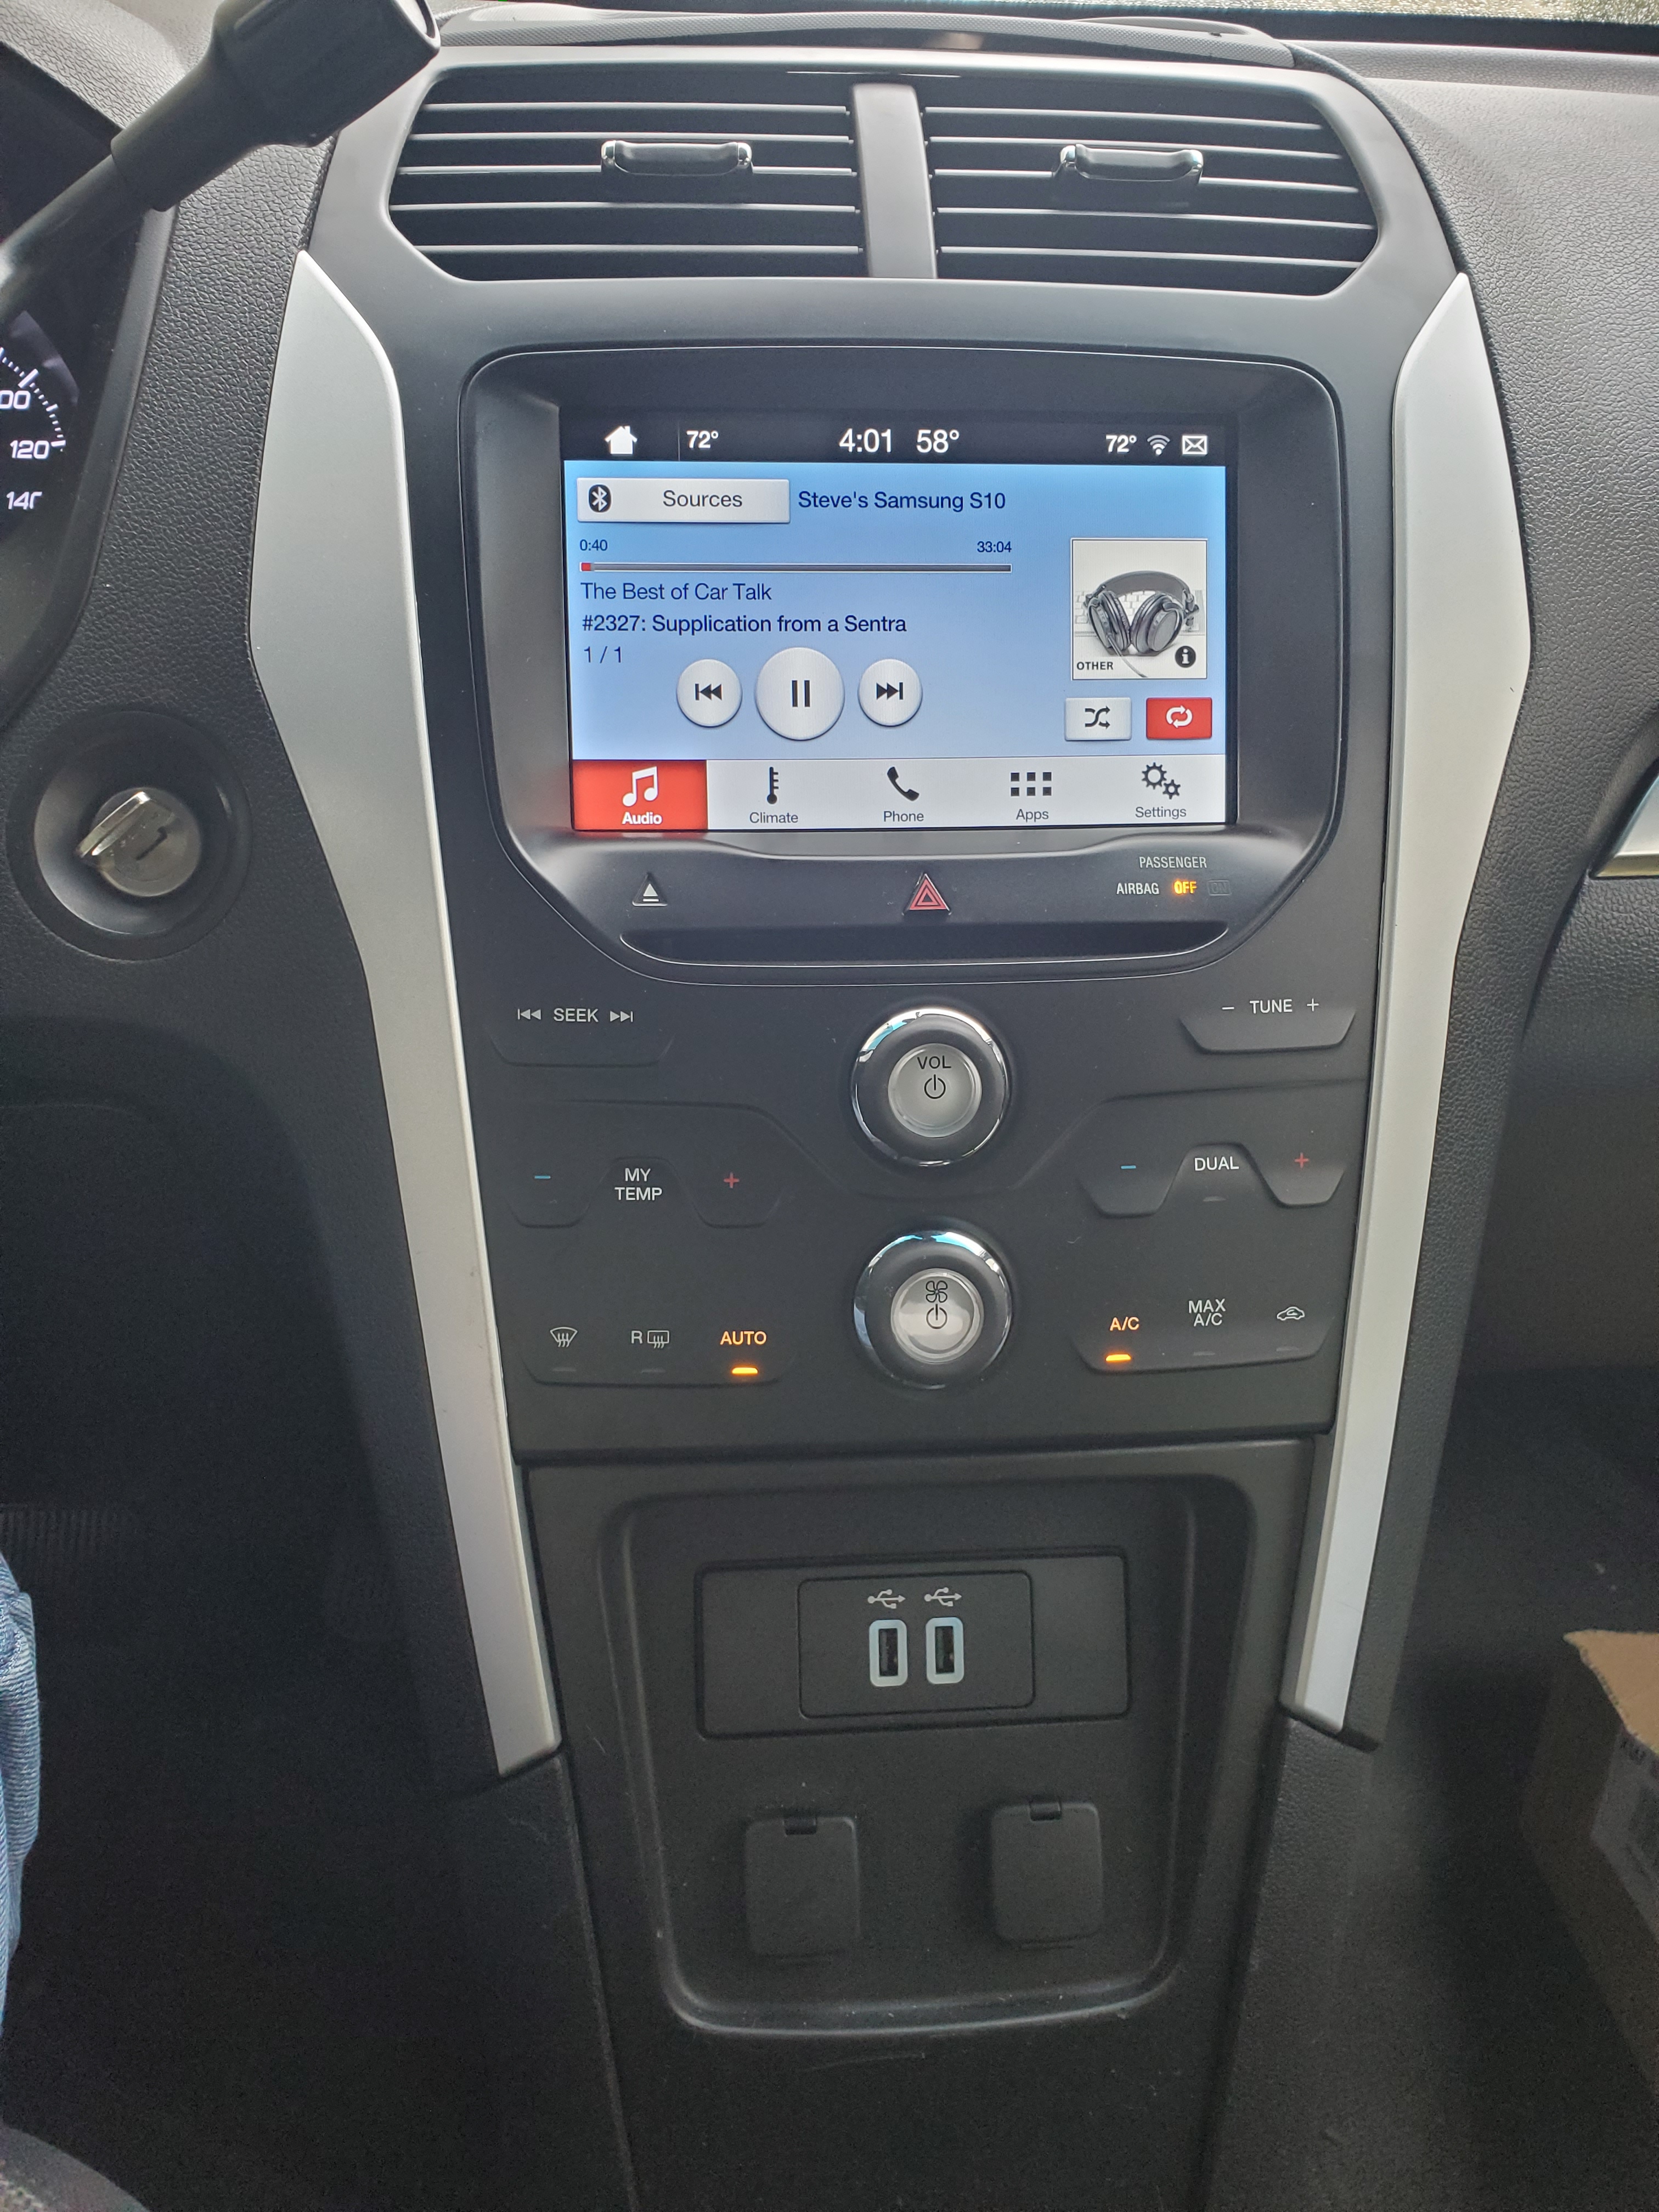
Services Performed: Major interior upgrade today. Fitted a 4″ to 8″ screen Infotainment system upgrade from Infotainment.com. This is a Ford Factory upgrade of the stock 4″ screen to a more glorious 8″ touchscreen. All the parts other than the wiring harness they supply are actual Ford parts from the screen to the plastic bezel to climate control to USB ports. Some major feature updates include:
- 8″ Touchscreen
- Android Auto and Apple Carplay
- Ford Sync 3 software with WiFi updates
- Bluetooth Streaming
- Automatic climate control (single zone)
They had a fantastic how to install YouTube video that I followed step by step and it only took about 90 minutes to fit from start to finish.
Works great now! Loving the automatic climate control and the much easier music streaming. Now with Android Auto can use Google Maps for navigation.
The only lingering issues with the kit are:
- The time setting on its display isn’t sticking. Seems to change with turning the key on/off. Sometimes says noon.
- The rear parking camera signal displays on the rear view mirror still rather than the new screen
- The right side buttons on the steering wheel that used to control the old system don’t seem to do anything now. Not sure if that is by design.
I am reaching out to their tech support to ask them about it. There will be the overshadowing complication of it being a police interceptor and not a stock 2014 explorer. Might be blazing the trail some here.
Date: November 29, 2022
Mileage: 165,812
Performed by: Stefano
Services Performed: Final few details completed before its off to the mountains and the snow.
- Replaced the jack, tow ring, foam tool assembly that was missing. Sourced used from eBay. Fit perfectly and was complete.
- Replaced the two missing rear seat belt buckles. Sourced used from eBay. Fit perfectly.
- Stowed a space 1 liter bottle of Castrol Edge 5W-20 oil in spare tire compartment along with some shop rags and a roll of shop paper towels.
- Had an extra key cut. Home Depot – plastic head key format 24R. Tested in all three locks and ignition.
Barney’s ready for his next adventure!
Date: November 29, 2022
Mileage: 165,808
Performed by: Les Schwab Tires
Services Performed: Performed wheel alignment. Rear was OK from the dealer visit last week, front needed some toe adjustment. Came into spec just fine. Technician noted the car was in good condition underneath.
Date: November 28, 2022
Mileage: 165,800
Performed by: Stefano
Services Performed: Received my Forscan software license and OBDLink EX cable. Connected to car and reviewed DTCs and module configurations. Was able to adjust:
- Disabled Police Dark Mode. The interior lights now come on when the door is opened – Yay!
- Enabled Daytime Running Lights. They work with the park lights though, not the headlights. More to experiment with in the software.
Still trying to learn why the turn signal don’t make noise, and there is no dinger for leaving the lights on or key in ignition. May need to ask the Ford Dealer if they know. More Googling to do I think.
Date: November 26, 2022
Mileage: 165,778
Performed by: Stefano
Services Performed: Continuing the last few odd’s and end’s of the refurb:
- Set all five tire pressures to spec (36 psi).
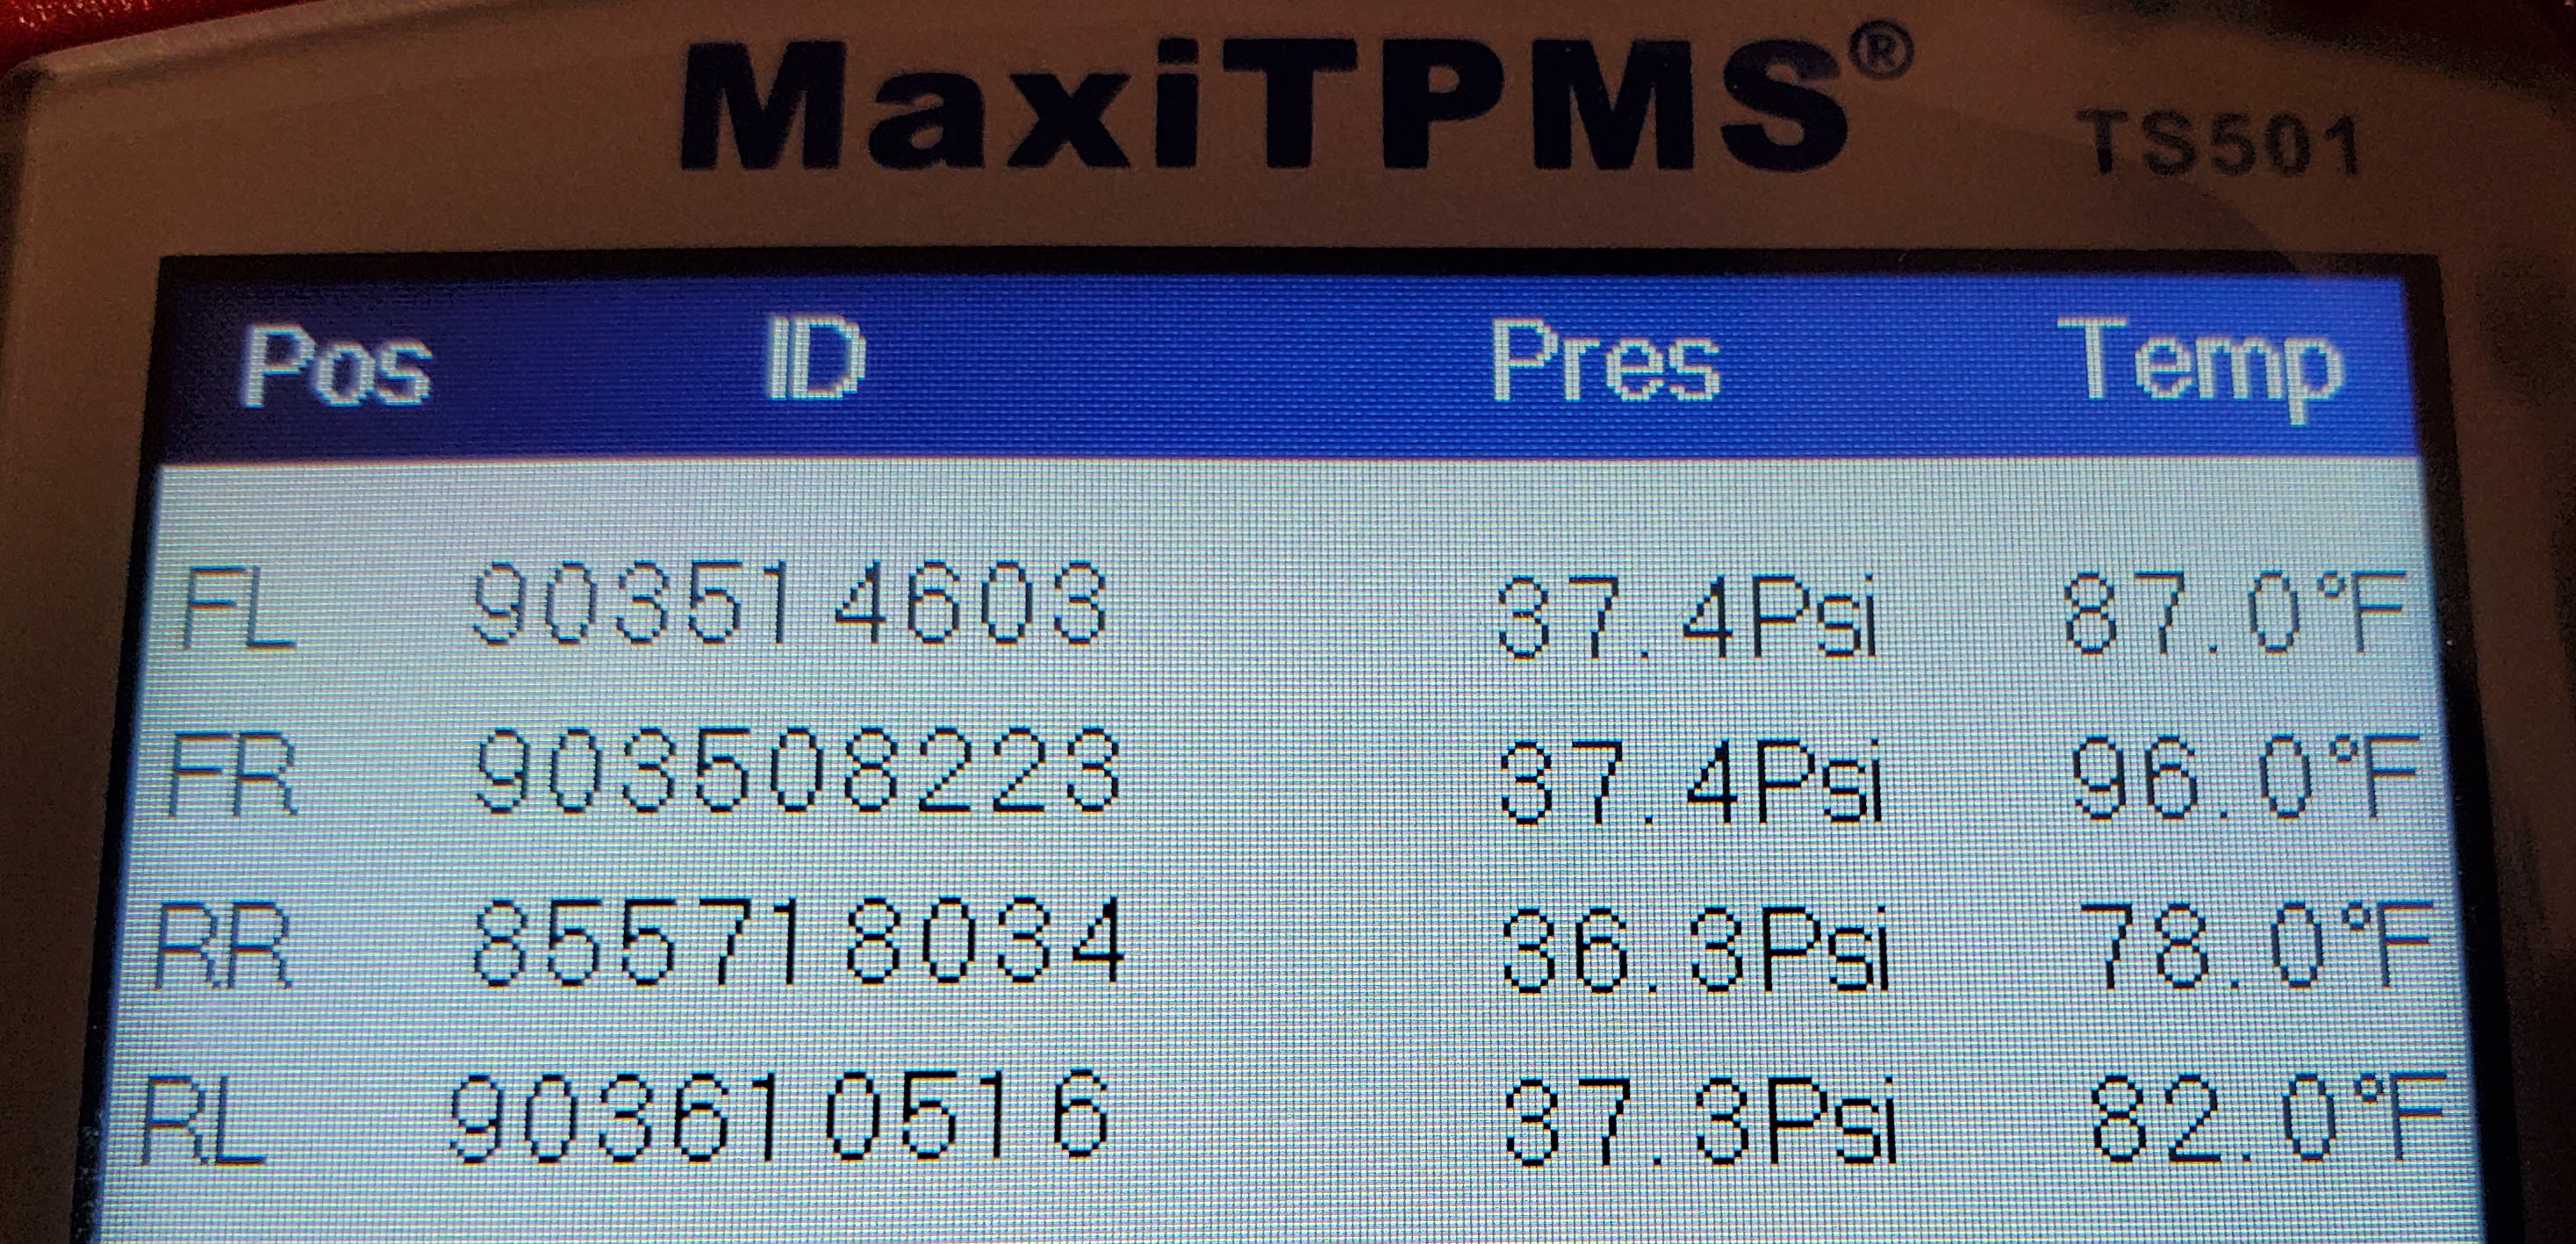
- Retrained the TPMS system to the four wheels after the new tires now installed (including the new rim and Autel TPMS sensor). Codes at each wheel now according to the Autel are:
- FL 903514603
- FR 903508223
- RR 855718034 (Autel MX sensor)
- LR 903610516
- Replaced the burned out rear license plate light with new Sylvania 2825 bulb.
- Properly stowed the spare tire using the new hold down.
- Made a final adjustment to the headlight aim to give it 1% down angle (3″ at 25 feet). Based this on the molded in note on the headlight assembly. The owners manual method doesn’t make it clear what down angle there should be, rather they base it on the thickness of the bright solid offset light. Could be about the same, but I was worried that dead level was not the best idea either.
- Installed some infotainment stuff:
- 4 ft. USB A to C cable from the USB port
- 4 ft. 3.5mm Line In cable
- High Speed Charger with USB A and C ports to one of the 12V power ports
- 3 ft. USB C to C cable for the high speed charger port
Date: November 26, 2022
Mileage: 165,761
Performed by: Costo Tire Center
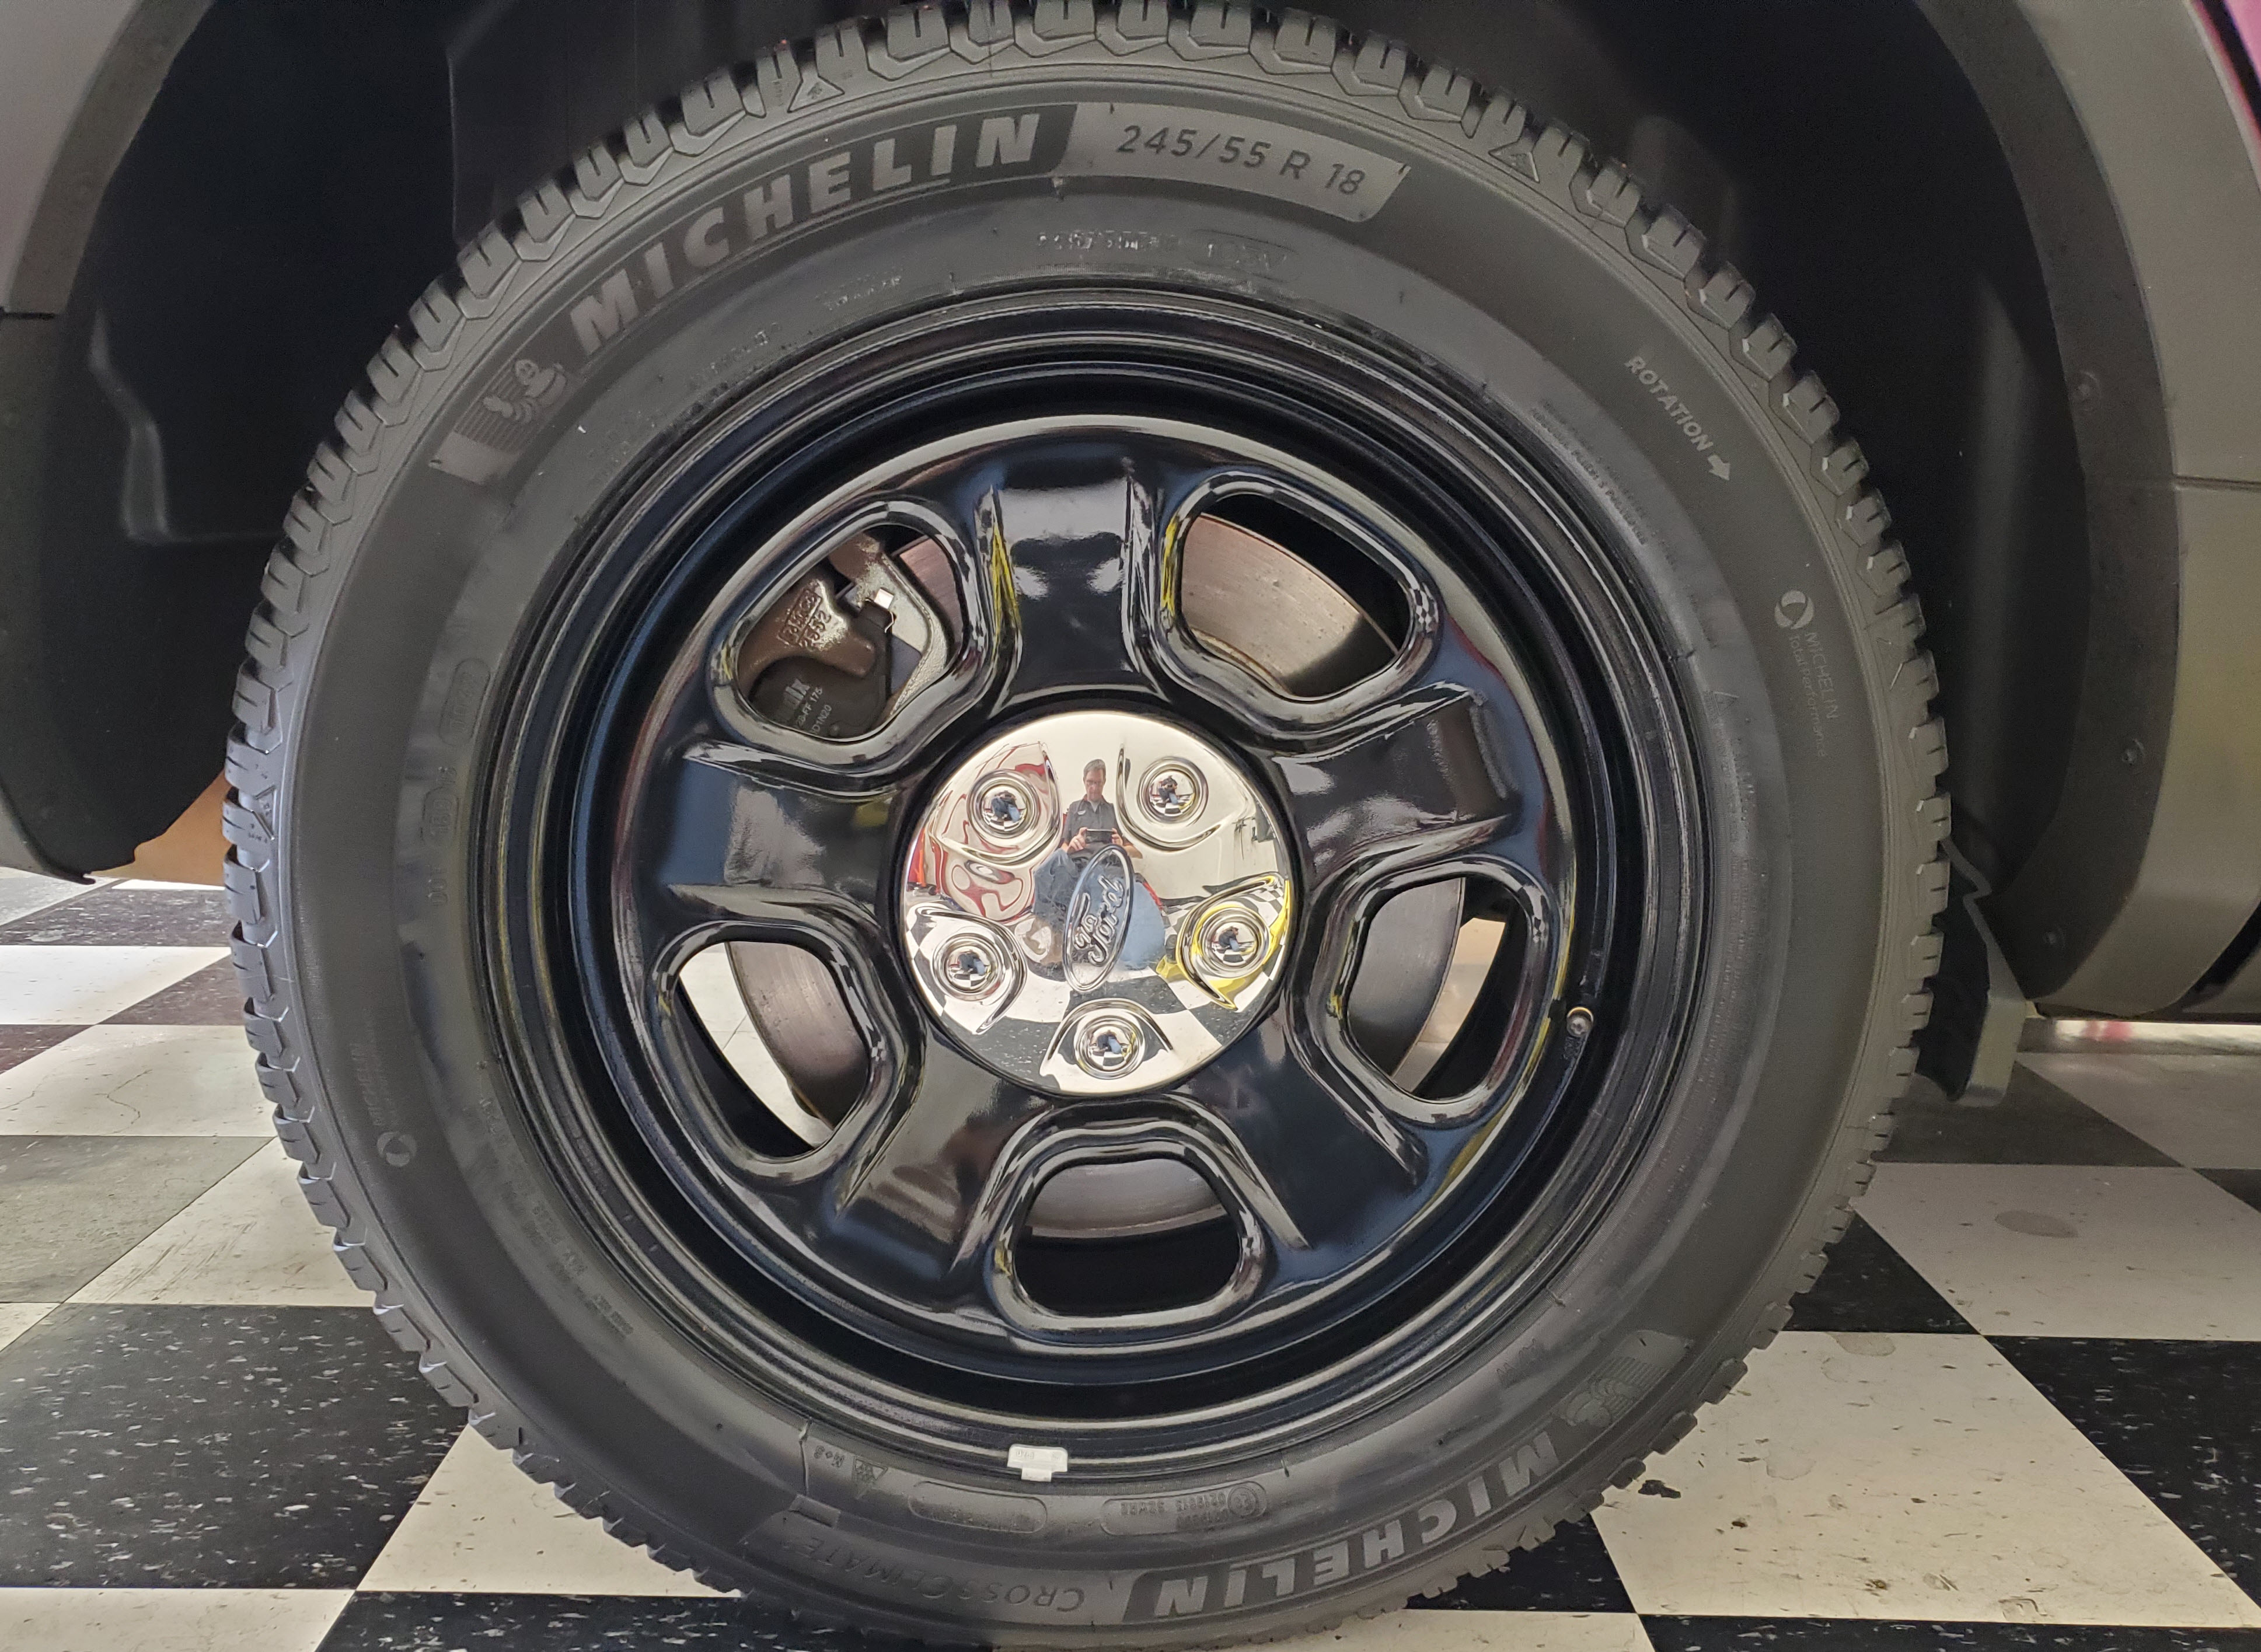
Services Performed: Fitted Barney with new shoes today. Ordered four new Michelin Cross Climate 2 tires from Costco. 245/55R18. $1,022 installed.
- Had them move the existing Left Rear tire and rim (with TPMS) to the spare (since we were missing the spare). Spare is still fitted with original police spec tire Goodyear Eagle RS-A and has a lot of tread left on it.
- Had them install the new Ford rim and Autel TPMS sensor along with the new tire to the LR position
- Had them balance all four wheels
Date: November 24, 2022
Mileage: 165,743
Performed by: Stefano
Services Performed: Continuing Barney’s recovery, today Stefano managed to:
- Replaced the front suspension drop links (both left and right) with Ford OEM
- Replaced the front sway bar bushings with Ford OEM. Tada – the ‘clunk’ from the Front suspension is now gone.
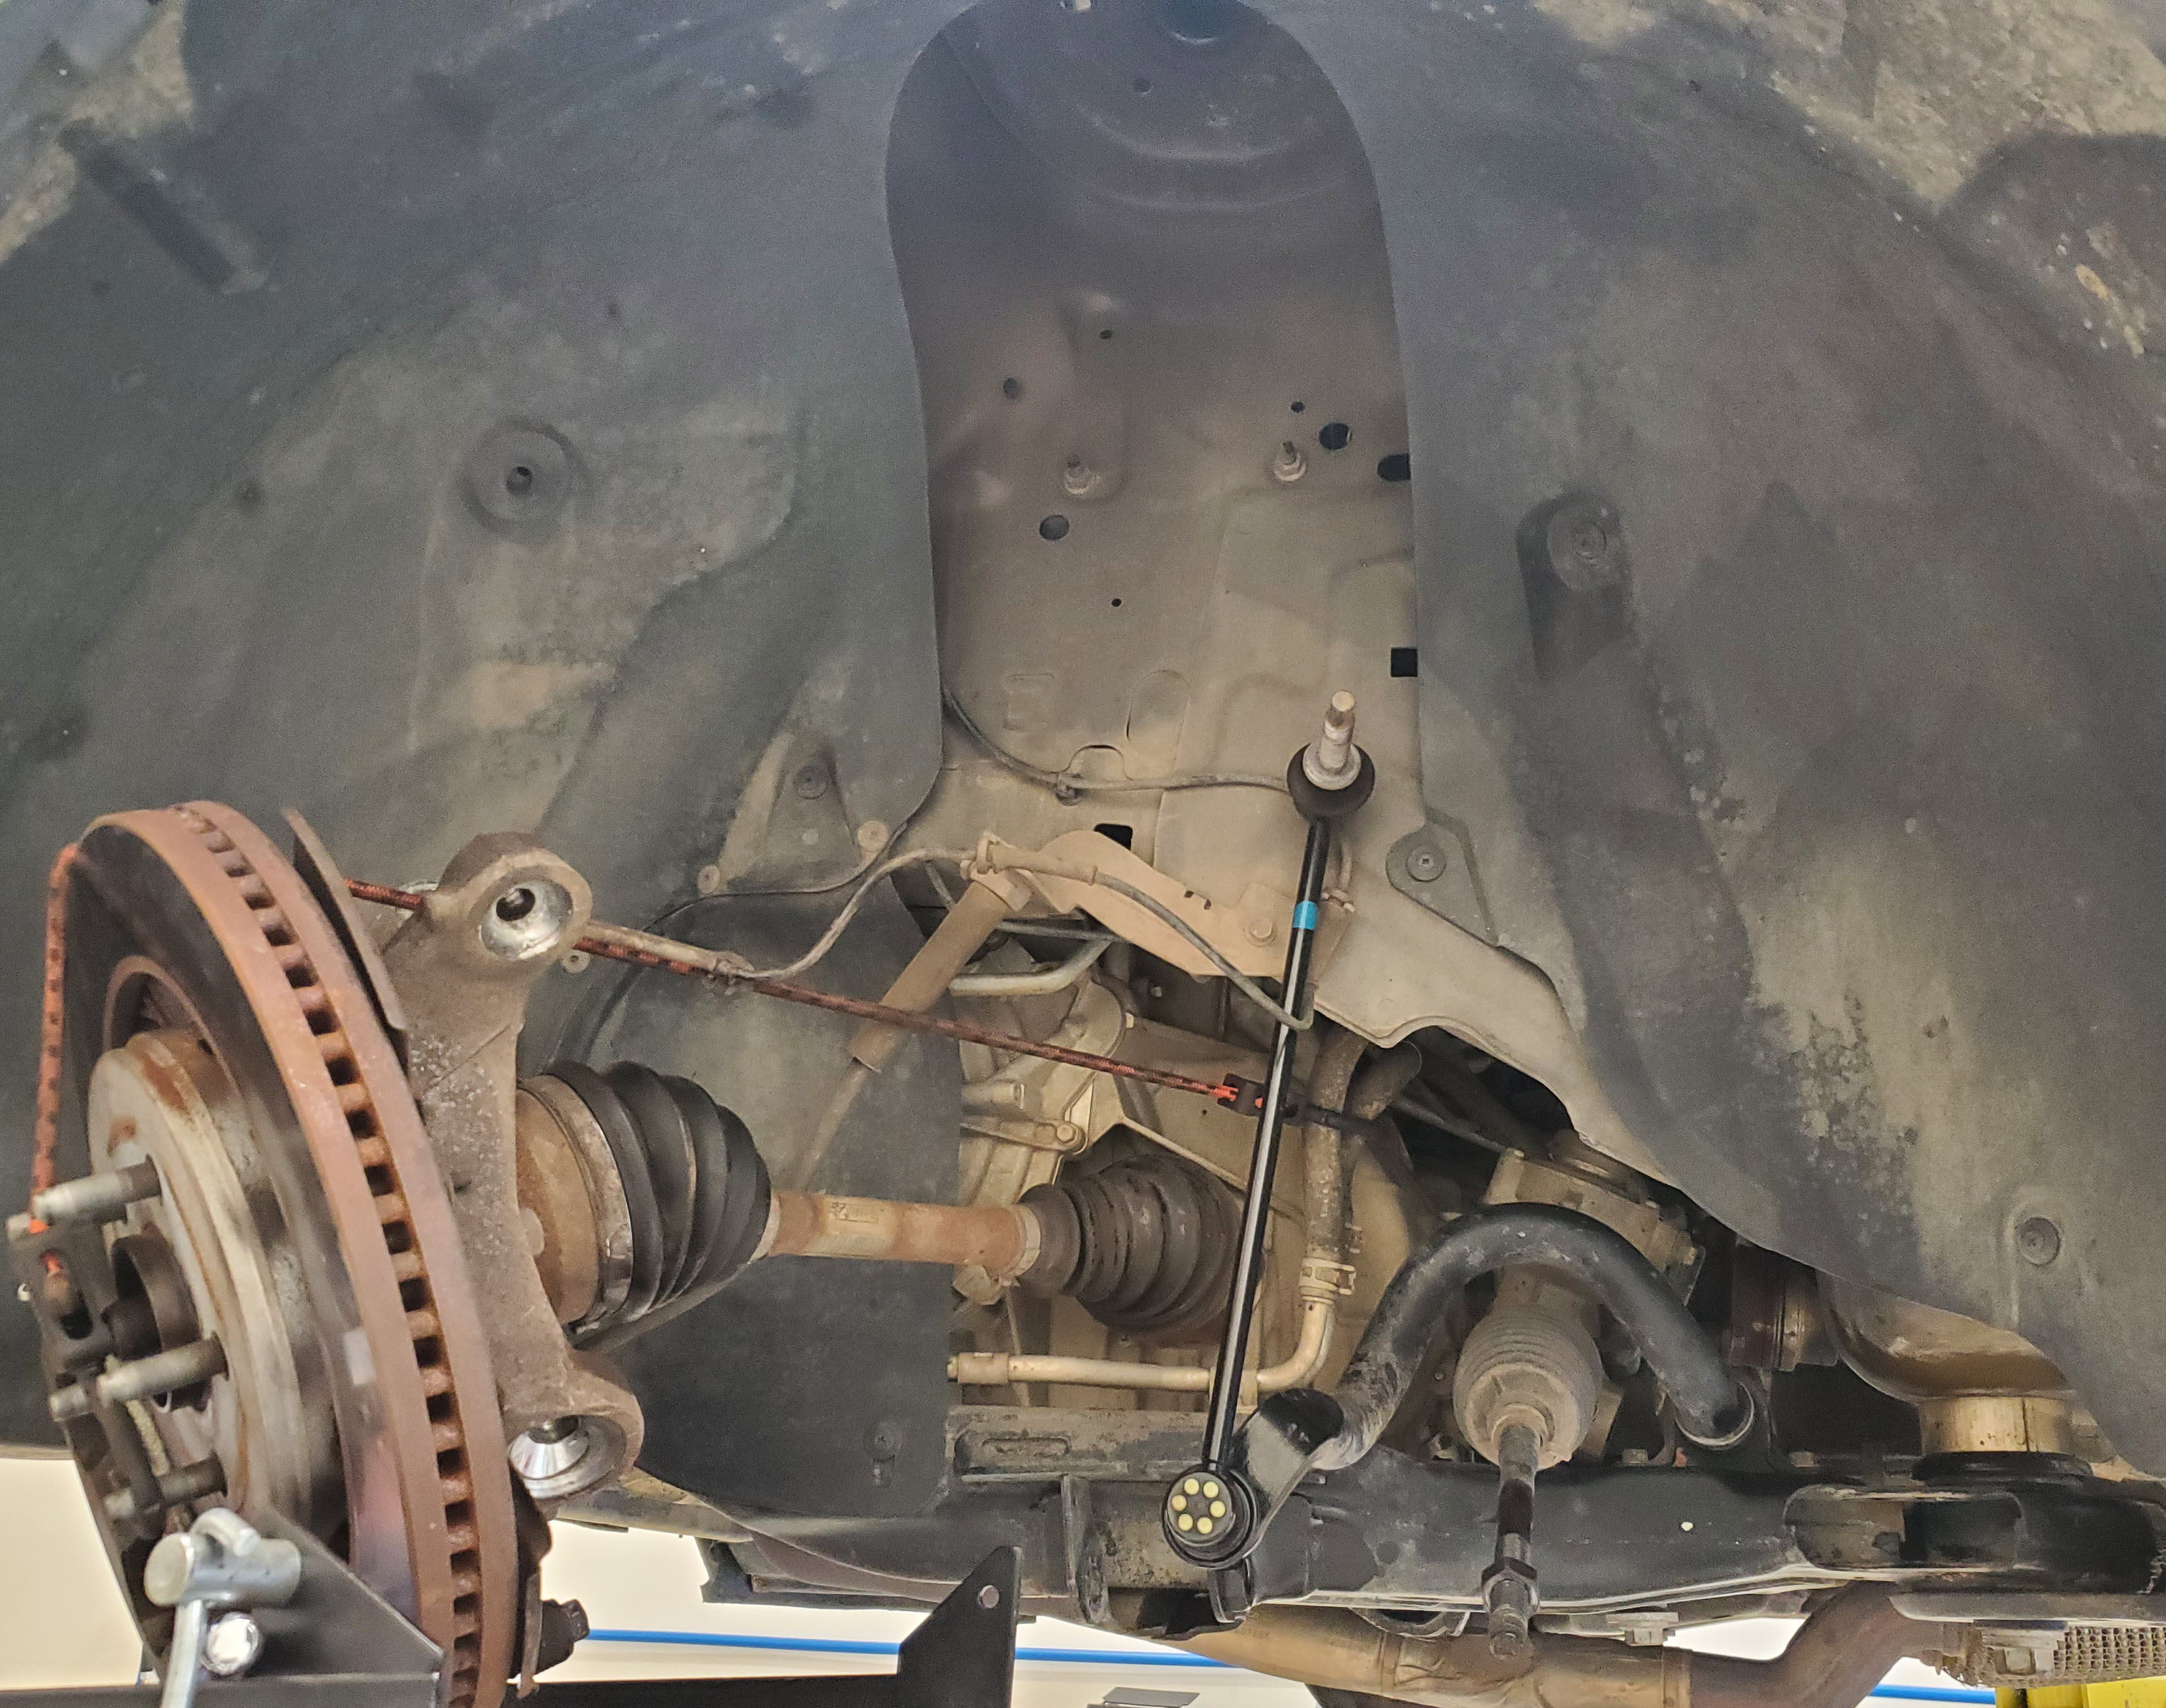
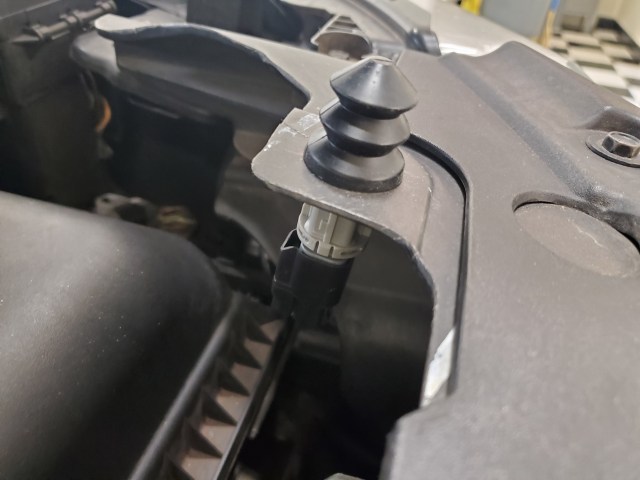
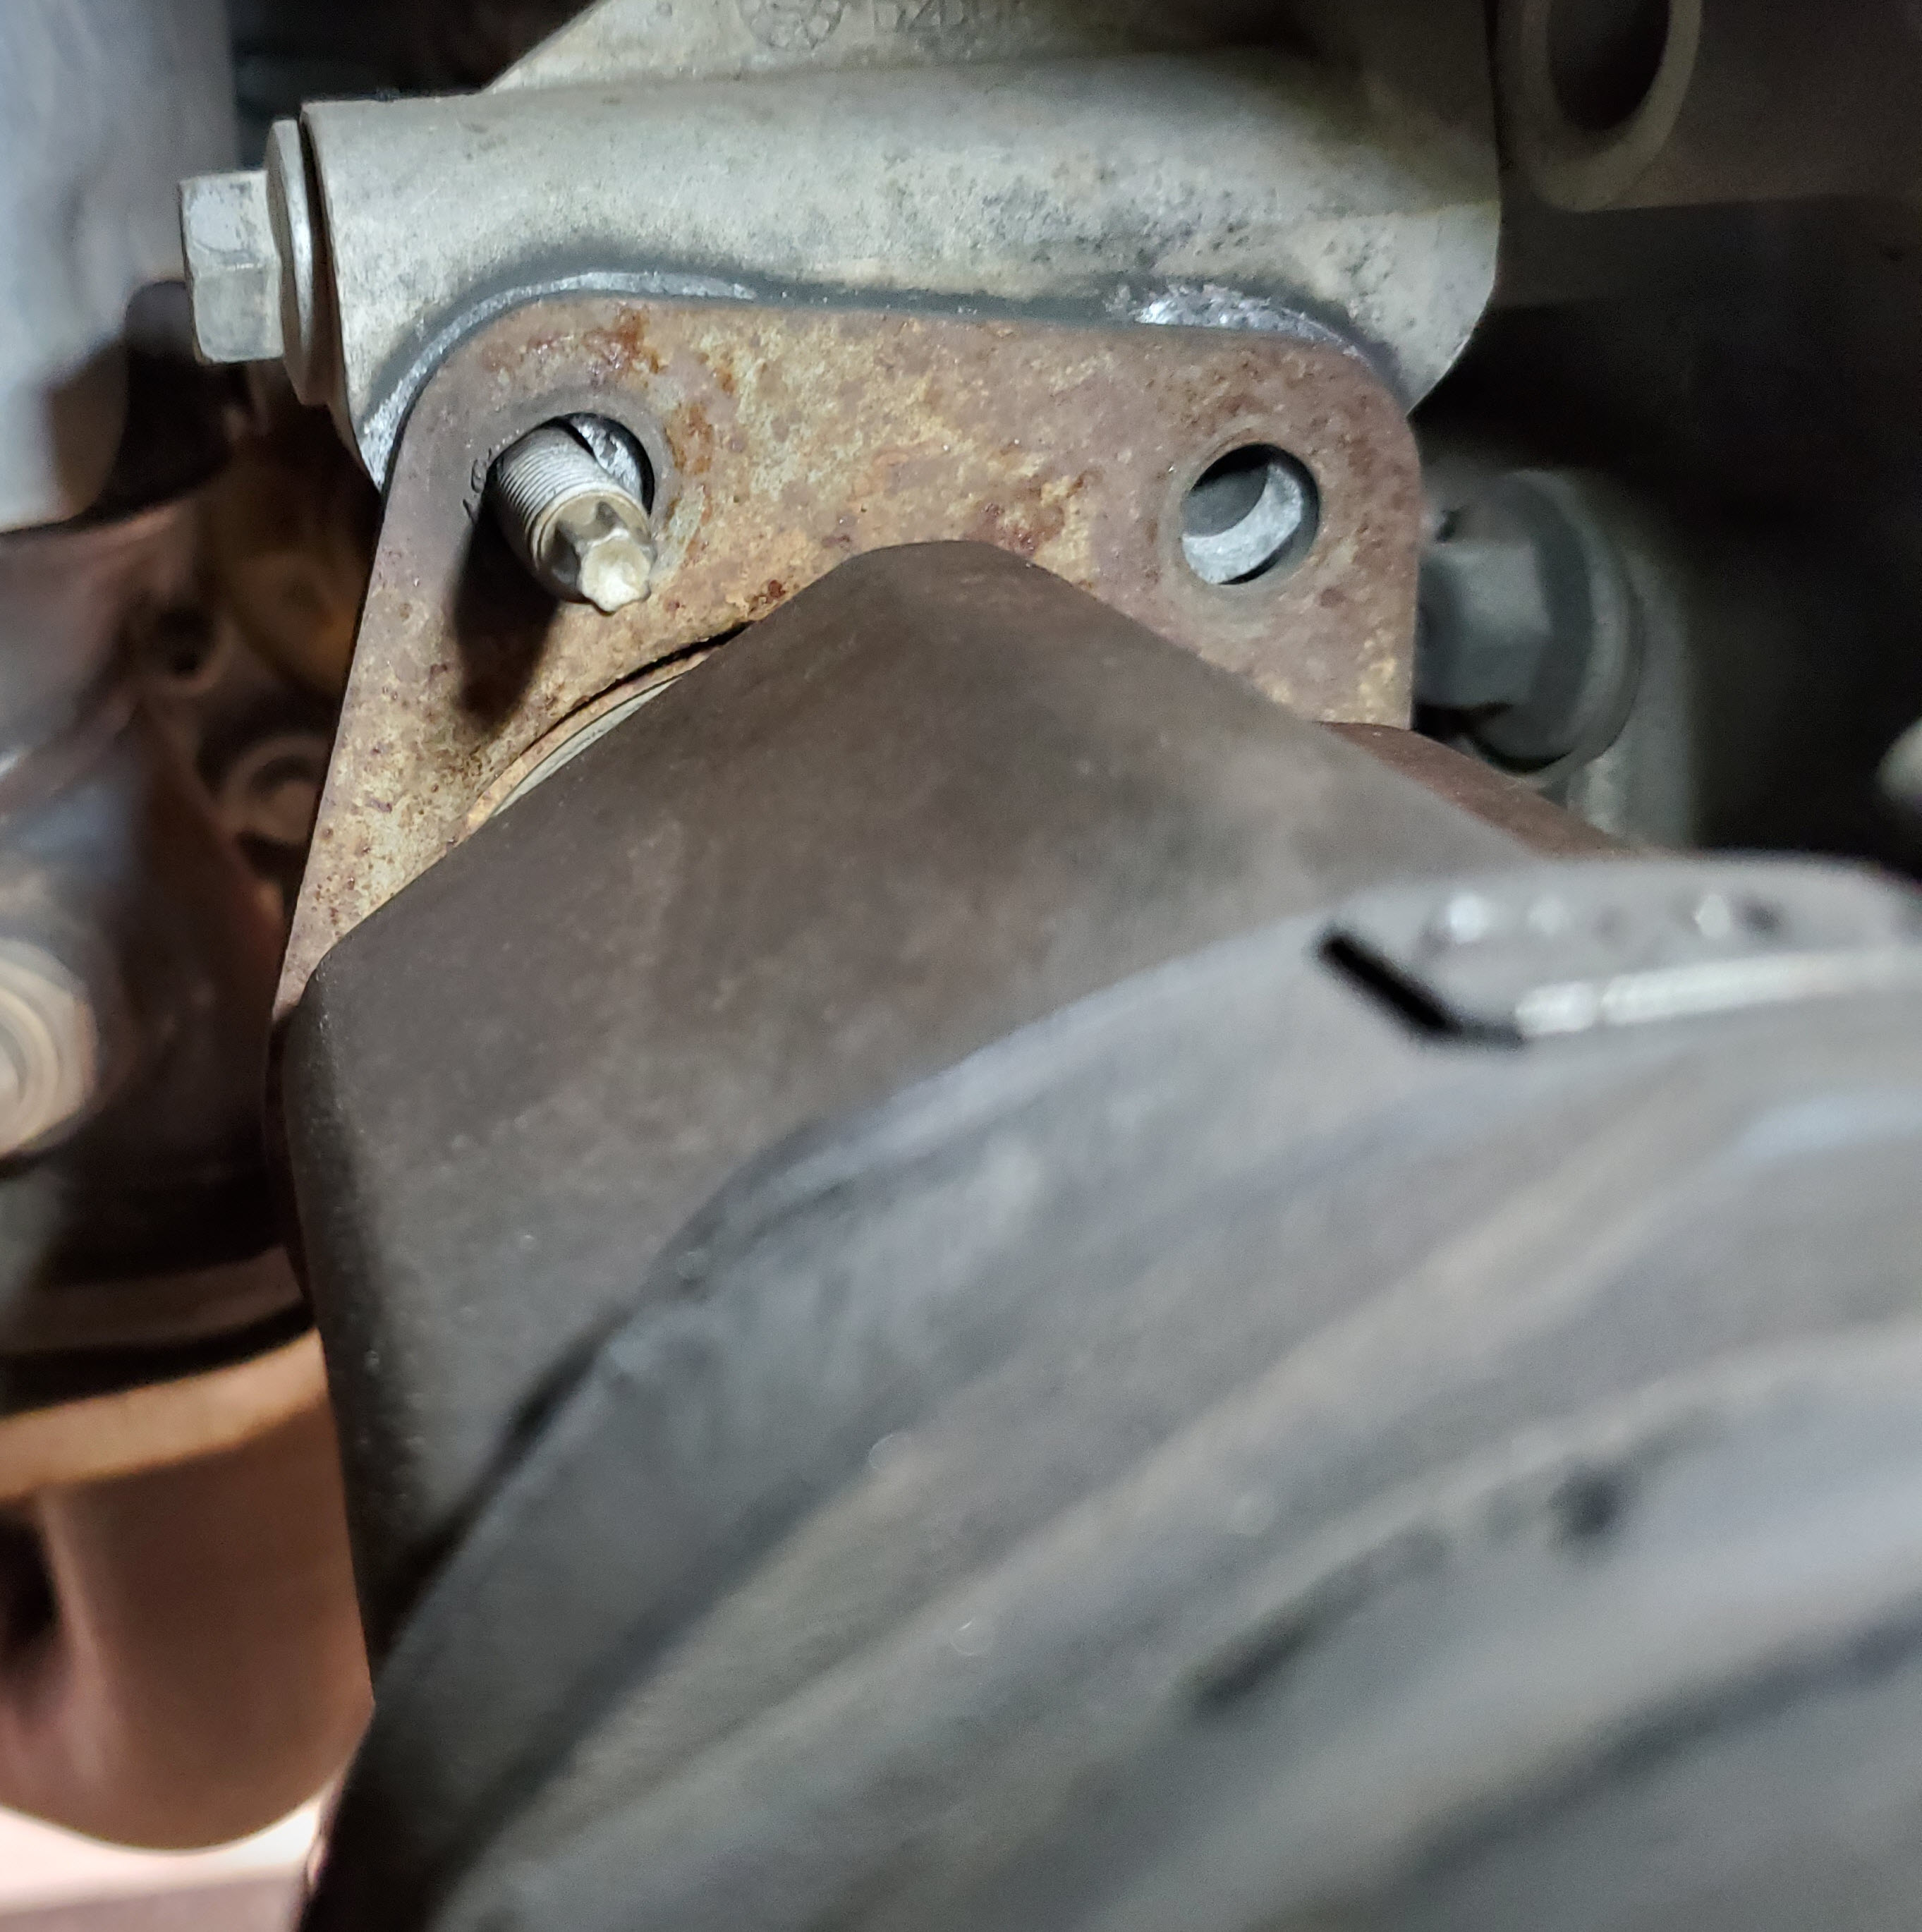
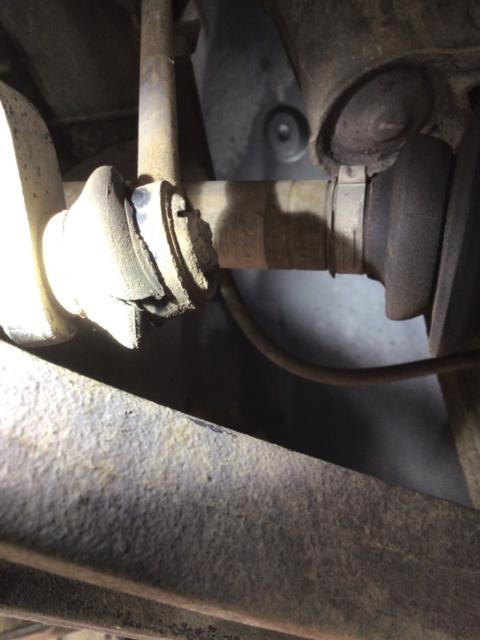
- Discovered the right front half shaft middle bearing carrier was hanging barely on. One stud/nut entirely gone, and the other no nut. Just resting by gravity. Half shaft could be moved L-R an inch or two. Geez. Nice job Ford PPI. The corrosion seems to show this has been like this a while. My guess is that the half shaft was replaced previously, and these were forgotten or not tightened. Check out the photo.
- Went to Ford same day and purchased the replacement stud and nuts. Installed.
- Double checked the leak from the now replaced Engine Oil Pressure sender. Some old residual oil still streaking. Used brake clean and hosed the entire area down, getting rid of all traces of the old leak. Will monitor.
- Changed the Automatic Transmission Fluid. Drained out ~ 3.5 liters – typical dirty ATF fluid. Refilled with 5.1 liters of new Ford Mercon LV fluid using the proper fill and level check procedure. So it was about 1.5 liters low when we purchased.
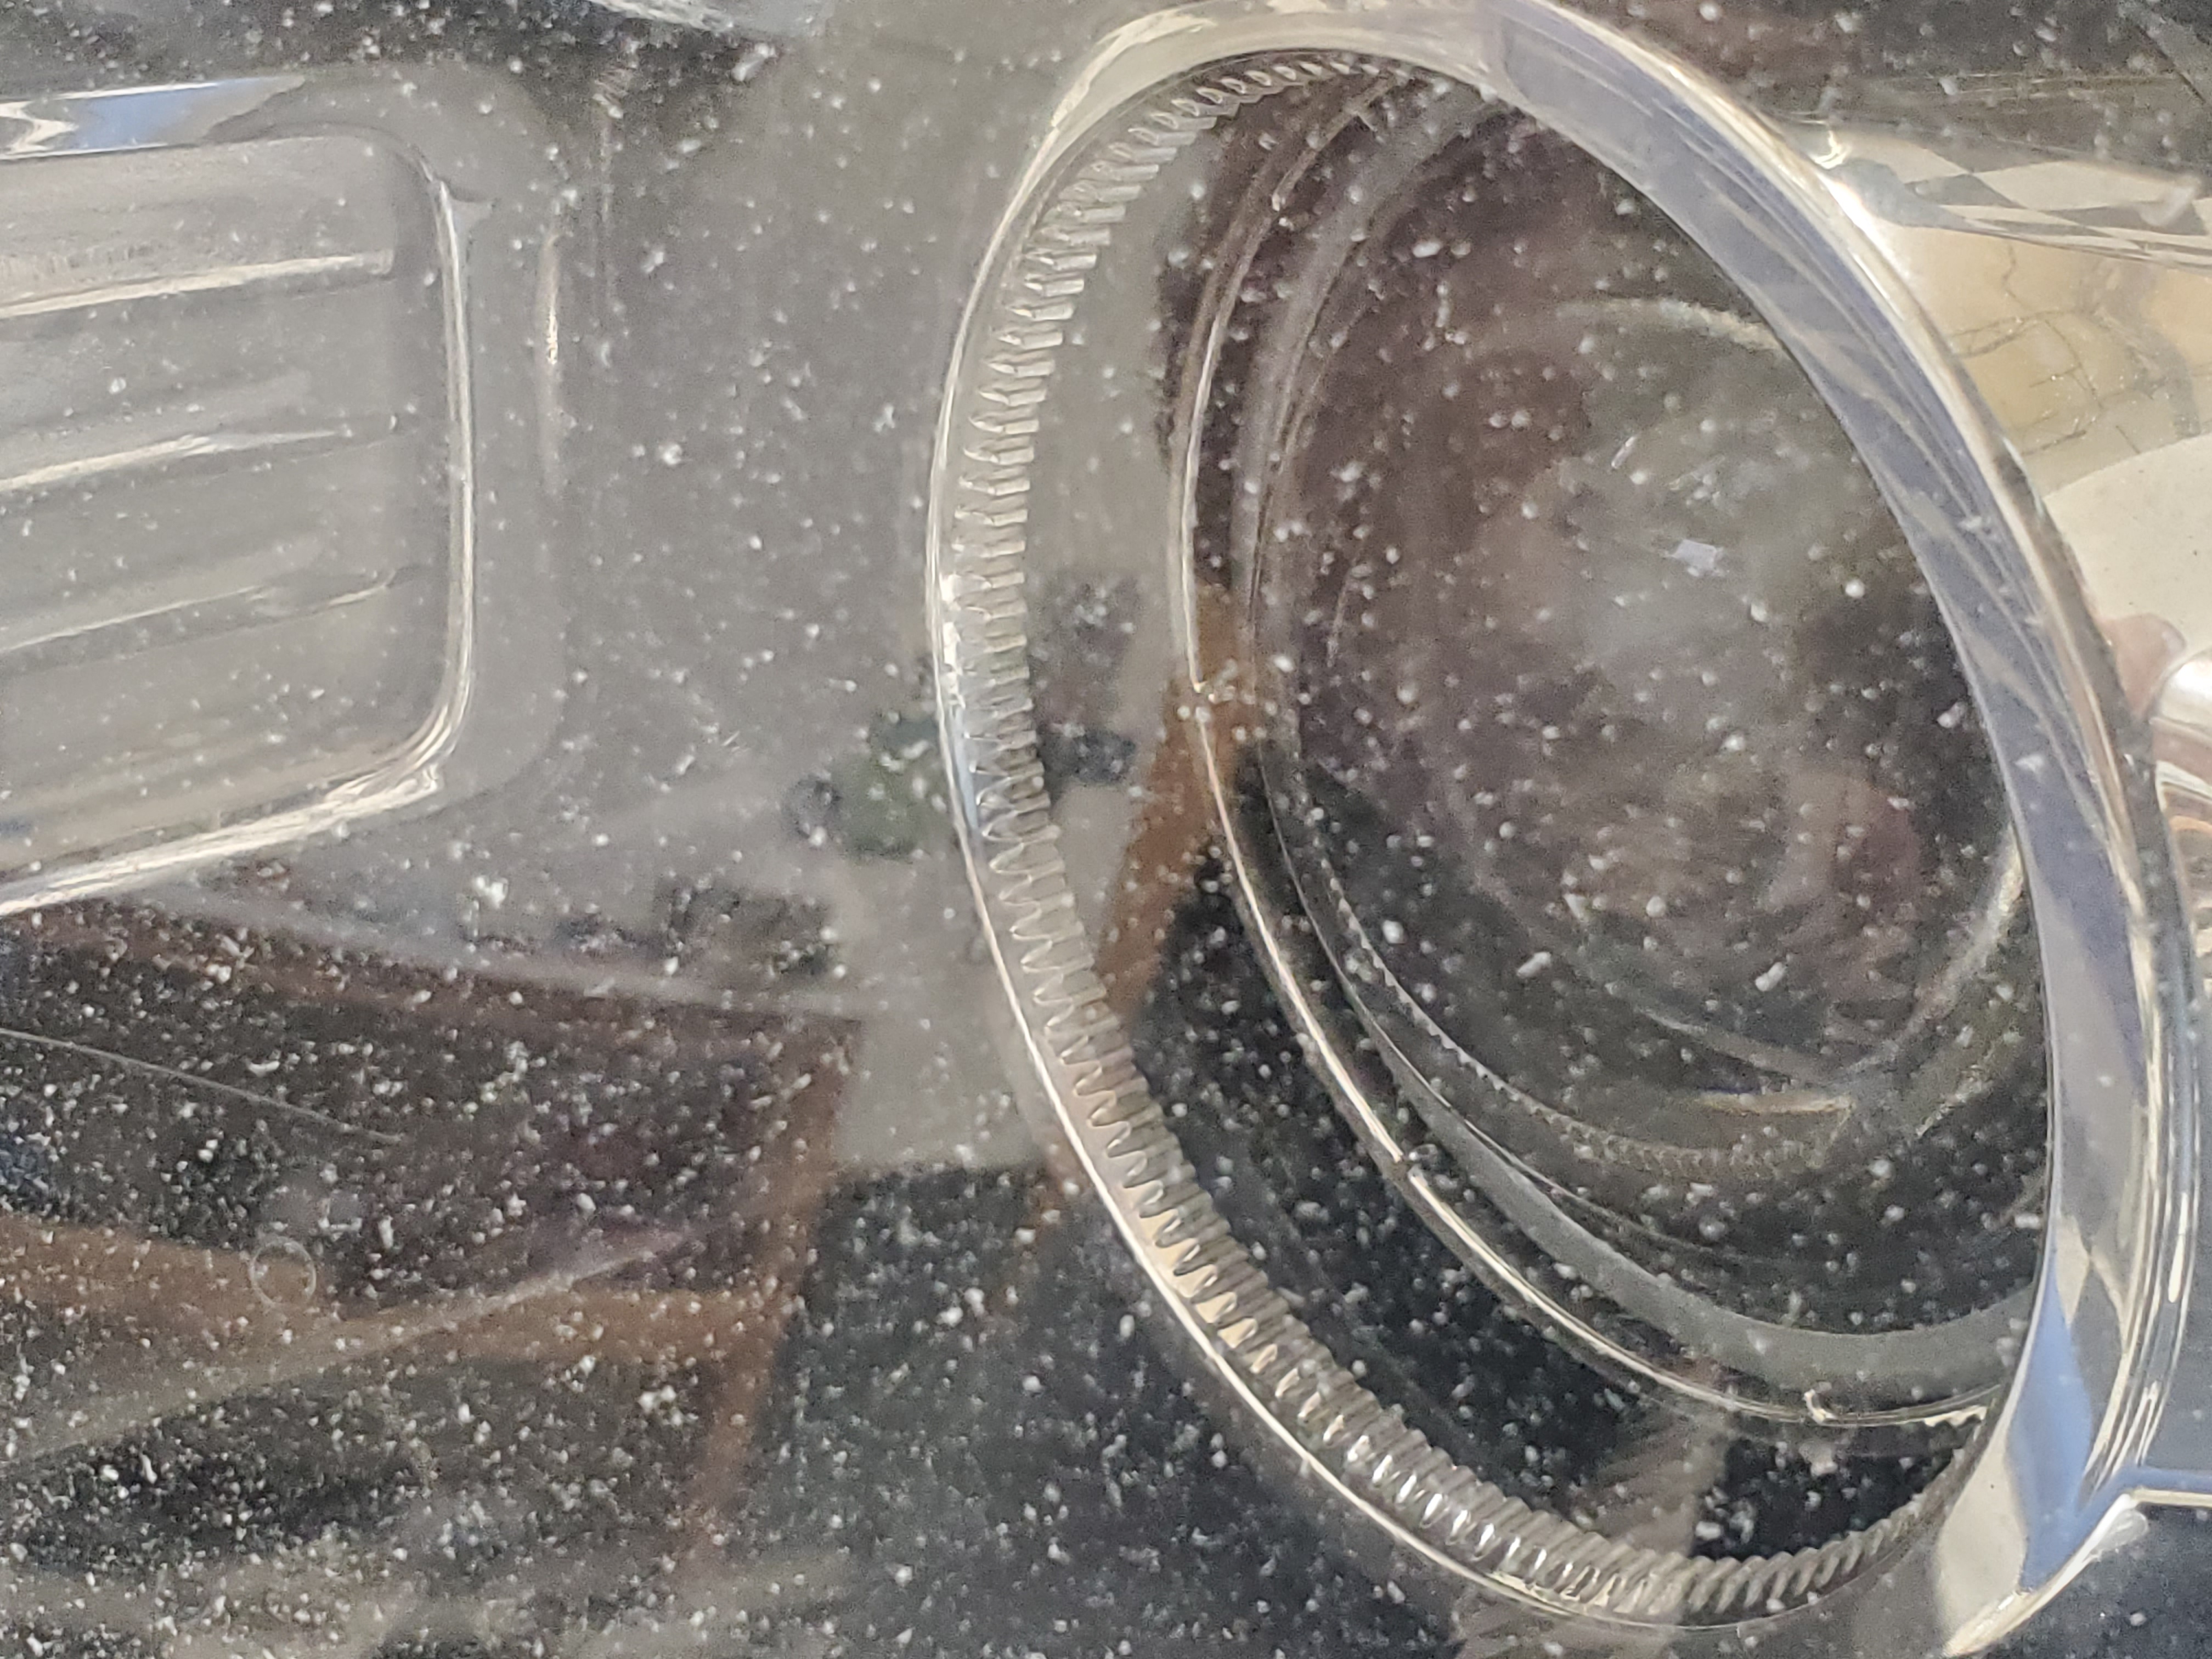
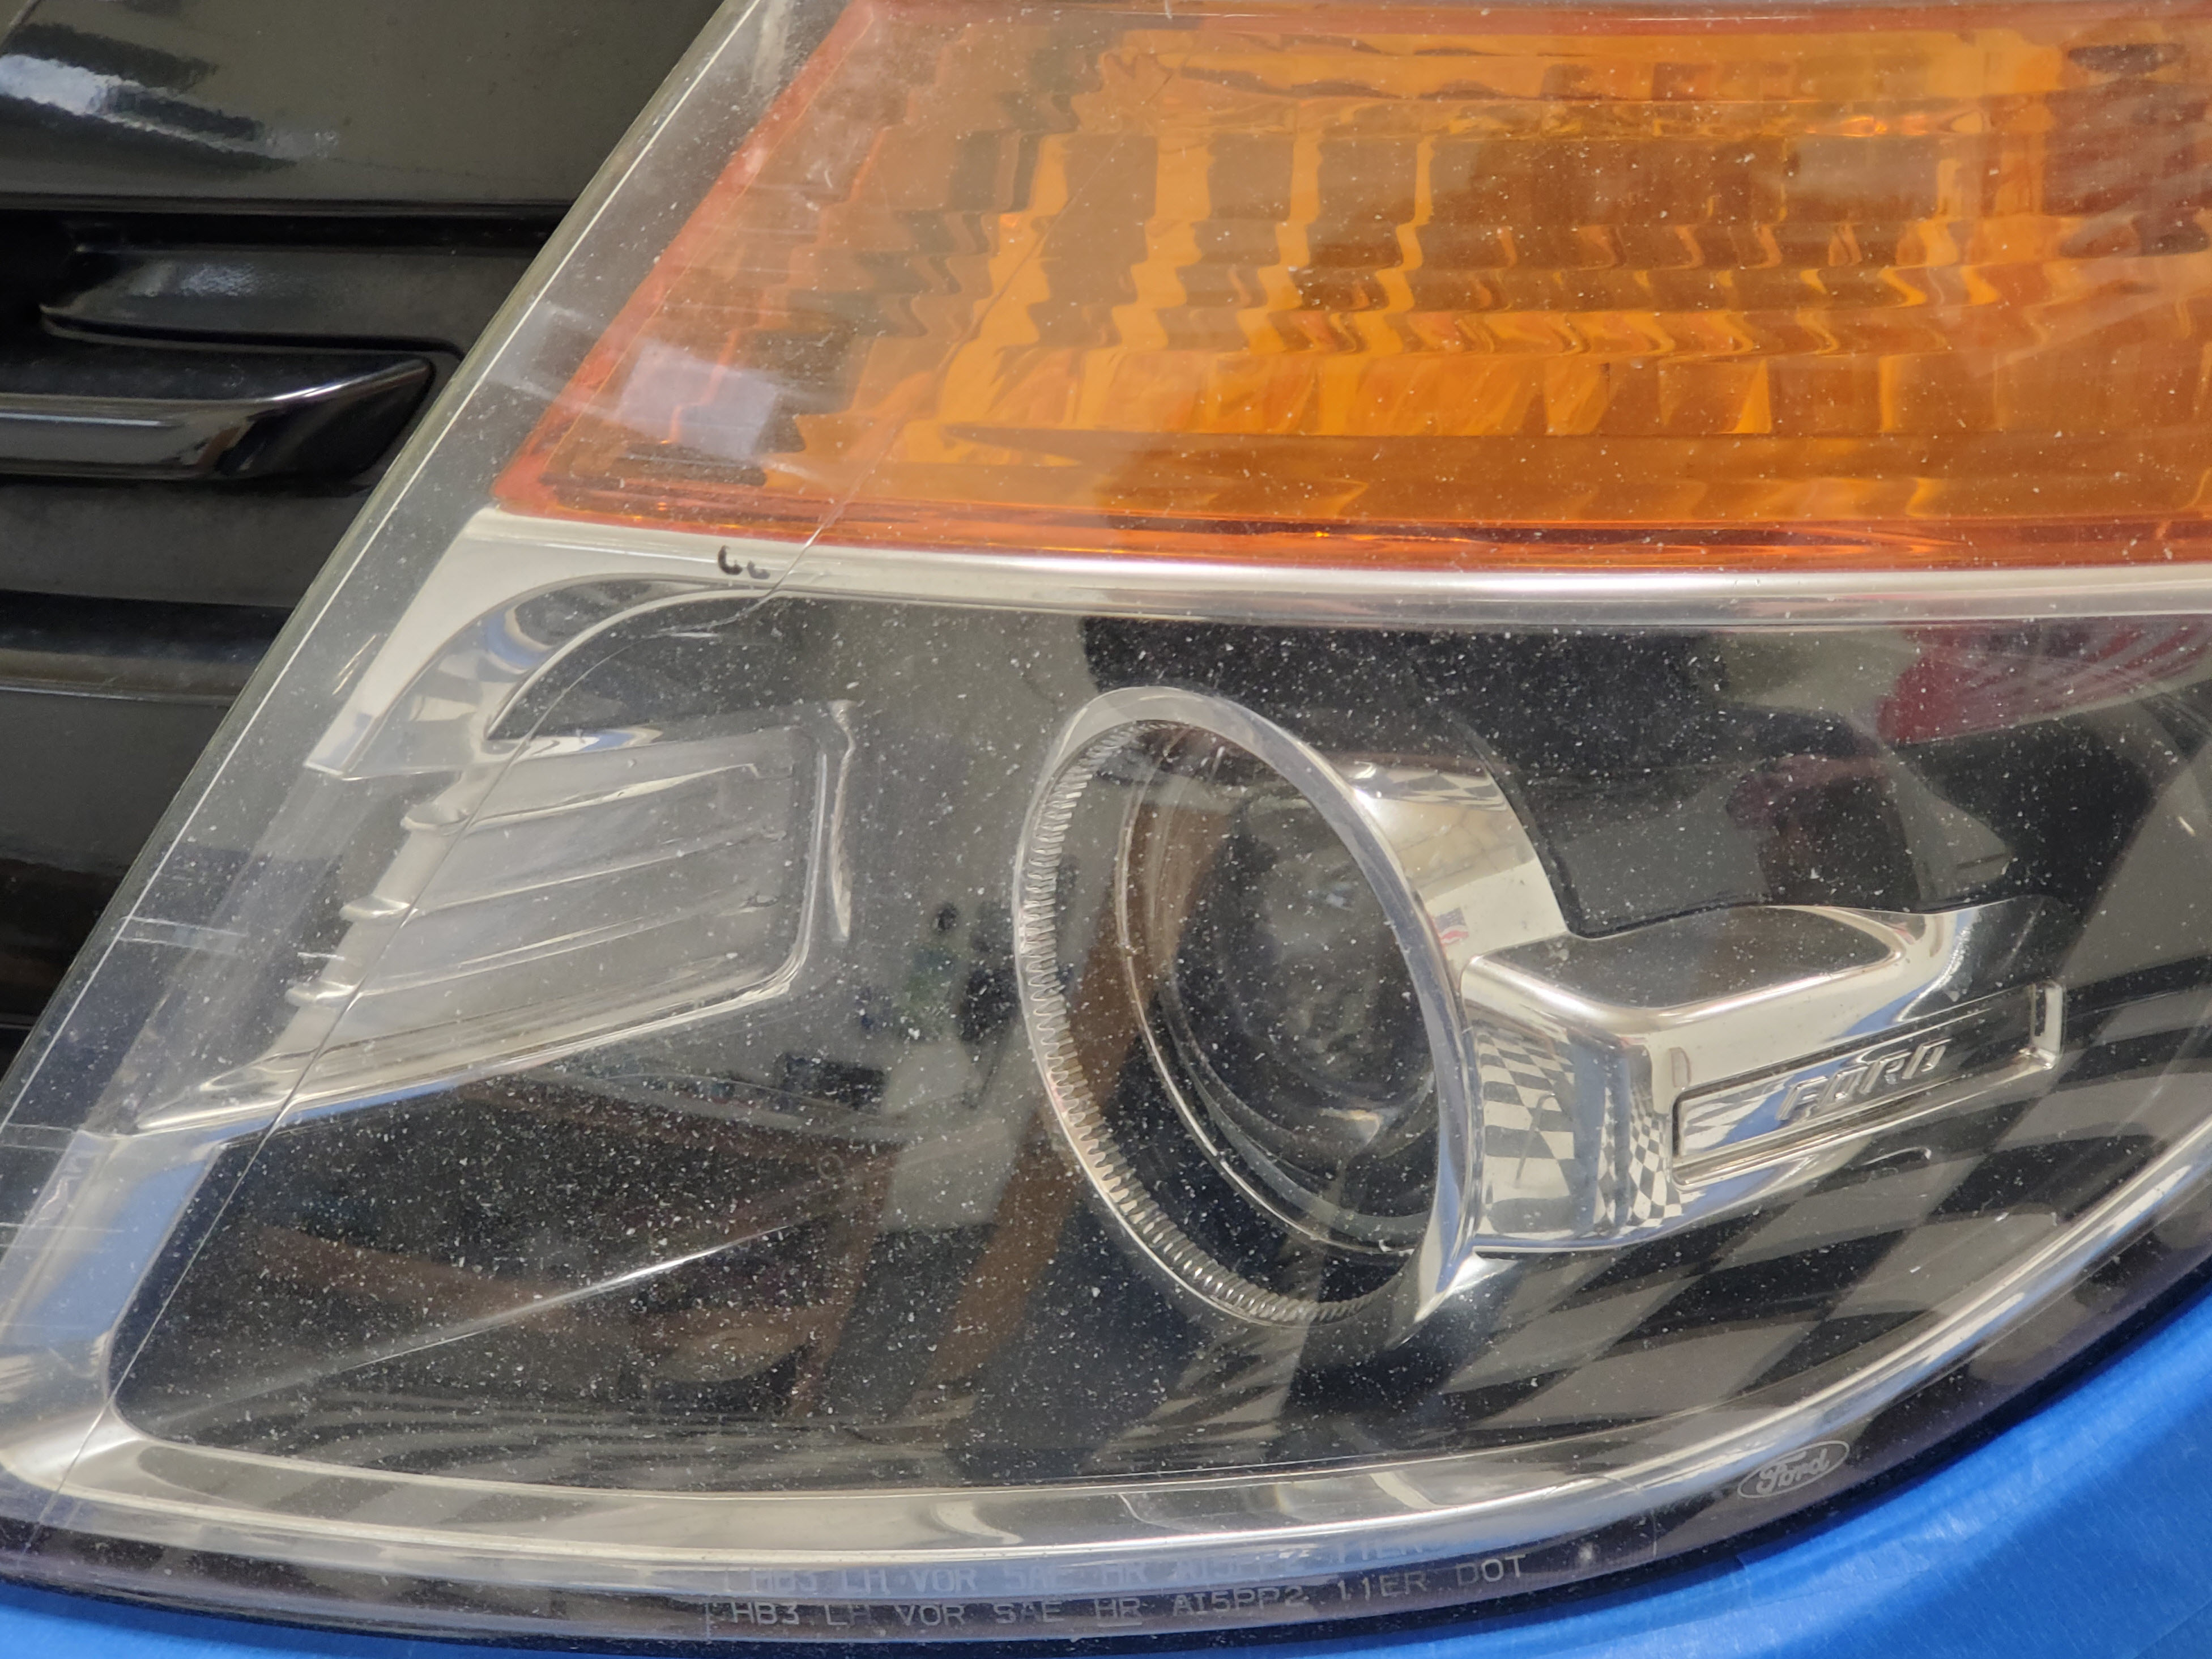
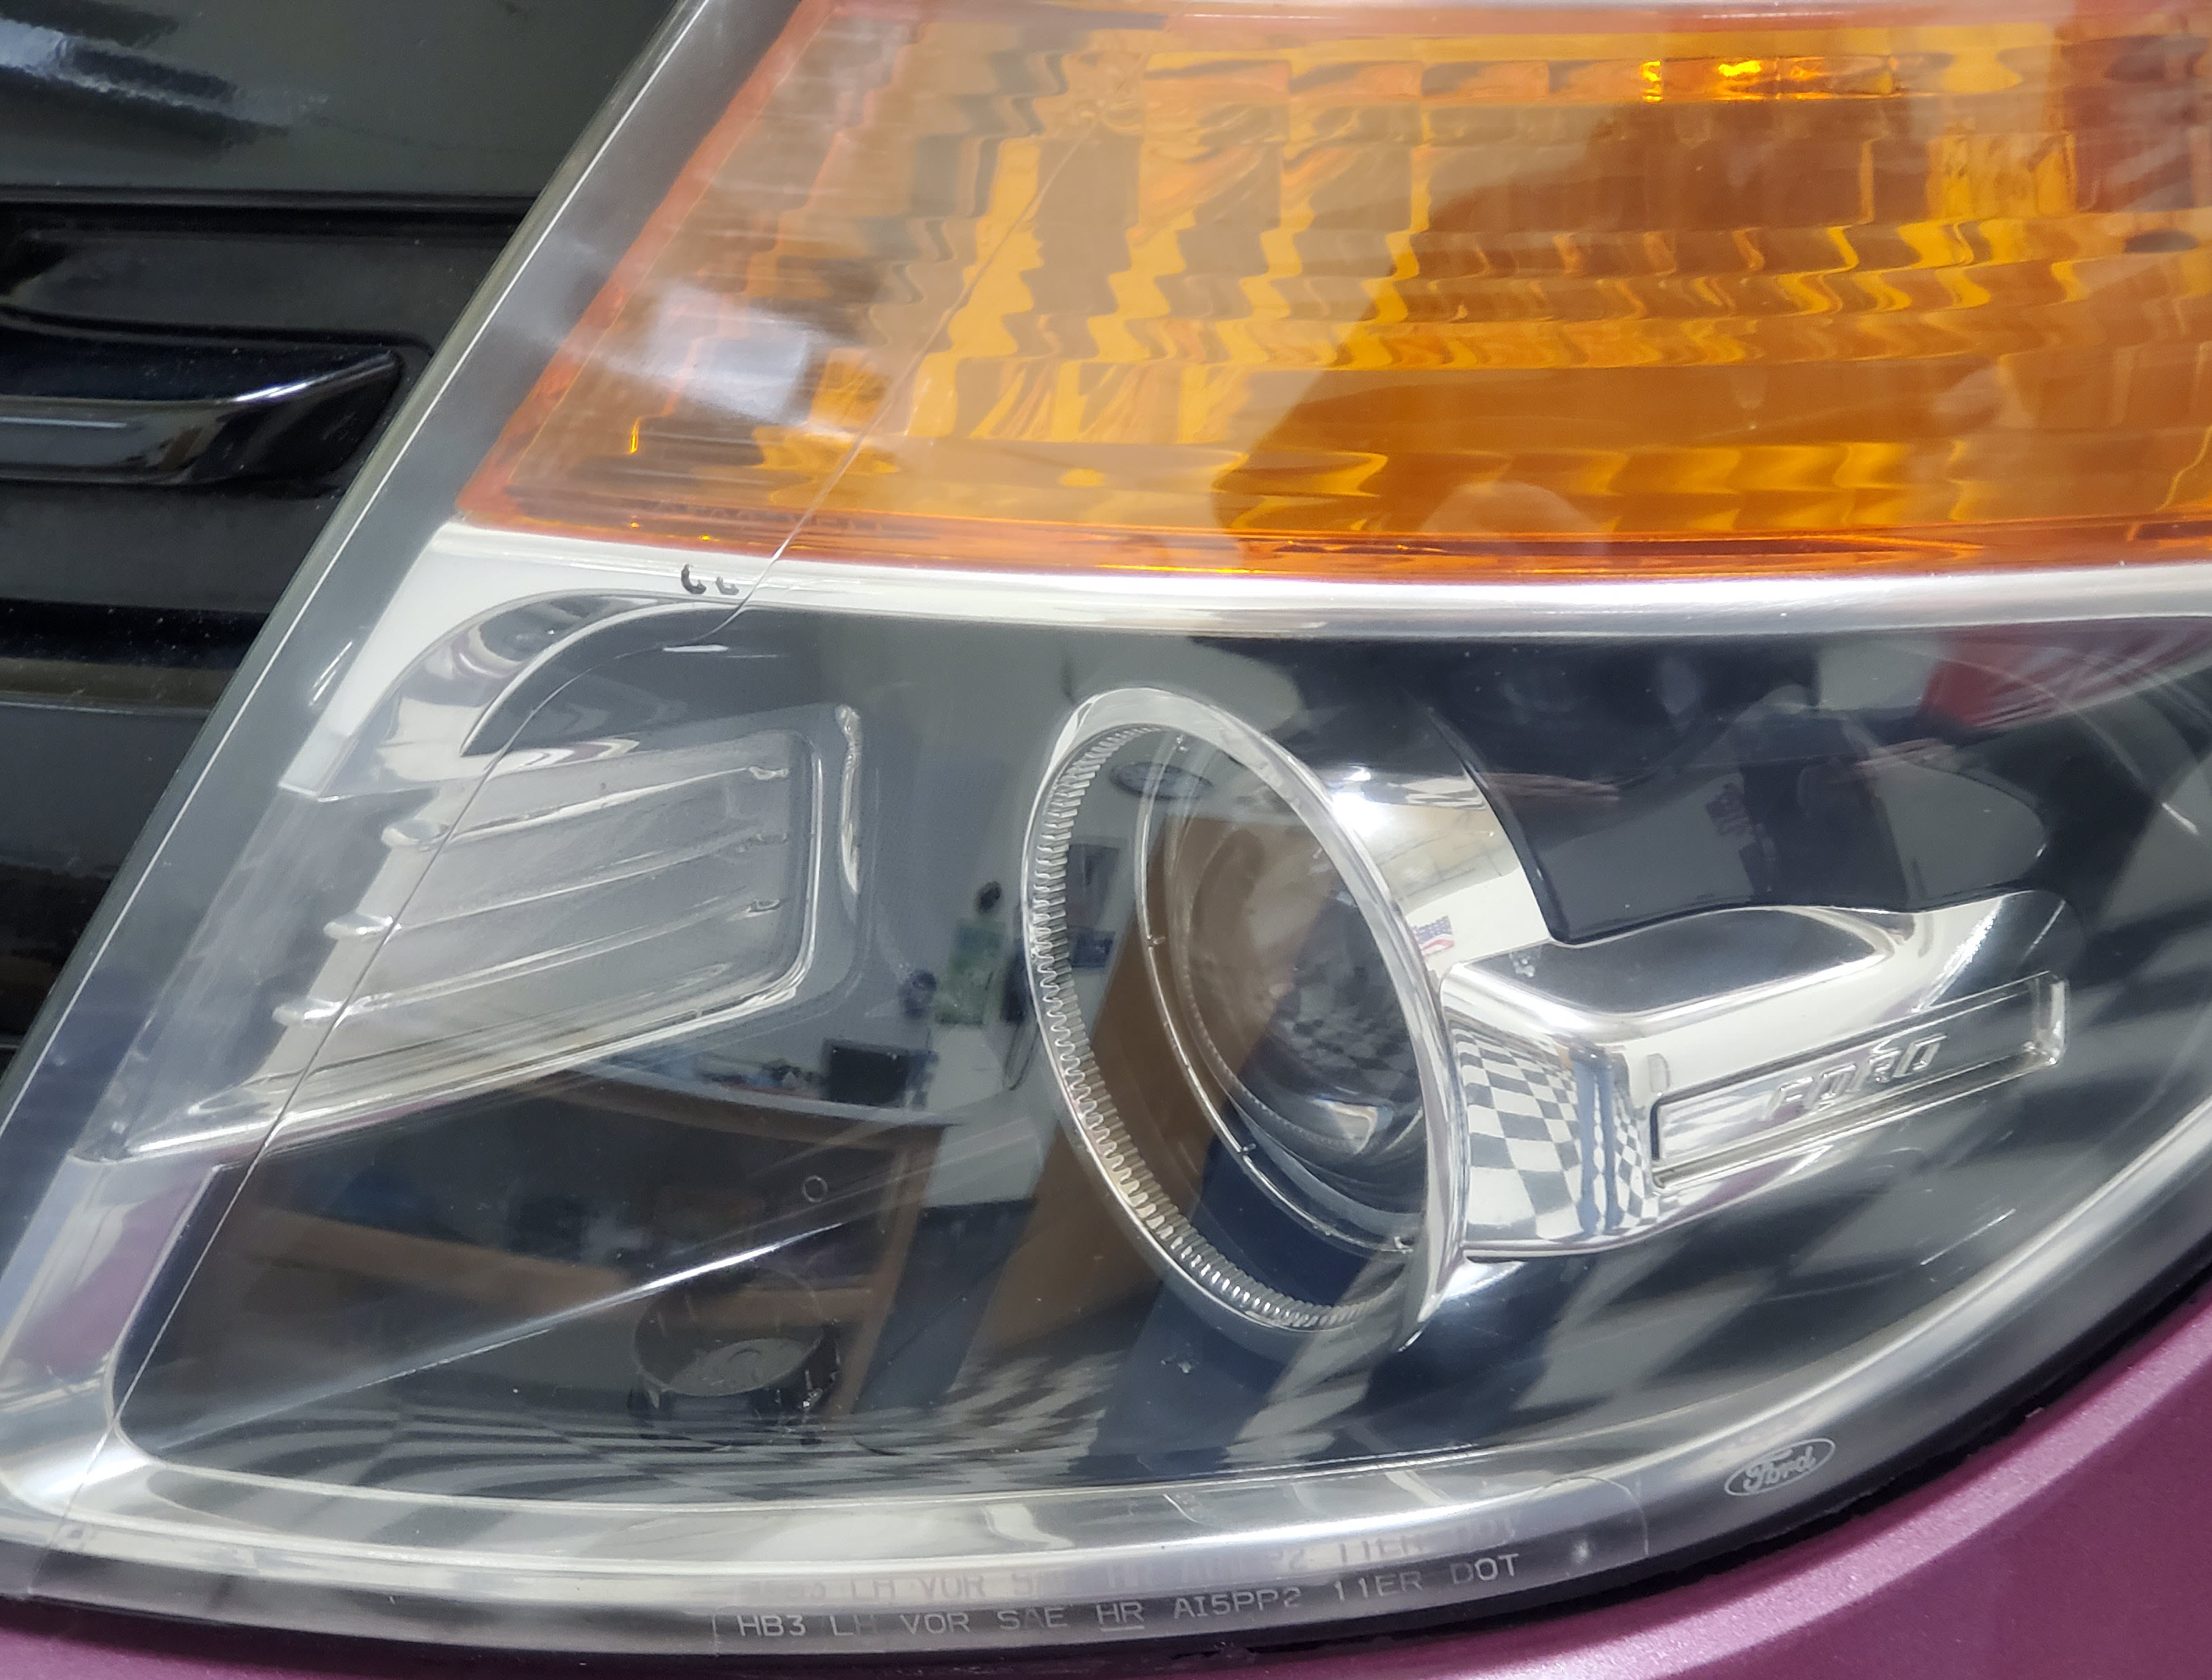
- Sanded and polished the Left Front headlight. What a difference. I was more aggressive sanding off the pitted hard clear coat layer than I was with the right. Check out the before/after photo.
- Adjusted the aim of the headlights. Noticed while night driving they seemed aimed too close. Followed the procedure in the owners manual. Both were low, but right side was super low.
- Adjusted the aim of the windshield sprayers. Drivers side was spraying high. All good now. Topped up the washer reservoir.
- Picked up a new matching wheel rim from local Ford dealer. Ordered new Ford OEM rim.
- Ordered one Autel MX Sensor (rubber stem) for the new spare wheel. Used Autel programmer to commission it with a new random code.
- Installed new toolkit hold down stud and spare tire mount. Ordered Ford OEM.
- Removed manky aftermarket foam trim that was falling off around the perimeter of the opening of the rear hatch. Just peeled away the old loose sections.
- Connected the rear door handles so they can now open the doors from the inside. Removed door panels (all mounting screws were missing – these are on order now), connected the existing fitted cable to the handles, and then removed rubber bung cover over child lock location and set lock to work properly. Tada! Refitted door panels.
- Fixed drivers side A-pillar cover, was sitting proud. Found incorrectly installed and a plastic aligner was out of place. Removed and reinstalled.
- Fixed passenger side A-pillar fitment to the door seal and headliner.
- Fixed passenger front door seal fitment to headliner by correcting B-pillar plastic fitment where it meets headliner. I’m guessing all the trim was removed when decommissioned to remove wiring and prisoner cage. They did a crap job and just threw it back together knowing it would be auctioned.
- Fixed Left Rear door leading edge trim and door wiring harness rubber boot cover. Just removed and refitted properly.
- Fixed right rear trim panel where it meets the rear hatch seal. Clip was trapped out of place. Removed and refitted properly.
- Fixed park brake cable rubber boot fitment where it comes out under the drivers floor area.
- Fitted the Ford OEM right front sun visor retaining mount. Old screw and remains of old mount were there, just unscrewed and replaced.
- Changed the windshield washer fluid to winterized -20 deg fluid. Syphoned out the old fluid, and refilled with new. Then ran the front and rear wiper sprayers considerably long time to flush out the old. Topped off fluid.
Date: November 23, 2022
Mileage: 165,686
Performed by: Future Ford of Sacramento (dealership)
Services Performed: I took Barney in for a Post Purchase Inspection (PPI) to have the dealership do their best and find any issues. I wanted to compare to Stefano’s review. Peace of mind having the ‘professionals’ look at it. Honestly, lived up to a typical dealer level of quality (mediocre to poor). They noted that the Oil Pressure sending unit was leaking oil and needed replaced, but this had already been repaired and all they based it on was the residual oil. They stated the A/C wasn’t working, but it blows ‘sorta’ cold, so it’s not completely dead. Maybe there is an A/C leak or needs recharged, but its not ‘broken’. They seemed to wiff at the front suspension, and just recommended replacing it all (Struts, sway bar, links, control arms). They admitted they weren’t sure what was causing the clunk, but the drop links and sway bar bushes were certainly gone. I’m not sure the lower control arms or front struts are completely worn out. We’ll see if the Sway Bar issues clear it up. Other than that, they spotted that one of the rear license plate bulbs (left) was out (Stefano missed that). You can view their entire inspection report and estimated repair costs (here). They also had a nifty online version of it too, here is the link.

Fun to compare the costs. For example, Stefano paid about $32 for a new Ford OEM oil pressure sending unit from Amazon, and it took an hour to install. Their estimate is $444 for the work. DIY is the way to go for some items. They want $70 to fix the license plate light bulb?!
Also asked them to look for any open recalls or service campaigns for the car. They said the Carbon Monoxide inspection was not necessary for this VIN. They did find it needed the rear Toe Link recall done. Some issue where the rear toe link can break. They kept Barney overnight, fitted new rear suspension toe links, and then did a rear wheel alignment. Back in spec!
Date: November 20, 2022
Mileage: 165,660
Performed by: Stefano
Services Performed: Starting the renovation work:
- Replaced the Cabin filter with Ford OEM FP68
- Filter was moderately dirty, but not nasty.
- Noted that the left latch on the filter retaining cover is snapped off by someone in the past. Still holds on well with the right catch.
- Replaced the rear hatch gas struts with aftermarket from Amazon. Rear hatch is much better now.
- Sanded and polished the RF headlight to remove pitting and bring back to 95% of new awesomeness.
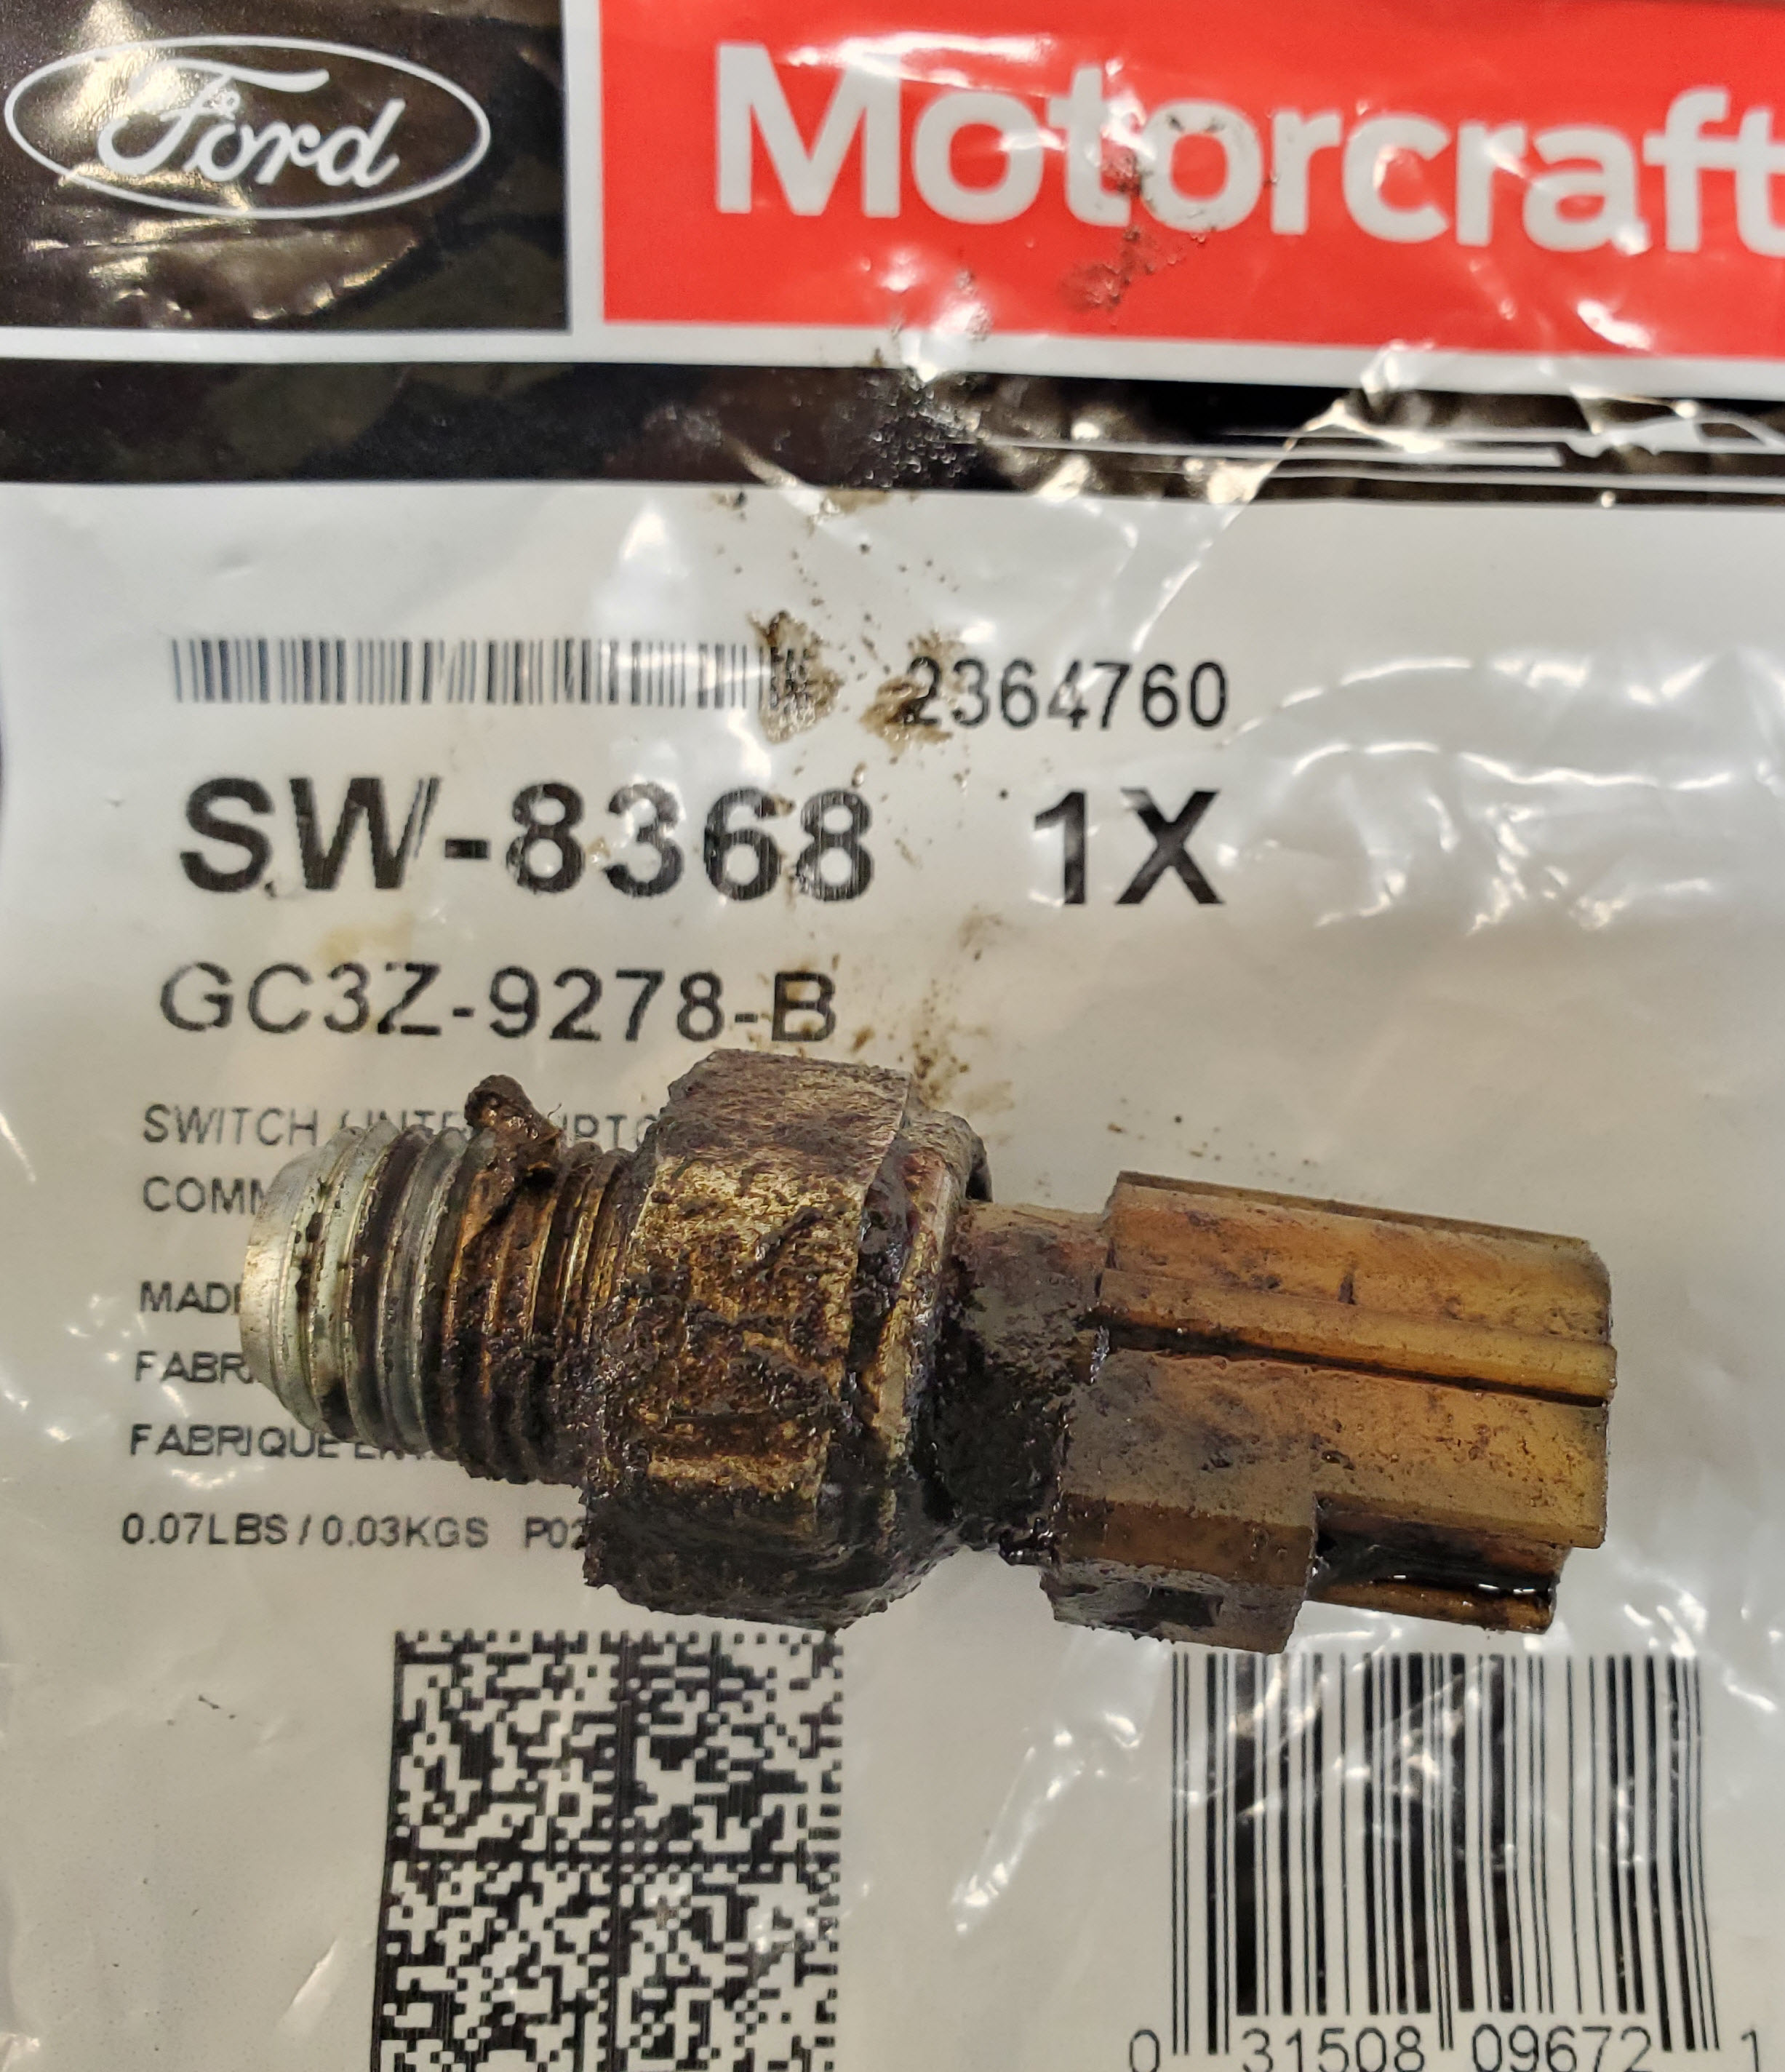
- Changed leaking Engine Oil Pressure sending unit with Ford OEMSW-8368. Oil leak resolved.
- Cleaned up oil from the leak using Chemical Guys Grime Reaper and brush. Wiped and rinsed. All clean now.
- Degreased bottom of transmission area where it meets the engine. Grime Reaper, brush, brake clean. Can monitor now better.
- Changed Engine Oil with Castrol Edge 5W-20 full synthetic. Took just over 6 liters
- Changed Engine Oil filter. Used Ford OEM filter.
- Changed/Flushed Engine Coolant. Drained the red stuff out through radiator petcock valve. Airlift Vacuum refilled using PEAK OET Extended Life Orange prediluted 50/50 coolant. All I could get out is about 4 liters. So, I filled with new coolant, ran engine up to temp for 10 mins, then drained and refilled again with more new Coolant. Took about 5 liters second time. Topped off at max level.
- Flushed brake fluid. Was nasty looking. RF bleed nipple was really tight. Flushed with new Prestone DOT4 synthetic fluid.
- Applied anti-seize compound to the wheel studs while I had wheels off doing brake fluid flush. They needed it.
- Trimmed a piece of foil tape and applied on roof to temporarily seal the 3/4″ rubber bung that is missing. May be the roof leak that was causing water in the rear dome light. Not sure. All 5 rubber bungs should be replaced, and the cell antenna gasket could probably be replaced too. Its painted but may be the culprit since its directly over the dome light.
- Fixed the lower drivers footwell left side trim that was flopping over onto the park brake pedal. Some cabling was mounded. Realigned, and properly reinstalled the side panel protection with a new fir tree pin under the trim.
- Used my Autel TPMS tool and read the TPMS sensor IDs of all four wheels. They responded perfectly, so seems they are present and OK. The codes are:
- FL 903610516
- FR 903508223
- RR 903514603
- RL 893635654
- Used my Autel OBDII tool to auto scan all the modules for DTCs. All OK except these noted ones:
- Body Module B115E-55 which seems to indicate that the rear backup camera might have been replaced and needs calibrated. May ask the Dealer to explain it/fix it. Upon review, the ‘lines’ don’t bend indicating where the car is going in reverse. Maybe this will fix that.
- General Module B1 457-15 called Auxiliary Switch 1. I couldn’t find any reference to this on the Google. Not going to worry about it.
Date: November 13, 2022
Mileage: 165,600
Performed by: Stefano
Services Performed: Post Purchase inspection by Stefano to see if Barney was a gem or a dud. Overall, has a few issues, but in decent shape especially for what was paid for him. Inspection report:
- Oil Leak – substantial. Observed Oil Pressure sending unit leaking out of its electronics head and dripping down over A/C compressor and blowing back across sump and suspension. Might be lucky here and just have to replace the sensor and clean up the mess.
- Inspected Suspension. Notables:
- LF and RF Sway bar drop links worn. Boots torn, some play. Recommend replacing.
- Front sway bar bushings worn. Movement in sway bay. I think this is causing some clunking noise. Recommend replace bushings.
- LF and RF rear lower control arm bushings appear ‘soft’. The shaft is slightly offset when observed. Not torn or broken. Might be normal, but suspect. Wait for Ford dealer PPI to see what they find/say.
- RR and LR shocks found to be ‘wet’. Still functional, but sign that they are worn and should be replaced soon’ish
- RF interior sun visor mount broken off. Recommend ordering replacement from Ford.
- Front bumper Tow Hook cover missing
- Spare tire missing
- Jack/Toolkit missing
- Inspected drive shaft, U-joints, bearing support. OK.
- Inspected the rear differential (no leaks), rear half shafts (boots OK), and rear subframe mounts (OK).
- Bit of oil seen on bottom of transmission housing where it mates with engine. Just a weep mixed with dried dust. Not a significant problem. Likely a weeping rear main seal? Observe.
- Inspected Tires
- Date codes all about 2018. Goodyear Eagle RS-A 245/55 R18 (cop tires)
- LF, RF and RR all about 75% worn out.
- LR has more tread, likely only 25% worn.
- LR has remains of nail or screw in tread block, not sure if leaking. Aligned with tire weight in outer tread block
- TPMS light was on. Checked and set all tire pressures to 36 psi (fronts were about 25psi). TPMS light went out on its own.
- Recommend buy new rim for spare, order four new tires, move LR to spare position and mount for new tires to existing rims and 1 new rim.
- Rear seats missing the seat belt buckle for the right and center seats. Anchor bolts and wave washers present. Seems like someone peeled them out. Also missing the plastic trims that surround them. The buckles should be replaced at least.
- Right Rear Door power window not working. Could be the switch, or maybe Police Interceptor programming, or no power window at all. Need to look inside the door panel first.
- Rear hatch struts found to be a bit weak. Holding it up now, but in cold weather will be a head banger. Recommend replace.
- Front Interior lights don’t operate with the door opening/closing. Just dark. The center roof map lights and the front cabin lights work fine manually. Wondering if there was some police programming that set it so the lights don’t come on when doors open.
- Turn signals seem to have some issues
- There is no ‘tick tick tick’ when they are blinking. No sound.
- They don’t auto cancel unless the turn is more extreme (full 90 deg corner). If you put them on and lane change, they keep going.
- The stalk doesn’t stick in the flicked direction. Like the detents are worn out. Just always comes back to center. Might be worth a try just to replace the stalk.
- Front headlights aren’t aimed at the same level. RF seems a bit low. Suggest just aligning them both to match.
- Rear storage area light has issues
- I could see water sloshing in it
- Only the white light works in the 2 position switch. 2nd position doesn’t work
- Removed lens, drained water, wiped out. Issue has been around a while due to stains.
- Corrosion on the LED outer ring of lights, they don’t work now.
- Suspect missing bung on roof causing water infiltration
- Will need to have light unit replaced to fix the dual mode if wanted.
- Where the missing spare tire should be, there was an extra battery box bolted to floor.
- Removed battery box and bolts.
- Vacuumed all the debris that was hiding underneath
- Used Dynamat Metal Foil Tape and taped over the four holes, and four additional adjacent holes that were visible to prevent carbon monoxide ingress.
- Removed AutoAmore dealer license plate frames
- Windshield Wipers were shot. All three.
- Purchased Bosch Icon blades for front – Icon 26OE for LF, and 22OE for RF. Purchase Bosch 11″ rear wiper blade.
- Installed new blades. All good now.
- Check Fluids
- Engine oil – OK
- Brake fluid – OK
- Coolant – OK (recommend getting some Ford coolant for shop)
- Inspected Exhaust – no issues found
- Lubricated Door Lock Cylinders with 3-in-1 Dry Lock Lube
- Cleared existing Paired cell phones form Ford Sync media system. Paired my S10 and tested.
- Inspected engine air filter – looks new.
- Recommend doing an engine oil and filter change after the Oil Pressure sending unit is replaced.
- Recommend doing a cabin filter change
- Recommend taking to Ford Dealer for PPI to see what the experts find beyond what I’ve seen.
- Request they do the CO Capaign inspection
- Request they do the Rear Toe Link Campaign inspection
- Pickup parts for
- Replacement Rim for Spare
- Sunvisor mount
- Front drop links
- Front swap bar bushings
- Engine Oil Sending unit
- Firmware update of all electronic modules
Date: April 6, 2022
Mileage: 162,611
Performed by: Fairchild Automotive, Chico, CA
Services Performed: According to Carfax report, the previous owner had the Serpentine Belt replaced.
Date: June 11, 2021
Mileage: 156,993
Performed by: Affordable Automotive, Chico, CA
Services Performed: According to Carfax report, the previous owner had the following work performed:
- Brakes Checked
- Front Brake Pads replaced
- Rear Brake Pads replaced
- Brake rotors replaced
- Coolant reservoir replaced
- A/C system serviced
- A/C refrigerant recharged
Date: December 3, 2019
Mileage: 134,573
Performed by: Fairchild Automotive, Chico, CA
Services Performed: According to Carfax report, the previous owner had the horn checked and horn contact replaced. This is misleading, as there is gawd awful scabbed on horn button on the lower dash. They didn’t actually fix the horn in the wheel.
Date: June 30, 2017
Mileage: 90,952
Performed by: Geweke Ford, Yuba City, CA
Services Performed: According to Carfax report, the original owner (Yuba City Police?) had the spark plugs replaced.
Date:
Mileage:
Performed by:
Date:
Mileage:
Performed by:
